Normal Track 6 Guide - Full Throttle! Bolt & Blitz!
★ Version 3.1 → Map Update: Roya Frostlands
┣ Aemeath: Builds, Materials, Sig. Weapon
┣ Reruns & Builds: Lupa, Chisa
┣ Mansion Event: Bartending Recipes
┗ Tapes of Last Words | Soliskin | 3.1 Hidden Trophies
★ Exclusives: Tier List Maker | State of the Meta
This is a guide for Normal Track 6 in the Full Throttle! Bolt & Blitz! event in Wuthering Waves 3.1. See the best biker character to use, which support items to get, and tips on how to clear the stage here!
List of Contents
Normal Track 6 Best Character
Luuk Herssen is Recommended
|
|
Biker Skill |
|---|---|
| Professional Medic DMG taken when ramming into enemies is reduced by 20% and healing received is increased by 20%. |
This track has a unique quirk focused on ramming down enemies and healing up, so we advise using Luuk Hersen in this stage due to his ability to minimize ramming damage and gain better heals.
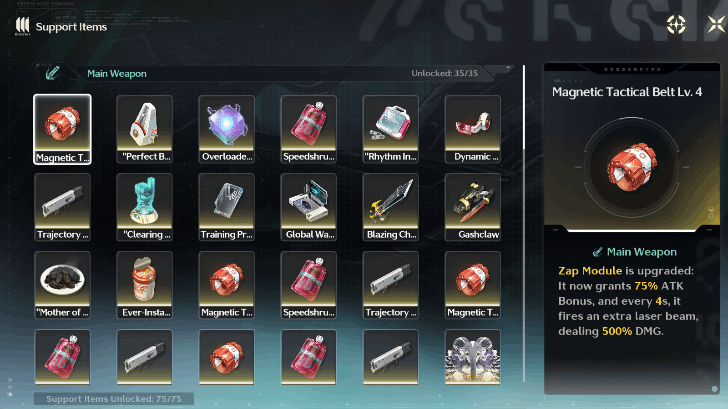
Normal Track 6 Best Support Items
Recommended Upgrades
| Support Item | Description |
|---|---|
| Magnetic Tactical Belt (Main Weapon) |
Adds a powerful Zap Module beam which upgrades your weapon to fire a beam dealing 500% DMG every 8s. |
| Any Data Extraction Weapon (Main Weapon) |
Choosing any of the three Data Extraction support weapons will upgrade your weapons to deal additional damage alongside your main weapon. |
| Emergent Scaling (General) |
HP is doubled, make sure to have high HP as well before picking this up! |
| Ram Barrier (General) |
Further decreases ramming damage by 20%. |
| Grilled Fern Spore (General) |
Reduces enemy HP by 15%. |
| Momentum Gear (General) |
Increases ATK by 1 with every 5 ATK SPD, pick this up when scaling oin ATK SPD to deal more damage. |
Upgrades for your main weapon, such as Data Extraction and Magnetic Belt should primarily stay as your priorities, while also gaining power-ups that boost your ATK SPD and also your stats when ramming enemies.
Choose Ram Barrier and Emergent Scaling to improve your HP and survivability in this stage when directly contacting against mobs on the track.
Normal Track 6 Recommended Stats
Prioritize Attack and Crit Stats
| Stat Priority |
|---|
| ATK → ATK SPD = HP = Crit. DMG = Crit Rate → Quantity → Support Droid Cooldown |
Your stat priorities will change slightly for this stage to take advantage of the ramming mechanics. Increase your survivability by going for a slightly higher priority on HP and then focus on ATK and ATK SPD for faster and harder-hitting projectiles.
Normal Track 6 Tips
| Recommended Tips |
|---|
|
|
Use Ramming to Your Advantage
This track has a special gimmick that makes your bike heal after ramming into enemies, so take advantage of this and use upgrades related to ramming and use Luuk's Biker Skill for full effect.
Pick Up Health Upgrades to Tank Hits
Make sure to pick up HP upgrades and HP boosts to replace loss health after ramming on targets, this increases your survivabilty especially on later stages.
Use Boosts on Boss Fights
As always, whenever approaching a boss fight, make sure to use your Boost to accelerate the fight and deal enormous damage to the enemy while you are protected by the shield. You cannot ram bosses during boss fights, so keeping yourself protected is the best option.
Continue Upgrading Existing Support Drops
As recommended in earlier stages, continue to upgrade and invest on existing support drops collected to get the best stat buffs for your gear, rather than spreading your upgrades on lower-level weapons.
Build Your Bike to be Boosted on Ramming Stats
Make sure to pick up upgrades that boost your bike while also supporting it to ram your enemies on the track. Boosts such as Grilled Fern Spore will improve your bike's survivability while also reducing enemy HP.
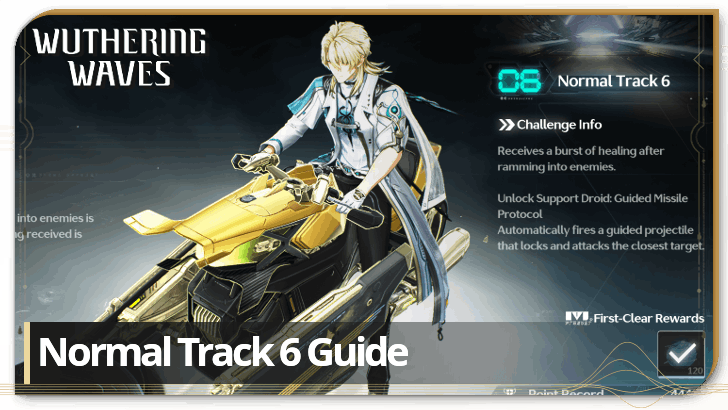
Normal Track 6 Stage Information
Basic Information
| Challenge Info |
|---|
|
Receives a burst of healing after ramming into enemies. Unlock Support Droid: Guided Missile Protocol: Automatically fires a guided projectile that locks and attacks the closest target. |
| First-Clear Rewards |
Trust Key x120 |
Wuthering Waves Related Guides
Full Throttle! Bolt & Blitz! Event Guide
All Stage Guides
| Normal Track Guides | |||||
|---|---|---|---|---|---|
| Track 01 | Track 02 | Track 03 | |||
| Track 04 | Track 05 | Track 06 | |||
| Elite Track Guides | |||||
| Track H1 | Track H2 | ||||
| Infinite Stage Guides | |||||
| Endless Track | |||||
Comment
Author

Normal Track 6 Guide - Full Throttle! Bolt & Blitz!
Premium Articles

Rankings
Gaming News


Popular Games

Genshin Impact Walkthrough & Guides Wiki
Honkai: Star Rail Walkthrough & Guides Wiki
Arknights: Endfield Walkthrough & Guides Wiki
Umamusume: Pretty Derby Walkthrough & Guides Wiki
Wuthering Waves Walkthrough & Guides Wiki
Pokemon TCG Pocket (PTCGP) Strategies & Guides Wiki
Abyss Walkthrough & Guides Wiki
Zenless Zone Zero Walkthrough & Guides Wiki
Digimon Story: Time Stranger Walkthrough & Guides Wiki
Clair Obscur: Expedition 33 Walkthrough & Guides Wiki


Recommended Games
Fire Emblem Heroes (FEH) Walkthrough & Guides Wiki
Pokemon Brilliant Diamond and Shining Pearl (BDSP) Walkthrough & Guides Wiki
Diablo 4: Vessel of Hatred Walkthrough & Guides Wiki
Super Smash Bros. Ultimate Walkthrough & Guides Wiki
Yu-Gi-Oh! Master Duel Walkthrough & Guides Wiki
Elden Ring Shadow of the Erdtree Walkthrough & Guides Wiki
Monster Hunter World Walkthrough & Guides Wiki
The Legend of Zelda: Tears of the Kingdom Walkthrough & Guides Wiki
Persona 3 Reload Walkthrough & Guides Wiki
Cyberpunk 2077: Ultimate Edition Walkthrough & Guides Wiki


All rights reserved
Copyright© 2024-2025 Kuro Games. All Rights Reserved.
The copyrights of videos of games used in our content and other intellectual property rights belong to the provider of the game.
The contents we provide on this site were created personally by members of the Game8 editorial department.
We refuse the right to reuse or repost content taken without our permission such as data or images to other sites.