This survey will take about 1 minute.
Your answers will help us to improve our website.
Wuthering Waves (WuWa)
Roccia Best Builds and Teams
★ Version 3.2 Banners → Livestream Codes
┣ Sigrika → Materials, Weapon, Banner
┣ Qiuyuan → Builds, Materials, Weapon
┗ Phase 2 → Lynae, Zani, Phoebe
★ Tapes of Last Words | Soliskin | 3.1 Trophies
★ Exclusives: Tier Maker | State of the Meta

Roccia is a playable 5-star Havoc Gauntlet character in Wuthering Waves (WuWa). Check out this guide for the best Roccia build, Roccia best teams, echoes, kit (skills), skill priority, and voice actor here!
| Roccia Character Guides | |
|---|---|
|
|
|
List of Contents
Roccia Character Overview
Roccia Information
| Resonator Information | ||
|---|---|---|
 Roccia Roccia |
||
| Rarity | ★★★★★ | |
| Element | ||
| Weapon | ||
| How to Get | Limited Convene | |
| Voice Actor (EN) | Holly Earl | |
Roccia Rankings
| Overall | Role | Endgame |
|---|---|---|
|
|
Sub-DPS:
|
ToA:
WhiWa:
|
| The endgame tier placement considers the buffs present in both endgame modes. This will get updated periodically as buffs change. | ||
Are you Pulling for Roccia?
Roccia Stats
| Lv. 1 | Lv. 90 | |
|---|---|---|
| HP | 980 | 12250 |
| ATK | 30 | 375 |
| DEF | 98 | 1197 |
| Energy Regen | 100% | - |
| Crit. Rate | 5% | - |
| Crit. DMG | 150% | - |
Stat calculations does not include the Attribute Bonuses from Roccia's Forte.
How Strong is Roccia?
| Strengths | |||
|---|---|---|---|
|
• Premium Havoc Sub-DPS that elevates the two best Havoc Teams. • Deals a good chunk of damage thanks to the Midnight Veil sonata effect set. • The damage she deals is not negligible, generally improving the team's DPS as a whole. • Can group multiple enemies with her Outro Skill, making it easier for the Main DPS to take on hordes of enemies. Really good in Whimpering Wastes. |
|||
| Weaknesses | |||
|
• Can maximize her supporting capabilities on Havoc teams only. Very specific and only works perfectly with Camellya. • Rotation can be slower than Sanhua in general, so it takes some time before the Main DPS can come in. The additional Havoc DMG Bonus makes up for the time, but it may result in sub-optimally timed rotations. • Needs S1 for a faster rotation to keep up with Sanhua's fast rotation. |
Roccia is a great Havoc Sub-DPS unit that can provide buffs to a Havoc Main-DPS while dishing out non-negligible damage to increase the team's overall damage output. Her Outro Skill also provides a unique way to group enemies, which helps a lot in endgame modes like Whimpering Wastes and Tower of Adversity.
Roccia is currently the perfect Sub-DPS for Camellya, buffing both Basic Attack DMG and Havoc DMG which is the main stats that Camellya scales off of.
Her Off-field Magic Box is an Echo Skill
Roccia's secondary cast of her skill when off-field is considered an Echo Skill. This benefits Phrolova teams by providing an additional cast of Hecate's enhanced attacks while also grouping enemies together.
Roccia Build Guide
Havoc Sub-DPS Build
| Best Weapon | ||
|---|---|---|
| Alt. Weapons | ||
| Sonata Effect |
5-piece |
|
| Cost Pattern | ④ ③ ③ ① ① | |
| Main Echo |
|
|
Roccia Best Echo Stats
| Echo Main Stats Priority | ||
|---|---|---|
| 4 COST | 3 COST | 1 COST |
| CRIT Rate or CRIT DMG | Havoc DMG or Energy Regen | ATK% |
| Echo Substats Tuning Priority | ||
|
1. CRIT Rate ★★★ 2. CRIT DMG ★★ 3. Energy Regen ★★ 4. Heavy Attack DMG ★★ 5. ATK% ★ 6. Flat ATK ★ | ||
Roccia is the premier Havoc Sub-DPS capable of increasing Havoc DMG Bonus and Basic Attack DMG by a ton with her Outro Skill while also increasing ATK with her Resonance Liberation.
To fully maximize all of Roccia's buffs, you have to make sure that you can use her Resonance Liberation during her rotation. Testing your rotation and improving on your Energy Regen on top of the damage-centric skills is quite important for her.
Work Around 125% Energy Regen
Energy Regen is a moving target for most Resonators, so testing your team with Roccia is the best way to balance out your damage output and Energy Regen needs. A good starting point would be to reach around the 125% mark.
Echo Stat Goals
| 4-cost | For the 4-cost Echoes, aim for the usual Crit Rate or Crit DMG main stats, prioritizing Roccia's need to achieve 70% Crit Rate with a Crit DMG stat above 200%. |
|---|---|
| 3-cost | The 3-cost Echoes should be a double Havoc DMG Bonus main stat Echo, but if you need more Energy Regen for her rotation, switch up one of the 3-costs. The best case scenario is to get enough Energy Regen rolls from Echo tuning alone and have double Havoc DMG Bonus Echoes. |
| 1-cost | The standard ATK% main stat is needed for the 1-cost Echoes. Make sure to aim for Crit, Energy Regen, and Heavy Attack DMG rolls when tuning. |
Aim for 70% Crit Rate
| Crit Rate | 70% and above |
|---|
Roccia's Resonance Liberation provides a maximum of 200 ATK points for every 0.1% Crit Rate above 50%. To maximize this effect, aim for a 70% Crit Rate for your Roccia!
Roccia Best Echo Sets
Optimal Main Echo
| Main Echo | Explanation |
|---|---|
|
|
・The best echo to aim for when using Roccia. ・Has the Midnight Veil sonata effect, which is Roccia's best in slot. ・Increases Heavy Attack DMG which is the stat that Roccia scales off of. |
|
|
・The second best Midnight Veil echo to go for if you do not have Nightmare: Impermanence Heron. ・Can be passively farmed considering Roccia's ascension material is coming from Lorelei. |
|
|
・Great early game option for Roccia especially if you do not have access to Rinascita yet. ・Does not have the Midnight Veil sonata effect, but has the early game Sub-DPS set Moonlit Clouds. Great for when you're still in Huanglong! |
Roccia Best Sonata Effects
| Echo Set | Rating |
|---|---|
|
(5-pc) |
★★★ - Best The best-in-slot Sonata Effect for a Havoc Sub-DPS like Roccia. We chose Nightmare: Impermanence Heron over Lorelei mosty because the Heron provides Heavy Attack DMG Bonus - the stat that Roccia mostly scales off of. Recommended Main Echo: |
|
(5-pc) |
★★☆ - 2nd Best A Moonlit Clouds set with the normal impermanence Heron is a great set to have for Roccia. Considering she will be a sub-DPS, Moonlit Clouds is a great alternative especially if you're not in Rinascita yet. Recommended Main Echo: |
List of All Echoes and Sonata Effects
Roccia Best Weapons
Best Weapons for Roccia Ranked
| Weapon | Skill | |
|---|---|---|
| 1 |
|
Fool's Warble Increases ATK by 12%. Every time Basic Attack or Intro Skill is cast, Heavy Attack DMG Bonus increases by 48% for 3s. |
| 2 |
|
Ad Veritatem Gain 12% Attribute DMG Bonus. When using Resonance Liberation, the wielder gains 48% Resonance Liberation DMG Bonus for 8s. This effect can be extended by 5 seconds each time Resonance Skills are cast, up to 3 times. |
| 3 |
|
Darkness Breaker Increases ATK by 12%. Casting Basic Attack grants the following effects: Dealing damage ignores 8% of the target's DEF and amplifies Spectro Frazzle DMG dealt by 50% for 6s. Retriggering the effect resets its duration. |
| 4 |
|
Stormy Resolution Increases Energy Regen by 12.8%. When hitting a target with Resonance Skill, increases Basic Attack DMG Bonus by 10%, lasting for 8s. When hitting a target with Basic Attacks, increases Resonance Skill DMG Bonus by 10%, lasting for 8s. |
| 5 |
|
Intergalactic Gaze Casting the Resonance Skill grants 6 Resonance Energy and increases ATK by 10% lasting for 16s. This effect can be triggered once every 20s. |
| 6 |
|
Wallbreaker When Resonance Skill is cast, increases the caster's Resonance Liberation DMG Bonus by 18%, lasting for 15s. |
| 7 |
|
Ceaseless Aria When Resonance Skill is cast, restore 8 Concerto Energy. This effect can be triggered 1 time(s) every 20s. |
| 8 |
|
Assemble When Intro Skill is cast, increases ATK by 8%, lasting for 10s. |
Roccia Best Weapon Explained
Tragicomedy is Roccia's signature weapon and is unsurprisingly the best weapon to go for. If you do not have her signature weapon, the standard 5-star gauntlet Abyss Surges is a great alternative especially with the inherent increase in Energy Regen.
Verity's Handle and Blazing Justice are also great, but mostly to alleviate the Crit Rate requirement to maximize Roccia's Liberation ATK Bonus. Aside from that, the effect of the weapons are pretty sub-optimal for Roccia so they are expensive alternatives.
Roccia Best Free-to-Play (F2P) Weapon
| Weapon | Skill |
|---|---|
|
|
Base ATK: 325 ATK +24.3% Assemble: When Intro Skill is cast, increases ATK by 8%, lasting for 10s. |
A great weapon to maximize Roccia's ATK whenever she takes on the field. Still, try to get the better 4-star gauntlets from gacha like the Celestial Spiral if you are not too keen with investing on 5-star weapons.
Roccia Best Teams
Roccia Premium Havoc Team
| Character / Role | Echo Set |
|---|---|
|
(Main DPS) |
|
|
(Sub-DPS) |
|
|
(Support) |
|
Roccia will excel when put in a Havoc team, more specifically in a Camellya team. Roccia provides both Basic Attack and Havoc DMG amplification, increasing Camellya's overall DPS by a ton. Roccia basically completes Camellya's premium team, elevating the team's performance even more.
| Character | Explanation |
|---|---|
| | Main-DPS Replacement Danjin can be a viable replacement for Camellya in this team, where she can benefit from the Havoc DMG bonus, the grouping, and the ATK increase. |
| | Main-DPS Replacement A great replacement for Camellya, making use of the Havoc DMG, the grouping, the ATK increase, and some of the Basic Attack DMG Bonus from Roccia. |
| | Support Replacement Verina is another premium support that can provide great healing and an All-Type Damage Deepen buff. |
| | Support Replacement Buling is a decent healer support that can provide buffs and apply Electro Flare off-field. Her fast combos also allow for faster team rotations, making her a viable choice as a support. |
| | Support Replacement Baizhi can slot in as a F2P option to keep the team sustained. |
General Rotation
| 1 | Begin the battle with Shorekeeper, and go through her rotations to charge up her Resonance Liberation and Concerto Energy. |
|---|---|
| 2 | Once both are charged, use Shorekeeper's Resonance Liberation, then switch to Roccia to trigger the latter's Intro Skill. |
| 3 | Use Roccia's optimal combos, making sure to build Concerto Energy the fastest way possible. Also, make sure to use her Resonance Liberation before switching out to increase the entire team's ATK stat by 200. |
| 4 | Once Concerto Energy is full, switch to Camellya to give her Roccia's Havoc DMG and Basic Attack DMG buffs from Roccia's Outro Skill. |
| 5 | After switching to the Main-DPS, use the utility button to group enemies thanks to Roccia's Inherent Skill 2. This makes it easy for the DPS to hit multiple enemies at the same time. |
| 6 | After using the grouping utility, use Camellya's optimal combo until she's exhausted her resources and the buffs wear off. |
| 7 | Swap back to Shorekeeper when Concerto Energy is full to detonate her Resonance Liberation using her Intro Skill. |
| 8 | Rinse and repeat until all enemies have been taken down. |
Mono Havoc Echo Skill Team
| Character / Role | Echo Set |
|---|---|
|
(Main DPS) |
|
|
(Sub-DPS) |
|
|
(Sub-DPS) |
|
You may opt to use Midnight Veil as a 2-pc option for Phrolova since it also provides Havoc DMG Bonus.
Roccia can be grouped with Cantarella and Phrolova to make up a Mono Havoc team focused on Echo Skill usage and multiple succeeding Havoc buffs.
- Roccia - Outro buffs Cantarella's Havoc and Basic Attack DMG.
- Cantarella - Outro amplifies Phrolova's Havoc and Resonance Skill DMG.
- Phrolova - Outro improves Roccia's Havoc and Heavy Attack DMG.
General Rotation
| 1 | Initiate with Phrolova and build up her Volatile Note Forte to activate Scarlet Coda. |
|---|---|
| 2 | As she performs Scarlet Coda, she will enter the Resolving Chord state. During this time, you can activate her Liberation to summon Hecate and control her in the Maestro state. |
| 3 | During Maestro state, switch out to Roccia with Phrolova's Outro to buff her Havoc DMG and Heavy Attack DMG. |
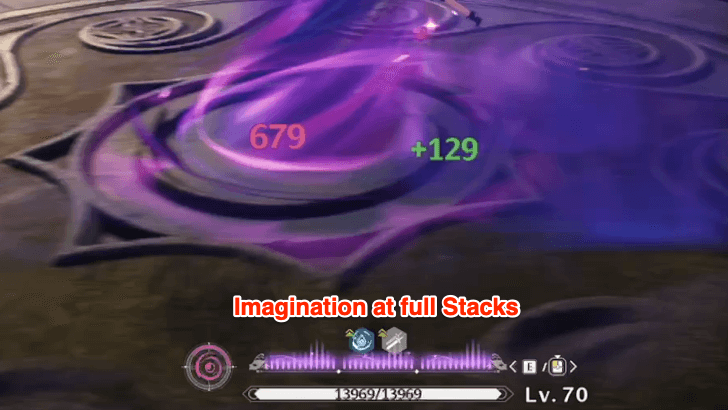
| 4 | With Roccia on-field, maximize her Imagination stacks to execute three Plunge Attacks and generate Concerto. Cast her Liberation to provide a party-wide ATK buff then switch to Cantarella once her Outro is ready. |
| 5 | Next, have Cantarella immediately cast Resonance Skill and Liberation to fill her Trance stacks quickly. |
| 6 | Then, enter her Mirage state and do her internal combos to Stagnate enemies. Once her Outro is available, switch to Phrolova to buff her Havoc and Resonance Skill DMG. |
| 7 | You may repeat steps 1 through 6 as Hecate performs its attacks off-field. Echo Skills empower its attacks, so cast them with Roccia and Cantarella when possible. |
Roccia Free-to-Play Havoc Team
| Character / Role | Echo Set |
|---|---|
|
(Main DPS) |
|
|
(Sub-DPS) |
|
|
(Support) |
|
Roccia is going to be invaluable in any team that deals Havoc DMG, and for the free-to-play team you can use the free-to-get Havoc Rover!
Roccia elevates Havoc Rover even more, increasing the damage they deal while providing much needed grouping with Roccia's Inherent Skill 2. Though Havoc Rover won't be able to fully utilize the Basic Attack DMG boost, the ATK increase from Roccia's Liberation and the Havoc DMG Bonus makes up for it big time.
For the healer-support of this team, Baizhi is the only free-to-play option but if you have Verina, that is a good replacement for her!
General Rotation
| 1 | Begin the battle with Baizhi, and go through her rotations to charge up her Resonance Liberation and Concerto Energy. |
|---|---|
| 2 | Once both are charged, use Shorekeeper's Resonance Liberation, then switch to Roccia to trigger the latter's Intro Skill. |
| 3 | Use Roccia's optimal combos, making sure to build Concerto Energy the fastest way possible. Also, make sure to use her Resonance Liberation before switching out to increase the entire team's ATK stat by 200. |
| 4 | Once Concerto Energy is full, switch to Havoc Rover to give them Roccia's Havoc DMG and Basic Attack DMG buffs from Roccia's Outro Skill. |
| 5 | After switching to the Main-DPS, use the utility button to group enemies thanks to Roccia's Inherent Skill 2. This makes it easy for the DPS to hit multiple enemies at the same time. |
| 6 | After using the grouping utility, use Havoc Rover's optimal combo until they have exhausted their resources and the buffs wear off. |
| 7 | Swap back to Baizhi when Concerto Energy is full. |
| 8 | Rinse and repeat until all enemies have been taken down. |
How to Play Roccia
| Roccia Gameplay Guide |
|---|
|
|
Roccia Gameplay Loop Summary
Note that the video above is sped up, and her rotation will usually take roughly around 11-13 seconds.
| ① | Initiate Intro Skill and immediately deal a Basic Attack to begin filling up her Imagination gauge. Her Intro Skill provides 100 Imagination, providing 1 stack immediately. |
|---|---|
| ② | Her Intro Skill allows her to immediately execute BA4 on your next Basic Attack, promptly filling her Imagination stack again by 1. By this time, you should have 2 stacks already. |
| ③ | Unleash her Resonance Skill to bunch up enemies and provide another stack of Imagination. This finally fully stacks her Imagination and allows her to perform her Forte Circuit Plunge Attacks immediately. |
| ④ | Execute all three Plunge Attacks to regenerate her Concerto rapidly. Make sure to finish all three to get all 51 Concerto Points. |
| ⑤ | Release her Resonance Liberation to activate a party-wide ATK buff. You may also use her Echo Skill before switching to the next character after her Resonance Liberation. |
| ⑥ | Switch to the next Resonator with full Concerto to further buff their Havoc DMG and Basic Attack DMG. |
| Note | Roccia's plunge attacks are vital to her rotation and should all be executed. Successfully performing one only grants 10 Concerto, performing two grants 26, but making it to three plunge attacks will grant you a large gain of 51 Concerto. Missing the last plunge is a huge loss for Concerto Energy, and will not trigger your Outro Skill for the next Resonator which can mess up your rotations. |
Roccia's core gameplay loop focuses on quickly stacking Imagination, which enables her to activate her Forte Circuit and unleash three consecutive plunge attacks to rapidly charge Concerto which becomes vital for her outro skill.
As a Sub-DPS, Roccia's greatest strength lies in her ability to buff the next Resonator through stacking her Resonance Liberation and Outro Skill. Focus on charging her Concerto as quickly as possible during her time on the field, by landing all Plunge Attacks with full Imagination stacks to enable a seamless swap to the next Resonator.
Stack Imagination Quick
| Fastest Imagination Stack Source |
Stacks |
|---|---|
| Intro Skill | 100 (1 stack) |
| Basic Attack 4 | 100 (1 stack) |
| Resonance Skill | 100 (1 stack) |
When Roccia is on the field, your priority should be stacking her Imagination as quickly as possible. Since her Intro Skill already provides 1 stack, follow up with a Basic Attack (considered Basic Attack 4) to fill another bar instantly due to her Intro Skill.
Then, activate her Resonance Skill to instantly reach 3 stacks, seamlessly enabling you to execute her Forte Circuit with Plunge Attacks.
Hold Basic Attack to Charge Imagination
You can also charge her Imagination gauge by holding her Basic Attack. Though this option is here, it shouldn't be your main priority as it is slow and non-optimal for Roccia's rotations. You can use it to close in gaps though!
Completed Plunge Attacks Charge Concerto Faster
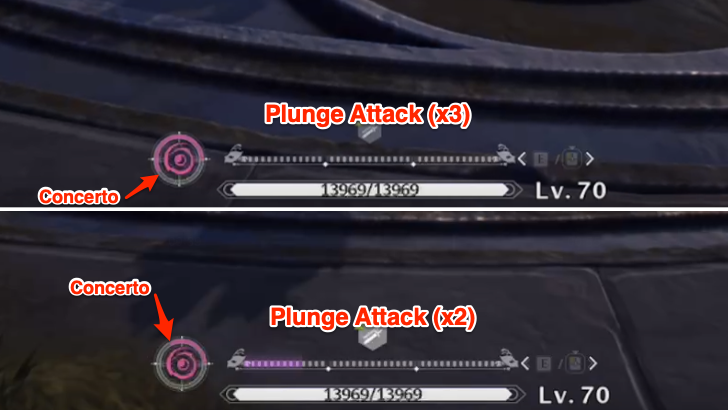
| Completed Plunge Attack | Concerto Gain |
|---|---|
| 1 | 10 |
| 2 | 16 |
| 3 | 25 |
| Total Concerto | 51 |
Always ensure you land all of Roccia's Plunge Attacks, as her Concerto gain increases with each hit, up to a total of 51. This is crucial for accelerating her rotation and enabling her to switch to the next character with a fully charged Concerto, allowing her to apply the buffs from her Outro Skill.
Always Cast Resonance Liberation Before Outro Skill
Once Roccia's Resonance Liberation is ready, make sure to activate it before switching to the next Resonator. Her Liberation provides a party-wide ATK buff, stacking well with her Outro Skill that gives Havoc and Basic Attack DMG amplification.
Do note that the flat ATK increase is added only after the final calculations of your ATK stat is done. It is not an increase in the Resonators' base ATK.
Use Inherent Skill 2 for Crowd Control
Unlocking Roccia's Inherent Skill 2 applies the Super Attractive Magic Box to her Outro Skill which allows you to summon a whirlwind that bundles enemies and execute a more organized AoE attack on them. This can also be useful in situations where you might find yourself being overwhelmed by hordes of enemies.
Roccia Materials: Ascension and Forte
Roccia Ascension Materials
Character Ascension Materials
| How to Get | Materials |
|---|---|
| Normal Enemies | |
| World Boss |
|
| Overworld Material | |
| Currency |
|
Forte Materials
| How to Get | Materials |
|---|---|
| Normal Enemies | |
| Forgery Challenge |
|
| Weekly Boss | |
| Currency |
|
Roccia Ascension and Forte Materials
Ascension Materials Per Rank
| Character Ascension Materials | |
|---|---|
| Rank 1 20 ➔ 40 |
|
| Rank 2 40 ➔ 50 |
|
| Rank 3 50 ➔ 60 |
|
| Rank 4 60 ➔ 70 |
|
| Rank 5 70 ➔ 80 |
|
| Rank 6 80 ➔ 90 |
|
Total Forte Materials
| Total Forte Materials | |
|---|---|
| Main Nodes (Total) Lv. 1 ➔ 10 |
|
| Stat Bonus 1 (Total) |
|
| Stat Bonus 2 (Total) |
|
| Inherent Skill 1 |
|
| Inherent Skill 2 |
|
| Level Upgrade | Upgrade Materials |
|---|---|
| 1 ➔ 2 | |
| 2 ➔ 3 | |
| 3 ➔ 4 | |
| 4 ➔ 5 | |
| 5 ➔ 6 | |
| 6 ➔ 7 | |
| 7 ➔ 8 | |
| 8 ➔ 9 | |
| 9 ➔ 10 | |
Roccia Skill Priority and Forte List
Forte Tree Priority
| Skill | Priority | Explanation |
|---|---|---|
| Normal Attack | ★★★☆☆ | Normal Attack should be upgraded after the first three, mostly because the damage Roccia deals will not scale much from Normal Attack. |
| Resonance Skill | ★★★★☆ | Roccia's Resonance Skill will have non-negligible damage so don't forget to level this up as well. We still suggest upgrading this after Forte Circuit and Resonance Liberation if you're short on materials. |
| Forte Circuit | ★★★★★ | Level up Roccia's Forte Circuit together with her Resonance Liberation first. The plunge attacks that Roccia will use in her combos will scale off her Forte Circuit multipliers, so level this one up first. |
| Resonance Liberation | ★★★★★ | It is important that Roccia is able to cast her Resonance Liberation during her rotation, so to maximize the damage output you'd want to level this one up together with the Forte Circuit. |
| Intro Skill | ★☆☆☆☆ | Roccia's Intro Skill can come last especially if you are short on resources. |
Roccia must upgrade both her Forte Skill and Resonance Liberation first, mostly because her combos rotate between those two. Resonance Skill will come next because you will still use Roccia's Skill, but not as much as the first two.
Normal Attack and Intro Skill can come last, only upgrading Intro Skill if you have extra materials.
Normal Attack
| NATK | SKILL | FORTE | INHE |
| LIBE | INTRO | OUTRO | TUNE |
| Pero, Easy |
|---|
|
Perform up to 4 consecutive attacks, dealing Havoc DMG.
Heavy Attack: Consume STA to attack, dealing Havoc DMG. Hitting a target with at least 100 Imagination sends Roccia into mid-air and activates the Beyond Imagination state. The longer you hold the Basic Attack button, the more Imagination Roccia gains. In this state, Roccia can continue to charge the attack even when her STA depletes. Heavy Attack will be automatically cast when you release the Basic Attack button while charging or when Imagination reaches the max limit. Mid-air Attack: Consume STA to perform a Plunging Attack, dealing Havoc DMG. Dodge Counter: Use Basic Attack right after a successful Dodge to attack the target, dealing Havoc DMG. Attribute Bonuses: 1. Crit. DMG +2.40% 2. Crit. DMG +5.60% |
| Skill Detail | Effect (Lvl 1) |
|---|---|
| Stage 1 DMG | 36.81% |
| Stage 2 DMG | 19.19%*3 |
| Stage 3 DMG | 17.00%*2+51.00% |
| Stage 4 DMG | 52.41%*2 |
| Heavy Attack DMG | 85.00% |
| Mid-air Attack DMG | 52.70% |
| Dodge Counter DMG | 34.66%*3 |
| Heavy Attack STA Cost | 10 |
| STA Cost per Second while Charging | 15 |
| Mid-air Attack STA Cost | 30 |
Resonance Skill
| NATK | SKILL | FORTE | INHE |
| LIBE | INTRO | OUTRO | TUNE |
| Acrobatic Trick |
|---|
|
Roccia projects her creativity into reality, pulling in nearby targets and dealing Havoc DMG. She then launches into mid-air and activates the Beyond Imagination state.
Attribute Bonuses: 1. ATK +1.80%. 2. ATK +4.20%. |
| Skill Detail | Effect (Lvl 1) |
|---|---|
| Skill DMG | 30.92%*8 |
| Cooldown | 10s |
| Concerto Regen | 20 |
Forte Circuit
| NATK | SKILL | FORTE | INHE |
| LIBE | INTRO | OUTRO | TUNE |
| A Prop Master Prepares |
|---|
|
Beyond Imagination: When Roccia is in Beyond Imagination with at least 100 Imagination, press the Basic Attack button to consume 100 Imagination to cast Basic Attack Real Fantasy. Roccia exits this state when she is not airborne or when switched off the field. Basic Attack - Real Fantasy: Perform up to 3 consecutive attacks, dealing Havoc DMG, considered Heavy Attack DMG. When Roccia lands after Stage 1 and Stage 2 attacks with over 100 Imagination, she will launch into mid-air and activate Beyond Imagination. Imagination: Roccia can hold up to 300 Imagination. - Dealing DMG with Normal Attacks restores Imagination. - Hold Normal Attack to charge the next attack while restoring Imagination. - Casting Resonance Skill Acrobatic Trick restores 100 Imagination. - Casting Intro Skill Pero, Help restores 100 Imagination. |
| Skill Detail | Effect (Lvl 1) |
|---|---|
| Stage 1 DMG | 162.00% |
| Stage 2 DMG | 171.00% |
| Stage 3 DMG | 180.00% |
| Stage 1 Concerto Regen | 10 |
| Stage 2 Concerto Regen | 16 |
| Stage 3 Concerto Regen | 25 |
Inherent Skills
| NATK | SKILL | FORTE | INHE |
| LIBE | INTRO | OUTRO | TUNE |
| Inherent Skill 1: Immersive Performance |
|---|
| Casting Resonance Skill or Heavy Attack increases Roccia's ATK by 20% for 12s. |
| Inherent Skill 2: Super Attractive Magic Box |
|---|
| After casting Outro Skill, the Utility of the incoming Resonator is replaced with Magic Box. Upon use, Magic Box pulls nearby targets towards it, dealing 100 points of Havoc DMG. This skill is considered Echo Skill that deals Utility DMG. The box lasts for 14s or until the Resonator is switched out. |
Resonance Liberation
| NATK | SKILL | FORTE | INHE |
| LIBE | INTRO | OUTRO | TUNE |
| Commedia Improvviso! |
|---|
|
Roccia's improvised comedy begins! Deal Havoc DMG to the target, considered Heavy Attack DMG. For every 0.1% of Roccia's Crit. Rate over 50%, this skill increases the ATK of all Resonators in the team by 1 point for 30s, up to 200 points. The flat ATK bonus is added after the final calculations and is not an increase of the Resonators' base ATK stat. Attribute Bonuses: 1. ATK +1.80%. 2. ATK +4.20%. |
| Skill Detail | Effect (Lvl 1) |
|---|---|
| Skill DMG | 140.00%*3 |
| Cooldown | 20s |
| Resonance Cost | 125 |
| Concerto Regen | 20 |
Intro Skill
| NATK | SKILL | FORTE | INHE |
| LIBE | INTRO | OUTRO | TUNE |
| Pero, Help |
|---|
|
Attack the target, dealing Havoc DMG. Use Basic Attack right after casting this skill to cast Basic Attack Stage 4.
Attribute Bonuses: 1. Crit. DMG +2.40%. 2. Crit. DMG +5.60%. |
| Skill Detail | Effect (Lvl 1) |
|---|---|
| Skill DMG | 85.00% |
| Concerto Regen | 10 |
Outro Skill
| NATK | SKILL | FORTE | INHE |
| LIBE | INTRO | OUTRO | TUNE |
| Applause, Please! |
|---|
| The incoming Resonator has their Havoc DMG Amplified by 20% and Basic Attack DMG Amplified by 25% for 14s or until the Resonator is switched out. |
Tune Break
| NATK | SKILL | FORTE | INHE |
| LIBE | INTRO | OUTRO | TUNE |
| Tune Break: Gauntlets |
|---|
| When the target's Off-Tune Level is full, the Resonator may cast Tune Break on the target. |
Roccia Resonance Chain
Recommended Sequence Nodes
| Why We Recommend It | |
|---|---|
| S1 | ★★★★☆ - Great Shortens Roccia's rotation so she can switch to the Main DPS faster. Invaluable for a sub-DPS, especially if the Main DPS requires a lot of time on-field. |
| S2 | ★★★★★ - Amazing Provides additional Havoc DMG Bonus for the entire team, elevating the already insane Havoc DMG Amplification she provides with her Outro Skill. |
| S3 | ★★☆☆☆ - Okay An okay Resonance Chain to get, but only improves Roccia's Crit ratio and personal damage. |
| S4 | ★★★☆☆ - Good Increases the damage multiplier of Real Fantasy, which is in turn increases the overall DMG of Roccia. A pretty limited upgrade though, but a good one nonetheless. |
| S5 | ★★★★☆ - Great Increases Heavy Attack DMG where all of Roccia's skills scale off of. In addition, her Liberation's multiplier is increased as well, so your overall damage will improve with S5! |
| S6 | ★★★★★ - Amazing Roccia's final Resonance Chain is by far the best one to get, improving Roccia's overall DMG output by a lot thanks to the 60% DEF ignore! In addition, Roccia will have access to a fourth plunge attack with this Resonance Chain improving her overall damage even more. |
All Sequence Node Effects
| S1 | When Shadows Engulf the Hull Casting Resonance Skill Acrobatic Trick grants 100 additional Imagination and 10 Concerto Energy. Immune to interruptions when casting Basic Attack Real Fantasy. |
|---|---|
| S2 | When the Luceanite Gleams Casting Basic Attack Real Fantasy grants all Resonators in the team 10% Havoc DMG Bonus for 30s, stacking up to 3 times. Upon reaching the max stacks, it grants all Resonators in the team 10% additional Havoc DMG Bonus for 30s. |
| S3 | When the Heart Sees and Hands Feel Casting Intro Skill Pero, Help increases Roccia's Crit Rate by 10% and Crit DMG by 30% for 15s. |
| S4 | When Wonders Gather in the Box Casting Resonance Skill Acrobatic Trick increases Basic Attack Real Fantasy's DMG Multiplier by 60% for 12s. |
| S5 | When Dreams Are Reborn on Stage Increase Resonance Liberation Commedia Improvviso!'s DMG Multiplier by 20% and Heavy Attack's DMG Multiplier by 80%. |
| S6 | When Golden Wings Fly Casting Resonance Liberation Commedia Improvviso! grants the following effects for 12s: - Basic Attack Real Fantasy ignores enemies' DEF by 60%. - When Roccia lands after performing Basic Attack Real Fantasy Stage 3, she is launched into mid-air, activating Beyond Imagination. In this state, Basic Attack becomes Basic Attack Reality Recreation, dealing DMG equal to 100% of Basic Attack Real Fantasy Stage 3 DMG, considered Heavy Attack DMG. Roccia is immune to interruptions while casting Basic Attack Reality Recreation. - When Roccia lands after performing Basic Attack Reality Recreation, she is launched into mid-air, activating Beyond Imagination. Basic Attack Reality Recreation is only available in the Beyond Imagination state. |
How to Get Roccia
Previously Featured in a Limited Banner
| Limited Banner | |
|---|---|
 Stage in the Box |
|
| Availability |
|---|
| Version 2.5 - Phase 1 July 24, 2025 - August 14, 2025 (Asia) |
Roccia was featured in the Character Event Convene called Stage in the Box which was available in Version 2.5 from July 23, 2025 to August 14, 2025 (UTC-5).
Roccia Voice Actor and Lore
Roccia Voice Actors
| Roccia Voice Actor List | |
|---|---|
| EN | Holly Earl |
| JP | Konomi Kohara |
| CN | Shen Huasang |
| KR | Jang Mi |
Roccia In-Game Lore
| Gender | Female |
|---|---|
| Birthplace | Rinascita |
| Affiliation | Troupe of Fools |
| Basic Info | Assistant, prop mater, and improv comedian, Roccia is always there to make sure the Fool's Troupe is at the ready. The Magic Box she carries appears to hold the world, or perhaps she had recreated a world inside the box. |
Wuthering Waves Related Guides

| List of All Characters | List of Character Builds |
| All Character Ascension Materials | All Wing and Glider Skins |
Characters by Rarity
| Resonator Rarity | |
|---|---|
 5-Star Characters 5-Star Characters |
 4-Star Characters 4-Star Characters |
Characters by Element
| Resonator Elements | ||
|---|---|---|
Characters by Weapon
| Characters by Weapon | |||||
|---|---|---|---|---|---|
Other Lists of Characters
| Other Resonator Lists | ||
|---|---|---|
| Female Characters | Male Characters | |
| Voice Actors | Free Characters | |
| Healers | Factions | |
| Upcoming Characters | ||
All Playable Characters
Upcoming Characters
| Upcoming Characters | ||
|---|---|---|
|
|
|
|
Comment
23  Verse 10 months
Is she saying "yes" on Japanese? Sounds horrible.
Author

Roccia Best Builds and Teams
Please participate in our site
improvement survey
03/2026
improvement survey
03/2026
Would you assist in
improving Game8's site?
improving Game8's site?

×
We are listening to our users' valuable opinions and discussing how to act on them.
The information collected through this survey will be used for the purpose of improving our services. In addition, the information will only be disclosed a part of a statistic in a format that will not allow identification of personal information.
Begin Survey
Not Now
×
Please rate each item regarding Game8.co's Advertisements.
Amount of Ads
Very Dissatisfied
Somewhat Dissatisfied
Fine
Somewhat Satisfied
Highly Satisfied
Placement of Ads
Timing of Ad Display
Ad Loading Speed
Safeness of Ads
Content of Ads
×
Please rate each item regarding Game8.co's Quality of Articles.
Amount of information
Very Dissatisfied
Somewhat Dissatisfied
Fine
Somewhat Satisfied
Highly Satisfied
Frequency of updates
Speed of new information
Accuracy of articles
Understandibility of articles
Readability of sentences
×
Please rate each item regarding Game8.co's Usability of the Site.
Ease of finding information
Very Dissatisfied
Somewhat Dissatisfied
Fine
Somewhat Satisfied
Highly Satisfied
Loading Speed
Use of Color
Font Size
Visibility of Images
Easy to Understand Layout
×
Please rate each item regarding Game8.co's Message Boards, Comments.
Ease of Writing
Very Dissatisfied
Somewhat Dissatisfied
Fine
Somewhat Satisfied
Highly Satisfied
Readability
Ease in Finding Information
Comment Quality
Comment Quantity
Admin Response
×
Please rate each item regarding Game8.co's Site's new design.
Please rate our site's new design
Very Dissatisfied
Somewhat Dissatisfied
Fine
Somewhat Satisfied
Highly Satisfied
Do you think that the website's design change makes the site easier to use?
Has the new design made it easier for you to find information on the site?
Has the new design improved the overall visual appeal of the site?
How would you rate your overall satisfaction with the new design of the site?
×
How likely are you to recommend Game8 to someone you know?
Very Unlikely
0
1
2
3
4
5
6
7
8
9
10
Very Likely
If you have other opinions regarding potential improvement to the website, please share them with us. We would appreciate your honest opinion.
Note: This is a free response section, so you can proceed without entering anything.
Note: Please be sure not to enter any kind of personal information into your response.
Note: Please be sure not to enter any kind of personal information into your response.
×
Thank You
×
Thank you for participating in our survey! Your answers will help us to improve the quality of our website and services.
We hope you continue to make use of Game8.
We hope you continue to make use of Game8.
Close
Premium Articles

Rankings
- We could not find the message board you were looking for.

Gaming News


![Everwind Review [Early Access] | The Shaky First Step to A Very Long Journey](https://img.game8.co/4440226/ab079b1153298a042633dd1ef51e878e.png/thumb)

![Monster Hunter Stories 3 Review [First Impressions] | Simply Rejuvenating](https://img.game8.co/4438641/2a31b7702bd70e78ec8efd24661dacda.jpeg/thumb)
Popular Games

Genshin Impact Walkthrough & Guides Wiki
Honkai: Star Rail Walkthrough & Guides Wiki
Umamusume: Pretty Derby Walkthrough & Guides Wiki
Pokemon Pokopia Walkthrough & Guides Wiki
Resident Evil Requiem (RE9) Walkthrough & Guides Wiki
Monster Hunter Wilds Walkthrough & Guides Wiki
Wuthering Waves Walkthrough & Guides Wiki
Arknights: Endfield Walkthrough & Guides Wiki
Pokemon FireRed and LeafGreen (FRLG) Walkthrough & Guides Wiki
Pokemon TCG Pocket (PTCGP) Strategies & Guides Wiki


Recommended Games
Diablo 4: Vessel of Hatred Walkthrough & Guides Wiki
Cyberpunk 2077: Ultimate Edition Walkthrough & Guides Wiki
Fire Emblem Heroes (FEH) Walkthrough & Guides Wiki
Yu-Gi-Oh! Master Duel Walkthrough & Guides Wiki
Super Smash Bros. Ultimate Walkthrough & Guides Wiki
Pokemon Brilliant Diamond and Shining Pearl (BDSP) Walkthrough & Guides Wiki
Elden Ring Shadow of the Erdtree Walkthrough & Guides Wiki
Monster Hunter World Walkthrough & Guides Wiki
The Legend of Zelda: Tears of the Kingdom Walkthrough & Guides Wiki
Persona 3 Reload Walkthrough & Guides Wiki


All rights reserved
Copyright© 2024-2025 Kuro Games. All Rights Reserved.
The copyrights of videos of games used in our content and other intellectual property rights belong to the provider of the game.
The contents we provide on this site were created personally by members of the Game8 editorial department.
We refuse the right to reuse or repost content taken without our permission such as data or images to other sites.
nope, she doesnt say yes