This survey will take about 1 minute.
Your answers will help us to improve our website.
Wuthering Waves (WuWa)
Void Storm Zone Locations and Guide
★ Version 3.1 → Phase 2 Pull Strategy
┣ Luuk Herssen: Builds, Asc. Materials, Sig. Weapon
┣ Rerun: Gabrena Build, Asc. Materials, Sig. Weapon
┣ Mansion Event Guide | Bartending Recipes
┗ Tapes of Last Words | Soliskin | 3.1 Hidden Trophies
★ Exclusives: Tier List Maker | State of the Meta
This page lists all Void Storm Zones and their locations in Wuthering Waves Version 3.0. Check out how to beat the different Void Storm Zones in Lahai-Roi, their locations, rewards and more in this guide!
List of Contents
Void Storm Zones Interactive Map
The Interactive Map both shows the location of key points on the map, and doubles as a collectible checker.
- Click an icon on the right side to show all the pins of a specific type, or click the magnifying glass button to search for a specific pin by name.
- Click a pin on the map to see its name and description, and a relevant picture or video if available.
- From here, click Mark as Acquired to indicate that you've gotten a collectible already. This will change its icon on the map to show that it has been collected, and add 1 to that pin type's Counter.
- To undo this, click on the same pin and click Restore to unclaimed.
- To check how many pins you have marked so far, check the Counter in the bottom left, and click the icon that looks like a checklist to see counters for all pin types.
- If the collected pins start to get in the way, you can hide them all by clicking the green Show Pins button on the left side.
| Icon | How to Use |
|---|---|
 | Show Names This button reveals the Name of every icon currently shown. |
 | Show Pins This button will toggle between showing and hiding all the pins which you have already marked as acquired. |
 | Fullscreen This button will change the map display to fill the screen. |
 | Search Mode Toggle This button will display a searchbar which you can use to search for an individual pin by its name. |
 | Icon Mode Toggle In Search Mode, this button will toggle you back to Icon Mode, removing the search bar and displaying the icons again. |
 | All Pins This button is shown along with the Icons on the right when there are over 6 types of pins. Click it for a full selection of all available pin types. |
 | Counter Tracks the number of pins you have of a certain type. The pin type shown is set to the page and currently cannot be changed; however, all pin type counters can be viewed by clicking the checklist icon on the right side. |
| View All Counters This icon is found on the right side of the Counter. When a map has more than one pin type, click this icon to see Counters for all pin types. | |
| Zoom In / Zoom Out This icon is found on the top left side of the map. You can press these buttons, or use your scroll wheel while hovering, to Zoom In and Out of the interactive map. |
Map Legend
All Void Storm Zone Locations
Frostlands Surface (Version 3.1)
 |
||
| All Void Storm Locations | ||
|---|---|---|
| Tidelost Forest I | Tidelost Forest II | |
| Mount Gjallar III | Transit Port IV | |
| Upphaf Forest Ruins V | - | |
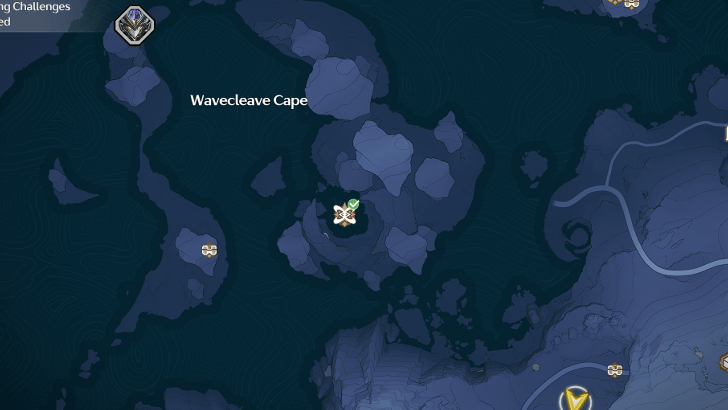
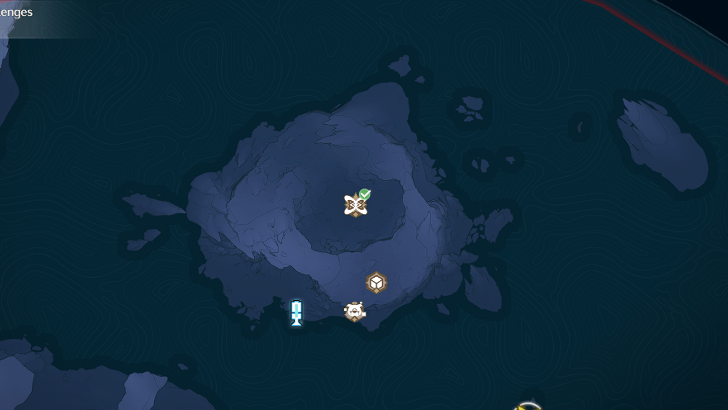
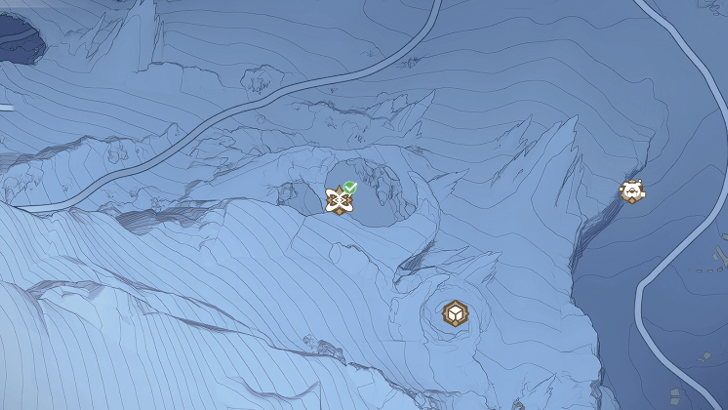
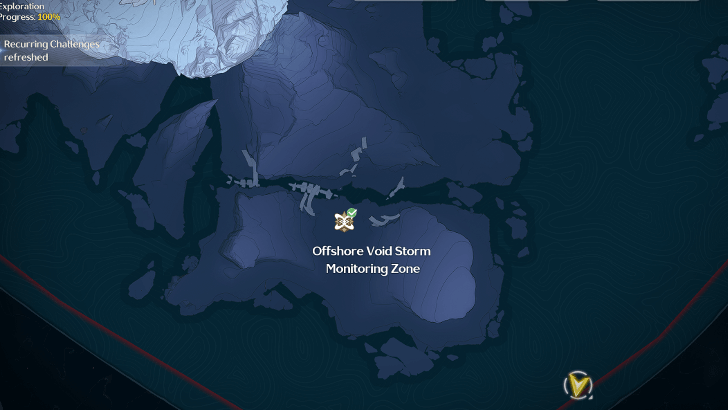
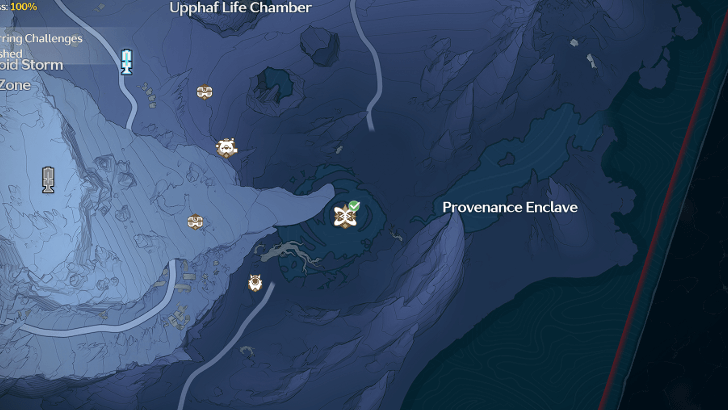
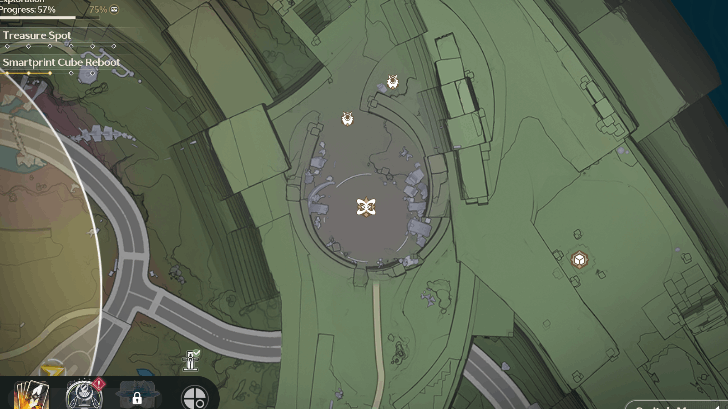
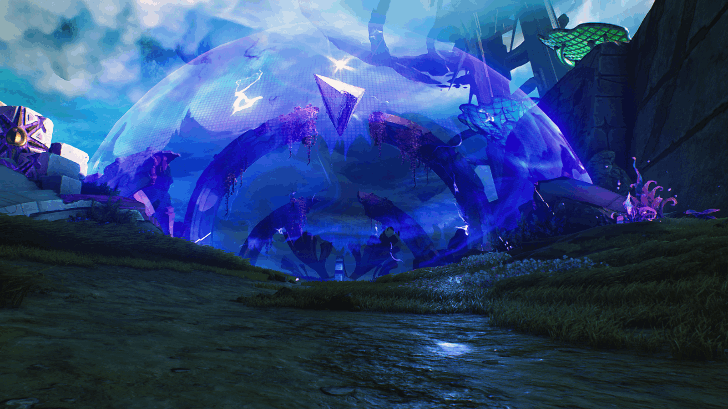
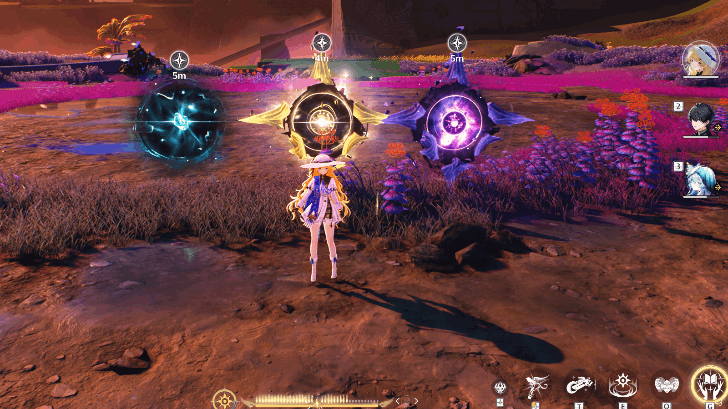
There are 5 Void Zones located in Roya Frostlands Surface, all located near open challenge areas with circular or diamond stone structures. Like the ones in underground Lahai-Roi, these areas are also open terrains with enclosed purple spheres that you will fight in as part of the challenge.
Frostlands Void Storm 1 (Tidelost Forest)
 |
|
| Wave 1 | Wave 2 |
|---|---|
The first wave is no problem as the small mobs are extremely easy to manage. Just be careful of the Mining Reindeer as they can easily knock down characters especially the likes of Mornye or Changli.
The main problem for this storm is the Kronablight. When enraged, it is imperative that you build up its Tune Break Meter and break it to make it exit the enraged state. Furthermore, using characters with Tune Rupture - Shifting in their kits will greatly reduce its RES so bring the likes of Aemeath or Lynae to this fight.
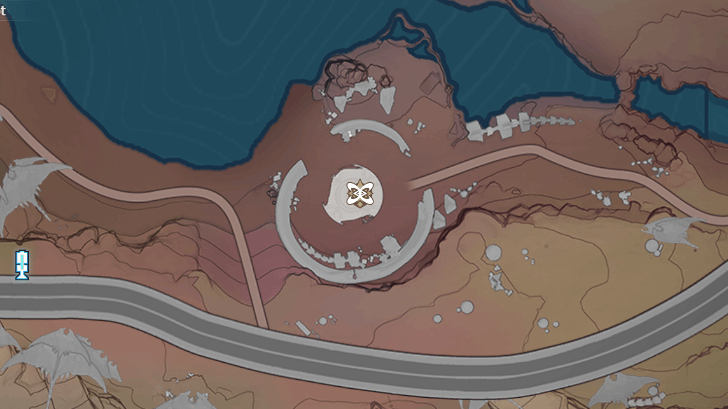
Frostlands Void Storm 2 (Tidelost Forest)
 |
|
| Wave 1 | Wave 2 |
|---|---|
The two Coleoid enemies in the first wave is something to look out for as they dart around the battlefield a lot. In a game mode that drains your health, this is a way to stall so maintain proximity if you can.
Similar to the Kronablight, the Kronaclaw will also start in enraged mode and the only way to make them calm down is through Tune Breaks. If you're using any character with Tune Rupture - Shifting, it also has greatly decreased RES so bring characters like Lynae or Mornye to this fight.
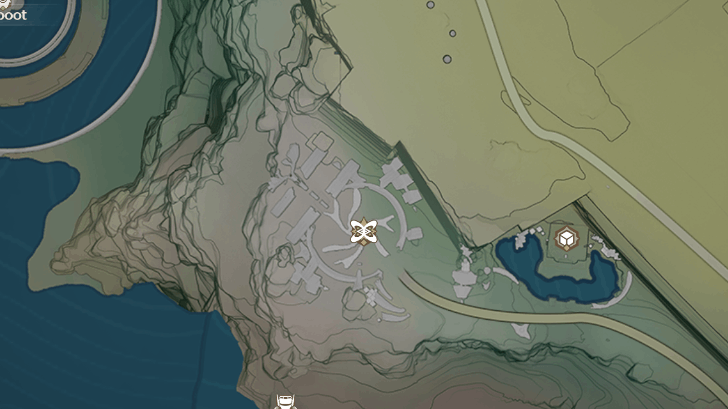
Frostlands Void Storm 3 (Mount Gjallar)
 |
|
| Wave 1 | Wave 2 |
|---|---|
For the first wave, be wary of the Ironhoof as it can easily knock your characters down especially airborne ones. This may disrupt combos and break rotations.
The Glommoth in the second wave is easy enough to manage, as there is no apparentl special mechanic around this. Just make sure your rotations are solid and you are avoiding its attacks.
Frostlands Void Storm 4 (Transit Port)
 |
|
| Wave 1 | Wave 2 |
|---|---|
The first wave's main problem is the Spacetrek Explorer as it is capable of using its rotational beam attack that can interrupt characters if you are not able to avoid it.
For the second wave, the Thundering Mephis is an easy enemy to deal with as it has no special mechanic at all. Be sure to hit all your rotations and avoid all attacks to succeed.
Frostlands Void Storm 5 (Upphaf Forest Ruins)
 |
|
| Wave 1 | Wave 2 |
|---|---|
This is probably the hardest Void Storm in the Frostlands as all the enemies in both waves are quite hard to manage. Be wary of the Spacetrek Explorer's spinning beam attacks that can interrupt combos as well as the Sabercat Prowler's attack from the shadows.
The Nameless Explorer is the biggest problem here because it is floating at all times, making grounded characters at a huge disadvantage. In addition, this enemy also needs Tune Strain - Shifting so make sure to bring characters that can apply Strain like Lynae.
The Nameless Explorer also has a smaller, secondary health bar for its backpack, which when destroyed will ground the Nameless Explorer. Make sure to aim for this backpack by attacking from behind.
Lahai-Roi (Version 3.1)
 |
||
| All Void Storm Locations | ||
|---|---|---|
| Etching Plains I | Fangspire Chasm II | |
| Fangspire Chasm III | Giant's Gaze IV | |
| Etching Plains V | Stagnant Run VI | |
| Stagnant Run VII | - | |
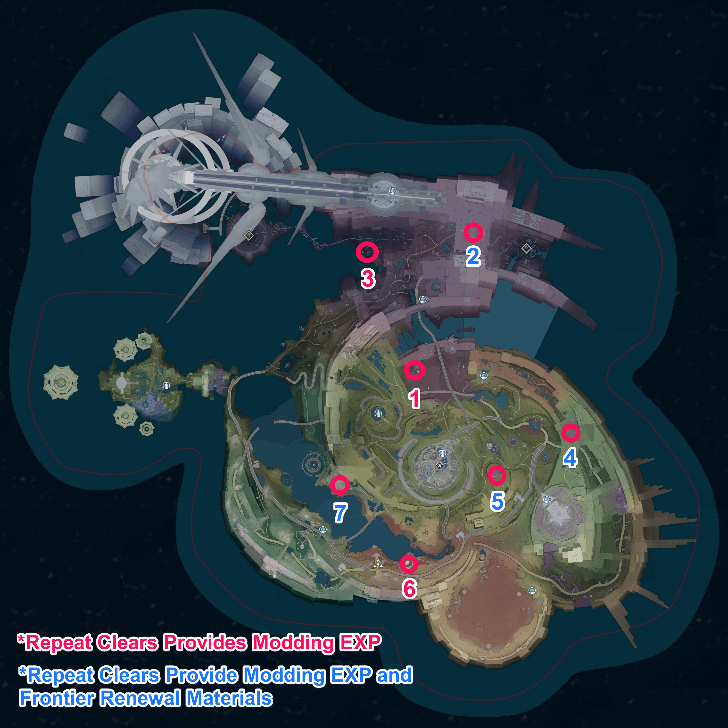
There are 7 Void Zones located in Lahai-Roi, all located near open challenge areas with circular or diamond stone structures. These areas are open terrains with enclosed purple spheres that you will fight in as part of the challenge.
Lahai-Roi Void Storm 1 (Etching Plains)
 |
|
| Wave 1 | Wave 2 |
|---|---|
Void Storm I's first wave features two Spacetrek Explorers and two Geospider S4s, spawning after a few seconds. Do not pop off any skills or buffs until they show up, then burst down the enemies to quickly take out the Geospiders and Tune Break the Explorers.
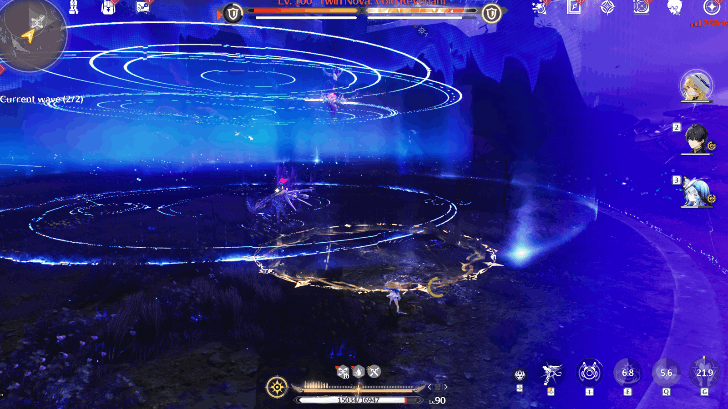
Once cleared, the second wave shows up, featuring both Twin Nova mechs. We advise prioritizing the Collapsar Blade first as its attacks will send your character airborne. Tune Break either mechs that you hit to gain health and deal more damage against them.
Lahai-Roi Void Storm 2 (Fangspire Chasm)
 |
|
| Wave 1 | Wave 2 |
|---|---|
Void Storm Zone II's first wave presents one each of a Windlash Coleoid and Frostbite Coleoid paired with one Spacetrek Explorer. Deal with the slower Spacetrek Explorer first to Tune Break it and then deal with the Coleoids.
The second wave features a Mech Abomination that has multiple lightning attacks that can be fatal if you are near the boss, make sure to keep some distance and constantly go behind it to quickly Tune Break the target.
Lahai-Roi Void Storm 3 (Fangspire Chasm)
 |
|
| Wave 1 | Wave 2 |
|---|---|
Void Storm Zone III's first wave, is composed of two Flora Drones and Mining Drones,.and one Spacetrek Explorer. Burst down the Spacetrek Explorer with Area-of-Effect attacks so you can take out the four drones quickly and easily deal with the Spacetrek Explorer.
The second wave features a unique variant of Hyvatia that focuses on melee attacks and is the most dangerous enemy in all of the Void Zones. You can cheese this boss by going to the edges of the zone and temporarily exiting the field to remove your debuffs.
You can either engage Hyvatia on the edge of the sphere where you won't be as hurt with her attacks, or heal without any debuffs on the way. Use this technique repeatedly in the fight to make Hyvatia easier.
Lahai-Roi Void Storm 4 (Giant's Gaze)
 |
|
| Wave 1 | Wave 2 |
|---|---|
Void Storm IV's first wave is composed of Two Mining Reindeer and Two Ironhoofs. These enemies can be Tune Skill Broken one-by-one as they are Elite enemies, allowing you to get heals one after another with the right timing.
The Lampylumen Myriad at the second wave can freeze you if you stay on the ice fields they create. Make sure to keep distance and lure them near the edge of the map to make the fight easier.
Lahai-Roi Void Storm 5 (Etching Plains)
 |
|
| Wave 1 | Wave 2 |
|---|---|
Void Storm V's first wave features two Ironhoofs, Mining Drones and Geospider S4s. Frontload your Resonance Liberation attacks to immediately take down the minor mobs, allowing you to easily Tune Break the Ironhoofs and making them easier to manage.
The second wave features a single Impermanence Heron, which is relatively easy to take out. Prioritize dodging should it fly in the air and aggressively attack to Tune Break and stun the boss repeatedly.
Lahai-Roi Void Storm 6 (Stagnant Run)
 |
|
| Wave 1 | Wave 2 |
|---|---|
Void Storm VI features two Flora Reindeer and Mining Reindeer for it's first wave and they can easily be dealt with by Area-of-Effect attacks that can fill the Tune Gauge of any of the four Elite enemies easily.
For the second wave, you will be engaged against a modified Reactor Husk with more Fire attacks, dodge its Fire Arm attacks as well its Ground Slam to avoid massive damage. Make sure to Tune Break the boss constantly to regain health should you get hit.
Lahai-Roi Void Storm 7 (Stagnant Run)
 |
|
| Wave 1 | Wave 2 |
|---|---|
Void Storm 7 features one Windlash and Frostbite Coleoid each and two Sabercat Prowlers for its first wave. Take care of the Coleoid enemies and the Sabercat Prowlers with a Tune Skill Break.
The second wave then reveals a Tempest Mephis, lure it to the edge of the sphere and take advantage of its parry attack timings which can whittle its Tune Gauge down easily if correctly parried.
Void Storm Zones Tips and Tricks
- Tune Break Enemies
- Fight Near the Zone's Exit Range
- Get Out of the Zone's Range Temporarily
- Prioritize Stronger Enemies
- Heal Your Characters at Opportune Moments
- Use Your Strongest Characters
Tune Break Enemies to Eliminate Them Faster and Gain Health
Hit your enemies constantly with attacks to fill their Tune Gauge and trigger a Tune Break, weakening and temporarily stunning them while providing a decent heal boost to all of your characters.
This will be the core strategy behind these stages, so be aggressive and make sure to Parry and Counter enemy attacks to build Tune Gauge faster.
Fight Near the Zone's Exit Range
Make sure to lure enemies near the edge of the zone while you are fighting them so you can see your enemies better and avoid getting overwhelmed or circled quickly as fighting in the center is a positional disadvantage.
This also allows you to set-up a cheese strat against the enemies that reduces their buffs and your debuffs to make the fight easier.
Get Out of the Zone's Range Temporarily
You can cheese the Void Storm stages by simply moving near the edge of the zone and temporarily exiting while attacking enemies or healing, then returning to the edges of the battle zone to reset the timer.
The 10 seconds you have can be used to heal without the debuffs or allow you to reposition and attack the enemies with minimal impunity. Make sure to return to the sphere to reset the timer however, or you might fail the challenge.
Prioritize Stronger Enemies and Focus on One Enemy at a Time
Take on the more dangerous enemies first, as the weaker mobs will follow them and you can hit both with your attacks, and take on one enemy at a time.
This makes the first stages faster as you can usually pop a Resonance Liberation to trigger Tune Break immediately on minor mobs while Tune Skill Breaking larger mobs at the same time.
Heal Your Characters at Opportune Moments
Make sure to heal your characters whenever possible as this extends your survivability for a few seconds even with the debuffs in-place, just make sure to time your heals whenever an opening is found.
You can gain better healing by triggering Tune Break on enemies as much as possible, or heal outside the zone's sphere before the 10 second limit expires then return.
Use Your Strongest Characters and Prepare For the Stage
When engaging with these stages, make sure to have your strongest built team ready to take on them as they can be fairly difficult with unbuilt characters.
You can also prep your chars with a full Resonance Liberation and max core passive level so you can deal as much damage as quickly as possible before engaging the Void Storm Zones.
Total Number of Void Storm Zones
7 Void Storm Zones as of Version 3.0
As of Version 3.0, there are 7 Void Storm Zones around Lahai-Roi. Should there be any additional ones in future versions, we will update this number!
What are Void Storm Zones?
Difficult Challenge Zones With Player Debuffs
Void Storm Zones are difficult combat challenges requiring you to quickly eliminate two enemy waves usually comprised of buffed enemies while your characters are being debuffed in a zone.
You will receive healing debuffs, constant passive damage and take increased damage while in the sphere, so bring your strongest characters before starting the fight!
Introduced in Void Storm Reinforcement Side Quest
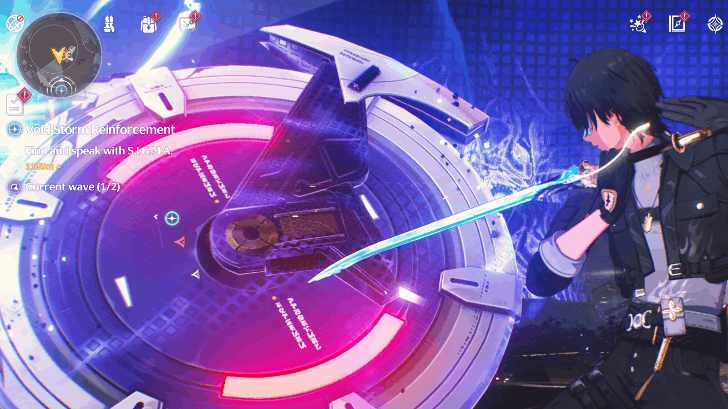
You will also be introduced to the effects of Void Storm Zones via the Void Storm Reinforcement sidequest by S.I.G.M.A, the traffic management automaton of Lahai-Roi. Finish the quest by clearing seven Void Storms!
Void Storm Reinforcement Quest Guide
Void Storms Reset After a Day
Void Storms do not disappear after your initial clear and can be challenged again after a day on your server's reset time, providing Motorbike Modding EXP and Frontier Renewal materials on a rerun.
Expedition Motorcycle Features
Void Storm Zone Rewards
Astrites and Character Upgrade Materials
The following rewards are provided to the player after completing a Void Storm Challenge for the first time. These rewards can be collected by absorbing the three Tidal Heritages in the zone, causing your map to tick the Void Storm Zone cleared.
Repeat Clears Grant Modding EXP and Frontier Renewal Materials
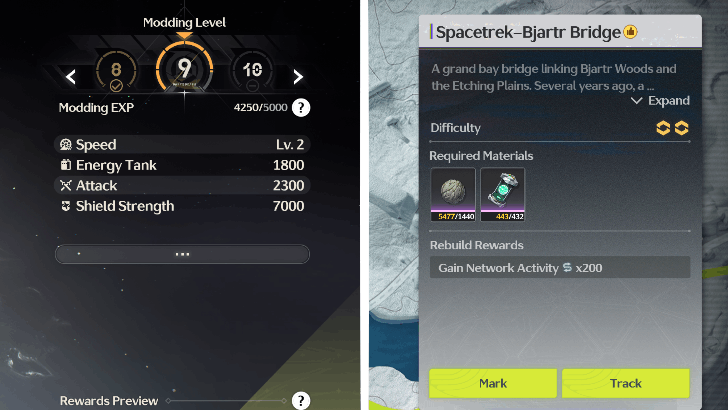
Repeat clears grant you Motorbike Modding EXP to improve your Expedition Motorbike and unlock more decals for customization.
Mechanite and Compressed Bedrock are materials for the Operation: Frontier Renewal permanent event and is only available in Void Storms II, IV, V and VII.
8 Trophies for All Void Storm Clears
| Trophy | Objective and Rewards |
|---|---|
 Void Storm Trooper Type I Void Storm Trooper Type I |
Purge the Tacet Discords of Void Storm Zone I in the borderland between Etching Plains and Fangspire Chasm. Rewards: |
 Void Storm Trooper Type II Void Storm Trooper Type II |
Clear the Tacet Discords of Void Storm Zone II in Exospine Barrows (Emberfall Barrows). Rewards: |
| Void Storm Trooper Type III |
Purge the Tacet Discords of Void Storm Zone III in Sundermere. Rewards: |
| Void Storm Trooper Type IV |
Purge the Tacet Discords of Void Storm Zone IV in Giant's Gaze. Rewards: |
| Void Storm Trooper Type V |
Purge the Tacet Discords of Void Storm Zone V in the borderland between Etching Plains and Startorch Academy. Rewards: |
| Void Storm Trooper Type VI |
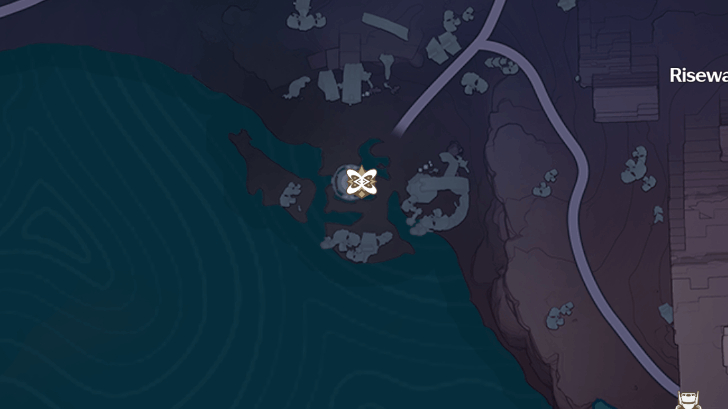
Purge the Tacet Discords of Void Storm Zone VI around the Riseway-Sundermere Corridor in Fangspire Chasm. Rewards: |
| Void Storm Trooper Type VII |
Purge the Tacet Discords of Void Storm Zone VII at Agentflare Drapes in Jetrified Ridge. Rewards: |
| All-Terrain Void Storm Trooper |
Purge the Tacet Discords of all Void Storm Zones in Lahai-Roi. Rewards: |
Each Void Storm Zone cleared provides a trophy achievement, plus an additional trophy for clearing all Void Zones currently in Lahai-Roi, for a total of 8 trophies and 45 Astrites.
Wuthering Waves Related Guides

Wuthering Waves Interactive Map
Lahai-Roi
Lahai-Roi Interactive Map and 100% Guide
Rinascita
Rinascita Interactive Map and 100% Guide
Black Shores
| All Black Shores Areas | |
|---|---|
| Tethys' Deep | Chronorift Metropolis |
Black Shores Map and 100% Exploration Guide
Huanglong
| All Huanglong Areas | |||||
|---|---|---|---|---|---|
| Jinzhou | Central Plains | Dim Forest | |||
| Gorges of Spirits | Desorock Highland | Port City of Guixu | |||
| Wuming Bay | Norfall Barrens | Tiger's Maw | |||
| Whining Aix's Mire | Mt. Firmament | ||||
Huanglong Interactive Map and 100% Guide
All Location Guides
Comment
Author

Void Storm Zone Locations and Guide
Please participate in our site
improvement survey
03/2026
improvement survey
03/2026
Would you assist in
improving Game8's site?
improving Game8's site?

×
We are listening to our users' valuable opinions and discussing how to act on them.
The information collected through this survey will be used for the purpose of improving our services. In addition, the information will only be disclosed a part of a statistic in a format that will not allow identification of personal information.
Begin Survey
Not Now
×
Please rate each item regarding Game8.co's Advertisements.
Amount of Ads
Very Dissatisfied
Somewhat Dissatisfied
Fine
Somewhat Satisfied
Highly Satisfied
Placement of Ads
Timing of Ad Display
Ad Loading Speed
Safeness of Ads
Content of Ads
×
Please rate each item regarding Game8.co's Quality of Articles.
Amount of information
Very Dissatisfied
Somewhat Dissatisfied
Fine
Somewhat Satisfied
Highly Satisfied
Frequency of updates
Speed of new information
Accuracy of articles
Understandibility of articles
Readability of sentences
×
Please rate each item regarding Game8.co's Usability of the Site.
Ease of finding information
Very Dissatisfied
Somewhat Dissatisfied
Fine
Somewhat Satisfied
Highly Satisfied
Loading Speed
Use of Color
Font Size
Visibility of Images
Easy to Understand Layout
×
Please rate each item regarding Game8.co's Message Boards, Comments.
Ease of Writing
Very Dissatisfied
Somewhat Dissatisfied
Fine
Somewhat Satisfied
Highly Satisfied
Readability
Ease in Finding Information
Comment Quality
Comment Quantity
Admin Response
×
Please rate each item regarding Game8.co's Site's new design.
Please rate our site's new design
Very Dissatisfied
Somewhat Dissatisfied
Fine
Somewhat Satisfied
Highly Satisfied
Do you think that the website's design change makes the site easier to use?
Has the new design made it easier for you to find information on the site?
Has the new design improved the overall visual appeal of the site?
How would you rate your overall satisfaction with the new design of the site?
×
How likely are you to recommend Game8 to someone you know?
Very Unlikely
0
1
2
3
4
5
6
7
8
9
10
Very Likely
If you have other opinions regarding potential improvement to the website, please share them with us. We would appreciate your honest opinion.
Note: This is a free response section, so you can proceed without entering anything.
Note: Please be sure not to enter any kind of personal information into your response.
Note: Please be sure not to enter any kind of personal information into your response.
×
Thank You
×
Thank you for participating in our survey! Your answers will help us to improve the quality of our website and services.
We hope you continue to make use of Game8.
We hope you continue to make use of Game8.
Close
Premium Articles

Rankings
- We could not find the message board you were looking for.
Gaming News


Popular Games

Genshin Impact Walkthrough & Guides Wiki
Honkai: Star Rail Walkthrough & Guides Wiki
Umamusume: Pretty Derby Walkthrough & Guides Wiki
Pokemon Pokopia Walkthrough & Guides Wiki
Resident Evil Requiem (RE9) Walkthrough & Guides Wiki
Monster Hunter Wilds Walkthrough & Guides Wiki
Wuthering Waves Walkthrough & Guides Wiki
Arknights: Endfield Walkthrough & Guides Wiki
Pokemon FireRed and LeafGreen (FRLG) Walkthrough & Guides Wiki
Pokemon TCG Pocket (PTCGP) Strategies & Guides Wiki


Recommended Games
Fire Emblem Heroes (FEH) Walkthrough & Guides Wiki
Diablo 4: Vessel of Hatred Walkthrough & Guides Wiki
Yu-Gi-Oh! Master Duel Walkthrough & Guides Wiki
Super Smash Bros. Ultimate Walkthrough & Guides Wiki
Pokemon Brilliant Diamond and Shining Pearl (BDSP) Walkthrough & Guides Wiki
Elden Ring Shadow of the Erdtree Walkthrough & Guides Wiki
Monster Hunter World Walkthrough & Guides Wiki
The Legend of Zelda: Tears of the Kingdom Walkthrough & Guides Wiki
Persona 3 Reload Walkthrough & Guides Wiki
Cyberpunk 2077: Ultimate Edition Walkthrough & Guides Wiki


All rights reserved
Copyright© 2024-2025 Kuro Games. All Rights Reserved.
The copyrights of videos of games used in our content and other intellectual property rights belong to the provider of the game.
The contents we provide on this site were created personally by members of the Game8 editorial department.
We refuse the right to reuse or repost content taken without our permission such as data or images to other sites.