Echoing Tower (Experimental Zone) Guide
★ Version 3.2 Banners → Livestream Codes
┣ Sigrika → Materials, Weapon, Banner
┣ Qiuyuan → Builds, Materials, Weapon
┗ Phase 2 → Lynae, Zani, Phoebe
★ Tapes of Last Words | Soliskin | 3.1 Trophies
★ Exclusives: Tier Maker | State of the Meta

Check out how to beat the Experimental Zone's Echoing Tower in Wuthering Waves. We have the best characters and stage guides for each floor here!
List of Contents
Experimental Zone Echoing Tower Floor 1
Echoing Tower 1 Details
| Interference | |
|---|---|
| Echo Skill DMG is increased by 200%. After Resonators release Echo Skills, their ATK is increased by 25% for 8s, and they restore 30% Resonance Energy. | |
| Objectives | |
| Enemies (Lv. 50) |
|
| Vigor Cost | 1 Vigor |
Echoing Tower 1 Best Characters
| Main DPS | |
|---|---|
| Sub-DPS | |
| Support |
Depending on your Main DPS, you'll want to bring a Sub-DPS whose Outro Skill compliments their playstyle. For example, if you're using Heavy Attackers like Calcharo and Danjin, you'll want to bring Mortefi since his Outro Skill buffs Heavy Attack DMG.
Make sure that you also bring a healing support since the Echoing Tower is harder than the Resonant Tower, and you'll need the sustain to survive.
How to Beat Echoing Tower Floor 1
Spam Interference Buffed Echo Skills
For both floors 1 and 2, you'll want to use your Echo Skill as much as possible since it gets a 200% DMG boost. Using your Echo Skill will also increase your Resonator's ATK by 25%, making it easier to kill off all the enemies on this floor.
Experimental Zone Echoing Tower Floor 2
Echoing Tower 2 Details
| Interference | |
|---|---|
| Echo Skill DMG is increased by 200%. After Resonators release Echo Skills, their ATK is increased by 25% for 8s, and they restore 30% Resonance Energy. | |
| Objectives | |
| Enemies (Lv. 55) |
|
| Vigor Cost | 2 Vigor |
Echoing Tower 2 Best Characters
| Main DPS | |
|---|---|
| Sub-DPS | |
| Support |
For this floor, you'll want to avoid using Aero and Fusion characters since the Hoochiefs and Saurians resist those elements respectively. However, if your strongest characters use those elements, you can still use them as long as their character and equipment levels match or exceed that of the enemies.
How to Beat Echoing Tower Floor 2
Focus on Killing the Saurians First
The Hoochief Cyclones are much harder to kill since you'll need to deal with their Vibration Strength shields and larger health bars. Focus on killing the Baby Viridblaze Saurians first so that you'll have an easier time dealing with the Hoochiefs once they're gone.
Experimental Zone Echoing Tower Floor 3
Echoing Tower 3 Details
| Interference | |
|---|---|
| After Echo skill is cast, all party members' DMG is increased by 20% and DEF by 20% for 15s, stacking up to 3 times. | |
| Objectives | |
| Enemies (Lv. 60) |
|
| Vigor Cost | 3 Vigor |
Echoing Tower 3 Best Characters
| Main DPS | |
|---|---|
| Sub-DPS | |
| Support |
Similar to floor 2, you'll want to avoid using Electro characters for this floor since 3 enemies resist it, with one of them being an Elite Class enemy. As much as possible, try not to use a character that isn't the same element as any of the enemies, but if you can't, then it's fine as long as their character and equipment levels match or exceeds the enemies.
How to Beat Echoing Tower Floor 3
Kill the Flautist and Tambourinist First
Even though the Flautist and Tambourinist are harder to kill compared to the Elemental Predators, you'll still want to deal with them first since they have large AoE attacks that can be annoying. Make sure to kill them off so that you don't accidentally dodge into their attacks.
Watch Out for Ranged Attacks

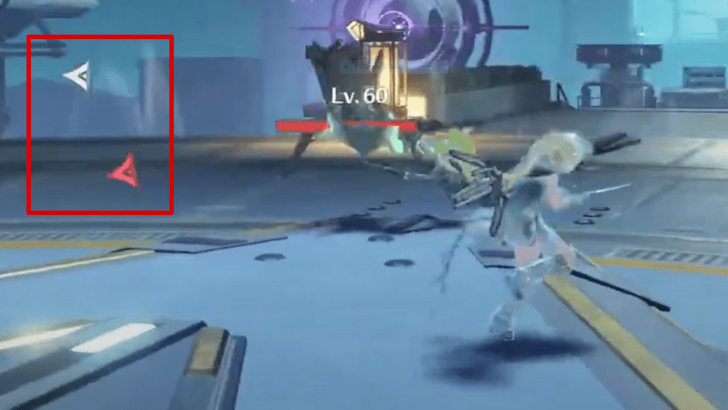
This floor has a lot of enemies with ranged attacks, and you don't want to take too much damage or you could lose one of your party members. Watch out for the enemies' attack indicators on your screen. As soon as it starts blinking red, swap your focus to that enemy so you can see their attack and dodge it.
Experimental Zone Echoing Tower Floor 4
Echoing Tower 4 Details
| Interference | |
|---|---|
| After Echo skill is cast, all party members' DMG is increased by 20% and DEF by 20% for 15s, stacking up to 3 times. | |
| Objectives | |
| Enemies (Lv. 70) |
|
| Vigor Cost | 4 Vigor |
Echoing Tower 4 Best Characters
| Main DPS | |
|---|---|
| Sub-DPS | |
| Support |
This is going to be the hardest challenge in this Zone since you'll be facing two Herons and three Prisms, as well as a Mourning Aix afterwards. Make sure that your team is fully upgraded and that you know each character's rotations so that you can maximize their DPS.
Remember that you can always come back later with a higher-level team if you don't clear all three objectives the first time around.
Do Not Use Spectro Characters

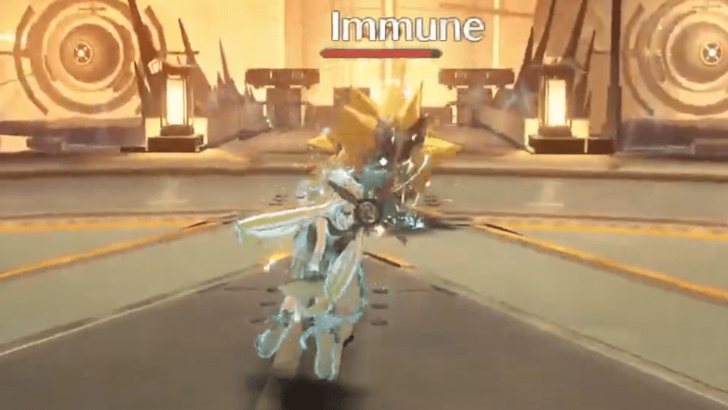
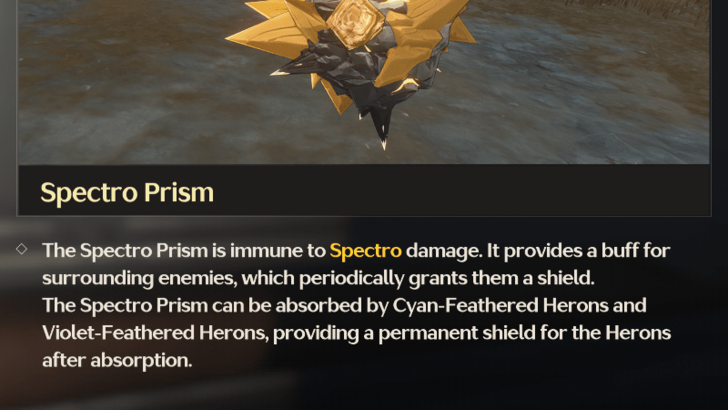
For the final floor of this Tower, you will have to avoid using Spectro DPS characters. This is because there are two Spectro Prisms on this floor, and they'll be immune to Spectro damage. However, you can still use Verina since she's primarily used as a Support rather than a DPS.
How to Beat Echoing Tower Floor 4
Kill the Spectro Prisms First

As soon as the fight begins, focus on killing the Spectro Prisms first before anything else. If they're left alive, they will provide constant shield buffs to the other enemies, and they can also be absorbed by the two Herons giving them a permanent shield.
Play Safe and Spam Echo Skills for DEF Boosts
Unless you're aiming to clear all 3 Objectives, play safe and focus on healing and dodging attacks. Make sure that you also spam Echo Skills as much as possible so that you can get the constant DEF boosts to survive attacks you wouldn't be able to otherwise.
Wuthering Waves Related Guides

Hazard Zone
| All Hazard Zone Towers | ||
|---|---|---|
| Hazard Zone Reset Date and Countdown March 30, 2026 |
||
Hazard Zone refreshes every 28 days.
All Permanent Zones
Overdrive Zone
| All Overdrive Zone Towers | ||
|---|---|---|
Experimental Zone
| All Experimental Zone Towers | ||
|---|---|---|
Stable Zone
| Stable Zone Tower | ||
|---|---|---|
Comment
Author
Echoing Tower (Experimental Zone) Guide
improvement survey
03/2026
improving Game8's site?

Your answers will help us to improve our website.
Note: Please be sure not to enter any kind of personal information into your response.

We hope you continue to make use of Game8.
Premium Articles
Rankings
Gaming News
Popular Games

Genshin Impact Walkthrough & Guides Wiki

Honkai: Star Rail Walkthrough & Guides Wiki

Umamusume: Pretty Derby Walkthrough & Guides Wiki

Pokemon Pokopia Walkthrough & Guides Wiki

Resident Evil Requiem (RE9) Walkthrough & Guides Wiki

Monster Hunter Wilds Walkthrough & Guides Wiki

Wuthering Waves Walkthrough & Guides Wiki

Arknights: Endfield Walkthrough & Guides Wiki

Pokemon FireRed and LeafGreen (FRLG) Walkthrough & Guides Wiki

Pokemon TCG Pocket (PTCGP) Strategies & Guides Wiki
Recommended Games

Cyberpunk 2077: Ultimate Edition Walkthrough & Guides Wiki

Diablo 4: Vessel of Hatred Walkthrough & Guides Wiki

Fire Emblem Heroes (FEH) Walkthrough & Guides Wiki

Yu-Gi-Oh! Master Duel Walkthrough & Guides Wiki

Super Smash Bros. Ultimate Walkthrough & Guides Wiki

Pokemon Brilliant Diamond and Shining Pearl (BDSP) Walkthrough & Guides Wiki

Elden Ring Shadow of the Erdtree Walkthrough & Guides Wiki

Monster Hunter World Walkthrough & Guides Wiki

The Legend of Zelda: Tears of the Kingdom Walkthrough & Guides Wiki

Persona 3 Reload Walkthrough & Guides Wiki
All rights reserved
Copyright© 2024-2025 Kuro Games. All Rights Reserved.
The copyrights of videos of games used in our content and other intellectual property rights belong to the provider of the game.
The contents we provide on this site were created personally by members of the Game8 editorial department.
We refuse the right to reuse or repost content taken without our permission such as data or images to other sites.


![Everwind Review [Early Access] | The Shaky First Step to A Very Long Journey](https://img.game8.co/4440226/ab079b1153298a042633dd1ef51e878e.png/thumb)

![Monster Hunter Stories 3 Review [First Impressions] | Simply Rejuvenating](https://img.game8.co/4438641/2a31b7702bd70e78ec8efd24661dacda.jpeg/thumb)


