Buling Best Builds and Teams
★ Version 3.2 out now!
┣ Sigrika → Builds, Materials, Weapon
┣ Qiuyuan → Builds, Materials, Weapon
┗ Phase 2 → Lynae, Zani, Phoebe
★ Upcoming Characters: Hiyuki, Denia
★ Exclusives: Tier Maker | State of the Meta
Buling is a playable 4-star Electro Rectifier character in Wuthering Waves (WuWa). Check out this guide for the best Buling build, Buling best teams, echoes, kit (skills), skill priority, and voice actor here!
List of Contents
Buling Character Overview
Buling Information
| Resonator Information | ||
|---|---|---|
 Buling Buling |
||
| Rarity | ★★★★ | |
| Element | ||
| Weapon | ||
| How to Get | Limited Convene | |
| Voice Actor (EN) | Elizabeth Chu | |
Buling Rankings
| Overall | Role | Endgame |
|---|---|---|
|
|
Support:
|
ToA:
WhiWa:
|
| The endgame tier placement considers the buffs present in both endgame modes. This will get updated periodically as buffs change. | ||
Are you Pulling for Buling?
Buling Stats
| Lv. 1 | Lv. 90 | |
|---|---|---|
| HP | 850 | 10625 |
| ATK | 18 | 225 |
| DEF | 103 | 1258 |
| Energy Regen | 100% | - |
| Crit. Rate | 5% | - |
| Crit. DMG | 150% | - |
Stat calculations does not include the Attribute Bonuses from Buling's Forte.
How Strong is Buling?
| Strengths | |||
|---|---|---|---|
|
• A great healer that can utilize the full power of the Rejuvenating Glow sonata effect. Buling is capable of healing teammates while increasing their ATK. • Provides a general DMG amplification for the entire team with her Outro and Resonance Skill DMG Amplification with her Forte-enhanced Liberation. A great 4-star character to slot in multiple teams. • Has grouping capabilities with her Resonance Skill, which is very much appreciated in multi-wave contents like Whimpering Wastes. • Applies Electro Flare passively with her Forte and Inherent Skill 2. |
|||
| Weaknesses | |||
|
• The effects of her Resonance Liberation that increases Resonance Skill DMG Amplification is a bit limiting. The full power of her entire kit only benefits Resonance Skill DMG scaling teams. • Straightforward to use, but can fail if you do not execute her combos flawlessly. This opens Buling up to attacks. |
Buling is a highly valuable 4-star support unit, acting as an alternative to premium options, Shorekeeper and Verina. She excels at providing heals and DMG amplification in general, but is especially great in Resonance Skill teams due to her Liberation.
We highly recommend pulling for Buling if she's on a banner you like, as she's one of the strongest 4-stars you can have in the game!
Buling Best Builds
Full Healer Support Build
| Best Weapon | ||
|---|---|---|
| Alt. Weapons | ||
| Sonata Effect |
5-piece |
|
| Cost Pattern | 4 3 3 1 1 | |
| Main Echo |
|
|
Buling Best Echo Stats
| Echo Main Stats Priority | ||
|---|---|---|
| 4 COST | 3 COST | 1 COST |
| Healing Bonus or ATK% | Energy Regen | ATK% |
| Echo Substats Tuning Priority | ||
|
1. Energy Regen ★★★ 2. ATK% ★★ 3. Flat ATK ★ | ||
Buling is best built as a traditional support with Rejuvenating Glow, as her kit primarily revolves around healing and supporting rather than dealing damage on her own. Prioritize getting Energy Regen first for more consistent rotations, then followed by ATK, as her heals scale off it.
For main stats, it's generally more recommended to get two 4-COST Healing Bonus pieces, as it greatly improves her healing capabilities, though you can replace it with ATK if she's lacking in the stat.
Lvl. 90 Recommended Stats
| Attribute | Recommended Numbers |
|---|---|
| Energy Regen | 150% |
| ATK | >1800 |
You mostly want to achieve these stats for Buling to perform quite well, which is quite achievable even with 4-star weapons. That said, focus on reaching the recommended Energy Regen first, then just roll for more ATK afterwards.
Buling Best Echo Sets
Optimal Main Echo
| Main Echo | Explanation |
|---|---|
|
|
・Best Main Echo for Buling. ・Provides Energy Regen for easier rotations. ・Buffs allies with additional ATK%. ・Deals consecutive attacks that scale off HP. ・Summon-type Echo, so it doesn't affect combos. |
|
|
・Second best option for Buling, especially if used with the Moonlit Clouds set. ・Provides extra Resonance Energy for improved rotations. ・Increases the damage dealt by the next Resonator. ・Transform-type Echo, so it will have to be weaved into your combos. |
|
|
・Early game option for Buling. ・Gives DMG Reduction to Buling and a DMG Boost to allies with the shield. ・Deals damage based on Buling's DEF stat. ・Other options are still better, but you can use this in Huanglong. |
Buling Best Sonata Effects
| Echo Set | Rating |
|---|---|
|
(5-pc) |
★★★ - Best Buling is best run as a standard healer support unit with the Rejuvenating Glow set. Her healing greatly improves with this set and her DMG amplification via her Outro synergizes with the ATK bonus provided by the 5-pc set effect. Recommended Main Echo: |
|
(5-pc) |
★★☆ - 2nd Best Moonlit Clouds is a decent alternative since it provides Energy Regen and increases the ATK of the next Resonator. The only downside to this is that the ATK buff only affects one party member. Recommended Main Echo: |
List of All Echoes and Sonata Effects
Buling Best Weapons
Best Weapons for Buling Ranked
| Weapon | Skill | |
|---|---|---|
| 1 |
|
Astral Evolvement Increase HP by 12%. Restore 8 Concerto Energy when casting Resonance Liberation. This effect can be triggered once every 20s. When casting Resonance Skill that heals, increase nearby party members' ATK by 14% for 30s. Effects of the same name cannot be stacked. |
| 2 |
|
Ceaseless Aria When Resonance Skill is cast, restore 8 Concerto Energy. This effect can be triggered 1 time(s) every 20s. |
| 3 |
|
Stormy Resolution Increases Energy Regen by 12.8%. When dealing Basic Attack DMG, increases Basic Attack DMG Bonus by 3.2%, stacking up to 5 time(s). This effect lasts for 8s and can be triggered 1 time(s) every 0.5s. |
| 4 |
|
Pole of the Celestial Dome Casting Resonance Liberation increases the Resonator's Healing Bonus by 16% for 15s. |
| 5 |
|
Dawnbringer When Resonance Skill is cast, if the Resonator's HP is below 60%, heals them by 5% of their Max HP. This effect can be triggered 1 times(s) every 8s; if the Resonator's HP is above 60%, increases ATK by 12%, lasting for 10s. |
| 6 |
|
Crusade When Resonance Skill is cast, restores 8 Resonance Energy. This effect can be triggered 1 time(s) every 20s. |
Buling Best Weapon Explained
Played as the typical support, Buling's best weapon is Stellar Symphony. While Buling cannot activate its team-wide ATK buffs, she still performs better with it due to it providing higher overall stats that Buling needs for her healing and rotations.
Alternatively, Variation is a more cost-effective option that plays out the same with less strict conditions. You can also use Cosmic Ripples, as it gives you a lot of ATK and some Energy Regen with its weapon skill.
Buling Free-to-Play (F2P) Weapon
| Weapon | Skill |
|---|---|
|
|
Pole of the Celestial Dome Casting Resonance Liberation increases the Resonator's Healing Bonus by 16% for 15s. |
Call of the Abyss is your best free-to-play option, since it increases her healing potency quite a bit with its skill. Furthermore, it gives Energy Regen and ATK, both being necessary for Buling. To get it, complete the Shadow of the Towers questline in Rinascita.
Shadow of the Towers: Twilight Rise Quest Guide
Buling Best Teams
Carlotta Glacio Team
| Character / Role | Echo Set |
|---|---|
|
(Main DPS) |
|
|
(Sub-DPS) |
|
|
(Support) |
|
One of Buling's two best teams is the Carlotta Glacio team, as she works alongside Zhezhi to essentially funnel Resonance Skill Buffs and DMG Amplification to Carlotta.
Zhezhi provides Glacio buffs on top of that and also deals decent damage with her Coordinated Attacks. As for Buling, she provides healing multiple times with her skills and applies Electro Flare via her Forte and Inherent Skill for continuous damage.
General Rotation
| 1 | Initiate with Carlotta and immediately use two instances of her Resonance Skill to charge her Forte Gauge. This should be back up once other Resonators are done with their on-field combos. |
|---|---|
| 2 | Switch to Buling and do her Mountain Over Thunder combo via 4 Basic Attacks and a Heavy Attack to generate Minor Yang. |
| 3 | Then, do her Twin Thunders combo by casting her Resonance Skill and a Basic Attack to generate Minor Yin. |
| 4 | With both Minor Yin and Yang available, perform Resonance Liberation and switch to Zhezhi with her Outro. |
| 5 | As Zhezhi, build up her Forte gauge with attacks, then follow it up with her Resonance Skill and a Heavy Attack. |
| 6 | Next, cast the three instances of her empowered Resonance Skills and continue with her Liberation. |
| 7 | Once done, use her Echo Skill and switch back to Carlotta with her Outro. |
| 8 | With Carlotta once again on-field, utilize her Resonance Skills once again and build up her Forte. Once her Forte is full, perform a Heavy Attack to consume it. |
| 9 | Afterwards, perform Liberation and make sure to use all her shots within 10 seconds of casting it. |
| 10 | Repeat until all enemies are defeated. |
Jinhsi Res. Skill Burst Team
| Character / Role | Echo Set |
|---|---|
|
(Main DPS) |
|
|
(Sub-DPS) |
|
|
(Support) |
|
The second team that Buling works best in is with Jinhsi and Zhezhi. Jinhsi excels as a DPS with her burst damage as long as she gets the necessary stacks for her Incandescence Forte, which Zhezhi can maximize with her Coordinated Attacks.
Both Zhezhi and Buling provide Resonance Skill DMG buffs, which Jinhsi mainly scales off of. For Zhezhi, she amplifies it via her Outro. On the other hand, Buling gives it with her Forte-enhanced Liberation, on top of her healing capabilities and a team-wide general DMG Amplification upon exiting the field.
General Rotation
| 1 | Start combat with Buling and do 4 Basic Attacks into a Heavy Attack to perform Mountain over Thunder and generate Minor Yang. |
|---|---|
| 2 | Then, press Resonance Skill and immediately follow it up with a Basic Attack. Once you have two Thunders, press Heavy Attack to perform Twin Thunders and create Minor Yin. |
| 3 | With both Minor Yin and Yang present, press Resonance Liberation to deploy the Five Thunders Spell Array and switch to Jinhsi via her Outro. |
| 4 | As Jinhsi, use Resonance Skill, Overflowing Radiance, and follow it up with another Resonance Skill. Continue this with Basic Attacks and cast a third Resonance Skill once available. You can then switch out to Zhezhi to generate stacks for her. |
| 5 | With Zhezhi, do three Basic Attacks, then use her Resonance Skill and follow this up with a Heavy Attack. |
| 6 | Use three instances of her empowered Resonance Skill and perform her Liberation immediately afterwards. |
| 7 | Lastly, use her Echo Skill and switch back to Jinhsi with her Outro. |
| 8 | As Jinhsi again, continue building up her Forte Circuit with her attacks. Use her Liberation, followed by her Resonance Skill, Illuminous Epiphany to burst down enemies. |
| 9 | Switch back to Buling and repeat until all enemies are defeated. |
Buling Flex Support Team
| Main DPS | Sub-DPS | Support |
|---|---|---|
| Any Main DPS | Any Sub-DPS |
|
Buling can fit into any team as a general healer support, as she provides continuous damage with Electro Flare and gives a team-wide DMG amplification with her Outro. That said, she performs the best in Resonance Skill DMG teams since her Liberation is well-catered to buffing the damage type.
It is worth mentioning that Buling performs excellently with the Rejuvenating Glow set, which provides multiple general buffs to the entire team. She can essentially fit into any team that benefits from ATK buffs with this set.
How to Play Buling
| Buling Gameplay Guide |
|---|
|
|
Buling Gameplay Loop Summary
You can perform any Trigram Combination, but we recommended the fastest sequence available for this summary!
| ① | Initiate combat with Buling and perform four Basic Attacks followed by a Heavy Attack to generate a Thunder over Mountain trigram sequence. ▼ Trigram Combos |
|---|---|
| ② | Next, cast Resonance Skill and follow it up with a Basic Attack immediately. Then, do a Heavy Attack to generate a Twin Thunders trigram sequence. |
| ③ | Once you performed both sequences, your Forte will be filled by Minor Yin and Yang which empowers your next Liberation. |
| ④ | Cast Buling's Resonance Liberation to deploy the Five Thunders Spell Array which inflicts 2 Electro Flare stacks every 2s and provides a Resonance Skill DMG to other Resonators. Five Thunders Spell Array: Gives an increasing Res. Skill DMG Bonus per Intro performed. |
| ⑤ | Lastly, perform Buling's Outro and switch to the next Resonator to provide them with a general DMG amplification. |
Generate Trigrams with Attacks
| Trigram Type | Action Done |
|---|---|
 Trigram - Mountain |
・Basic Attack Stage 2 |
 Trigram - Thunder |
・Basic Attack Stage 4 ・Mid-air Attack ・Resonance Skill |
Buling's main playstyle is to generate Trigrams with her attacks and convert them into either damage or healing. Use her different attacks and skills to gain either the Trigram - Mountain or Thunder. Both are necessary to perform unique heavy attacks that affect her team differently.
Cast Special Heavy Attacks with Trigram Combos
| Heavy Attack | Effect |
|---|---|
| Her strongest Heavy Attack that deals Electro DMG. |
|
| Deals some Electro DMG and reduces an enemy's Vibration Strength. |
|
| Heals all Resonators in the team instantly. |
|
| Heals all Resonators periodically, once per second for 8s. |
When Buling has at least two Trigrams, she can perform a Special Heavy Attack. Each special Heavy Attack affects her enemies or teammates differently, so make sure to consider which one to use based on the situation!
Trigram Combinations are also important to build up her Forte bar. Two different trigram symbols generate her Minor Yang Forte, while two same trigram symbols will create Minor Yin.
Do Not Use Heavy Attack Without Trigrams
| Ghost Gate Omen (Less than 2 Trigrams) |
If Buling performs a Heavy Attack without a complete Trigram sequence, she shocks herself. This causes her to lose 20% HP and remove all Trigrams she generated. Do note that she cannot die from this effect alone.
Group Enemies with Resonance Skill
Buling's Resonance Skill is a great utility tool to pull and group enemies together. This is great when dealing with multiple smaller enemies, especially in endgame content like Whimpering Wastes.
Whimpering Wastes (WhiWa) Guide
Empower Resonance Liberation with Forte
Once Buling generates both the Minor Yin and Yang seen in her Forte bar, you can perform an empowered version of her Resonance Liberation called Flashing Thunder Spell - Harmony. This deals stronger damage than the base version and generates the Five Thunders Spell Array.
Non-Forte Liberation Only Deals Damage
If you don't have the Minor Yin and Yang completed, Buling will only deal damage with her Liberation and will not deploy the Spell Array.
Deploy the Five Thunders Spell Array
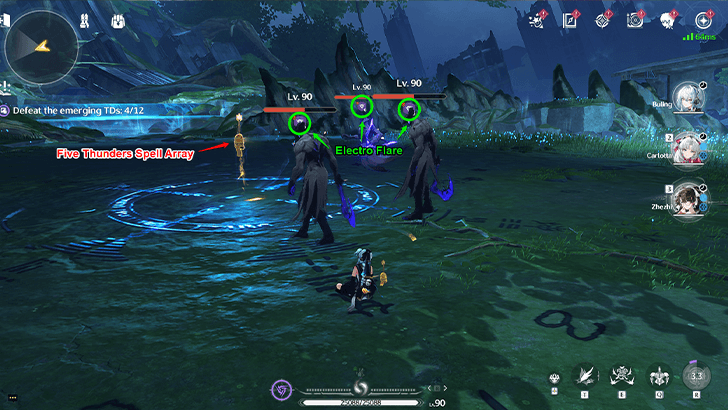
| Spell Array Levels | Effects |
|---|---|
| Thunder Spell - Primordial Qi Base Form |
Inflicts 2 stacks of Electro Flare every 2 seconds for 24s. (Applies to All Levels) |
| Thunder Spell - Yin and Yang One Intro Performed |
Gives 10% Resonance Skill DMG Bonus to all Resonators. |
| Thunder Spell - Heaven, Earth, Mind Two Intros Performed |
Gives 25% Resonance Skill DMG Bonus to all Resonators. |
The Five Thunders Spell Array is a deployable circle on the field that inflicts Electro Flare on enemies and provides a Resonance Skill DMG Bonus to other Resonators. This, however, is quite similar to Shorekeeper's Stellarealm that requires multiple Intro Skills to activate its full effects.
Ensure to perform Intro Skills per Resonator to maximize Buling's Resonance Skill DMG buffs!
Provide DMG Amplification with Outro Skill
| Outro Skill | ・Heals allies periodically every second for 16s, amounting to 18% of her ATK. ・15% DMG Amplification to all Resonators for 30s. |
|---|
Make sure to utilize Buling's Outro Skill, as it gives the entire team periodic healing and a general DMG amplification!
Buling Recommended Combos
Buling Quick General Combo
| Combo |
|---|
| BA (x4) → HA → Res. Skill → BA → HA → Res. Liberation → Outro |
Buling's general rotation of her skills follows the Mountain Over Thunder and Twin Thunders Trigram sequences. Do a full basic attack string and a Heavy Attack to complete Minor Yang, and Resonance Skill with a Basic Attack to create Minor Yin.
Once both Minor Yin and Yang are present, you can use Resonance Liberation to deal Electro DMG and deploy her Spell Array before exiting the field via her Outro.
Buling Trigram Combos
Here are all the ideal combos for generating the different trigram combinations for Buling.
Mountain Over Thunder Combo
| Combo |
|---|
| BA (x4) → HA |
The Mountain over Thunder combo is her standard Trigram sequence and is easily done by completing her full Attack String and then following it up with a Heavy Attack. This Special Heavy Attack deals the most damage among the four.
Thunder Over Mountain Combo
| Combo |
|---|
| Jump → BA (Mid-Air) → BA (x2) → HA Res. Skill → Dodge → BA (x2) → HA |
To have Thunder first, jump and perform a Mid-air Attack. Then, do two Basic Attacks to generate Trigram - Mountain and follow it up with a Heavy Attack. This combo is great for reducing the Vibration Strength of enemies.
Alternatively, you can use Buling's Resonance Skill, followed by a Dodge Cancel into two Basic Attacks to get the Trigram Sequence.
Twin Thunders Combo
| Combo |
|---|
| Res. Skill → BA → HA |
The best way to perform the Twin Thunders combo is to use her Resonance Skill followed instantly by her Basic Attack Stage 2. This leads to her special Heavy Attack giving a periodic heal to her teammates.
Twin Mountains Combo
| Combo |
|---|
| BA (x2) → Dodge → BA (x2) → HA |
The Twin Mountains combo requires you to cancel her attack string with a dodge to generate two Trigram - Mountains. Upon using this combo, the special Heavy Attack she performs heals all Resonators instantly.
Buling Ascension and Forte Materials
Buling Ascension Materials
Character Ascension Materials
| How to Get | Materials |
|---|---|
| Normal Enemies | |
| World Boss | |
| Overworld Material |
|
| Currency |
|
Forte Materials
| How to Get | Materials |
|---|---|
| Normal Enemies | |
| Forgery Challenge |
|
| Weekly Boss | |
| Currency |
|
Buling Ascension and Forte Materials
Ascension Materials Per Rank
| Character Ascension Materials | |
|---|---|
| Rank 1 20 ➔ 40 |
|
| Rank 2 40 ➔ 50 |
|
| Rank 3 50 ➔ 60 |
|
| Rank 4 60 ➔ 70 |
|
| Rank 5 70 ➔ 80 |
|
| Rank 6 80 ➔ 90 |
|
Total Forte Materials
| Total Forte Materials | |
|---|---|
| Main Nodes (Total) Lv. 1 ➔ 10 |
|
| Stat Bonus 1 (Total) |
|
| Stat Bonus 2 (Total) |
|
| Inherent Skill 1 |
|
| Inherent Skill 2 |
|
| Level Upgrade | Upgrade Materials |
|---|---|
| 1 ➔ 2 | |
| 2 ➔ 3 | |
| 3 ➔ 4 | |
| 4 ➔ 5 | |
| 5 ➔ 6 | |
| 6 ➔ 7 | |
| 7 ➔ 8 | |
| 8 ➔ 9 | |
| 9 ➔ 10 | |
Buling Skill Priority and Forte List
| Skill | Priority | Explanation |
|---|---|---|
| Normal Attack | ★★★★★ | Buling's kit mainly revolves around her Basic Attacks. Most of her healing comes from this skill, so upgrade this first! |
| Resonance Skill | ★★☆☆☆ | Her Resonance Skill isn't that big of a priority, as it's more of a utility tool to group enemies together. It doesn't provide much damage, so you can focus on other skills first. |
| Forte Circuit | ★★★★★ | The bulk of her damage comes from this skill, so we suggest upgrading this first alongside her Normal Attacks. Note that her enhanced Liberation, Flashing Thunder Spell - Harmony, scales off this skill and not her Liberation. |
| Resonance Liberation | ★☆☆☆☆ | Buling's Liberation is negligible as a skill, since most of her rotations make use of the Forte-enhanced Flashing Thunder Spell. You'll almost never use this ability, so upgrading this is useless. |
| Intro Skill | ★★★☆☆☆ | Some of Buling's healing comes from her Intro Skill, so we suggest to upgrade it when you can! That said, prioritize her primary skills first. |
Focus on upgrading Buling's Normal Attacks and Forte Circuit first, since a majority of her kit revolves around those two skills. Afterwards, put some points into her Intro Skill for damage and healing. Lastly, upgrade her Resonance Skill once her other skills are maxed out.
Normal Attack
| NATK | SKILL | FORTE | INHE |
| LIBE | INTRO | OUTRO | TUNE |
| Hexagram Calls, Lightning Falls |
|---|
|
Perform up to 4 consecutive attacks, dealing Electro DMG.
Heavy Attack - Mountain Over Thunder: Hold Normal Attack to consume the highlighted Trigram - Mountain and Trigram - Thunder from left to right and cast Heavy Attack - Mountain Over Thunder, dealing Electro DMG. Heavy Attack - Thunder Over Mountain: Hold Normal Attack to consume the highlighted Trigram - Thunder and Trigram - Mountain from left to right and cast Heavy Attack - Thunder Over Mountain, dealing a small amount of Electro DMG and additionally reducing the target's Vibration Strength. Heavy Attack - Twin Mountains: Hold Normal Attack to consume the highlighted 2 Trigrams - Mountain from left to right and cast Heavy Attack - Twin Mountains, healing all nearby Resonators in the team. Heavy Attack - Twin Thunders: Hold Normal Attack to consume the highlighted 2 Trigrams - Thunder from left to right and cast Heavy Attack - Twin Thunders, healing all nearby Resonators in the team once per second for 8s. Heavy Attack - Ghost Gate Omen: When holding Normal Attack with fewer than 2 Trigrams, Buling fails the divination, becoming temporarily immobilized and losing all Trigrams and 20% of her current HP. This effect will not consume HP if Buling's current HP is below 1%. Mid-air Attack: Consume STA to perform Mid-air Attack, dealing Electro DMG. Dodge Counter: Press Normal Attack right after a successful Dodge to perform Basic Attack Stage 3, dealing Electro DMG. - After performing Dodge Counter, press Normal Attack to perform Basic Attack Stage 4. Trigram: Buling can hold up to 4 Trigrams. When Trigrams reach the max number, gaining new Trigrams moves all Trigrams 1 slot to the left, and the original leftmost Trigram will be removed. - Trigram - Mountain is obtained when Basic Attack Stage 2 deals damage. - Trigram - Thunder is obtained when Basic Attack Stage 4 or Mid-air Attack deals damage. - Trigram - Thunder is obtained when casting Resonance Skill - In Shadow Thunder Stirs. Attribute Bonuses: 1. Healing Bonus +1.80% 2. Healing Bonus +4.20% |
| Skill Detail | Effect (Lvl 1) |
|---|---|
| Stage 1 DMG | 10.43%*2 |
| Stage 2 DMG | 16.83%*2 |
| Stage 3 DMG | 11.83%*2 |
| Stage 4 DMG | 47.10% |
| Mid-air Attack DMG | 37.20% |
| Dodge Counter DMG | 11.83%*2 |
| Heavy Attack - Mountain Over Thunder DMG | 90.00% |
| Heavy Attack - Thunder Over Mountain DMG | 45.00% |
| Heavy Attack - Twin Mountains Healing | 360+68.00% ATK |
| Heavy Attack - Twin Thunders Healing | 85+9.20% ATK |
| Mid-air Attack STA Cost | 30 |
| Heavy Attack - Mountain Over Thunder STA Cost | 20 |
| Heavy Attack - Thunder Over Mountain STA Cost | 20 |
| Heavy Attack - Twin Mountains STA Cost | 20 |
| Heavy Attack - Twin Thunders STA Cost | 20 |
| Heavy Attack - Ghost Gate Omen STA Cost | 20 |
| Heavy Attack - Mountain Over Thunder Concerto Regen | 15 |
| Heavy Attack - Thunder Over Mountain Concerto Regen | 15 |
| Heavy Attack - Twin Mountains Concerto Regen | 15 |
| Heavy Attack - Twin Thunders Concerto Regen | 15 |
Resonance Skill
| NATK | SKILL | FORTE | INHE |
| LIBE | INTRO | OUTRO | TUNE |
| In Shadow Thunder Stirs |
|---|
|
Attack the target, dealing Electro DMG and continuously pulling in nearby targets. - Right after casting Resonance Skill, press Normal Attack to perform Basic Attack Stage 4. Attribute Bonuses: 1. ATK +1.80% 2. ATK +4.20% |
| Skill Detail | Effect (Lvl 1) |
|---|---|
| Thunder Talisman DMG | 29.37% |
| Pull-in Effect Continuous DMG | 2.94%*10 |
| Cooldown | 15s |
| Concerto Regen | 23 |
Forte Circuit
| NATK | SKILL | FORTE | INHE |
| LIBE | INTRO | OUTRO | TUNE |
| Thunder Begets Life |
|---|
|
Yin-Yang Balance: When Buling obtains Minor Yin and Minor Yang, she enters the Yin-Yang Balance state, replacing her Resonance Liberation - Flashing Thunder Spell with Resonance Liberation - Flashing Thunder Spell: Harmony. Flashing Thunder Spell - Harmony: Attack the target, dealing Electro DMG and generating a Five Thunders Spell Array at the target area. The array deals Electro DMG and inflicts 2 stacks of Electro Flare on all targets within it every 2s, lasting for 24s. When Five Thunders Spell Array is active, all Resonators in the team enter the Thunder Spell - Primordial Qi state. - While in the Thunder Spell - Primordial Qi state, when any Resonator in the team casts Intro Skill, Thunder Spell - Primordial Qi becomes Thunder Spell - Yin and Yang. - Thunder Spell - Yin and Yang grants 10% Resonance Skill DMG Bonus to all active Resonators in the team. When any Resonator in the team casts Intro Skill during this state, Thunder Spell - Yin and Yang becomes Thunder Spell - Heaven, Earth, Mind. - Thunder Spell - Heaven, Earth, Mind grants 25% Resonance Skill DMG Bonus to all active Resonators in the team. Minor Yang and Minor Yin: Minor Yang is obtained after casting Heavy Attack - Mountain Over Thunder or Heavy Attack - Thunder Over Mountain. - Minor Yin is obtained after casting Heavy Attack - Twin Mountains or Heavy Attack - Twin Thunders. |
| Skill Detail | Effect (Lvl 1) |
|---|---|
| Flashing Thunder Spell - Harmony DMG | 270.00% |
| Five Thunders Spell Array Continuous DMG | 10.00% |
Inherent Skills
| NATK | SKILL | FORTE | INHE |
| LIBE | INTRO | OUTRO | TUNE |
| Inherent Skill 1: Time Arrives, Evil Declines |
|---|
| Buling gains 25% Healing Bonus when restoring HP for Resonators with less than 50% HP. |
| Inherent Skill 2: Earthly Immortal is Here! |
|---|
| Targets damaged by Intro Skill – Summon and Smite obtain 4 stacks of Electro Flare. This effect is triggered once every 10s. |
Resonance Liberation
| NATK | SKILL | FORTE | INHE |
| LIBE | INTRO | OUTRO | TUNE |
| Flashing Thunder Spell |
|---|
|
Attack the target, dealing Electro DMG.
Attribute Bonuses: 1. ATK +1.80% 2. ATK +4.20% |
| Skill Detail | Effect (Lvl 1) |
|---|---|
| Flashing Thunder Spell DMG | 180.00% |
| Cooldown | 24s |
| Resonance Cost | 150 |
| Concerto Regen | 20 |
Intro Skill
| NATK | SKILL | FORTE | INHE |
| LIBE | INTRO | OUTRO | TUNE |
| Summon and Smite |
|---|
|
Attack the target, dealing Electro DMG and healing all nearby Resonators in the team.
Attribute Bonuses: 1. Healing Bonus +1.80% 2. Healing Bonus +4.20% |
| Skill Detail | Effect (Lvl 1) |
|---|---|
| Skill DMG | 65.94% |
| Skill Healing | 350+40.00% ATK |
| Concerto Regen | 10 |
Outro Skill
| NATK | SKILL | FORTE | INHE |
| LIBE | INTRO | OUTRO | TUNE |
| Exorcism Spell |
|---|
| Heal the active Resonator in the team by 18% of Buling's ATK per second for 16s. All nearby Resonators in the team have their DMG Amplified by 15% for 30s. |
Tune Break
| NATK | SKILL | FORTE | INHE |
| LIBE | INTRO | OUTRO | TUNE |
| Tune Break: Rectifier |
|---|
| When the target's Off-Tune Level is full, the Resonator may cast Tune Break on the target. |
Buling Resonance Chain
Recommended Sequence Nodes
| Why We Recommend It | |
|---|---|
| S1 | ★★★☆☆ - Good Buling's S1 gives a Crit. buff to her Forte-enhanced Liberation damage, making it quite good. Since she isn't necessarily building CRIT on her stats, she benefits quite a bit with the extra potential damage it gives. |
| S2 | ★★★★☆ - Great This is a great upgrade for Buling, as it essentially improves her Liberation's uptime to be available every rotation. |
| S3 | ★★★☆☆ - Good A nice-to-have for the team, as it gives a last stand for DPS Resonators in case they take a lot of damage against enemies. |
| S4 | ★★★☆☆ - Good Her 4th node increases her healing's potency, making team sustain a lot better in general. |
| S5 | ★★★★★ - Amazing This drastically increases Buling's Electro Flare application, allowing her to trigger Electro Rage a lot more consistently. |
| S6 | ★★★★★ - Amazing Buling's Capstone node essentially doubles her Resonance Skill buff, allowing other Resonators to gain a whopping 50% Resonance Skill DMG buff! |
All Sequence Node Effects
| S1 | Exorcist Gadgets, Lend Me Your Power The Crit. Rate of Resonance Liberation - Flashing Thunder Spell: Harmony is increased by 20% upon dealing damage. |
|---|---|
| S2 | Talisman Burns, Spirits Turn Buling restores 25 points of Resonance Energy when she enters the Yin-Yang Balance state. This effect is triggered once every 24s. |
| S3 | Summoner of Spirits, Seeker of Fate While Five Thunders Spell Array lasts, whenever the HP of Resonators in the team drops below 50%, immediately restore their HP by 350+150% of Buling's ATK. This effect can be triggered once every 24s. |
| S4 | Wanderer of Solaris, Blessed by Fortune Buling gains 20% Healing Bonus. |
| S5 | Forum Ban? New Account! Five Thunders Spell Array instantly inflicts another 6 stacks of Electro Flare on all targets within its range upon generation. |
| S6 | "Almighty Forum Lord of Thunder Spell" The Thunder Spell - Heaven, Earth, Mind state now grants 50% Resonance Skill DMG Bonus to the active Resonator in the team. |
How to Get Buling
Currently a Featured 4-Star Resonator
| Limited Banner | |
|---|---|
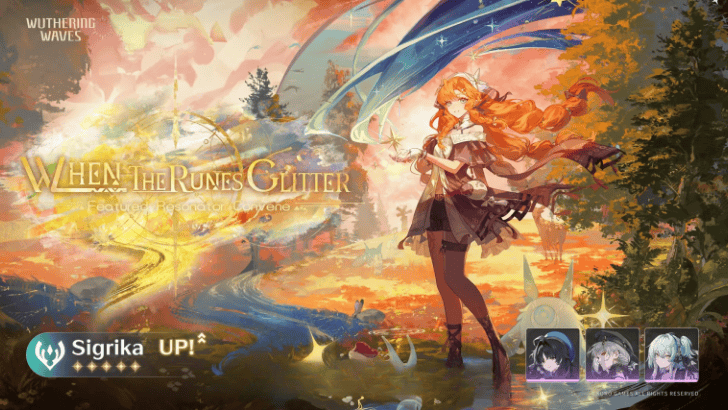 When the Runes Glitter |
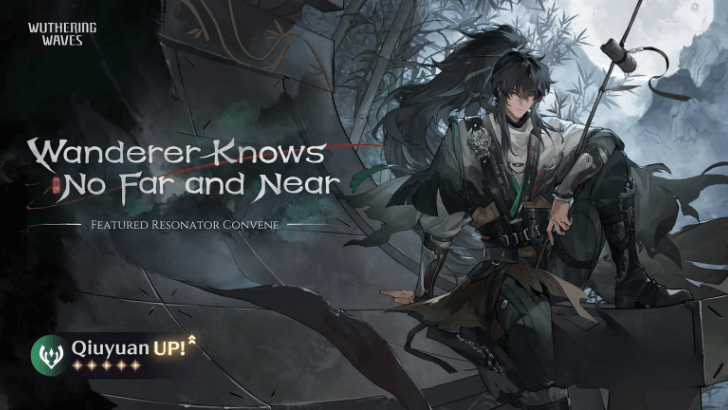 Wanderer Knows No Far and Near |
| Availability |
|---|
| Version 3.2 - Phase 1 March 19, 2026 - April 9, 2026 (Asia) |
Buling is a featured 4-star Resonator in a Convene banner running now. Make sure to pull for a higher chance of getting Buling!
Available in Most Convene Banners
| All Limited and Permanent Banners |
When the Runes Glitter |
 Tidal Chorus |
|---|---|
|
Weapon Permanent Convene |
|
Buling can be summoned from the Convenes shown above!
Buling Voice Actor and Lore
Buling Voice Actors
| Buling Voice Actor List | |
|---|---|
| EN | Elizabeth Chu |
| JP | Sayaka Sembongi |
| CN | Zhang Ye |
| KR | Lee I Ro |
Buling In-Game Lore
| Gender | Female |
|---|---|
| Birthplace | Huanglong |
| Affiliation | Black Shores |
| Basic Info | Taoist of Mengzhou, Black Shores Consultant, feng shui master, and veteran forum dweller. Easygoing and well-traveled, Buling will “bling” whatever you seek. |
Wuthering Waves Related Guides

| List of All Characters | List of Character Builds |
| All Character Ascension Materials | All Wing and Glider Skins |
Characters by Rarity
| Resonator Rarity | |
|---|---|
 5-Star Characters 5-Star Characters |
 4-Star Characters 4-Star Characters |
Characters by Element
| Resonator Elements | ||
|---|---|---|
Characters by Weapon
| Characters by Weapon | |||||
|---|---|---|---|---|---|
Other Lists of Characters
| Other Resonator Lists | ||
|---|---|---|
| Female Characters | Male Characters | |
| Voice Actors | Free Characters | |
| Healers | Factions | |
| Upcoming Characters | ||
All Playable Characters
Upcoming Characters
| Upcoming Characters | ||
|---|---|---|
|
|
|
|
Comment
Upgrading her liberation is pointless. She'll only ever use her forte-enhanced liberation and that damage increases by upgrading her forte, not her liberation
Author

Buling Best Builds and Teams
Premium Articles

Rankings
- We could not find the message board you were looking for.

Gaming News


![Nova Roma Review [Early Access] | Newer, Better, and More Confusing](https://img.game8.co/4455512/2cbf8926e9a1c72a3ff056088f801ef4.png/thumb)


Popular Games

Genshin Impact Walkthrough & Guides Wiki
Umamusume: Pretty Derby Walkthrough & Guides Wiki
Crimson Desert Walkthrough & Guides Wiki
Monster Hunter Stories 3: Twisted Reflection Walkthrough & Guides Wiki
Honkai: Star Rail Walkthrough & Guides Wiki
Pokemon Pokopia Walkthrough & Guides Wiki
The Seven Deadly Sins: Origin Walkthrough & Guides Wiki
Wuthering Waves Walkthrough & Guides Wiki
Zenless Zone Zero Walkthrough & Guides Wiki
Arknights: Endfield Walkthrough & Guides Wiki


Recommended Games
Fire Emblem Heroes (FEH) Walkthrough & Guides Wiki
Diablo 4: Vessel of Hatred Walkthrough & Guides Wiki
Cyberpunk 2077: Ultimate Edition Walkthrough & Guides Wiki
Yu-Gi-Oh! Master Duel Walkthrough & Guides Wiki
Super Smash Bros. Ultimate Walkthrough & Guides Wiki
Pokemon Brilliant Diamond and Shining Pearl (BDSP) Walkthrough & Guides Wiki
Elden Ring Shadow of the Erdtree Walkthrough & Guides Wiki
Monster Hunter World Walkthrough & Guides Wiki
The Legend of Zelda: Tears of the Kingdom Walkthrough & Guides Wiki
Persona 3 Reload Walkthrough & Guides Wiki


All rights reserved
Copyright© 2024-2025 Kuro Games. All Rights Reserved.
The copyrights of videos of games used in our content and other intellectual property rights belong to the provider of the game.
The contents we provide on this site were created personally by members of the Game8 editorial department.
We refuse the right to reuse or repost content taken without our permission such as data or images to other sites.
Sure game8, i waste my corals on 4stars 😒