Camellya Builds and Best Teams
★ Version 3.2 Banners → Livestream Codes
┣ Sigrika → Materials, Weapon, Banner
┣ Qiuyuan → Builds, Materials, Weapon
┗ Phase 2 → Lynae, Zani, Phoebe
★ Tapes of Last Words | Soliskin | 3.1 Trophies
★ Exclusives: Tier Maker | State of the Meta

Camellya is a playable 5-star Havoc Sword character in Wuthering Waves (WuWa). Check out this guide for the best Camellya build, Camellya best teams, echoes, kit (skills), skill priority, and voice actor here!
| Camellya Character Guides | |
|---|---|
|
|
|
List of Contents
Camellya Character Overview
Camellya Information
| Resonator Information | ||
|---|---|---|
 Camellya Camellya |
||
| Rarity | ★★★★★ | |
| Element | ||
| Weapon | ||
| How to Get | Limited Convene | |
| Voice Actor (EN) | Meaghan Martin | |
Camellya Rankings
| Overall | Role | Endgame |
|---|---|---|
|
|
Main DPS:
|
ToA:
WhiWa:
|
| The endgame tier placement considers the buffs present in both endgame modes. This will get updated periodically as buffs change. | ||
Are you Pulling for Camellya?
Camellya Stats
| Lv. 1 | Lv. 90 | |
|---|---|---|
| HP | 826 | 10325 |
| ATK | 29 | 450 |
| DEF | 95 | 1161 |
| Energy Regen | 100% | - |
| Crit. Rate | 5% | - |
| Crit. DMG | 150% | - |
Stat calculations does not include the Attribute Bonuses from Camellya's Forte.
How Strong is Camellya?
| Strengths | |||
|---|---|---|---|
|
• Great On-Field Havoc DMG dealer with access to both consistent and burst damage in her kit. • Has access to self-buffs through Budding and Blossom Mode, which helps increase her damage. • The premier Havoc DMG dealer, capable of both burst damage and consistent auto-attacks that can easily shred Vibration Strength. |
|||
| Weaknesses | |||
|
• No interruption resistance when casting Ephemeral at S0 so enemy attacks can cancel Camellya entering Budding Mode. You need atleast an S1 Camellya to get the interrupt resistance. • Consumes stamina when moving in Blossom Mode, which may pose a problem if you're running out of stamina in your rotations. |
Camellya is a Havoc Main DPS Resonator who uses her Budding Mode and Blossom Mode states to deal massive damage with her Basic Attacks. As a main DPS, she demands time on the field to do her job against enemies.
Camellya Build Guide
Havoc Main DPS Build
| Best Weapon | ||
|---|---|---|
| Alt. Weapons | ||
| Sonata Effect |
5-piece |
|
| Cost Pattern | ④ ③ ③ ① ① | |
| Main Echo |
|
|
Camellya Best Echo Stats
| Echo Main Stats Priority | ||
|---|---|---|
| 4 COST | 3 COST | 1 COST |
| CRIT Rate or CRIT DMG | Havoc DMG | ATK% |
| Echo Substats Tuning Priority | ||
|
1. CRIT Rate ★★★ 2. CRIT DMG ★★★ 3. Basic Attack DMG Bonus ★★ 4. ATK% ★★ 5. Energy Regen % ★ 6. Flat ATK ★ | ||
Camellya is built as a typical DPS, with Havoc Eclipse as her main set so she can maximize its Havoc DMG buffs. You'll want to balance out her Crit. Rate and DMG stats, while still maintaining ATK. Go with the Crit Stat you need more on the 4-Cost Echo, with double Havoc DMG and ATK for the 3 and 1-cost Echoes respectively.
For her substats, Camellya primarily scales off Basic Attack DMG, so we suggest getting as much of it as possible alongside more Crit, ATK, and just enough ER to make her rotations more comfortable.
Camellya Ideal Stats
| Crit. Rate | 70% |
|---|---|
| Crit. DMG | 250% |
| ATK | 2000+ |
| Havoc DMG | 60% |
| Basic Attack DMG | 25% |
| Energy Regen | 115% |
Stats shown are just recommended stats. The higher you can get, the better.
We suggest aiming for these stats while building Camellya. Her damage mainly scales off Basic Attack DMG, so roll for this stat as much as possible.
Camellya Best Echo Sets
Optimal Main Echo
| Main Echo | Explanation |
|---|---|
|
|
・The Nightmare: Crownless is Camellya's best Echo as it passively provides her with a Havoc DMG bonus which helps Camellya's own damage output greatly. ・Use Crownless if you do not have access to Rinascita yet. Skip its lengthy attack animation by jumping after it is summoned. |
|
|
・Normal version of the Crownless. ・You will need to summon this echo mid-combo to get its buff, but it is easier to get since it exists in Huanglong. ・Replace with the Nightmare version after getting to Rinascita. |
|
|
・The next best Echo to use as its skill can deal a large amount of Havoc DMG to enemy targets, though without any additional effects for Camellya. |
|
|
・Only use this if Camellya is using a full Lingering Tunes set. Mech Abomination can boost Camellya's ATK stat by 12% for 15s which Camellya can fully utilize because of her long on-field time. Still, replace this with a Crownless when you inevitably change to the Sun-Sinking Eclipse set. |
|
|
・An early-game option for Camellya. ・It will boost her Havoc DMG with its buffs, but should be replaced with stronger Echoes when they are available. |
Camellya Best Sonata Effects
| Echo Set | Rating |
|---|---|
|
(5-pc) |
★★★ - Best As a Havoc Main DPS, Camellya benefits most from a full Havoc Eclipse set as she is able to constantly fulfill its trigger conditions by nature of being a Basic Attack-oriented Resonator. Crownless is the best echo to use for this set, as it gives straight up Havoc DMG bonus that Camellya will appreciate. Recommended Main Echo: |
|
(5-pc) |
★★☆ - 2nd Best The second best set for Camellya is the Lingering Tunes set as she can full utilize the set's 5-pc effect. Camellya will stay on field for a very long time, so she can easily reach the 6-second on-field requirement of the set for maximum ATK bonus. Recommended Main Echo: |
|
(2-pc) (2-pc) |
★☆☆ - 3rd Best If a full Havoc Eclipse or Lingering Tunes is not yet available, a combination of 2 Havoc Eclipse and 2 Lingering Tunes can be used for Camellya, especially in the early game. Swap to Nightmare: Crownless when able. Recommended Main Echo: |
List of All Echoes and Sonata Effects
Camellya Best Weapons
Best Weapons for Camellya Ranked
| Weapon | Skill | |
|---|---|---|
| 1 |
|
Beyond the Cycle Increase ATK by 12%. When dealing Basic Attack DMG, the weilder gains 10% Basic Attack DMG Bonus for 14s. This effect can be triggered once per second, stacking up to 3 times. When the weilder's Concerto Energy is consumed, gain 40% Basic Attack DMG Bonus for 10s. This effect can be triggered once per second and ends when the weilder is switched off the field. |
| 2 |
|
Stormy Resolution Increases Energy Regen by 12.8%. When Resonance Skill is cast, increases ATK by 6%, stacking up to 2 time(s). This effect lasts for 10s. |
| 3 |
|
Meow! Gain 1 stack of Hiss when dealing damage to the target, with 1 stack generated every 1s. Hiss: each stack increases the wielder's ATK by 2% for 3s, stacking up to 10 times. Switching off the wielder clears all stacks. Gaining 10 stacks increases the wielder's Crit. Rate by 6%. |
| 4 |
|
Crimson Phoenix ATK increased by 12%. The wielder gains 1 stack of Searing Feather upon dealing damage, which can be triggered once every 0.5s, and gains 5 stacks of the same effect upon casting Resonance Skill. Each stack of Searing Feather gives 4% additional Resonance Skill DMG Bonus for up to 14 stacks. After reaching the max stacks, all stacks will be removed in 12s. |
| 5 |
|
Pale Gale When Resonance Skill is cast, increases Basic Attack DMG and Heavy Attack DMG by 20%, stacking up to 1 time(s). This effect lasts for 10s and can be triggered 1 time(s) every 1s. |
Camellya Best Weapon Explained
Camellya's best weapon is undoubtedly Red Spring, as it's essentially tailor-made for her to enhance her Basic Attack DMG. That said, there are decent options you can use for their stats or general buffs. The 5-star options, Emerald of Genesis and Blazing Brilliance are good options to balance her Crit. Ratio and ATK.
As for 4-star Swords, Somnoire Anchor and Lumingloss are considerable options. Camellya can effectively stack Somnoire Anchor's extra ATK and Crit. Rate effect. Meanwhile, Lumingloss provides decent base stats for a 4-star weapon, and Camellya benefits from its Basic Attack DMG buff.
Camellya Best Free-to-Play (F2P) Weapon
| Weapon | Skill |
|---|---|
|
|
Base ATK: 462 ATK +18.20% Meow!: Gain 1 stack of Hiss when dealing damage to the target, with 1 stack generated every 1s. Hiss: each stack increases the wielder's ATK by 2% for 3s, stacking up to 10 times. Switching off the wielder clears all stacks. Gaining 10 stacks increases the wielder's Crit. Rate by 6%. |
|
|
Base ATK: 412 ATK +30.4% Preordained: Equipped Resonator gains 6 stack(s) of Oath upon entering the battlefield. Each stack icnreases ATK by 2%, up to 6 stacks. This effect can be triggered 1 time(s) every 12s. The equipped Resonator loses 1 stack(s) of Oath every 2s, and gains 6 stack(s) upon defeating an enemy. |
|
|
Base ATK: 412 ATK +30.4% Unyielding: When Intro Skill is cast, increases ATK by 15%, lasting for 15s. |
Somnoire Anchor is Camellya's best free-to-play weapon, thanks to its virtually free 20% ATK bonus. The weapon is obtained from the event Somnium Labyrinth.
While not fully F2P-friendly, 4-star weapons such as Lunar Cutter are still highly recommended. You can also receive a free copy of Commando of Conviction through the Rangers' Series Weapon Supply Chest.
Which Rangers' Series Weapon to Choose from the Supply Chest?
Use Sword of Night for Full F2P
| Weapon | Skill |
|---|---|
|
|
Base ATK: 325 ATK +24.3% Tenacity: When Intro Skill is cast, increases ATK by 8%, lasting for 10s. |
For full F2P, the best Camellya weapon would be the Sword of Night. It will perform significantly worse than other weapons though as it is a 3-Star Weapon.
Camellya Best Teams
Camellya Premium Havoc Team
| Character / Role | Echo Set |
|---|---|
|
(Main DPS) |
|
|
(Sub-DPS) |
|
|
(Support) |
|
| Character | Explanation |
|---|---|
| | Sub-DPS Replacement Sanhua provides really fast Concerto Energy regeneration so her rotations are quick, which is great for a on-field hogger like Camellya. She also buffs Basic Attack DMG, one of the stat that Camellya scale off of. |
| | Sub-DPS Replacement Danjin can provide a Havoc DMG Bonus with her Outro Skill, as well as an ATK Buff at S6. She will need to have a lengthier field time though, so Camellya might not be able to use the support's buffs. |
| | Support Replacement Verina is another premium support that can provide great healing and an All-Type Damage Deepen buff. |
| | Support Replacement Baizhi can slot in as a F2P option to keep the team sustained. |
| | Support Replacement Cantarella can be added into this team as a viable Coordinated Attack support with some healing. You will lose access to better supports in Shorekeeper and Verina, but Cantarella can slot in to buff the Havoc DMG of Roccia for more overall DPS. This won't be better than any of the resonators above, but it's a choice that can be made. |
| | Support Replacement Buling is a decent healer support that can provide buffs and apply Electro Flare off-field. Her fast combos also allow for faster team rotations, making her a viable choice as a support. |
Camellya's premium team will have her serve as the main DPS who takes up most of the field time. Roccia plays as a sub-dps, whose main goal is to give her Basic Attack DMG and Havoc DMG Amplification Outro Skill buff to Camellya, while Shorekeeper provides further buffs and sustain.
General Rotation
| 1 | Begin the battle with Shorekeeper, and go through her rotations to charge up her Resonance Liberation and Concerto Energy. |
|---|---|
| 2 | Once both are charged, use Shorekeeper's Resonance Liberation, then switch to Roccia to trigger the latter's Intro Skill and charge her Imagination. |
| 3 | Use Roccia's optimal combos to do as much damage as possible while charging Concerto Energy to maximum again. |
| 4 | Once Concerto Energy is full, switch to Camellya to give her Basic Attack and Havoc DMG buff from Roccia's Outro Skill. |
| 5 | Using the buffs from Shorekeeper and Roccia, use Camellya's optimal combo until she's exhausted her resources and the buffs wear off. |
| 6 | Swap back to Shorekeeper when Concerto Energy is full to detonate her Resonance Liberation using her Intro Skill. |
| 7 | Rinse and repeat until all enemies have been taken down. |
Camellya Free-To-Play Team
| Character / Role | Echo Set |
|---|---|
|
(Main DPS) |
|
|
(Sub-DPS) |
|
|
(Support) |
|
In this team, Camellya will serve as the main DPS who takes up most of the field time. Sanhua plays as a sub-dps, whose main goal is to give her Basic Attack DMG Amplification Outro Skill buff to Camellya, while Baizhi provides healing and further ATK buffs to the party.
Sanhua is ultimately chosen because she has extremely low field time able to cast her full kit and charge her Concerto Energy in less than 10 seconds. This makes it so that Camellya can still maximize the Baizhi's buffs even with her extremely long on-field time.
General Rotation
| 1 | Begin the battle with Shorekeeper, and go through her rotations to charge up her Resonance Liberation and Concerto Energy. |
|---|---|
| 2 | Once both are charged, use Shorekeeper's Resonance Liberation, then switch to Sanhua to trigger the latter's Intro Skill. |
| 3 | Use Sanhua's optimal combos to do as much damage as possible while charging Concerto Energy to maximum again. |
| 4 | Once Concerto Energy is full, switch to Camellya to give her Basic Attack buff from Sanhua's Outro Skill. |
| 5 | Using the buffs from Shorekeeper and Sanhua, Camellya's optimal combo until she's exhausted her resources and the buffs wear off. |
| 6 | Swap back to Shorekeeper when Concerto Energy is full to detonate her Resonance Liberation using her Intro Skill. |
| 7 | Rinse and repeat until all enemies have been taken down. |
How to Play Camellya
| Camellya Gameplay Guide |
|---|
|
|
Camellya Gameplay Loop Summary
Gameplay footage is sped up to twice the normal speed. This is mainly meant to show how Camellya's gameplay plays out.
| ① | Use Camellya's Resonance Skill to enter Blossom Mode, charging her Concerto Energy in the process. If Intro Skill is triggered, Camellya will consume Crimson Buds even at this mode. |
|---|---|
| ② | Use her BA1-BA2-BA3 (Hold) combo to deal damage and charge her Concerto Energy. |
| ③ | Once the Concerto Energy is full, use Resonance Skill: Ephemeral to enter Budding Mode, refilling the Forte Gauge immediately. |
| ④ | Use her BA1-BA2-BA3 (Hold) combo to attack again while expending the Crimson Buds to deal bigger damage. |
| ⑤ | Once all Crimson Buds are expended, use her Resonance Skill again to exit Budding Mode. By this time, you should have filled up Concerto Energy again. Switch out to the next Resonator in the rotation and trigger their Intro Skill. |
| Note | Use her Resonance Liberation when available for a quick burst of Havoc DMG. |
Camellya's main gameplay loop revolves buffing herself by entering her two modes Budding and Blossom Modes. Blossom Mode is the empowered mode that sees Camellya hanging on vines, while Budding Mode is a more powerful super mode that has higher multipliers and can expend Crimson Buds.
Camellya first uses her Resonance Skill to enter Blossom Mode for stronger versions of her attacks. Note that Blossom Mode drains Stamina and makes her unable to move, so be sure of her position before entering the mode. While in Blossom Mode, Camellya can fill up her Concerto Energy that changes Resonance Skill into the Ephemeral attack.
Using the Ephemeral Attack causes a huge explosion and refills the Crimson Buds*. Attacks while in this mode will expend Crimson Buds but will be more powerful. Once all buds are expended, exit this mode by pressing the Resonance Skill button again.
Max Concerto Energy for Ephemeral
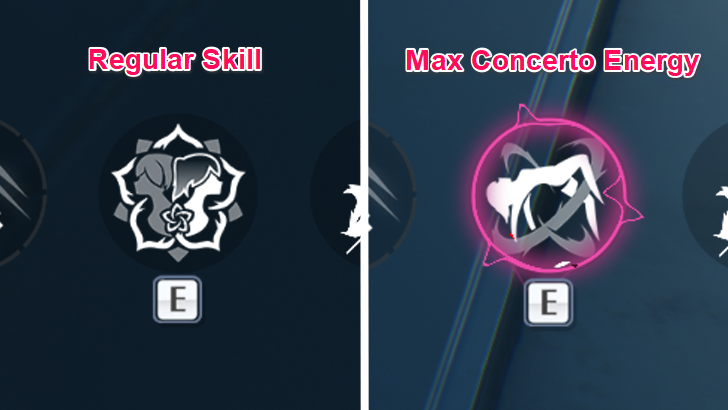
Camellya's Forte Circuit expends her Forte Gauge's Crimson Pistils to gain extra Concerto Energy, and a stack of Crimson Bud. At max Concerto Energy, her Resonance Skill changes to the Ephemeral skill.
Enter Blossom Mode Using Skill
Camellya can enter Blossom Mode after using her regular Resonance Skill while the Concerto Energy is not full. This mode changes her Basic and Heavy Attacks, Dodge Counter, and Resonance Skill into more damaging variations.
Blossom Mode continuously consumes Stamina to suspend Camellya on vines, and she cannot move while she is suspended. Using Resonance Skill again during Blossom Mode will end the state.
Enter Budding Mode When Concerto is Full
When Concerto Energy is full, using her Resonance Skill causes an Ephemeral explosion that also causes Camellya to enter Budding Mode, filling her Forte Gauge back up to max, and increasing her Basic Attack DMG multipliers, with a further increase based on how many Crimson Bud stacks Camellya has.
Note that Budding Mode has lowered Energy Regen Multipliers on Camellya's attacks, meaning that her Resonance Liberation will be available less often. The bulk of her damage will be from her Basic Attacks instead.
Basic Attack Until The Bud Stacks are Gone
Blossom Mode continually consumes Stamina and Crimson Buds found in her Forte Gauge. Maximize the damage that Camellya can do before it runs out with Basic Attack chains, holding the attack button during the 3rd Attack for Blazing Waltz, which does more damage.
Resonance Skill Ends Blossom and Budding Mode
Using Camellya's Resonance Skill while in Blossom or Budding Mode ends the empowered Mode when used. We suggest exiting the mode before Camellya runs out of Stamina in Blossom Mode or after comsuming all Crimson Buds in Budding Mode.
Use Resonance Liberation When Ready
Camellya's Resonance Liberation is a simple damage nuke that can also be performed mid-air for no additional cost. It can be slow to charge due to Budding Mode, but use it whenever it is ready for a burst of Havoc DMG.
The best time to use the Liberation is right after using an echo buff, either before or during Camellya's combos.
Camellya Recommended Combos
Concerto Gauge Gain Combo
| Combo |
|---|
| Intro Skill → (Crownless Echo Skill → Jump Animation Cancel for Crownless) → Resonance Skill (Blossom Mode) → BA1 → BA2 → BA3 (Hold for Blazing Waltz) → BA4 → Repeat Until Max Concerto Energy |
This combo is used to set-up Budding Mode for Camellya. As her Intro Skill grants her a full Forte Gauge, it is important to activate it so that Camellya can charge Concerto Energy quicker by expending her Forte Gauge.
Once she's used her Intro Skill, follow-up with the Crownless Echo to gain a Havoc DMG Bonus. Then, use her Intro Skill to enter Blossom Mode and expend her Forte Gauge until Concerto Energy is maxed out.
If you are using Nightmare: Crownless, there is no need to use the Echo Skill and do the Jump animation at the start of the combo.
Budding Mode DPS Combo
| Combo |
|---|
| Resonance Skill (Ephemeral) → BA1 → BA2 → BA3 (Hold for Blazing Waltz) → BA4 → Repeat BAs Until Low Stamina or Buffs Wear Off → Resonance Skill → Resonance Liberation (If Available) |
This combo is used once Camellya has charged her Concerto Energy, and has access to Ephemeral. Ideally, she starts the combo already in Blossom Mode, so she'll be ready to maximize the buffs from Budding Mode.
Camellya Materials: Ascension and Forte
Camellya Ascension Materials
Character Ascension Materials
| How to Get | Materials |
|---|---|
| Normal Enemies | |
| World Boss | |
| Overworld Material |
|
| Currency |
|
Forte Materials
| How to Get | Materials |
|---|---|
| Normal Enemies | |
| Forgery Challenge | |
| Weekly Boss | |
| Currency |
|
Ascension Materials Per Rank
| Character Ascension Materials | |
|---|---|
| Rank 1 20 ➔ 40 |
|
| Rank 2 40 ➔ 50 |
|
| Rank 3 50 ➔ 60 |
|
| Rank 4 60 ➔ 70 |
|
| Rank 5 70 ➔ 80 |
|
| Rank 6 80 ➔ 90 |
|
Total Forte Materials
| Total Forte Materials | |
|---|---|
| Main Nodes (Total) Lv. 1 ➔ 10 |
|
| Stat Bonus 1 (Total) |
|
| Stat Bonus 2 (Total) |
|
| Inherent Skill 1 |
|
| Inherent Skill 2 |
|
| Level Upgrade | Upgrade Materials |
|---|---|
| 1 ➔ 2 | |
| 2 ➔ 3 | |
| 3 ➔ 4 | |
| 4 ➔ 5 | |
| 5 ➔ 6 | |
| 6 ➔ 7 | |
| 7 ➔ 8 | |
| 8 ➔ 9 | |
| 9 ➔ 10 | |
Camellya Skill Priority and Forte List
Forte Tree Priority
| Skill | Priority | Explanation |
|---|---|---|
| Normal Attack | ★★☆☆☆ | Though Camellya's main damage comes from attacking, most of it will come while in Blossom Mode. The damage scaling while in Blossom Mode is from her Resonance Skill, so Normal Attacks should be deprioritized. |
| Resonance Skill | ★★★★★ | Prioritize levelling Camellya's Resonance Skill since this improves the scalings of her Blossom Mode Basic Attacks, which are her main form of damage. |
| Forte Circuit | ★★★★☆ | Ephemeral's damage multiplier is extremely high and is a great source of burst damage while in Blossom Mode. Make sure to level this one up after Resonance Skill. |
| Resonance Liberation | ★★★☆☆ | Camellya's Resonance Liberation is the most straightforward of them all and can deal a good number of burst damage. Level this one up after her Forte Circuit. |
| Intro Skill | ★☆☆☆☆ | The main purpose of Camellya's Intro Skill is to fill her Forte Gauge only. Its damage is not very high, and should only be levelled if everything else is set. |
The priority skills for Camellya should be her Resonance Skill as her Basic Attacks in Blossom Mode will be her main source of damage.
She has also good burst damage multipliers on her Forte Circuit's Ephemeral attack, as well as her Resonance Liberation, so these should be prioritized after her Resonance Skill.
Normal Attack
| NATK | SKILL | FORTE | INHE |
| LIBE | INTRO | OUTRO | TUNE |
| Burgeoning |
|---|
|
Perform up to 5 consecutive attacks, dealing Havoc DMG. After performing Basic Attack Stage 3 or Heavy Attack Pruning, hold Normal Attack Button to continuously strike the target, dealing HAvoc DMG. Basic Attack Stage 4 is automatically followed by Basic Attack Stage 5. Heavy Attack - Pruning: Consume stamina to attack the target, dealing Havoc DMG. Mid-air Attack: Consume stamina to perform a Plunging Attack, dealing Havoc DMG. Dodge Counter: Use Basic Attack right after a successful Dodge to attack the target, dealing Havoc DMG. Attribute Bonuses: 1. Crit DMG +2.40% 2. Crit DMG +5.60% |
| Skill Detail | Effect (Lvl 1) |
|---|---|
| Stage 1 DMG | 31.45% |
| Stage 2 DMG | 23.38%*2 |
| Stage 3 DMG | 25.50%*3 |
| Stage 4 DMG | 12.42%*20 |
| Stage 5 DMG | 24.23%*4 |
| Heavy Attack DMG | 44.33%*3 |
| Mid-air Attack DMG | 33.00%*2 |
| Dodge Counter DMG | 50.00%*3 |
| Heavy Attack STA Cost | 25 |
| Mid-air Attack STA Cost | 30 |
Resonance Skill
| NATK | SKILL | FORTE | INHE |
| LIBE | INTRO | OUTRO | TUNE |
| Valse of Bloom and Blight |
|---|
|
Crimson Blossom: Attack the target, dealing Havoc DMG (considered Basic Attack DMG), then enter Blossom Mode. This attack can be performed in mid-air. Blossom Mode: - Unable to move while suspended in vines. - Basic Attackand Heavy Attack Pruning are replaced by Basic Attack Vining Waltz, chaining together 4 consecutive attacks, dealing Havoc DMG, considered Basic Attack DMG. - When performing Vining Waltz 3, hold Normal Attack Button to cast Blazing Waltz that deals Havoc DMG before automatically performing Vining Waltz 4. - Dodge Counter is replaced by Dodge Counter Atonement. Normal Attack right after a successful Dodge to attack the target, dealing Havoc DMG, considered Basic Attack DMG. - Resonance Skill is replaced by Resonance Skill Floral Ravage. Casting Floral Ravage deals Havoc DMG considered Basic Attack DMG. - Resonance Skill Floral Ravage can be cast in mid-air. - Blossom Mode ends after casting Resonance Skill Floral Ravage. - Blossom Mode ends after using the Levitator. - Jump is replaced with Basic Attack Vining Ronde. Jump to attack the target at the cost of stamina, dealing Havoc DMG considered as Basic Attack DMG. This ends Blossom Mode. - Using Basic Attack Vining Waltz and Basic Attack Blazing Waltz in mid-air consumes STA. - Casting Resonance Skill Floral Ravage in mid-air doesn't restore STA. - Consume STA continuously to stay suspended on the vines. Attribute Bonuses: 1. ATK +1.80% 2. ATK +4.20% |
| Skill Detail | Effect (Lvl 1) |
|---|---|
| Crimson Blossom DMG | 57.15%*2 |
| Vining Waltz 1 DMG | 48.45% |
| Vining Waltz 2 DMG | 22.95%*2 |
| Vining Waltz 3 DMG | 11.04%*6 |
| Vining Waltz 4 DMG | 34.00%*3 |
| Blazing Waltz DMG | 11.04%*19 |
| Floral Ravage DMG | 26.46%*5 |
| Vining Ronde DMG | 26.64%*3 |
| Atonement DMG | 57.00%*2 |
| Cooldown | 4s |
| Crimson Blossom Concerto Regen | 7 |
| Floral Ravage Concerto Regen | 7 |
| Vining Waltz 1 STA Cost | 5 |
| Vining Waltz 1 STA Cost | 5 |
| Vining Waltz 1 STA Cost | 5 |
| Vining Waltz 1 STA Cost | 5 |
| Blazing Waltz STA Cost | 5 |
| Vining Ronde STA Cost | 5 |
| STA Cost Per Second When Suspended | 5 |
Forte Circuit
| NATK | SKILL | FORTE | INHE |
| LIBE | INTRO | OUTRO | TUNE |
| Vegetative Universe |
|---|
|
Hitting a target with Normal Attack, Basic Attack Vining Waltz, Basic Attack Blazing Waltz, Basic Attack Vining Ronde, Dodge Counter Atonement, Resonance Skill Crimson Blossom, and Resonance Skill Floral Ravage consumes Crimson Pistils. The Energy Regen Multiplier of this attack is increased. Consuming 10 Crimson Pistils recovers 4 Concerto Energy and obtains 1 Crimson Bud. Each bud lasts for 15s, stacking up to 10 times. Forte Circuit: Ephemeral: When Concerto Energy is fully recovered, and Ephemeral is not on Cooldown, Resonance Skill is replaced with Ephemeral. Casting Ephemeral consumes 70 Concerto Energy and deals Havoc DMG to the targets. This damage is considered Basic Attack DMG. Camellya enters Budding Mode after casting Ephemeral. This can be cast in mid-air. Budding Mode: - Sweet Dream: Increase the DMG Multiplier of Normal Attack, Basic Attack Vining Waltz, Basic Attack Blazing Waltz, Basic Attack Vining Ronde, Dodge Counter Atonement, Resonance Skill Crimson Blossom, and Resonance Skill Floral Ravage. - Casting Ephemeral consumes all Crimson Buds. Each Crimson Bud consumed additionally increases the DMG Multiplier of Sweet Dream by 5%, up to 50%. - When in Budding Mode, Camellya cannot gain Crimson Buds. - When in Budding Mode, the Energy Regen Multiplier of Normall Attack, Basic Attack Vining Waltz, Basic Attack Blazing Waltz, Basic Attack Vining Ronde, Dodge Counter Atonement, Resonance Skill Crimson Blossom, and Resonance Skill Floral Ravage is reduced to 0%. - Budding Mode ends when Camellya is switched off the field. - Budding Mode ends when all Crimson Pistils are consumed. Crimson Pistil: Camellya can hold up to 100 Crimson Pistils. - Casting Intro Skill Everblooming recovers 100 Crimson Pistils. - Activating Forte Circuit's Ephemeral recovers 100 Crimson Pistils. |
| Skill Detail | Effect (Lvl 1) |
|---|---|
| Ephemeral DMG | 635.00%% |
| Budding Mode Duration | 15 |
| Ephemeral Cooldown | 25s |
Inherent Skills
| NATK | SKILL | FORTE | INHE |
| LIBE | INTRO | OUTRO | TUNE |
| Inherent Skill 1: Seedbed |
|---|
| Gain 15% Havoc DMG Bonus. Heavy Attack Pruning is now considered Basic Attack DMG. |
| Inherent Skill 2: Epiphyte |
|---|
| Gain 15% Havoc DMG Bonus.Gain increased resistance to interruption when casting Basic Attack, Basic Attack Vining Waltz, and Basic Attack Blazing Waltz. |
Resonance Liberation
| NATK | SKILL | FORTE | INHE |
| LIBE | INTRO | OUTRO | TUNE |
| Fervor Efflorescent |
|---|
|
Attack the target, dealing Havoc DMG. This attack can be performed in mid-air. Attribute Bonuses: 1. ATK +1.80% 2. ATK +4.20% |
| Skill Detail | Effect (Lvl 1) |
|---|---|
| Skill DMG | 605.00% |
| Cooldown | 25s |
| Resonance Cost | 125 |
| Concerto Regen | 20 |
Intro Skill
| NATK | SKILL | FORTE | INHE |
| LIBE | INTRO | OUTRO | TUNE |
| Everblooming |
|---|
|
Attack the target, dealing Havoc DMG.
Attribute Bonuses: 1. Crit DMG +2.40% 2. Crit DMG +5.60% |
| Skill Detail | Effect (Lvl 1) |
|---|---|
| Skill DMG | 100.00% |
| Concerto Regen | 10 |
Outro Skill
| NATK | SKILL | FORTE | INHE |
| LIBE | INTRO | OUTRO | TUNE |
| Twining |
|---|
|
Attack the target, dealing Havoc DMG. After activating the Forte Circuit's Ephemeral, the next Outro Skill Twining deals additional Havoc DMG. |
| Skill Detail | Effect (Lvl 1) |
|---|---|
| Skill DMG | 329.24% |
| Additional Skill DMG | 459.02% |
Tune Break
| NATK | SKILL | FORTE | INHE |
| LIBE | INTRO | OUTRO | TUNE |
| Tune Break: Sword |
|---|
| When the target's Off-Tune Level is full, the Resonator may cast Tune Break on the target. |
Camellya Resonance Chain
Recommended Sequence Nodes
| Why We Recommend It | |
|---|---|
| S1 | ★★★★★ - Amazing Provides interruption resistance when casting Ephemeral so enemies cannot cancel Camellya entering Budding Mode which in turn improves overall comfort when playing. In addition, it also provides a Crit DMG boost which makes balancing her crit stats much easier. |
| S2 | ★★★★☆ - Great The Ephemeral attack of Camellya's Forte Circuit gets an increase to its DMG Multiplier, contributing a little bit more to her damage. |
| S3 | ★★★★★ - Amazing Camellya's third Sequence Node increases her Resonance Liberation's Multiplier slightly, and also provides a boost to her ATK when in Budding Mode. This ATK buff is massive, largely increasing her damage. |
| S4 | ★★★★☆ - Great The 4th node in Camellya's Resonance Chain gives the team a Basic Attack DMG boost when using her Intro Skill, which she can use to further her own DPS. |
| S5 | ★★☆☆☆ - Okay Camellya gains an increase to the damage multipliers of her Intro and Outro Skills, further increasing her damage. |
| S6 | ★★★★★ - Amazing The final Resonance Chain upgrade for Camellya unlocks a second version of Ephemeral, which grants her access to improved multipliers on her attacks after casting it. This node also increases her Forte Circuit's multipliers directly, making it more impactful. |
All Sequence Node Effects
| S1 | Somewhere No One Travelled Casting Intro Skill Everblooming increases Camellya's Crit. DMG by 28% for 18s. This effect can be triggered once every 25s. Immune to interruptions while casting Ephemeral. |
|---|---|
| S2 | Calling Upon the Silent Rose The DMG Multiplier of Resonance Skill Ephemeral is increased by 120%. |
| S3 | A Bud Adorned by Thorns The DMG Multiplier of Resonance Liberation Fervor Efflorescent is increased by 50%. When in Budding Mode, Camellya's ATK is increased by 58%. |
| S4 | Roots Set Deep in Eternity Casting Everblooming gives all team members 25% Basic Attack DMG Bonus for 30s. |
| S5 | Infinity Held in Your Palm The DMG Multipliers of Outro Skill Everblooming is increased by 303% and Intro Skill Twining is increased by 68%. |
| S6 | Bloom For You Thousand Times Over The DMG Multiplier of Forte Circuit's Sweet Dream is additionally increased by 150%. Forte Circuit Perennial: - Within 15s after casting Ephemeral, if Concerto Energy is full and Perennial is not on cooldown, Resonance Skill is replaced with Perennial. - Casting Perennial consumes 50 Concerto Energy and recovers 50 Crimson Pistils, dealing Havoc DMG equal to 100% of Ephemeral DMG, considered Basic Attack DMG. This skill can be cast once every 25s. - Camellya enters Budding Mode after casting Perennial and removes all Crimson Buds. The bonus DMG Multiplier granted by Forte Circuit's Sweet Dream is increased to 250%. - Immune to interruptions when casting Perennial. |
How to Get Camellya
Previously Featured in a Limited Banner
| Limited Banner | |
|---|---|
 End of Lost Trail |
|
| Availability |
|---|
| Version 2.2 - Phase 1 March 27,2025 - April 17, 2025 (Asia) |
Camellya was featured in the Character Event Convene called End of Lost Trail which was available in Version 2.2 from March 27,2025 to April 17, 2025 (UTC-5).
Camellya Voice Actor and Lore
Camellya Voice Actors
| Camellya Voice Actor List | |
|---|---|
| EN | Meaghan Martin |
| JP | Ise Mariya |
| CN | Liu ZhiXiao |
| KR | Yu Hye Ji |
Camellya In-Game Lore
| Gender | Female |
|---|---|
| Birthplace | Unknown |
| Affiliation | Black Shores |
| Basic Info | A Bloom Bearer of the Black Shores, Camellya is free-spirited and dangerously charming. She roams Solaris in search of talent, immersing herself in the present and relishing its pleasures, all while remaining true to herself, unburdened by thoughts of the past or future. |
Wuthering Waves Related Guides

| List of All Characters | List of Character Builds |
| All Character Ascension Materials | All Wing and Glider Skins |
Characters by Rarity
| Resonator Rarity | |
|---|---|
 5-Star Characters 5-Star Characters |
 4-Star Characters 4-Star Characters |
Characters by Element
| Resonator Elements | ||
|---|---|---|
Characters by Weapon
| Characters by Weapon | |||||
|---|---|---|---|---|---|
Other Lists of Characters
| Other Resonator Lists | ||
|---|---|---|
| Female Characters | Male Characters | |
| Voice Actors | Free Characters | |
| Healers | Factions | |
| Upcoming Characters | ||
All Playable Characters
Upcoming Characters
| Upcoming Characters | ||
|---|---|---|
|
|
|
|
Comment
you tell me her premium team support is baizhi ? but for alt you also use baizhi
Author

Camellya Builds and Best Teams
Premium Articles

Rankings

Gaming News


![Monster Hunter Stories 3 Review [First Impressions] | Simply Rejuvenating](https://img.game8.co/4438641/2a31b7702bd70e78ec8efd24661dacda.jpeg/thumb)
Popular Games

Genshin Impact Walkthrough & Guides Wiki
Honkai: Star Rail Walkthrough & Guides Wiki
Umamusume: Pretty Derby Walkthrough & Guides Wiki
Pokemon Pokopia Walkthrough & Guides Wiki
Resident Evil Requiem (RE9) Walkthrough & Guides Wiki
Monster Hunter Wilds Walkthrough & Guides Wiki
Wuthering Waves Walkthrough & Guides Wiki
Arknights: Endfield Walkthrough & Guides Wiki
Pokemon FireRed and LeafGreen (FRLG) Walkthrough & Guides Wiki
Pokemon TCG Pocket (PTCGP) Strategies & Guides Wiki


Recommended Games
Diablo 4: Vessel of Hatred Walkthrough & Guides Wiki
Cyberpunk 2077: Ultimate Edition Walkthrough & Guides Wiki
Fire Emblem Heroes (FEH) Walkthrough & Guides Wiki
Yu-Gi-Oh! Master Duel Walkthrough & Guides Wiki
Super Smash Bros. Ultimate Walkthrough & Guides Wiki
Pokemon Brilliant Diamond and Shining Pearl (BDSP) Walkthrough & Guides Wiki
Elden Ring Shadow of the Erdtree Walkthrough & Guides Wiki
Monster Hunter World Walkthrough & Guides Wiki
The Legend of Zelda: Tears of the Kingdom Walkthrough & Guides Wiki
Persona 3 Reload Walkthrough & Guides Wiki


All rights reserved
Copyright© 2024-2025 Kuro Games. All Rights Reserved.
The copyrights of videos of games used in our content and other intellectual property rights belong to the provider of the game.
The contents we provide on this site were created personally by members of the Game8 editorial department.
We refuse the right to reuse or repost content taken without our permission such as data or images to other sites.
The rotation suggestions given here are absolutely garbage. First of all with her team she should always be doing double intro rotation. Go run a search on this but the short version is that you build her buffer's outro but do not activate it to full, use her healer to outro into her first, let her build at least 7 stacks, then swap to her buffer to activate their outro back into her. Fill up remaining stacks need cast Liberation then Ephemeral. Without 2 intro then just cast Liberation first.