This survey will take about 1 minute.
Your answers will help us to improve our website.
Wuthering Waves (WuWa)
Drill Stage 5 Guide | Lament Recon: Solaris Soldier
★ 3.2 Phase 2 out now! → Best Pull Strategy
┣ Lynae → Builds, Materials, Sig. Weapon
┣ Zani → Builds, Materials, Sig. Weapon
┗ Phoebe → Builds, Materials, Sig. Weapon
★ Upcoming Characters: Hiyuki, Denia
★ Exclusives: Tier Maker | State of the Meta
This is a guide for Drill Stage 5 Nightmare mode in the Lament Recon: Solaris Soldier event for Wuthering Waves 2.7. See the best character and weapons for Drill Stage 5, the best items, and tips on how to clear the stage here!
Drill Stage 5 Best Character
Galbrena is Highly Recommended
|
|
Max HP | ATK |
|---|---|---|
| 90 | 54 | |
| Crit. Rate | Crit. DMG | |
| 20% | 20% | |
| ATK Bonus | Movement Speed | |
| 0% | 210 | |
| Effect | ||
| Cast Ashen Oath Ashen Oath Deal Fusion DMG to surrounding enemies equal to 100% of Galbrena's ATK. Then increase Attack Speed by 30% for 5s. Each damage dealt during this time increases the Weapon's Crit. Rate by 1% for 5s, stacking up to 20 times. , dealing Fusion DMG to surrounding enemies, increasing Galbrena's Crit. Rate and Attack Speed for a short duration.At Resonator Lv. 5: Attack Speed bonus increases to 40%, and the Crit. Rate bonus now stacks up to 30 times. At Resonator Lv. 10: Attack Speed bonus increases to 50%, and the Crit. Rate bonus now stacks up to 40 times. |
||
Galbrena is the primary recommendation for this stage, due to her highly-damaging Isomer Bolt that rips through enemy waves and a new weapon she can synergize with, the Explosive Omen, which leaves AoE traps around the map, exploding mobs and elites alike.
Recommended Character Upgrades
| Character | Stat Upgrade Priority |
|---|---|
|
|
1. All Weapons +ATK/DMG/Crit 2. Max STA and Recovery 3. Movement Speed 4. Pickup Range |
Galbrena's priorities for Character Upgrades will include Weapons DMG/ATK/Crit and Max Stamina and Recovery as she will have to run through the arena to collect coins due to her fast killing speed in later levels.
Movement Speed and Pickup Range can be also chosen but prioritize the first two stats above as they give Galbrena the most bang-for-buck increase with her abilities in this stage.
Drill Stage 5 Best Weapons
Recommended Weapons
| Weapon | Stat Upgrade Priority |
|---|---|
 Isomer Bolt Isomer Bolt Isomer Bolt Base Form:
・Reach Level 1. ・Fire multiple Isomer Bolts in quick succession. Advanced Form: ・Reach Level 3. ・The range and rate of fire of Isomer Bolts are increased. Superior Form: ・Reach Level 7. ・Enjoy overwhelming firepower. The range and rate of fire of Isomer Bolts are further increased. Ultimate I: ・Reach Level 15. ・Obtain and upgrade Weapon: Glittering Ray to Lv. 15. ・Isomer Bolt absorbs Glittering Ray and now periodically launches beams that pierce enemies. Ultimate II: ・Reach Level 15. ・Obtain and upgrade Weapon: Explosive Omen to Lv. 15. ・Isomer Bolt absorbs Explosive Omen and now periodically explodes in target areas, dealing additional AoE DMG. |
1. DMG% (Attack & Crit) 2. DEF Penetration 3. Attack Speed |
 Explosive Omen Explosive Omen Explosive Omen Base Form:
・Reach Level 1. ・Unleash Explosive Omens in all directions. Advanced Form: ・Reach Level 3. ・The number of Explosive Omens is greatly increased. Superior Form: ・Reach Level 7. ・Become a trap master. The range and DMG Multiplier of Explosive Omens are further increased. |
1. DMG% (Attack & Crit) 2. DEF Penetration 3. Attack Speed |
 Sanguine Wheel Sanguine Wheel Sanguine Wheel Base Form:
・Reach Level 1. ・Summon a Sanguine Wheel to continuously attack surrounding enemies. Advanced Form: ・Reach Level 3. ・Summon an additional Sanguine Wheel to attack surrounding enemies. Superior Form: ・Reach Level 7. ・Unleash the primal forces. Summon a total of three Sanguine Wheels to attack surrounding enemies. |
1. DMG% (Attack & Crit) 2. DEF Penetration 3. Attack Speed |
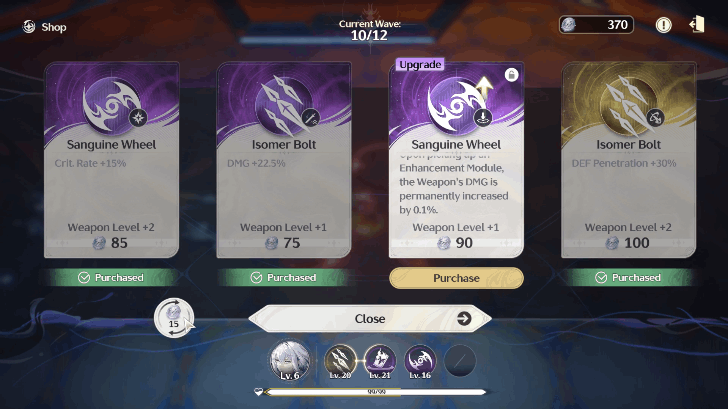
Prioritize leveling Isomer Bolt and Explosive Omen with DMG Multipliers, Crit DMG and DEF Penetration to immediately increase the weapon's firepower and damage, especially against Elites. This setup will reward you throughout the stage, as you simply have to watch enemy waves melt one after another.
Pair this with Sanguine Wheel in later waves with the same stat priority to assist you in dealing with straggling enemies that come too close for comfort.
Best Weapon Combinations and Resonators
Drill Stage 5 Best Items
Recommended Items
| Item | Explanation | |
|---|---|---|
| 1 |
 Glacio Boost Glacio Boost Glacio Boost Effect: Glacio DMG is increased by 50%.
|
Glacio Boost provides an additional 50% DMG Boost to Glacio Abilities, making Isomer Bolt even more powerful. |
| 2 |
 Fusion Boost Fusion Boost Fusion Boost Effect: Fusion DMG is increased by 50%.
|
Fusion Boost provides an additional 50% DMG Boost to Fusion Abilities, making Explosive Omen and Ashen Oath even more powerful. |
| 3 |
 Havoc Boost Havoc Boost Havoc Boost Effect: Havoc DMG is increased by 50%.
|
Havoc Boost provides an additional 50% DMG Boost to Havoc Abilities, making Sanguine Wheel even more powerful. |
| 4 |
 Capital Buffer Capital Buffer Capital Buffer Effect: Permanently gain 60 Shield points.
|
Allows you to be more risky when converging with enemies and collecting coins, as you have an extra 60 Shield to buffer any damage. |
| 5 |
 Crit Boost Crit Boost Crit Boost Effect: Instantly gain a Crit. upgrade card, with the chance of getting Crit. upgrade cards increased by 10%.
|
Gives you a free Crit Card and an increased 10% chance to get Crit Cards after a wave is completed. |
The main items we can recommend for this stage are relevant Elemental Boosts which upgrade the weapons chosen for the round to deal even more damage. You can then either choose Capital Buffer or Crit Boost for a free 60 Shield, allowing you to risk coin collection when enemies are swarming for the former or a free crit card for your weapons on the latter.
Otherwise, we advise prioritizing your Character and Weapons upgrade to get the most out of your Resonator in this stage as they provide better stat upgrades than items.
List of Items | Lament Recon: Solaris Soldier
Drill Stage 5 Tips
| Drill Stage 5 Recommended Tips |
|---|
|
|
Take Out All Chest Mimics You Can at Wave 8
Similar to Stage 3 and Stage 4, you will be introduced to Chest Mimics at Wave 8, moving at the edges of the map. Prioritize them and hunt all mimics you can find to immediately boost your weapons!
After the round, you will be able to see how many upgrades you acquired based on the number of mimics you took down.
Acquire Synergistic Evo with Explosive Omen to Take Out Elites Faster
Level up both Isomer Bolt and Explosive Omen to 15 to get the Synergistic Evolution effect and combine the two, making them even more powerful afterwards. This is crucial especially in later waves, allowing you to take out the Elite Pilgrim's Shell in less than 10 seconds.
Pick DMG and Attack Stats After Each Wave
Despite the multiple upgrades available to you, you will only need the DMG and Attack-related options to your weapons and characters, as they provide the most cost-effective measures at taking down enemy waves.
Other upgrades will be second priority after weapon and character damage as Galbrena's weapons overpower all mobs in this level with minimal impunity.
Use Galbrena's Skill When Converging With Enemies
Galbrena's Ashen Oath is an instant Area-of-Effect attack that doesn't stay in the field for long, and should be used in crucial moments, especially when converging multiple enemies into one position or moving through mobs.
Using the skill during these moments allows you to take out the most enemies with it while also giving you some room to move after engaging.
Sprint Into Coins Especially in Later Waves
Due to how fast mobs die at later stages, you will have to reserve your stamina to run through coins found around the map, make sure to upgrade your Stamina and Collection Range or pick up the Coin Magnet whenever it appears.
Interrupt Dashes by Running on the Opposite Direction
One way to avoid constant dashing is to stop your current inputted direction and press again on the opposing direction you are at, this saves you stamina that you can use for later sprints especially against fast enemies.
Drill Stage 5 Information
Basic Information
| Objectives | Completion Rewards |
|---|---|
| Survive Wave 12 | |
| Drill Details | |
|
-Spawns ranged Common-class Devotee's Flesh more frequently. -Spawns ranged Elite-Class Pilgrim's Shell for the first time. |
|
Wuthering Waves Related Guides

Lament Recon: Solaris Soldier Event Guide
All Stage Guides
| Stage Guides | |||||||||||
|---|---|---|---|---|---|---|---|---|---|---|---|
| Drill Stage 1 | Drill Stage 2 | Drill Stage 3 | |||||||||
| Drill Stage 4 | Drill Stage 5 | Drill Stage 6 | |||||||||
| Drill Stage 7 | Drill Stage 7 (Helltide) | ||||||||||
All Lament Recon: Solar Soldier Guides
| Best Weapons | Talents to Unlock First |
| List of Weapons | List of Items |
Comment
Author

Drill Stage 5 Guide | Lament Recon: Solaris Soldier
Please participate in our site
improvement survey
04/2026
improvement survey
04/2026
Would you assist in
improving Game8's site?
improving Game8's site?

×
We are listening to our users' valuable opinions and discussing how to act on them.
The information collected through this survey will be used for the purpose of improving our services. In addition, the information will only be disclosed a part of a statistic in a format that will not allow identification of personal information.
Begin Survey
Not Now
×
Please rate each item regarding Game8.co's Advertisements.
Amount of Ads
Very Dissatisfied
Somewhat Dissatisfied
Fine
Somewhat Satisfied
Highly Satisfied
Placement of Ads
Timing of Ad Display
Ad Loading Speed
Safeness of Ads
Content of Ads
×
Please rate each item regarding Game8.co's Quality of Articles.
Amount of information
Very Dissatisfied
Somewhat Dissatisfied
Fine
Somewhat Satisfied
Highly Satisfied
Frequency of updates
Speed of new information
Accuracy of articles
Understandibility of articles
Readability of sentences
×
Please rate each item regarding Game8.co's Usability of the Site.
Ease of finding information
Very Dissatisfied
Somewhat Dissatisfied
Fine
Somewhat Satisfied
Highly Satisfied
Loading Speed
Use of Color
Font Size
Visibility of Images
Easy to Understand Layout
×
Please rate each item regarding Game8.co's Message Boards, Comments.
Ease of Writing
Very Dissatisfied
Somewhat Dissatisfied
Fine
Somewhat Satisfied
Highly Satisfied
Readability
Ease in Finding Information
Comment Quality
Comment Quantity
Admin Response
×
Please rate each item regarding Game8.co's Site's new design.
Please rate our site's new design
Very Dissatisfied
Somewhat Dissatisfied
Fine
Somewhat Satisfied
Highly Satisfied
Do you think that the website's design change makes the site easier to use?
Has the new design made it easier for you to find information on the site?
Has the new design improved the overall visual appeal of the site?
How would you rate your overall satisfaction with the new design of the site?
×
How likely are you to recommend Game8 to someone you know?
Very Unlikely
0
1
2
3
4
5
6
7
8
9
10
Very Likely
If you have other opinions regarding potential improvement to the website, please share them with us. We would appreciate your honest opinion.
Note: This is a free response section, so you can proceed without entering anything.
Note: Please be sure not to enter any kind of personal information into your response.
Note: Please be sure not to enter any kind of personal information into your response.
×
Thank You
×
Thank you for participating in our survey! Your answers will help us to improve the quality of our website and services.
We hope you continue to make use of Game8.
We hope you continue to make use of Game8.
Close
Premium Articles

Rankings

Gaming News


![Forza Horizon 6 Review [Preview] | Beautiful Roads With a Whole Lot of Oversteer](https://img.game8.co/4460981/a7254c24945c43fbdf6ad9bea52b5ce9.png/thumb)
Popular Games

Genshin Impact Walkthrough & Guides Wiki
Crimson Desert Walkthrough & Guides Wiki
Umamusume: Pretty Derby Walkthrough & Guides Wiki
Honkai: Star Rail Walkthrough & Guides Wiki
Monster Hunter Stories 3: Twisted Reflection Walkthrough & Guides Wiki
Wuthering Waves Walkthrough & Guides Wiki
The Seven Deadly Sins: Origin Walkthrough & Guides Wiki
Pokemon TCG Pocket (PTCGP) Strategies & Guides Wiki
Pokemon Pokopia Walkthrough & Guides Wiki
Zenless Zone Zero Walkthrough & Guides Wiki


Recommended Games
Monster Hunter World Walkthrough & Guides Wiki
Fire Emblem Heroes (FEH) Walkthrough & Guides Wiki
Pokemon Brilliant Diamond and Shining Pearl (BDSP) Walkthrough & Guides Wiki
Super Smash Bros. Ultimate Walkthrough & Guides Wiki
Diablo 4: Vessel of Hatred Walkthrough & Guides Wiki
Cyberpunk 2077: Ultimate Edition Walkthrough & Guides Wiki
Yu-Gi-Oh! Master Duel Walkthrough & Guides Wiki
Elden Ring Shadow of the Erdtree Walkthrough & Guides Wiki
The Legend of Zelda: Tears of the Kingdom Walkthrough & Guides Wiki
Persona 3 Reload Walkthrough & Guides Wiki


All rights reserved
Copyright© 2024-2025 Kuro Games. All Rights Reserved.
The copyrights of videos of games used in our content and other intellectual property rights belong to the provider of the game.
The contents we provide on this site were created personally by members of the Game8 editorial department.
We refuse the right to reuse or repost content taken without our permission such as data or images to other sites.