This survey will take about 1 minute.
Your answers will help us to improve our website.
Wuthering Waves (WuWa)
Best Weapon Combinations and Resonators | Lament Recon: Solaris Soldier
★ 3.2 Phase 2 out now! → Best Pull Strategy
┣ Lynae → Builds, Materials, Sig. Weapon
┣ Zani → Builds, Materials, Sig. Weapon
┗ Phoebe → Builds, Materials, Sig. Weapon
★ Upcoming Characters: Hiyuki, Denia
★ Exclusives: Tier Maker | State of the Meta
This is a list of the best weapon combinations and Resonators in the Lament Recon: Solaris Soldier event in Wuthering Waves 2.7. See all of the best Resonators, the best weapon combinations, and how to upgrade weapon forms here!
Best Weapon Combinations
| Jump to a Section! | ||
|---|---|---|
| Early Game | Mid Game | Late Game |
Best Early Game Weapon Combinations
| Combo | Explanations | |
|---|---|---|
| 1 |
Isomer Bolt
Isomer Bolt Base Form:
・Reach Level 1. ・Fire multiple Isomer Bolts in quick succession. Advanced Form: ・Reach Level 3. ・The range and rate of fire of Isomer Bolts are increased. Superior Form: ・Reach Level 7. ・Enjoy overwhelming firepower. The range and rate of fire of Isomer Bolts are further increased. Ultimate I: ・Reach Level 15. ・Obtain and upgrade Weapon: Glittering Ray to Lv. 15. ・Isomer Bolt absorbs Glittering Ray and now periodically launches beams that pierce enemies. Ultimate II: ・Reach Level 15. ・Obtain and upgrade Weapon: Explosive Omen to Lv. 15. ・Isomer Bolt absorbs Explosive Omen and now periodically explodes in target areas, dealing additional AoE DMG. + Glittering Ray Glittering Ray Base Form:
・Reach Level 1. ・Fire Glittering Rays. Advanced Form: ・Reach Level 3. ・The number and DMG Multiplier of Glittering Rays are increased. Superior Form: ・Reach Level 7. ・Overclocking engaged. The number and DMG Multiplier of Glittering Rays are further increased. |
• Transitions well from early to late waves • Can deal with mobs and elites • Can kill all mimics in Stage 3-7 • Performs decently in all situations |
| 2 |
Zenith Windblade
Zenith Windblade Base Form:
・Reach Level 1. ・Launch a Zenith Windblade that pierces enemies. Advanced Form: ・Reach Level 3. ・The range and DMG Multiplier of Zenith Windblades are increased. Superior Form: ・Reach Level 7. ・Feel the power of the waves. The range and DMG Multiplier of Zenith Windblades are further increased. Ultimate I: ・Reach Level 15. ・Obtain and upgrade Weapon: Rampant Fire to Lv. 15. ・Zenith Windblade absorbs Rampant Fire and now launches five blades, attacking enemies in a large fan-shaped area. Ultimate II: ・Reach Level 15. ・Obtain and upgrade Weapon: Glittering Ray to Lv. 15. ・Zenith Windblade absorbs Glittering Ray and now launches five criss-crossing blades at once that pierce enemies along the way. + Glittering Ray Glittering Ray Base Form:
・Reach Level 1. ・Fire Glittering Rays. Advanced Form: ・Reach Level 3. ・The number and DMG Multiplier of Glittering Rays are increased. Superior Form: ・Reach Level 7. ・Overclocking engaged. The number and DMG Multiplier of Glittering Rays are further increased. |
• Excellent single target damage • Excellent against elites • Can kill all mimics in Stage 3-7 • Weak in earlier waves • Requires proper positioning due to linear AoE prior to Ultimate Form • Can struggle against large waves prior to Ultimate Form • In need of attack speed buffs |
| 3 |
Zenith Windblade
Zenith Windblade Base Form:
・Reach Level 1. ・Launch a Zenith Windblade that pierces enemies. Advanced Form: ・Reach Level 3. ・The range and DMG Multiplier of Zenith Windblades are increased. Superior Form: ・Reach Level 7. ・Feel the power of the waves. The range and DMG Multiplier of Zenith Windblades are further increased. Ultimate I: ・Reach Level 15. ・Obtain and upgrade Weapon: Rampant Fire to Lv. 15. ・Zenith Windblade absorbs Rampant Fire and now launches five blades, attacking enemies in a large fan-shaped area. Ultimate II: ・Reach Level 15. ・Obtain and upgrade Weapon: Glittering Ray to Lv. 15. ・Zenith Windblade absorbs Glittering Ray and now launches five criss-crossing blades at once that pierce enemies along the way. + Rampant Fire Rampant Fire Base Form:
・Reach Level 1. ・Continuously spray Rampant Fire forward. Advanced Form: ・Reach Level 3. ・The range and DMG Multiplier of Rampant Fire are increased Superior Form: ・Reach Level 7. ・Spray Rampant Fire from two sides with DMG Multiplier increased. |
• Excellent AoE Damage • Excellent against large waves • Transitions poorly from early to late waves • Can struggle in earlier waves due to lack of AoE prior to Ultimate Form • Extremely powerful when attained, but is a struggle to achieve |
Best Mid Game Weapon Combinations
| Combo | Explanations | |
|---|---|---|
| 1 |
Isomer Bolt
Isomer Bolt Base Form:
・Reach Level 1. ・Fire multiple Isomer Bolts in quick succession. Advanced Form: ・Reach Level 3. ・The range and rate of fire of Isomer Bolts are increased. Superior Form: ・Reach Level 7. ・Enjoy overwhelming firepower. The range and rate of fire of Isomer Bolts are further increased. Ultimate I: ・Reach Level 15. ・Obtain and upgrade Weapon: Glittering Ray to Lv. 15. ・Isomer Bolt absorbs Glittering Ray and now periodically launches beams that pierce enemies. Ultimate II: ・Reach Level 15. ・Obtain and upgrade Weapon: Explosive Omen to Lv. 15. ・Isomer Bolt absorbs Explosive Omen and now periodically explodes in target areas, dealing additional AoE DMG. + Explosive Omen Explosive Omen Base Form:
・Reach Level 1. ・Unleash Explosive Omens in all directions. Advanced Form: ・Reach Level 3. ・The number of Explosive Omens is greatly increased. Superior Form: ・Reach Level 7. ・Become a trap master. The range and DMG Multiplier of Explosive Omens are further increased. |
• Isomer Bolt and Explosive Omen work together to provide both single-target and AoE damage • Becomes very quick at shredding HP bars when evolved • Still deals with waves well in its Ultimate Form due to how fast it attacks • Can struggle in earlier waves due to lack of AoE prior to Explosive Omen or Ultimate Form |
| 2 |
Isomer Bolt
Isomer Bolt Base Form:
・Reach Level 1. ・Fire multiple Isomer Bolts in quick succession. Advanced Form: ・Reach Level 3. ・The range and rate of fire of Isomer Bolts are increased. Superior Form: ・Reach Level 7. ・Enjoy overwhelming firepower. The range and rate of fire of Isomer Bolts are further increased. Ultimate I: ・Reach Level 15. ・Obtain and upgrade Weapon: Glittering Ray to Lv. 15. ・Isomer Bolt absorbs Glittering Ray and now periodically launches beams that pierce enemies. Ultimate II: ・Reach Level 15. ・Obtain and upgrade Weapon: Explosive Omen to Lv. 15. ・Isomer Bolt absorbs Explosive Omen and now periodically explodes in target areas, dealing additional AoE DMG. + Glittering Ray Glittering Ray Base Form:
・Reach Level 1. ・Fire Glittering Rays. Advanced Form: ・Reach Level 3. ・The number and DMG Multiplier of Glittering Rays are increased. Superior Form: ・Reach Level 7. ・Overclocking engaged. The number and DMG Multiplier of Glittering Rays are further increased. |
• High single-target damage, enhanced with piercing AoE • Works well against large targets that get hit by multiple bullets and beams • Limited AoE capabilities • Requires positioning to maximize piercing beams |
| 3 |
Feilian Shock
Feilian Shock Base Form:
・Reach Level 1. ・Summon Feilian Shocks. Advanced Form: ・Reach Level 3. ・The summon rate and DMG Multiplier of Feilian Shocks are increased. Superior Form: ・Reach Level 7. ・Taste the wrath of the pack. The attack range, summon rate, and DMG Multiplier of Feilian Shocks are further increased. Ultimate I: ・Reach Level 15. ・Obtain and upgrade Weapon: Explosive Omen to Lv. 15. ・Feilian Shock absorbs Explosive Omen and now summons and detonates many Explosive Omens to attack the surrounding enemies. Ultimate II: ・Reach Level 15. ・Obtain and upgrade Weapon: Sanguine Wheel to Lv. 15. ・Feilian Shock absorbs Sanguine Wheel and now launches multiple Sanguine Wheels to deal more DMG with each attack. + Explosive Omen Explosive Omen Base Form:
・Reach Level 1. ・Unleash Explosive Omens in all directions. Advanced Form: ・Reach Level 3. ・The number of Explosive Omens is greatly increased. Superior Form: ・Reach Level 7. ・Become a trap master. The range and DMG Multiplier of Explosive Omens are further increased. |
• Feilian Shock can be concentrated in one area for lots of damage • Explosive Omen covers further areas that Feilian cannot • Can essentially blanket the map when in Ultimate Form • Stationary damage source requires you to lure enemies to it • Lack of dedicated single-target damage |
Best Late Game Weapon Combinations
| Combo | Explanations | |
|---|---|---|
| 1 |
Blazing Star
Blazing Star Base Form:
・Reach Level 1. ・Launch Blazing Stars from the sky. Advanced Form: ・Reach Level 3. ・The range and DMG Multiplier of Blazing Stars are increased. Superior Form: ・Reach Level 7. ・Charge up energy. The range and DMG Multiplier of Blazing Stars are further increased. Ultimate I: ・Reach Level 15. ・Obtain and upgrade Weapon: Sanguine Wheel to Lv. 15. ・Blazing Star absorbs Sanguine Wheel and now launches multiple Blazing Stars that deal damage to surrounding enemies upon impact. Ultimate II: ・Reach Level 15. ・Obtain and upgrade Weapon: Rampant Fire to Lv. 15. ・Blazing Star absorbs Rampant Fire and now sets the impact areas on fire to continuously burn enemies caught inside. + Sanguine Wheel Sanguine Wheel Base Form:
・Reach Level 1. ・Summon a Sanguine Wheel to continuously attack surrounding enemies. Advanced Form: ・Reach Level 3. ・Summon an additional Sanguine Wheel to attack surrounding enemies. Superior Form: ・Reach Level 7. ・Unleash the primal forces. Summon a total of three Sanguine Wheels to attack surrounding enemies. |
• Blazing Star has good damage and AoE early • Can scale off of HP with upgrades • Both Weapons can Increase Max HP with upgrades for even more scaling • Powerful damage coupled with immense AoE when evolved |
| 2 |
Blazing Star
Blazing Star Base Form:
・Reach Level 1. ・Launch Blazing Stars from the sky. Advanced Form: ・Reach Level 3. ・The range and DMG Multiplier of Blazing Stars are increased. Superior Form: ・Reach Level 7. ・Charge up energy. The range and DMG Multiplier of Blazing Stars are further increased. Ultimate I: ・Reach Level 15. ・Obtain and upgrade Weapon: Sanguine Wheel to Lv. 15. ・Blazing Star absorbs Sanguine Wheel and now launches multiple Blazing Stars that deal damage to surrounding enemies upon impact. Ultimate II: ・Reach Level 15. ・Obtain and upgrade Weapon: Rampant Fire to Lv. 15. ・Blazing Star absorbs Rampant Fire and now sets the impact areas on fire to continuously burn enemies caught inside. + Explosive Omen Explosive Omen Base Form:
・Reach Level 1. ・Unleash Explosive Omens in all directions. Advanced Form: ・Reach Level 3. ・The number of Explosive Omens is greatly increased. Superior Form: ・Reach Level 7. ・Become a trap master. The range and DMG Multiplier of Explosive Omens are further increased. |
• Blazing Star is a great starting weapon • Both weapons benefit from Fusion DMG increases • Smaller AoE than alternative evolution, but still has good damage • Leaves lingering pools that clean up mobs well |
| 3 |
Isomer Bolt
Isomer Bolt Base Form:
・Reach Level 1. ・Fire multiple Isomer Bolts in quick succession. Advanced Form: ・Reach Level 3. ・The range and rate of fire of Isomer Bolts are increased. Superior Form: ・Reach Level 7. ・Enjoy overwhelming firepower. The range and rate of fire of Isomer Bolts are further increased. Ultimate I: ・Reach Level 15. ・Obtain and upgrade Weapon: Glittering Ray to Lv. 15. ・Isomer Bolt absorbs Glittering Ray and now periodically launches beams that pierce enemies. Ultimate II: ・Reach Level 15. ・Obtain and upgrade Weapon: Explosive Omen to Lv. 15. ・Isomer Bolt absorbs Explosive Omen and now periodically explodes in target areas, dealing additional AoE DMG. + Explosive Omen Explosive Omen Base Form:
・Reach Level 1. ・Unleash Explosive Omens in all directions. Advanced Form: ・Reach Level 3. ・The number of Explosive Omens is greatly increased. Superior Form: ・Reach Level 7. ・Become a trap master. The range and DMG Multiplier of Explosive Omens are further increased. |
• Isomer Bolt and Explosive Omen still cover each other's weaknesses • When evolved, can melt individual targets very quickly • Can still handle waves due to evolved form's AoE • Still struggles in earlier waves due to lack of AoE prior to Explosive Omen or Ultimate Form |
Best Resonators
| Jump to a Section! | ||
|---|---|---|
| Early Game | Mid Game | Late Game |
Best Early Game Resonators
| Combo | Explanations | |
|---|---|---|
| 1 |
|
• Isomer Bolt performs decently against mobs and elites • Ashen Oath skill greatly increases DPS • Fragile when cornered due to low HP • Isomer Bolt power spike occurs at level 7 • Low ATK, but boasts the highest Crit Rate |
| 2 |
|
• Has the most combinations available in Stages 1-3 • Mobile due to movement speed buff from Breeze Breaker • Zenith Windblade is slow and lacks AoE • Zenith Windblade requires proper positioning to use effectively • Zenith Windblade suffers from low Crit Rate |
Best Mid Game Resonators
| Combo | Explanations | |
|---|---|---|
| 1 |
|
• Still a strong option due to her Ashen Oath and Isomer Bolt • Weapon's Ultimate Forms patch up her lack of AoE • Scales well with upgrades • Still fragile, and can struggle early with no AoE |
| 2 |
|
• Feilian Shock can cover lots of ground when spread out • Zephyr Symphony provides CC and Resistance Shred • Can deal with large waves very easily, especially with weapon Ultimate Forms • Distinct lack of single-target damage, coupled with stationary weapon and skill |
| 3 |
|
• Has the highest mobility innately via Breeze Breaker • Zenith Windblade is still a slow and restrictive weapon • Has well-balanced Ultimate Form weapons, but can be a struggle to get there |
Best Late Game Resonators
| Combo | Explanations | |
|---|---|---|
| 1 |
|
• Blazing Star is a great weapon that has good damage and AoE off the bat • Weapon's Ultimate Forms retain great damage and AoE • Blazing Star can scale with HP using upgrades, greatly furthering its damage • Skill provides a massive ATK buff that also scales with HP • Skill consumes a considerable chunk of HP on use, requiring careful management |
| 2 |
|
• Ashen Oath and Isomer Bolt are still great at shredding single targets • Secondary Weapons can assist with AoE issues • Ultimate Form Isomer Bolt can melt enemies very fast • Can have early wave difficulties due to no AoE |
| 3 |
|
• Feilian Shock and Zephyr Symphony remain effective against large waves of mobs • Weapon and Skill are still stationary, and require some foresight and maneuvering to use well • Can still have issues with higher-HP boss enemies |
| 4 |
|
• Zenith Windblade's drawbacks make for difficult early-game fighting • May need significantly more effort to reach a powerful state with Ultimate Form • Ultimate Forms are decent at both Single-Target and AoE |
How to Upgrade Weapon Forms
Purchase Through Post-Wave Upgrades
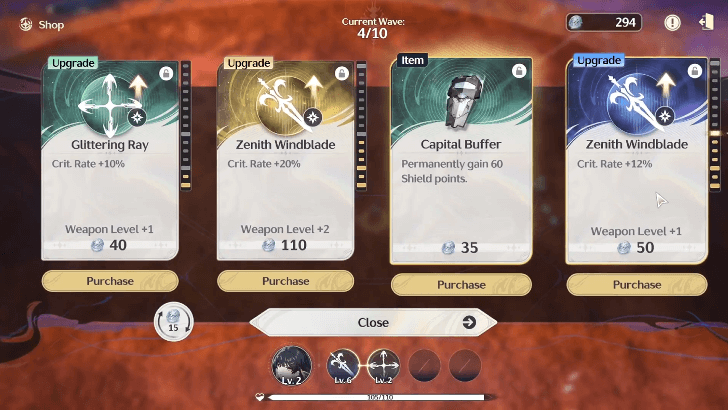
At the end of each wave, a randomized selection of rewards will appear, offering either weapon upgrades that progress its Levels and Forms, or items that grant stage-long buffs. Spend your Enhancement Modules wisely to upgrade your weapon’s Form, as doing so greatly improves your damage and survivability in later waves.
Ultimate Forms are Bound to Other Weapons

Every primary weapon has two Ultimate Forms, which are unlocked based on the weapon combination you have equipped. For example, Isomer Bolt’s first Ultimate Form requires both Isomer Bolt and Glittering Ray to reach Level 15, while its second Ultimate Form requires both Isomer Bolt and Explosive Omen to reach Level 15.
Ultimate Forms represent the strongest and most advanced version of a weapon, granting powerful upgrades that significantly boost performance once both weapons reach level 15.
Wuthering Waves Related Guides

Lament Recon: Solaris Soldier Event Guide
All Stage Guides
| Stage Guides | |||||||||||
|---|---|---|---|---|---|---|---|---|---|---|---|
| Drill Stage 1 | Drill Stage 2 | Drill Stage 3 | |||||||||
| Drill Stage 4 | Drill Stage 5 | Drill Stage 6 | |||||||||
| Drill Stage 7 | Drill Stage 7 (Helltide) | ||||||||||
All Lament Recon: Solar Soldier Guides
| Best Weapons | Talents to Unlock First |
| List of Weapons | List of Items |
Comment
Author

Best Weapon Combinations and Resonators | Lament Recon: Solaris Soldier
Please participate in our site
improvement survey
04/2026
improvement survey
04/2026
Would you assist in
improving Game8's site?
improving Game8's site?

×
We are listening to our users' valuable opinions and discussing how to act on them.
The information collected through this survey will be used for the purpose of improving our services. In addition, the information will only be disclosed a part of a statistic in a format that will not allow identification of personal information.
Begin Survey
Not Now
×
Please rate each item regarding Game8.co's Advertisements.
Amount of Ads
Very Dissatisfied
Somewhat Dissatisfied
Fine
Somewhat Satisfied
Highly Satisfied
Placement of Ads
Timing of Ad Display
Ad Loading Speed
Safeness of Ads
Content of Ads
×
Please rate each item regarding Game8.co's Quality of Articles.
Amount of information
Very Dissatisfied
Somewhat Dissatisfied
Fine
Somewhat Satisfied
Highly Satisfied
Frequency of updates
Speed of new information
Accuracy of articles
Understandibility of articles
Readability of sentences
×
Please rate each item regarding Game8.co's Usability of the Site.
Ease of finding information
Very Dissatisfied
Somewhat Dissatisfied
Fine
Somewhat Satisfied
Highly Satisfied
Loading Speed
Use of Color
Font Size
Visibility of Images
Easy to Understand Layout
×
Please rate each item regarding Game8.co's Message Boards, Comments.
Ease of Writing
Very Dissatisfied
Somewhat Dissatisfied
Fine
Somewhat Satisfied
Highly Satisfied
Readability
Ease in Finding Information
Comment Quality
Comment Quantity
Admin Response
×
Please rate each item regarding Game8.co's Site's new design.
Please rate our site's new design
Very Dissatisfied
Somewhat Dissatisfied
Fine
Somewhat Satisfied
Highly Satisfied
Do you think that the website's design change makes the site easier to use?
Has the new design made it easier for you to find information on the site?
Has the new design improved the overall visual appeal of the site?
How would you rate your overall satisfaction with the new design of the site?
×
How likely are you to recommend Game8 to someone you know?
Very Unlikely
0
1
2
3
4
5
6
7
8
9
10
Very Likely
If you have other opinions regarding potential improvement to the website, please share them with us. We would appreciate your honest opinion.
Note: This is a free response section, so you can proceed without entering anything.
Note: Please be sure not to enter any kind of personal information into your response.
Note: Please be sure not to enter any kind of personal information into your response.
×
Thank You
×
Thank you for participating in our survey! Your answers will help us to improve the quality of our website and services.
We hope you continue to make use of Game8.
We hope you continue to make use of Game8.
Close
Premium Articles

Rankings
- We could not find the message board you were looking for.

Gaming News


![Forza Horizon 6 Review [Preview] | Beautiful Roads With a Whole Lot of Oversteer](https://img.game8.co/4460981/a7254c24945c43fbdf6ad9bea52b5ce9.png/thumb)
Popular Games

Genshin Impact Walkthrough & Guides Wiki
Crimson Desert Walkthrough & Guides Wiki
Umamusume: Pretty Derby Walkthrough & Guides Wiki
Honkai: Star Rail Walkthrough & Guides Wiki
Monster Hunter Stories 3: Twisted Reflection Walkthrough & Guides Wiki
Wuthering Waves Walkthrough & Guides Wiki
The Seven Deadly Sins: Origin Walkthrough & Guides Wiki
Pokemon TCG Pocket (PTCGP) Strategies & Guides Wiki
Pokemon Pokopia Walkthrough & Guides Wiki
Zenless Zone Zero Walkthrough & Guides Wiki


Recommended Games
Monster Hunter World Walkthrough & Guides Wiki
Fire Emblem Heroes (FEH) Walkthrough & Guides Wiki
Pokemon Brilliant Diamond and Shining Pearl (BDSP) Walkthrough & Guides Wiki
Super Smash Bros. Ultimate Walkthrough & Guides Wiki
Diablo 4: Vessel of Hatred Walkthrough & Guides Wiki
Cyberpunk 2077: Ultimate Edition Walkthrough & Guides Wiki
Yu-Gi-Oh! Master Duel Walkthrough & Guides Wiki
Elden Ring Shadow of the Erdtree Walkthrough & Guides Wiki
The Legend of Zelda: Tears of the Kingdom Walkthrough & Guides Wiki
Persona 3 Reload Walkthrough & Guides Wiki


All rights reserved
Copyright© 2024-2025 Kuro Games. All Rights Reserved.
The copyrights of videos of games used in our content and other intellectual property rights belong to the provider of the game.
The contents we provide on this site were created personally by members of the Game8 editorial department.
We refuse the right to reuse or repost content taken without our permission such as data or images to other sites.