Drill Stage 4 Guide | Lament Recon: Solaris Soldier
★ 3.2 Phase 2 out now! → Best Pull Strategy
┣ Lynae → Builds, Materials, Sig. Weapon
┣ Zani → Builds, Materials, Sig. Weapon
┗ Phoebe → Builds, Materials, Sig. Weapon
★ Upcoming Characters: Hiyuki, Denia
★ Exclusives: Tier Maker | State of the Meta
This is a guide for Drill Stage 4 Realistic mode in the Lament Recon: Solaris Soldier event for Wuthering Waves 2.7. See the best character and weapons for Drill Stage 4, the best items, and tips on how to clear the stage here!
Drill Stage 4 Best Character
Ciaccona is Recommended
|
|
Max HP | ATK |
|---|---|---|
| 120 | 62 | |
| Crit. Rate | Crit. DMG | |
| 10% | 10% | |
| Effect | ||
| Cast Zephyr Symphony Zephyr Symphony Summon a Harmonic Note that deals Aero DMG to surrounding enemies equal to 10% of Ciaccona's ATK every 0.5s for 10s. Enemies damaged by this skill have their DMG taken increased by 3% and their Movement Speed reduced by 1% for 5s, stacking up to 20 times. , continuously dealing Aero DMG to surrounding enemies, increasing their DMG taken and reducing their Movement Speed.At Resonator Lv. 5: Enemies' DMG taken is increased by 4%, and Movement Speed is reduced by 2%. At Resonator Lv. 10: Enemies' DMG taken is increased by 5%, and Movement Speed is reduced by 3%. |
||
Ciaccona's initial weapon, Feilian Shock, shines in this stage as it can create a dangerous area where enemies can't enter, thanks to their Aero AoE damage.
The abundance of enemies can be alarming at certain waves, but the Feilian Beringal's continuous damage will kill them before they can touch you.
Recommended Character Upgrades
| Character | Stat Upgrade Priority |
|---|---|
|
|
1. All Weapons +%Crit DMG 2. DMG Reduction 3. Max STA and Recovery |
Ciaccona greatly benefits from weapon damage buffs, as this will kill enemies faster, which, in turn, prevents them from reaching you.
DMG Reduction, which makes Ciaccona more tanky, is crucial as you will be mostly stationary throughout the stage due to her playstyle. In the off chance an enemy slips through the Feilian Beringal's defenses, you will be at least tanky enough to survive.
Drill Stage 4 Best Weapons
Recommended Weapons
| Weapon | Stat Upgrade Priority |
|---|---|
 Feilian Shock Feilian Shock Feilian Shock Base Form:
・Reach Level 1. ・Summon Feilian Shocks. Advanced Form: ・Reach Level 3. ・The summon rate and DMG Multiplier of Feilian Shocks are increased. Superior Form: ・Reach Level 7. ・Taste the wrath of the pack. The attack range, summon rate, and DMG Multiplier of Feilian Shocks are further increased. Ultimate I: ・Reach Level 15. ・Obtain and upgrade Weapon: Explosive Omen to Lv. 15. ・Feilian Shock absorbs Explosive Omen and now summons and detonates many Explosive Omens to attack the surrounding enemies. Ultimate II: ・Reach Level 15. ・Obtain and upgrade Weapon: Sanguine Wheel to Lv. 15. ・Feilian Shock absorbs Sanguine Wheel and now launches multiple Sanguine Wheels to deal more DMG with each attack. |
1. DMG% 2. Crit. Rate/Crit. DMG 3. DEF Pen 4. ATK Speed |
 Sanguine Wheel Sanguine Wheel Sanguine Wheel Base Form:
・Reach Level 1. ・Summon a Sanguine Wheel to continuously attack surrounding enemies. Advanced Form: ・Reach Level 3. ・Summon an additional Sanguine Wheel to attack surrounding enemies. Superior Form: ・Reach Level 7. ・Unleash the primal forces. Summon a total of three Sanguine Wheels to attack surrounding enemies. |
1. DMG% 2. Crit. Rate/Crit. DMG 3. DEF Pen |
 Isomer Bolt Isomer Bolt Isomer Bolt Base Form:
・Reach Level 1. ・Fire multiple Isomer Bolts in quick succession. Advanced Form: ・Reach Level 3. ・The range and rate of fire of Isomer Bolts are increased. Superior Form: ・Reach Level 7. ・Enjoy overwhelming firepower. The range and rate of fire of Isomer Bolts are further increased. Ultimate I: ・Reach Level 15. ・Obtain and upgrade Weapon: Glittering Ray to Lv. 15. ・Isomer Bolt absorbs Glittering Ray and now periodically launches beams that pierce enemies. Ultimate II: ・Reach Level 15. ・Obtain and upgrade Weapon: Explosive Omen to Lv. 15. ・Isomer Bolt absorbs Explosive Omen and now periodically explodes in target areas, dealing additional AoE DMG. |
1. DMG% 2. Crit. Rate/Crit. DMG 3. DEF Pen |
Feilian Shock will automatically be your weapon if you choose Ciaccona. It creates an offensive area that kills enemies, which is much needed in this stage, as an abundant number of enemies will come at you all at once.
Choose Sanguine Wheel at Wave 3 as it has a Synergistic Evolution with Feilian Shock. You will miss Feilian Shock's Ultimate Form if you pick any other weapon.
Isomer Bolt is the final weapon pick for this stage as it can cover long distances while dealing consistent damage. This covers what the Feilian Shock and the Sanguine Wheel both lack.
Best Weapon Combinations and Resonators
Drill Stage 4 Best Items
Recommended Items
| Item | Explanation | |
|---|---|---|
| 1 |
 High-Stakes Gambler High-Stakes Gambler High-Stakes Gambler Effect: For the next 5 waves, DMG taken is increased by 1000%. After the next 5 waves, Max HP will be increased by 100%, and total DMG dealt is increased by 100%.
|
After five waves, this item will greatly buff your DMG and HP. While this item will make you more vulnerable before you get the buffs, your Feilian Shock will protect you! |
| 2 |
 Aggressive Investment Aggressive Investment Aggressive Investment Effect: DMG taken is increased by 100%, and DMG dealt is increased by 50%.
|
Similar to the High-Stakes Gambler, this item will greatly buff your damage. You don't have to worry about the DMG taken increase as the Feilian Shock will protect you. |
| 3 |
 Aero Boost Aero Boost Aero Boost Effect: Aero DMG is increased by 50%.
|
Feilian Shock, which is both your offense and defense, deals Aero damage. Getting this item will kill your enemies faster while strengthening your defenses at the same time! |
These are the recommended items to purchase if you encounter them in the shop and have Enhancement Modules to spare. All three will buff your weapons by a significant amount.
Note, though, that it's suggested to prioritize weapons and character upgrades first before purchasing any items.
List of Items | Lament Recon: Solaris Soldier
Drill Stage 4 Tips
| Drill Stage 4 Recommended Tips |
|---|
|
|
Run in a Small Circle
Ciaccona's playstyle requires you to stay stationary or run in a small circle. This is so the Feilian Beringals won't be too far from one another, as their strength is in their numbers.
If they are too far apart, enemies won't be killed fast enough, and they may damage you.
Lure Enemies to the Feilian Shock
If enemies do come close to you, lure them back to the Feilian Shock. Their continuous AoE damage will kill the enemy eventually!
Kill the Chest Mimics
At Wave 8, run for the seven Chest Mimics that'll spawn at the center of the map. Focus on killing the ones that are low HP and look for the rest and kill them as well! Count the Chest Mimics you've killed, as you may miss some that are hiding in the corner of the map.
Killing as many of them as you can is crucial in getting Feilian Shock and Sanguine Wheel upgrades.
Upgrade Feilian Shock & Sanguine Wheel

Prioritize buying Feilian Shock upgrades until it reaches Lv. 15. Afterwards, be sure to buy Sanguine Wheel upgrades until it reaches Lv. 15 as well! These are both crucial in order to get Feilian Shock's Ultimate Form which is only possible if both weapons are Lv. 15.
Killing as many Chest Mimics as possible in Wave 8 greatly helps in upgrading these weapons.
Be Careful of the Whiff Whaff's Beams
Whiff Whaffs will fire Aero shots towards you. Be careful of their shots as there's a chance you may get lost in the stage's visual clutter.
Watch Out for the Elite Enemies
| 1 | How to Kill Elite Enemies |
|---|---|
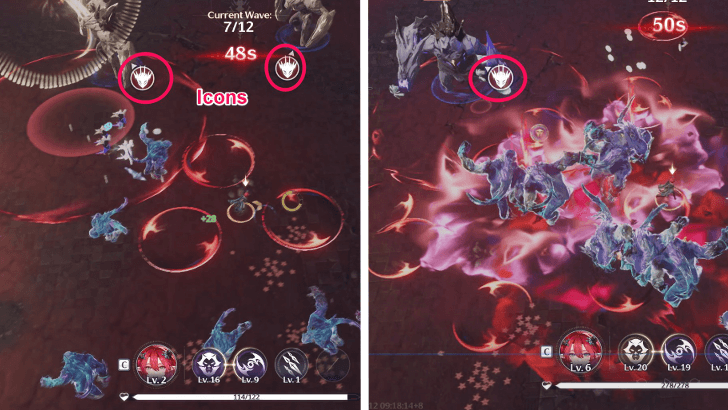 The elite enemies of this stage are the two Rocksteady Guardians, who appear on the 7th wave, and the Chasm Guardian, who appears on the last wave. Watch out for the Elite Enemy Icon to know their location on the stage. |
|
| 2 |
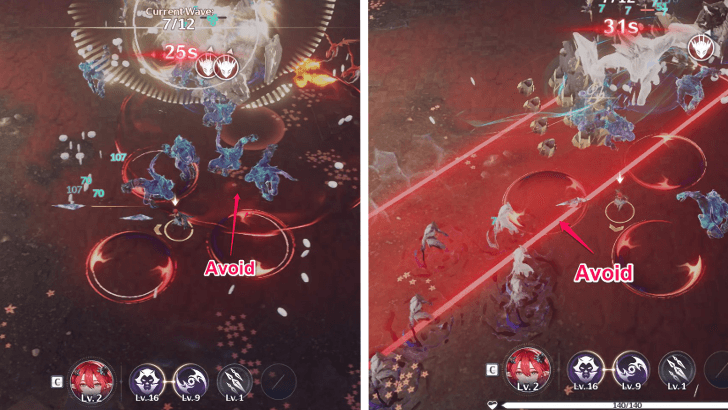 Lure the Rocksteady Guardians towards the Feilian Shock while dodging their attacks. Their first attack releases a vertical wave of rocks, which can easily be avoided by dodging the red rectangular attack pattern. Their other attack involves them slamming the ground. Be sure to avoid the red circular patterns as well! |
| 3 |
Similar to the Rocksteady Guardians, lure the Chasm Guardian towards your spawned Feilian Shocks. Dodge its initial powerful ground slam, as well as the multiple lightning streaks it summons. Stay near your Feilian Shocks until it eventually dies. |
Drill Stage 4 Information
Basic Information
| Objectives | Completion Rewards |
|---|---|
| Survive Wave 12 | |
| Drill Details | |
|
・Spawns ranged Common-Class Whiff Whaff more frequently. ・Spawns ranged Elite-Class Chasm Guardian for the first time. |
|
Wuthering Waves Related Guides

Lament Recon: Solaris Soldier Event Guide
All Stage Guides
| Stage Guides | |||||||||||
|---|---|---|---|---|---|---|---|---|---|---|---|
| Drill Stage 1 | Drill Stage 2 | Drill Stage 3 | |||||||||
| Drill Stage 4 | Drill Stage 5 | Drill Stage 6 | |||||||||
| Drill Stage 7 | Drill Stage 7 (Helltide) | ||||||||||
All Lament Recon: Solar Soldier Guides
| Best Weapons | Talents to Unlock First |
| List of Weapons | List of Items |
Comment
Author
Drill Stage 4 Guide | Lament Recon: Solaris Soldier
improvement survey
04/2026
improving Game8's site?

Your answers will help us to improve our website.
Note: Please be sure not to enter any kind of personal information into your response.

We hope you continue to make use of Game8.
Premium Articles
Rankings
- We could not find the message board you were looking for.
Gaming News
Popular Games

Genshin Impact Walkthrough & Guides Wiki

Crimson Desert Walkthrough & Guides Wiki

Umamusume: Pretty Derby Walkthrough & Guides Wiki

Honkai: Star Rail Walkthrough & Guides Wiki

Monster Hunter Stories 3: Twisted Reflection Walkthrough & Guides Wiki

Wuthering Waves Walkthrough & Guides Wiki

The Seven Deadly Sins: Origin Walkthrough & Guides Wiki

Pokemon TCG Pocket (PTCGP) Strategies & Guides Wiki

Pokemon Pokopia Walkthrough & Guides Wiki

Zenless Zone Zero Walkthrough & Guides Wiki
Recommended Games

Monster Hunter World Walkthrough & Guides Wiki

Fire Emblem Heroes (FEH) Walkthrough & Guides Wiki

Pokemon Brilliant Diamond and Shining Pearl (BDSP) Walkthrough & Guides Wiki

Super Smash Bros. Ultimate Walkthrough & Guides Wiki

Diablo 4: Vessel of Hatred Walkthrough & Guides Wiki

Cyberpunk 2077: Ultimate Edition Walkthrough & Guides Wiki

Yu-Gi-Oh! Master Duel Walkthrough & Guides Wiki

Elden Ring Shadow of the Erdtree Walkthrough & Guides Wiki

The Legend of Zelda: Tears of the Kingdom Walkthrough & Guides Wiki

Persona 3 Reload Walkthrough & Guides Wiki
All rights reserved
Copyright© 2024-2025 Kuro Games. All Rights Reserved.
The copyrights of videos of games used in our content and other intellectual property rights belong to the provider of the game.
The contents we provide on this site were created personally by members of the Game8 editorial department.
We refuse the right to reuse or repost content taken without our permission such as data or images to other sites.


![Forza Horizon 6 Review [Preview] | Beautiful Roads With a Whole Lot of Oversteer](https://img.game8.co/4460981/a7254c24945c43fbdf6ad9bea52b5ce9.png/show)


![Forza Horizon 6 Review [Preview] | Beautiful Roads With a Whole Lot of Oversteer](https://img.game8.co/4460981/a7254c24945c43fbdf6ad9bea52b5ce9.png/thumb)


