This survey will take about 1 minute.
Your answers will help us to improve our website.
Wuthering Waves (WuWa)
Banners Never Fall Zone 3 Chests and Guide
★ Version 3.1 → Phase 2 Pull Strategy
┣ Luuk Herssen: Builds, Asc. Materials, Sig. Weapon
┣ Rerun: Gabrena Build, Asc. Materials, Sig. Weapon
┣ Mansion Event Guide | Bartending Recipes
┗ Tapes of Last Words | Soliskin | 3.1 Hidden Trophies
★ Exclusives: Tier List Maker | State of the Meta
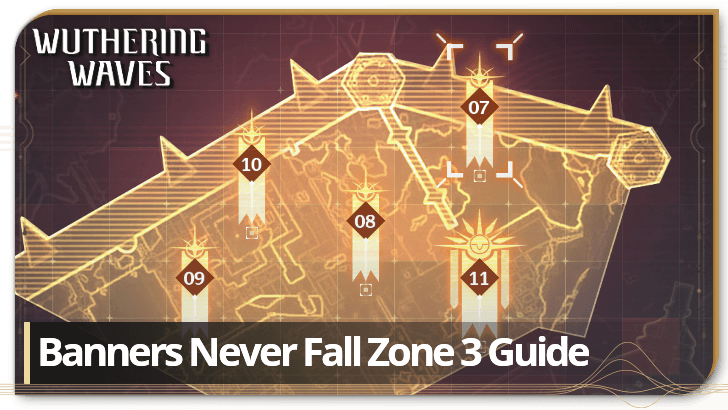
This is a guide for Challenge Zone 3 under the Banners Never Fall event in Wuthering Waves 2.4. See the recommended team comps, all Zone 3 Banner guides, as well as Trophy Chest and Banner of Conquest locations in Zone 3 here!
List of Contents
Zone 3 Full Clear Route
Full Clear Route
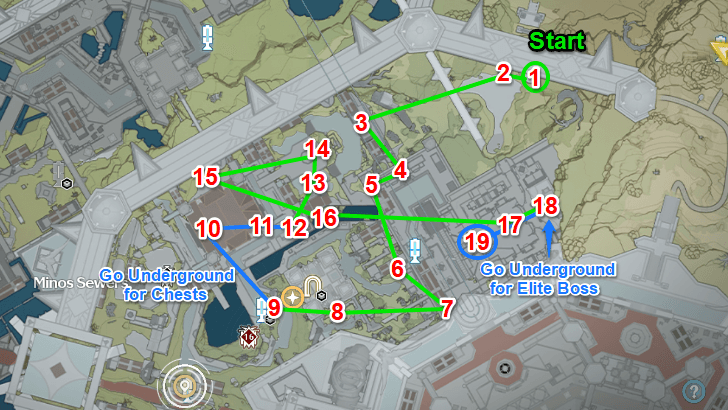
You can efficiently farm all Banners of Conquest and Trophy Chests together by starting with the Chest near Challenge 7 and making your way through the underground sections until you get to the Elite Boss!
Zone 3 Trophy Chest Locations
All Zone 3 Trophy Chest Locations

A total of 15 Trophy Chests can be found in Zone 3. Exploration Trophy Chests are indicated by red, while Banner Trophy Chests are shown in blue.
Exploration Trophy Chest Locations
| Exploration Trophy Chests | |
|---|---|
| 1 | 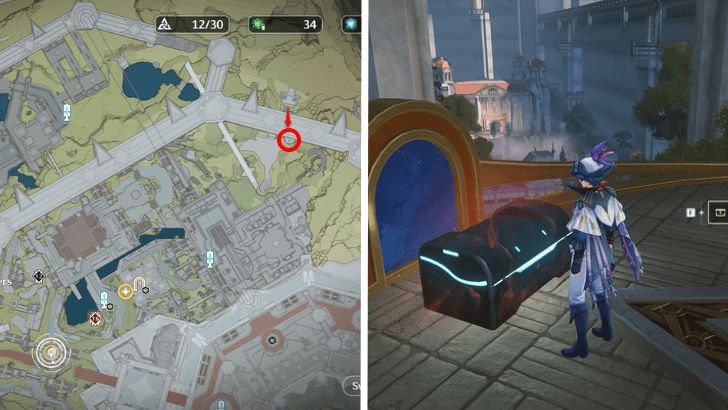 A Standard Trophy Chest can be found on the balcony above Challenge Banner 7. |
| 2 | 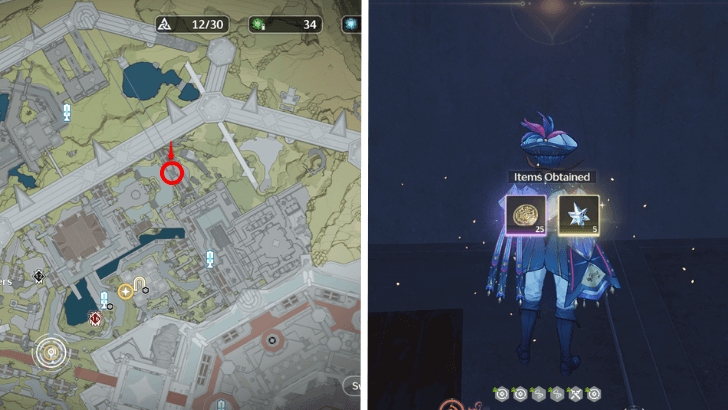 A Basic Trophy Chest is located on the roof of the building with the Golden Eagle statue at the back of Challenge Banner 10. |
| 3 |  A Basic Trophy Chest is beside the Gladiator statue on the roof of the building near Challenge Banner 10. |
| 4 | 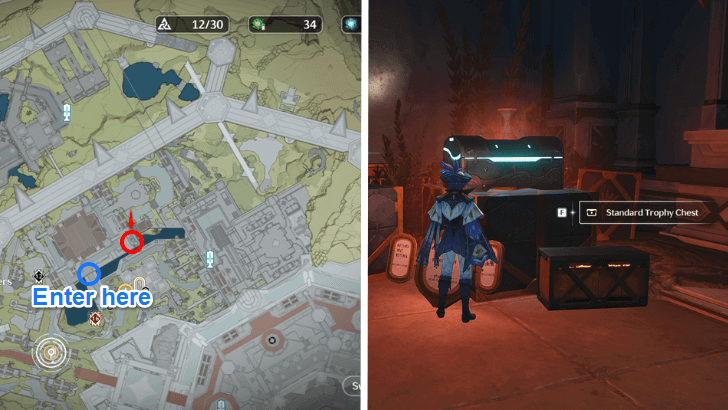 A Standard Trophy Chest can be found in the right side of the staircase in the main hall at the underground floor of the building in front of Challenge Banner 10. |
| 5 | 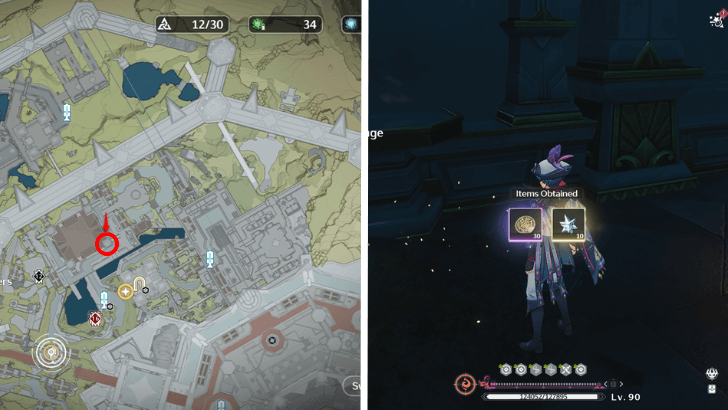 A Standard Trophy Chest is located underneath the staircase of the mainhall at the underground floor of the building in front of Challenge 10. You can find it behind the pillar. |
| 6 | 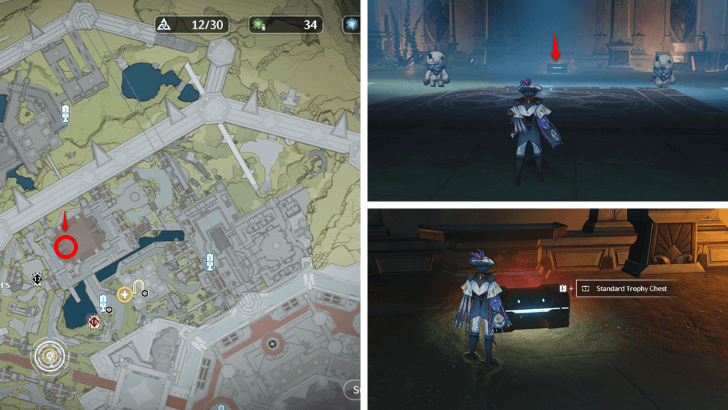 A Standard Trophy Chest is found inside a large room defended by two level 260 Cuddle Wuddles. |
| 7 | 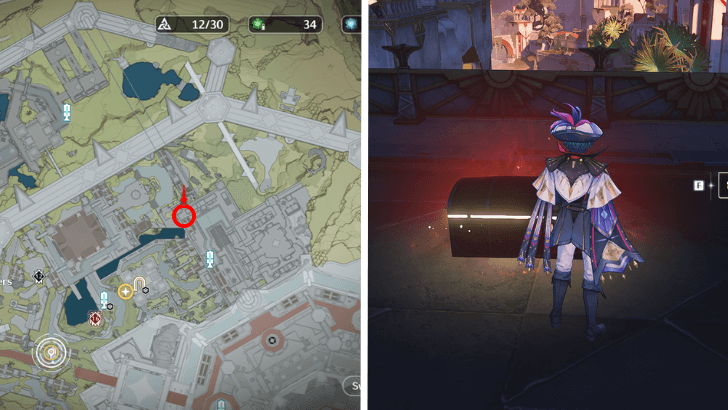 A Basic Trophy Chest can be found hidden by the balcony near Challenge Banner 8. |
| 8 | 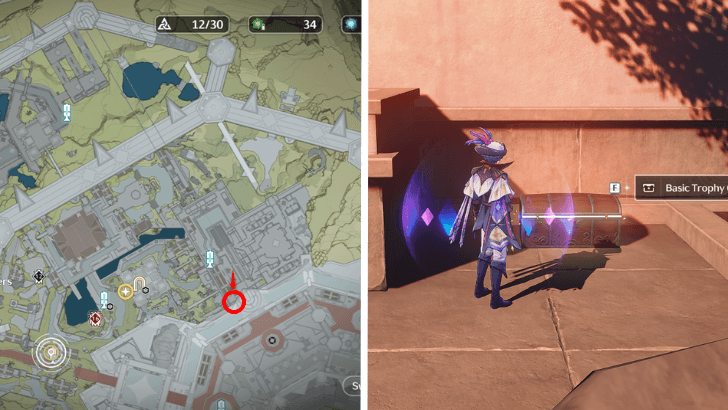 A Basic Trophy Chest is found on the right side of the large tree past the pond directly south of Challenge Banner 8. You may fast travel to the Capitoline Hillside Resonance Beacon to get to it quickly. |
| 9 | 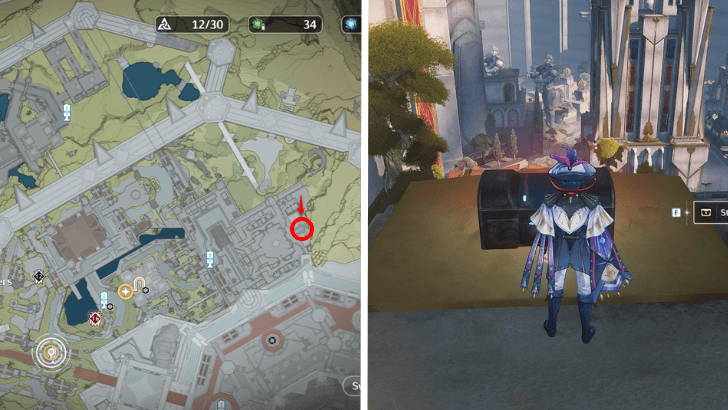 A Standard Trophy Chest is on the roof of the building that has an elevator going down to Challenge Banner 11. |
Exploration Trophy Chests can be found around Zone 3 without needing to defeat the bosses in the area. However, you will find it easier to track within the game if you defeat the Challenge Zone bosses first.
Banner Trophy Chest Locations
| Banner Trophy Chests | |
|---|---|
| 1 | 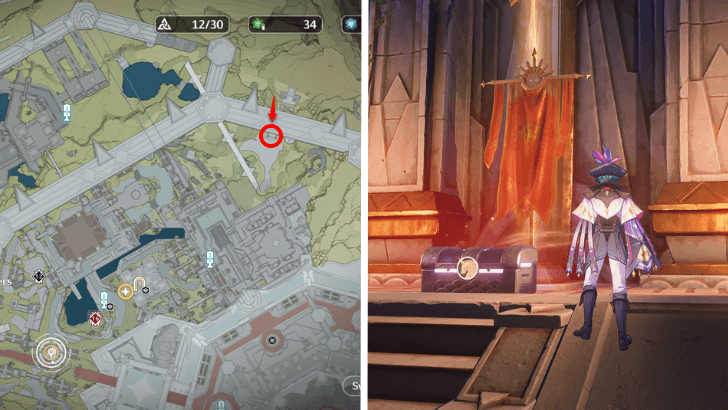 An Advanced Trophy Chest is rewarded to players who defeat the two Hurriclaws defending Challenge Banner 7. |
| 2 | 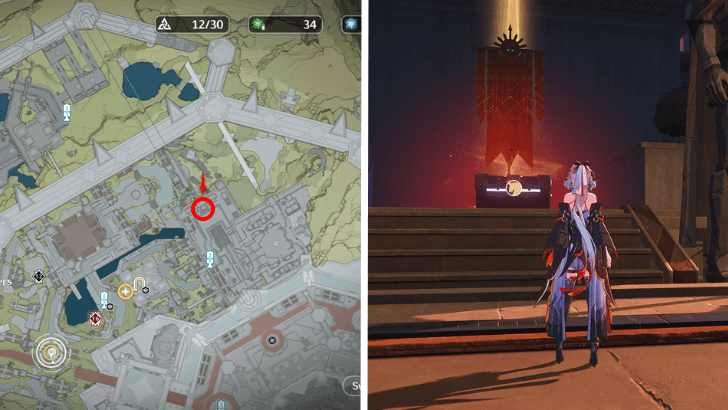 An Advanced Trophy Chest will pop up after defeating the Thundercrest Gladiator in Challenge Banner 8. |
| 3 | 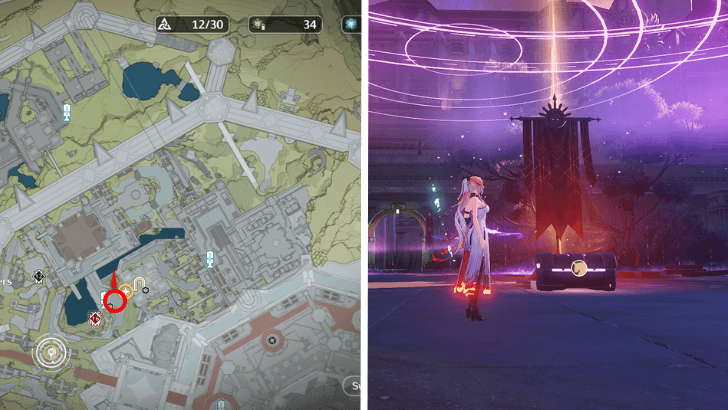 An Advanced Trophy Chest will show up after defeating the two Capitaneus enemies in Challenge 9. |
| 4 | 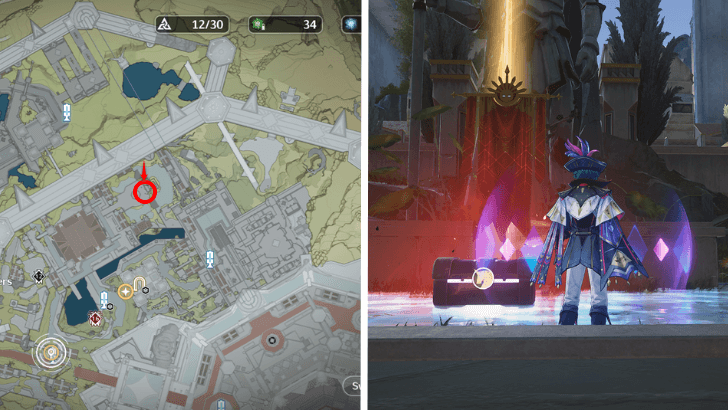 An Advanced Trophy Chest will be rewarded after defeating the Knight Trio in Challenge 10. |
| 5-6 | 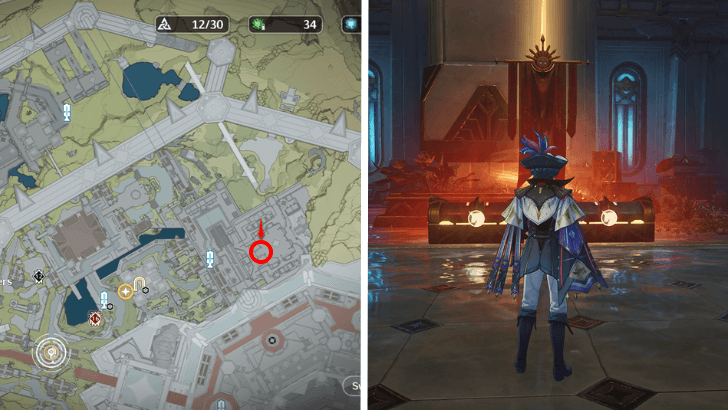 Two Trophy Chests will show up when you defeat the Elite Enemy, Dragon of Dirge, in Challenge Banner 11. |
Banner Trophy Chests only show up after defeating their designated bosses for the Challenge Banners. We recommend going against them in ascending order to scale against them and grow in level.
Zone 3 Banner of Conquest Locations
All Zone 3 Banner Locations
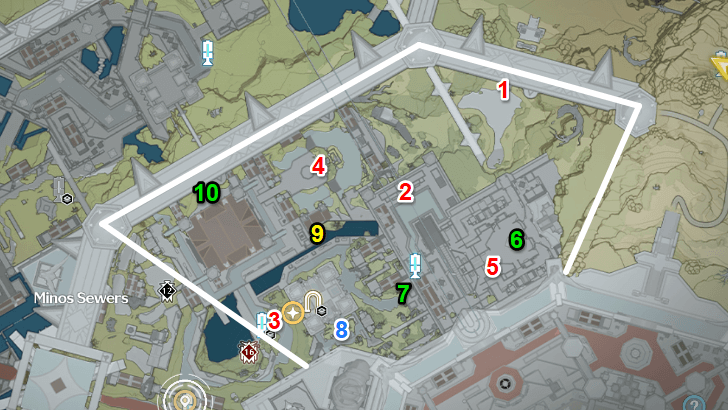
There are 10 Banners located in Zone 3. Green figures are shown to indicate unmarked banners that are being defended by enemies. Red numbers show the Zone's Challenge Bosses.
The Blue Banner rewards players the Swiftbreak All-Resonator Buff, which increases your Vibration Strength Reduction Multiplier by 100%. Lastly, the Yellow Banner rewards you free Glory to level up.
Blue Banner of Conquest Locations
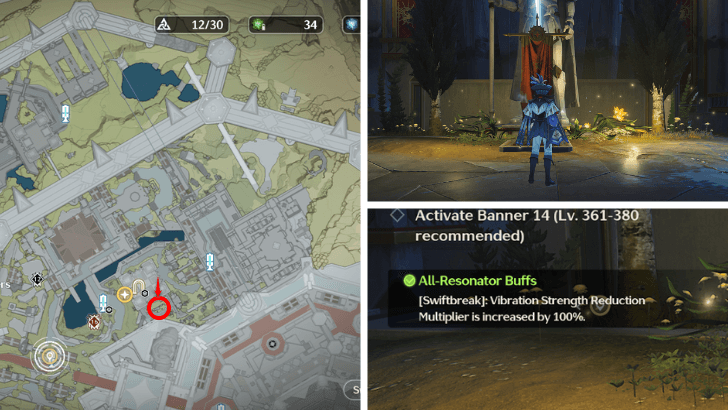
The Blue Banner can be found at the right side of the Colossal Statue in Zone 3. There, you can find it glowing a blue tinge in front of a Gladiator Statue holding a spear, adorned by flowers underneath it.
Yellow Banner of Conquest Locations
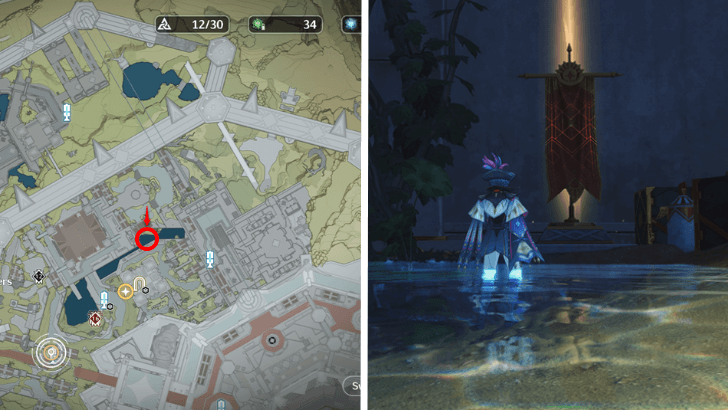
The Yellow Banner is found beside boxes and vines behind a large wall. It is located underground in the previously submerged area, and is in the pathway between two metal gates.
Unmarked Banner of Conquest Locations
| Unmarked Banners | |
|---|---|
| 1 | 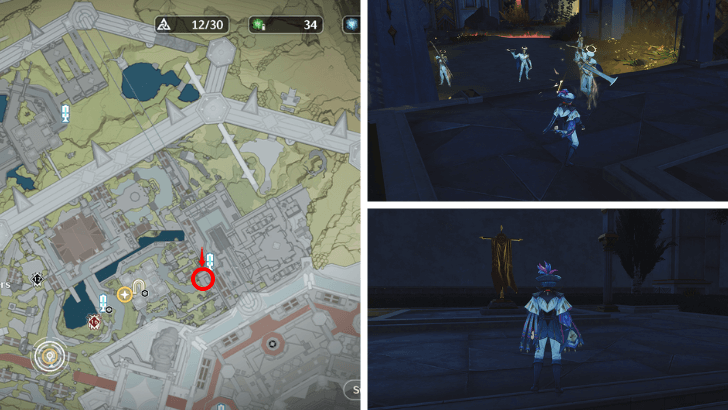 An Unmarked Banner can be found underground near the Capitoline Hillside Resonance Beacon. It is protected by 4 level 200 enemies, three Sagittario and one La Guardia leading the enemy team. |
| 2 | 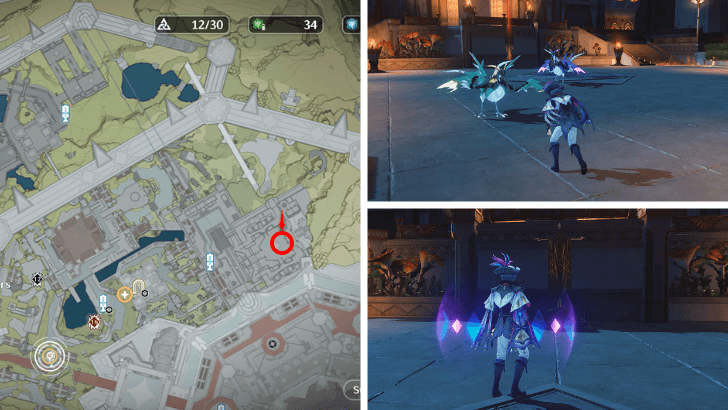 An Unmarked Banner is found in the courtyard above Challenge Banner 11, surrounded by well-lit buildings. You will fight two level 260 enemies, a Cyan-feathered Heron and a Violet-feathered Heron, to get its rewards. |
| 3 | 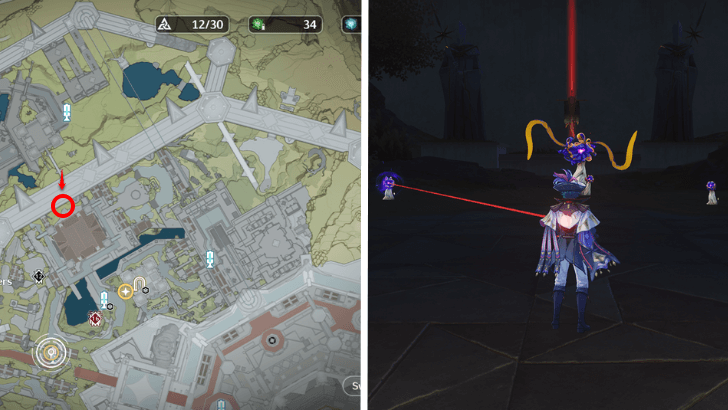 An Unmarked Banner can be found in a large room in the building in front of Challenge Banner 10. It will be defended by level 240 enemies, one being a Roseshroom and two Young Roseshrooms. |
Unmarked Banners are hidden banners within the zone that will reward you with extra Glory for defeating the enemies protecting it.
Challenge Banner of Conquest Locations
| Challenge Banners | |
|---|---|
| 7 | 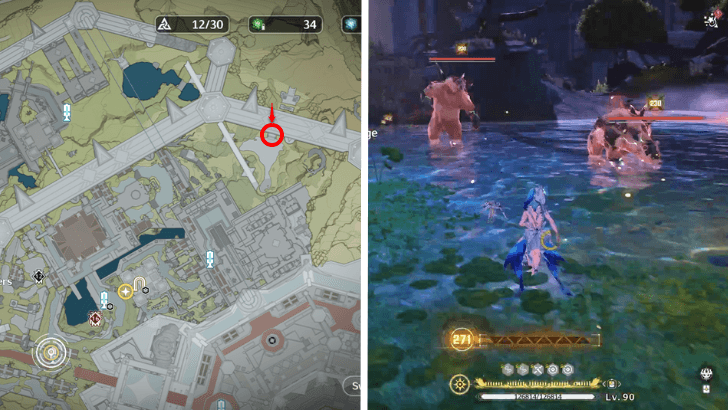 Challenge Banner 7 is located in front of a wall engraved with a Gladiator design, found in a pond by the huge pillar. It will be defended by two Hurriclaws. |
| 8 | 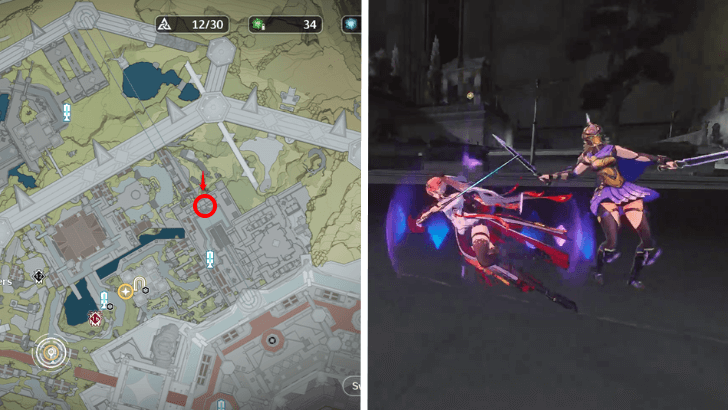 Challenge Banner 8 is found in the courtyard by the two large Gladiator statues. It will be defended by a Thundercrest Gladiator. |
| 9 | 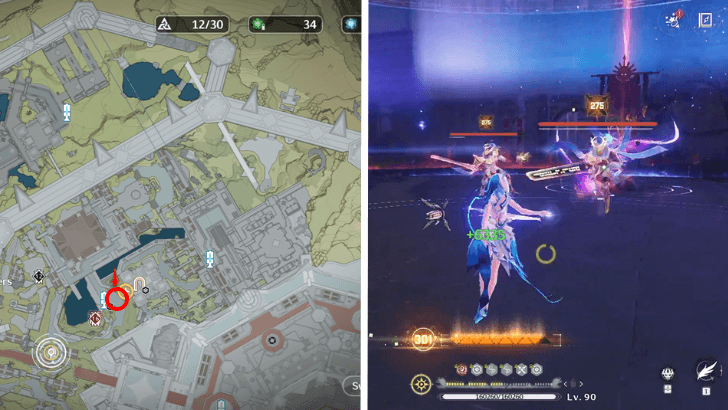 Challenge Banner 9 is located outside the elevator building going down to Minos Sewers. You will see two Capitaneus enemies defending the banner. |
| 10 | 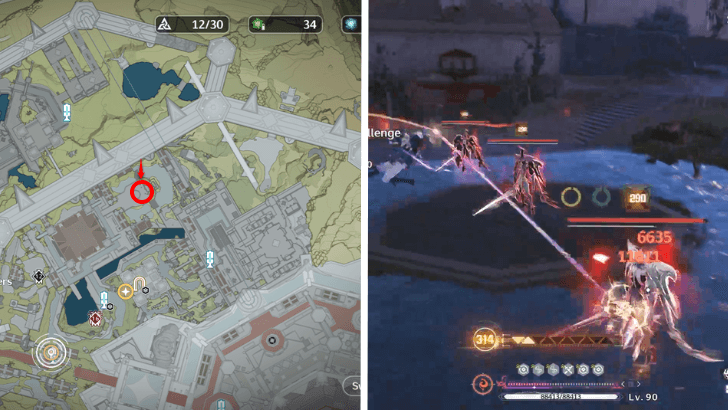 Challenge Banner 10 is found in a large courtyard surrounded by multiple buildings around the northern area of Zone 3. You will find a Questless Knight, a Nocturnus Knight, and a Diurnus Knight protecting the area. |
| 11 | 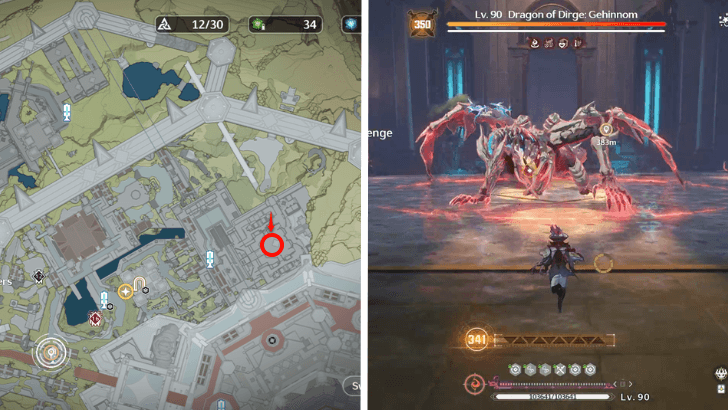 Challenge Banner 11 is located underneath the courtyard where the first Unmarked Banner is seen. You may fast travel to the challenge directly, or you may take the elevator of the building in the area. |
Challenge Banners are the Zone's primary banners containing big rewards but are protected by challenging enemies. We recommend leveling up first by exploring the Zone before challenging them to have an easier time.
Recommended Team Composition
| Recommended Attribute | ||
|---|---|---|
|
|
|
|
Best Premium Teams
| Main DPS | Sub-DPS or 2nd Main DPS |
Sub-DPS or Support |
|
|---|---|---|---|
| 1 |
|
|
|
| 2 |
|
|
|
| 3 |
|
|
|
Zone 3's Challenge Bosses are mainly resistant to Electro, Fusion, and Spectro, with the exception of Challenge 7 having Aero RES increased. We recommend playing against these elements to defeat them efficiently.
Best F2P Teams
| Main DPS | Sub-DPS or 2nd Main DPS |
Sub-DPS or Support |
|
|---|---|---|---|
| 1 |
|
|
|
| 2 |
|
|
|
For F2P players, using a team with either Havoc Rover or Danjin as a main carry will also work to clear out the stages.
Feel free to upgrade these teams with 5-Star alternatives, such as a Verina or Shorekeeper for your Support, or a Roccia for your Sub-DPS.
Zone 3 Challenge Banner Guides
Challenge Banner 7
| Enemy |
|---|
 Hurriclaw Hurriclaw
Glory Level: 230 |
| Enemy Details |
| The enemies have a higher RES to Aero DMG. |
Challenge Banner 7 will have two level 230 Hurriclaws waiting for you. We suggest using any attribute that isn't Aero to defeat it quickly.
Challenge Banner 8
| Enemy |
|---|
 Thundercrest Gladiator Thundercrest Gladiator
Glory Level: 260 |
| Enemy Details |
| The enemies have a higher RES to Electro DMG. |
Challenge Banner 8 has one level 260 Thundercrest Gladiator you will have to fight. Do not prolong the fight, as they will summon Echoes to fight for them. Target the main gladiator to finish the fight.
Challenge Banner 9
| Enemy |
|---|
 Capitaneus Capitaneus
Glory Level: 275 |
| Enemy Details |
| The enemies have a higher RES to Spectro DMG. |
In Challenge Banner 9, try to use a Havoc team as you will face against two level 275 Capitaneus enemies. Defeat them to gain the challenge's rewards.
Challenge Banner 10
| Enemy |
|---|
 Questless Knight Questless Knight
Glory Level: 290 |
| Enemy Details |
| The enemies have a higher RES against Electro DMG. |
A level 290 Knight Trio, namely a Questless Knight, Diurnus Knight, and Nocturnus Knight will be your enemy in Challenge Banner 10. Try to level up by fighting non-banner enemies inside the zone and use Aero against them.
Elite Challenge Banner 11
| Elite Enemy |
|---|
 Dragon of Dirge Dragon of Dirge
Glory Level: 350 |
| Elite Enemy Details |
| The enemies have a higher RES against Fusion DMG. Gehinom deals Fusion DMG equal to 4% of the targets' Max HP per second to the surrounding targets. When Gehinom hits a target, the target's Resonance Skill and Resonance Liberation's cooldown is extended by 5s, triggered once every 5s. |
The Elite Boss in Challenge Banner 11 will be a level 350 Dragon of Dirge. It will be a challenging fight, so prepare for it by collecting the unmarked banners and gain their buffs in battle.
Try to dodge its attacks and parry it whenever possible to reduce its Vibration Strength.
Zone 3 Rewards
Challenge Banner 7 Rewards
| Challenge Banner 7 Rewards | ||
|---|---|---|
|
|
|
|
|
|
||
Challenge Banner 8 Rewards
| Challenge Banner 8 Rewards | ||
|---|---|---|
|
|
|
|
|
|
||
Challenge Banner 9 Rewards
| Challenge Banner 9 Rewards | ||
|---|---|---|
|
|
|
|
|
|
||
Challenge Banner 10 Rewards
| Challenge Banner 10 Rewards | ||
|---|---|---|
|
|
|
|
|
|
||
Elite Challenge Banner 11 Rewards
| Elite Challenge Banner 11 Rewards | |||||
|---|---|---|---|---|---|
|
|
|
|
|||
|
|
|
||||
Wuthering Waves Related Guides
Banners Never Fall Event Guide
All Banners Never Fall Zone Guides
| All Zone Guides | |
|---|---|
| Zone 1 | Zone 2 |
| Zone 3 | Zone 4 |
| Zone 5 | |
Other Banners Never Fall Guides
| Other Guides | |
|---|---|
| All Trophy Chest Locations | All Banner of Conquest Locations |
Comment
Author

Banners Never Fall Zone 3 Chests and Guide
Please participate in our site
improvement survey
03/2026
improvement survey
03/2026
Would you assist in
improving Game8's site?
improving Game8's site?

×
We are listening to our users' valuable opinions and discussing how to act on them.
The information collected through this survey will be used for the purpose of improving our services. In addition, the information will only be disclosed a part of a statistic in a format that will not allow identification of personal information.
Begin Survey
Not Now
×
Please rate each item regarding Game8.co's Advertisements.
Amount of Ads
Very Dissatisfied
Somewhat Dissatisfied
Fine
Somewhat Satisfied
Highly Satisfied
Placement of Ads
Timing of Ad Display
Ad Loading Speed
Safeness of Ads
Content of Ads
×
Please rate each item regarding Game8.co's Quality of Articles.
Amount of information
Very Dissatisfied
Somewhat Dissatisfied
Fine
Somewhat Satisfied
Highly Satisfied
Frequency of updates
Speed of new information
Accuracy of articles
Understandibility of articles
Readability of sentences
×
Please rate each item regarding Game8.co's Usability of the Site.
Ease of finding information
Very Dissatisfied
Somewhat Dissatisfied
Fine
Somewhat Satisfied
Highly Satisfied
Loading Speed
Use of Color
Font Size
Visibility of Images
Easy to Understand Layout
×
Please rate each item regarding Game8.co's Message Boards, Comments.
Ease of Writing
Very Dissatisfied
Somewhat Dissatisfied
Fine
Somewhat Satisfied
Highly Satisfied
Readability
Ease in Finding Information
Comment Quality
Comment Quantity
Admin Response
×
Please rate each item regarding Game8.co's Site's new design.
Please rate our site's new design
Very Dissatisfied
Somewhat Dissatisfied
Fine
Somewhat Satisfied
Highly Satisfied
Do you think that the website's design change makes the site easier to use?
Has the new design made it easier for you to find information on the site?
Has the new design improved the overall visual appeal of the site?
How would you rate your overall satisfaction with the new design of the site?
×
How likely are you to recommend Game8 to someone you know?
Very Unlikely
0
1
2
3
4
5
6
7
8
9
10
Very Likely
If you have other opinions regarding potential improvement to the website, please share them with us. We would appreciate your honest opinion.
Note: This is a free response section, so you can proceed without entering anything.
Note: Please be sure not to enter any kind of personal information into your response.
Note: Please be sure not to enter any kind of personal information into your response.
×
Thank You
×
Thank you for participating in our survey! Your answers will help us to improve the quality of our website and services.
We hope you continue to make use of Game8.
We hope you continue to make use of Game8.
Close
Premium Articles

Rankings
Gaming News


![Monster Hunter Stories 3 Review [First Impressions] | Simply Rejuvenating](https://img.game8.co/4438641/2a31b7702bd70e78ec8efd24661dacda.jpeg/thumb)
Popular Games

Genshin Impact Walkthrough & Guides Wiki
Honkai: Star Rail Walkthrough & Guides Wiki
Umamusume: Pretty Derby Walkthrough & Guides Wiki
Pokemon Pokopia Walkthrough & Guides Wiki
Resident Evil Requiem (RE9) Walkthrough & Guides Wiki
Monster Hunter Wilds Walkthrough & Guides Wiki
Wuthering Waves Walkthrough & Guides Wiki
Arknights: Endfield Walkthrough & Guides Wiki
Pokemon FireRed and LeafGreen (FRLG) Walkthrough & Guides Wiki
Pokemon TCG Pocket (PTCGP) Strategies & Guides Wiki


Recommended Games
Diablo 4: Vessel of Hatred Walkthrough & Guides Wiki
Fire Emblem Heroes (FEH) Walkthrough & Guides Wiki
Yu-Gi-Oh! Master Duel Walkthrough & Guides Wiki
Super Smash Bros. Ultimate Walkthrough & Guides Wiki
Pokemon Brilliant Diamond and Shining Pearl (BDSP) Walkthrough & Guides Wiki
Elden Ring Shadow of the Erdtree Walkthrough & Guides Wiki
Monster Hunter World Walkthrough & Guides Wiki
The Legend of Zelda: Tears of the Kingdom Walkthrough & Guides Wiki
Persona 3 Reload Walkthrough & Guides Wiki
Cyberpunk 2077: Ultimate Edition Walkthrough & Guides Wiki


All rights reserved
Copyright© 2024-2025 Kuro Games. All Rights Reserved.
The copyrights of videos of games used in our content and other intellectual property rights belong to the provider of the game.
The contents we provide on this site were created personally by members of the Game8 editorial department.
We refuse the right to reuse or repost content taken without our permission such as data or images to other sites.