This survey will take about 1 minute.
Your answers will help us to improve our website.
Wuthering Waves (WuWa)
Banners Never Fall Zone 2 Chests and Guide
★ Version 3.1 → Phase 2 Pull Strategy
┣ Luuk Herssen: Builds, Asc. Materials, Sig. Weapon
┣ Rerun: Gabrena Build, Asc. Materials, Sig. Weapon
┣ Mansion Event Guide | Bartending Recipes
┗ Tapes of Last Words | Soliskin | 3.1 Hidden Trophies
★ Exclusives: Tier List Maker | State of the Meta
This is a guide for Challenge Zone 2 under the Banners Never Fall event in Wuthering Waves 2.4. See the recommended team comps, all Zone 2 Banner guides, as well as Trophy Chest and Banner of Conquest locations in Zone 2 here!
List of Contents
Zone 2 Trophy Chest Locations
All Zone 2 Trophy Chest Locations
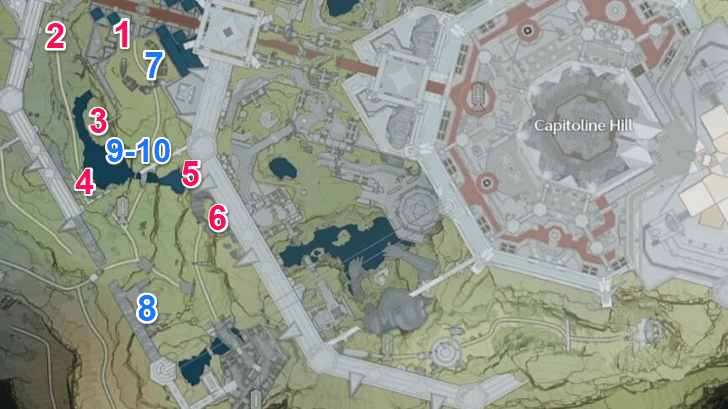
There are 10 Chests in Zone 2. The four chests denoted in blue are those that are given as a reward for defeating the area's bosses, and cannot be obtained otherwise.
Zone 2 Exploration Trophy Chest Locations
| # | Chests |
|---|---|
| 1 | 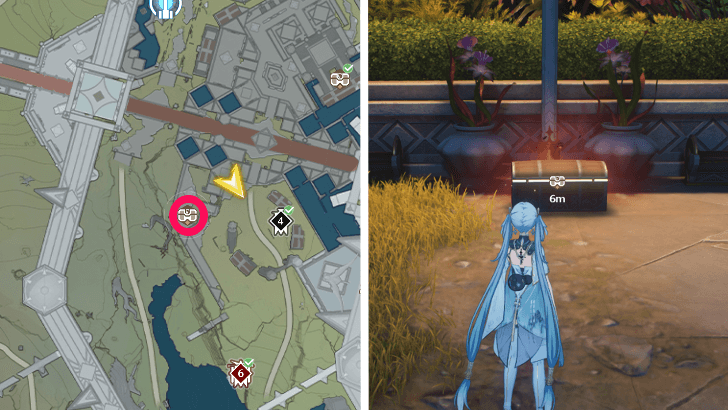 Found by the nearby walls, near some flower pots. |
| 2 | 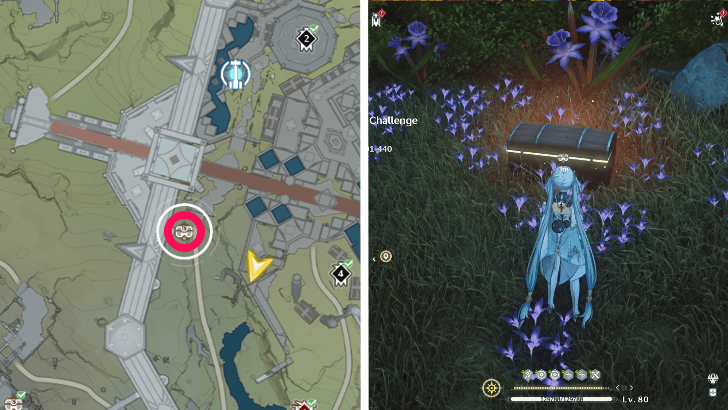 Found on the side of the road, in the flowers. |
| 3 | 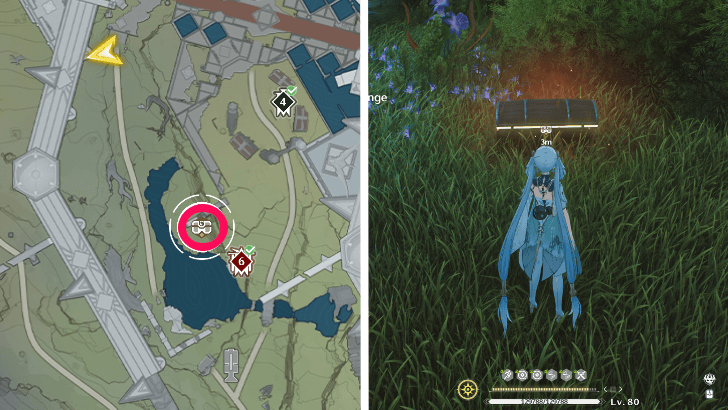 In the ravine, by the cliff wall on the small area sectioned off by the river. |
| 4 | 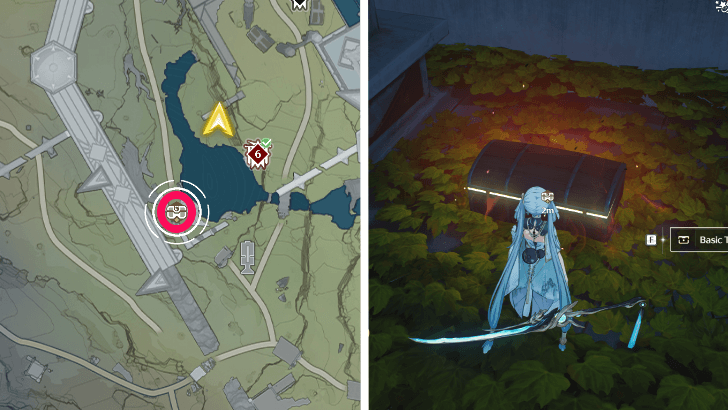 By the side of the path, hidden slightly by some brushes. |
| 5 | 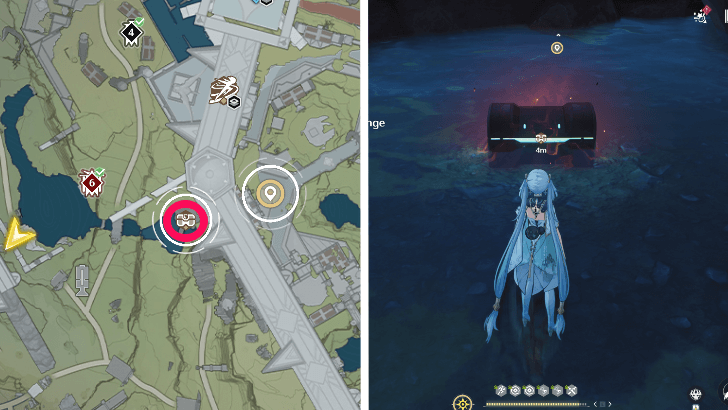 In the small pond at the top of the waterfall that connects to the river. |
| 6 | 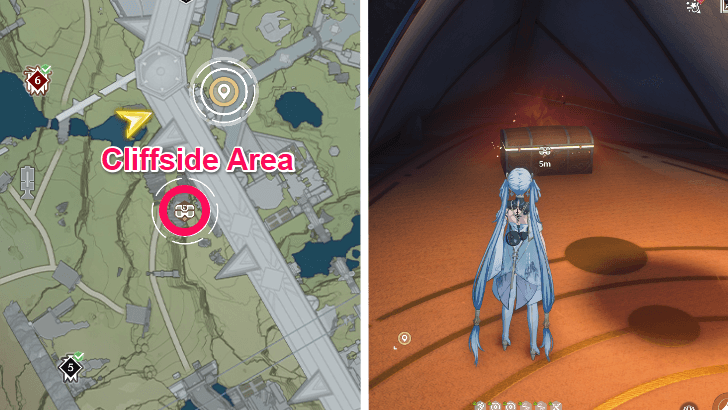 In a small tent on the cliffside area of the inner Capitoline Hill wall. |
Exploration Chests can be found at any point during the event. Do note that beating the Zone's boss will unlock a tracking feature for unclaimed chests in the Zone.
Zone 2 Boss Fight Trophy Chest Locations
| # | Chests |
|---|---|
| 7 | 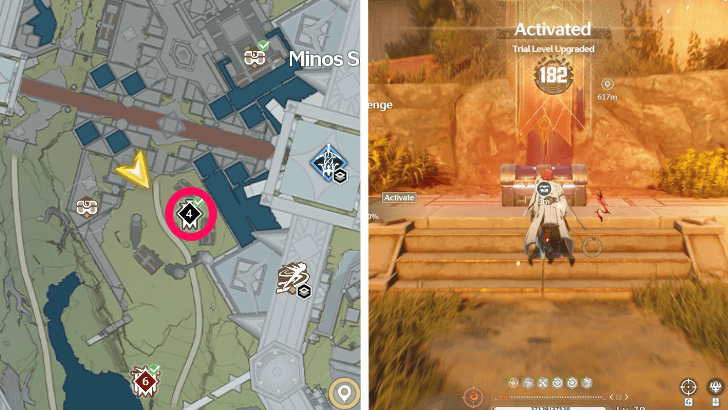 Unlocked by defeating the Glory Lvl. 150 Lightcrest Gladiator. |
| 8 | 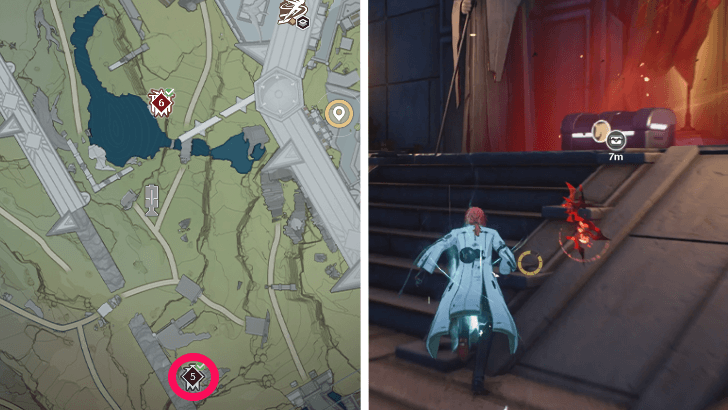 Unlocked by defeating the Glory Lvl. 175 Frostcrest Gladiator. |
| 9-10 | 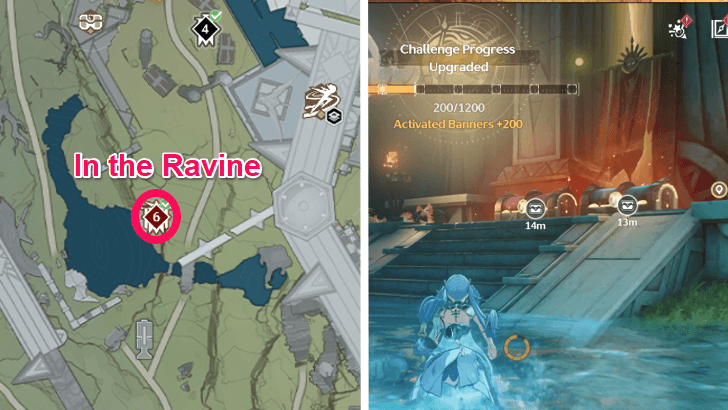 Unlocked by defeating the Glory Lvl. 225 Kelpie. |
Four chests are tied to defeating each of the Bosses in Zone 2. It is recommended to be at the suggested Glory Level before fighting each boss, as going in underlevelled may prove difficult due to enemy scaling.
Zone 2 Banner of Conquest Locations
All Zone 2 Unmarked Banner Locations
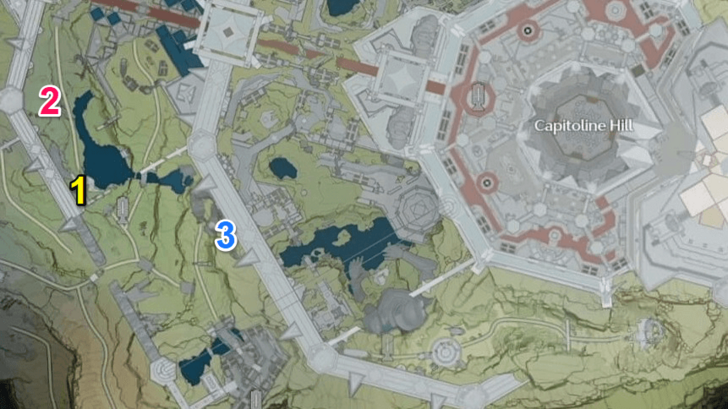
There are 3 unmarked Banners of Conquest in Zone 2. The Blue Banner provides the Halo buff, which augments your combat score. The Yellow Banner will provide free Glory, while the Red Banner is guarded by enemies.
Zone 2 Blue Banner of Conquest Locations
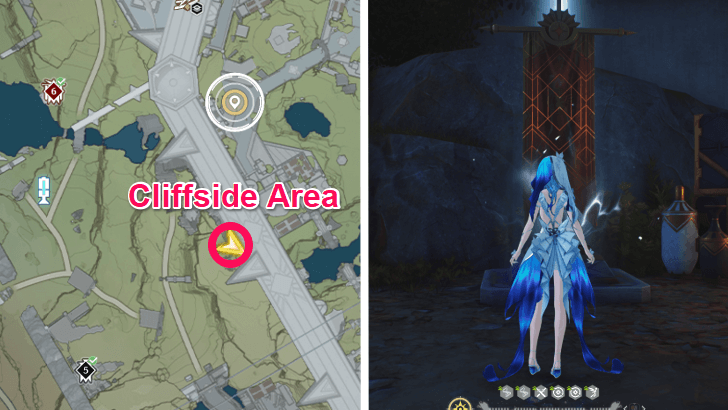
The Blue Banner for this Zone is found in a cliffside area, near the inner wall of the Capitoline Hill. It provides the Halo buff, increasing the Glory Level Increase cap of Battle Engagement Points by 200.
Zone 2 Yellow Banner of Conquest Locations

The Yellow Banner can be found along the path that cuts through Zone 2, behind the ruin walls close to the lake. It provides free Glory to help you level up.
Zone 2 Red Banner of Conquest Locations
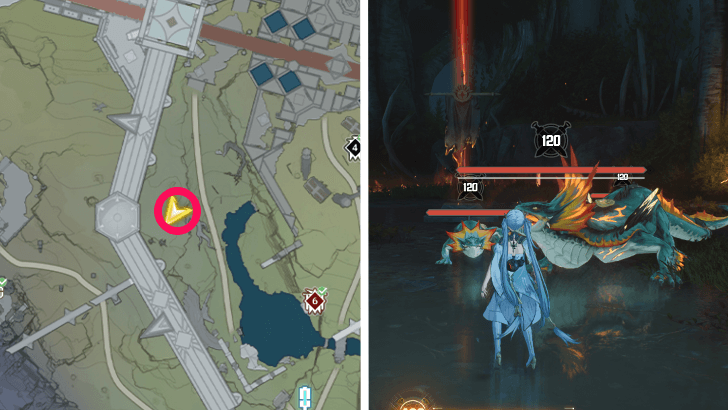
Similarly, the Red Banner in the area is found by the side of the path, close to the outer wall of the Capitoline Hill area. Your enemies will be a Viridblaze Saurian and two Baby Viridblaze Saurians at Glory Lvl. 120.
Recommended Team Composition
| Recommended Attribute | ||
|---|---|---|
|
|
|
|
Best Premium Teams
| Main DPS | Sub-DPS or 2nd Main DPS |
Sub-DPS or Support |
|
|---|---|---|---|
| 1 |
|
|
|
| 2 |
|
|
|
| 3 |
|
|
|
The enemies in Zone 2 resist Aero, Glacio, and Spectro DMG. As such, Fusion, Electro, and Havoc are the recommended elements to defeat this round of challenges.
Mono-Fusion Quickswap featuring Lupa, or a Xiangli Yao or Camellya Hypercarry team are all viable options to clear enemies in this Zone.
Best F2P Teams
| Main DPS | Sub-DPS or 2nd Main DPS |
Sub-DPS or Support |
|
|---|---|---|---|
| 1 |
|
|
|
| 2 |
|
|
|
| 3 |
|
|
|
For F2P options, a Chixia Main DPS can work as a viable Fusion Team, while both Rover (Havoc) and Danjin can work as Havoc Hypercarries.
You can opt to replace units with any Premium alternatives you have, such as having Shorekeeper or Verina as a support, or having Roccia as a Sub-DPS.
Zone 2 Challenge Banner Guides
Challenge Banner 4
| Enemy |
|---|
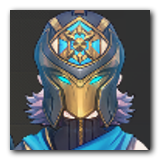
 Lightcrest Gladiator Lightcrest Gladiator
Glory Level: 150 |
| Enemy Details |
| The enemies have a higher RES against Spectro DMG. |
The first boss of Zone 2 is a Lightcrest Gladiator that resists Spectro DMG. Avoid using Spectro Resonators against it, and take note that this enemy can summon an Echo to help in combat.
Challenge Banner 5
| Enemy |
|---|
 Frostcrest Gladiator Frostcrest Gladiator
Glory Level: 175 |
| Enemy Details |
| The enemies have a higher RES against Glacio DMG. |
Similarly, the next boss, the Frostcrest Gladiator, resists Glacio DMG, and summons an Echo to assist in fighting. Don't use Glacio Resonators against it.
Elite Challenge Banner 6
| Elite Enemy |
|---|
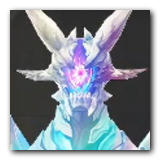 Nightmare: Kelpie Nightmare: Kelpie
Glory Level: 225 |
| Elite Enemy Details |
| The enemies have a higher RES against Glacio DMG and Aero DMG. Hitting Kelpie with Counterattack further reduces its Vibration Strength by 50%. When Kelpie is not Immobilized, all its Attribute Res is increased by 200%. When Kelpie hits a a target, the target's Resonance Skill and Resonance Liberation's cooldown is extended by 5s, triggered once every 5s. |
The Kelpie resists both Glacio and Aero DMG, so opt for other elements for this fight. The gimmick of this boss is to reduce damage taken before its Vibration Strength has been depleted.
Counterattacks have amplified Vibration Strength reduction, so aim to land these on the boss as much as possible. And lastly, try not to get hit, as the boss can increase cooldowns when landing an attack on you.
Zone 2 Rewards
Challenge Banner 4 Rewards
| Challenge Banner 4 Rewards | ||
|---|---|---|
|
|
|
|
|
|
||
Challenge Banner 5 Rewards
| Challenge Banner 5 Rewards | ||
|---|---|---|
|
|
|
|
|
|
||
Elite Challenge Banner 6 Rewards
| Elite Challenge Banner 6 Rewards | |||||
|---|---|---|---|---|---|
|
|
|
|
|||
|
|
|
||||
Wuthering Waves Related Guides
Banners Never Fall Event Guide
All Banners Never Fall Zone Guides
| All Zone Guides | |
|---|---|
| Zone 1 | Zone 2 |
| Zone 3 | Zone 4 |
| Zone 5 | |
Other Banners Never Fall Guides
| Other Guides | |
|---|---|
| All Trophy Chest Locations | All Banner of Conquest Locations |
Comment
Author

Banners Never Fall Zone 2 Chests and Guide
Please participate in our site
improvement survey
03/2026
improvement survey
03/2026
Would you assist in
improving Game8's site?
improving Game8's site?

×
We are listening to our users' valuable opinions and discussing how to act on them.
The information collected through this survey will be used for the purpose of improving our services. In addition, the information will only be disclosed a part of a statistic in a format that will not allow identification of personal information.
Begin Survey
Not Now
×
Please rate each item regarding Game8.co's Advertisements.
Amount of Ads
Very Dissatisfied
Somewhat Dissatisfied
Fine
Somewhat Satisfied
Highly Satisfied
Placement of Ads
Timing of Ad Display
Ad Loading Speed
Safeness of Ads
Content of Ads
×
Please rate each item regarding Game8.co's Quality of Articles.
Amount of information
Very Dissatisfied
Somewhat Dissatisfied
Fine
Somewhat Satisfied
Highly Satisfied
Frequency of updates
Speed of new information
Accuracy of articles
Understandibility of articles
Readability of sentences
×
Please rate each item regarding Game8.co's Usability of the Site.
Ease of finding information
Very Dissatisfied
Somewhat Dissatisfied
Fine
Somewhat Satisfied
Highly Satisfied
Loading Speed
Use of Color
Font Size
Visibility of Images
Easy to Understand Layout
×
Please rate each item regarding Game8.co's Message Boards, Comments.
Ease of Writing
Very Dissatisfied
Somewhat Dissatisfied
Fine
Somewhat Satisfied
Highly Satisfied
Readability
Ease in Finding Information
Comment Quality
Comment Quantity
Admin Response
×
Please rate each item regarding Game8.co's Site's new design.
Please rate our site's new design
Very Dissatisfied
Somewhat Dissatisfied
Fine
Somewhat Satisfied
Highly Satisfied
Do you think that the website's design change makes the site easier to use?
Has the new design made it easier for you to find information on the site?
Has the new design improved the overall visual appeal of the site?
How would you rate your overall satisfaction with the new design of the site?
×
How likely are you to recommend Game8 to someone you know?
Very Unlikely
0
1
2
3
4
5
6
7
8
9
10
Very Likely
If you have other opinions regarding potential improvement to the website, please share them with us. We would appreciate your honest opinion.
Note: This is a free response section, so you can proceed without entering anything.
Note: Please be sure not to enter any kind of personal information into your response.
Note: Please be sure not to enter any kind of personal information into your response.
×
Thank You
×
Thank you for participating in our survey! Your answers will help us to improve the quality of our website and services.
We hope you continue to make use of Game8.
We hope you continue to make use of Game8.
Close
Premium Articles

Rankings
Gaming News


![Monster Hunter Stories 3 Review [First Impressions] | Simply Rejuvenating](https://img.game8.co/4438641/2a31b7702bd70e78ec8efd24661dacda.jpeg/thumb)
Popular Games

Genshin Impact Walkthrough & Guides Wiki
Honkai: Star Rail Walkthrough & Guides Wiki
Umamusume: Pretty Derby Walkthrough & Guides Wiki
Pokemon Pokopia Walkthrough & Guides Wiki
Resident Evil Requiem (RE9) Walkthrough & Guides Wiki
Monster Hunter Wilds Walkthrough & Guides Wiki
Wuthering Waves Walkthrough & Guides Wiki
Arknights: Endfield Walkthrough & Guides Wiki
Pokemon FireRed and LeafGreen (FRLG) Walkthrough & Guides Wiki
Pokemon TCG Pocket (PTCGP) Strategies & Guides Wiki


Recommended Games
Diablo 4: Vessel of Hatred Walkthrough & Guides Wiki
Fire Emblem Heroes (FEH) Walkthrough & Guides Wiki
Yu-Gi-Oh! Master Duel Walkthrough & Guides Wiki
Super Smash Bros. Ultimate Walkthrough & Guides Wiki
Pokemon Brilliant Diamond and Shining Pearl (BDSP) Walkthrough & Guides Wiki
Elden Ring Shadow of the Erdtree Walkthrough & Guides Wiki
Monster Hunter World Walkthrough & Guides Wiki
The Legend of Zelda: Tears of the Kingdom Walkthrough & Guides Wiki
Persona 3 Reload Walkthrough & Guides Wiki
Cyberpunk 2077: Ultimate Edition Walkthrough & Guides Wiki


All rights reserved
Copyright© 2024-2025 Kuro Games. All Rights Reserved.
The copyrights of videos of games used in our content and other intellectual property rights belong to the provider of the game.
The contents we provide on this site were created personally by members of the Game8 editorial department.
We refuse the right to reuse or repost content taken without our permission such as data or images to other sites.