This survey will take about 1 minute.
Your answers will help us to improve our website.
Wuthering Waves (WuWa)
Banners Never Fall Zone 4 Chests and Guide
★ Version 3.1 → Map Update: Roya Frostlands
┣ Aemeath: Builds, Materials, Sig. Weapon
┣ Reruns & Builds: Lupa, Chisa
┣ Tapes of Last Words | Vista Views
┗ Smartprint Cubes | Soliskin | 3.1 Hidden Trophies
★ Exclusives: Tier List Maker | State of the Meta
This is a guide for Challenge Zone 4 under the Banners Never Fall event in Wuthering Waves 2.4. See the recommended team comp, all Zone 4 Banner guides, as well as trophy chest and banner of conquest locations in Zone 4 here!
List of Contents
Zone 4 Full Clear Route
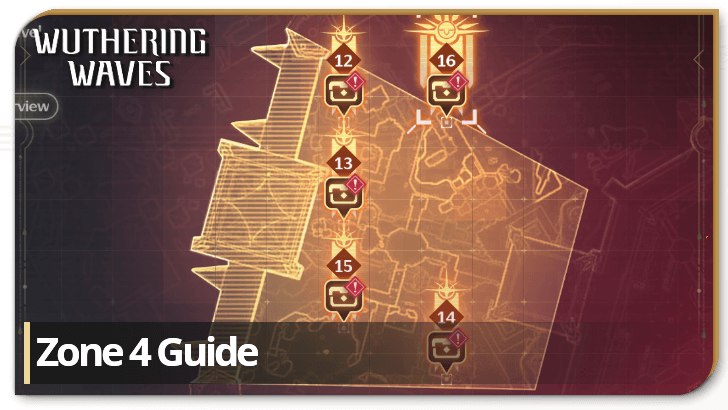
Full Clear Route
To fully clear Zone 4's challenge banners while also collecting all Trophy Chests within the area, start from challenge banner 12 and work your way south. Afterwards, fast travel to Elite challenge 16 once you've cleared all of the challenge banners and chests within the Zone.
Zone 4 Trophy Chest Locations
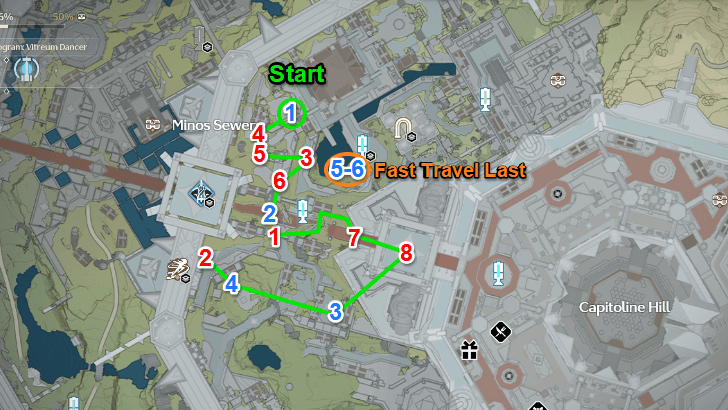
All Zone 4 Trophy Chest Locations
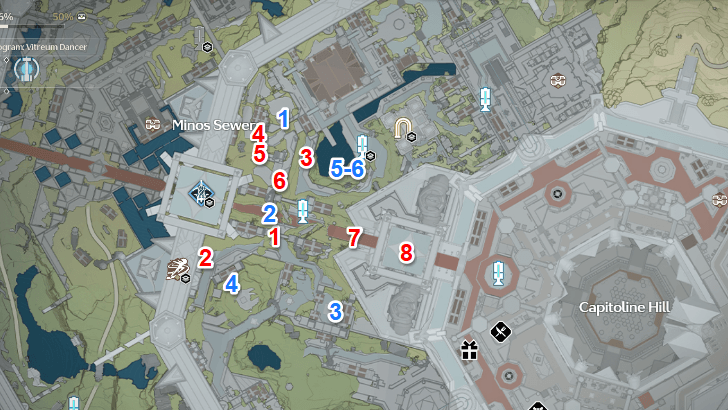
There are 14 Trophy Chests in total in Zone 4. Six can be obtained by completing all challenge banners in the zone (marked in blue), while the remaining eight become trackable after defeating the Elite Enemy (marked in red).
Exploration Trophy Chest Locations
| All Exploration Trophy Chests | |
|---|---|
| 1 | 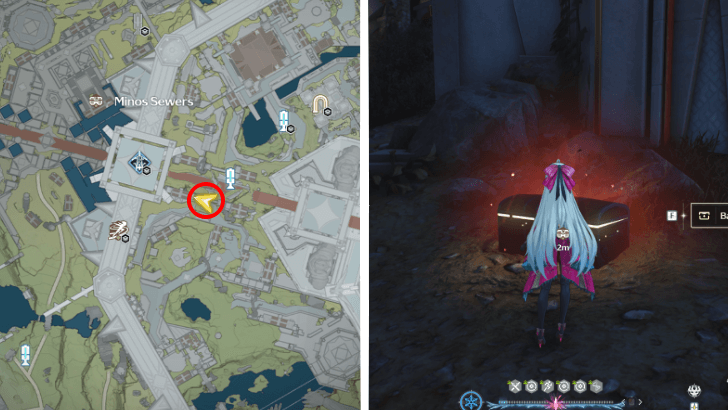 Found beside the archway entering into Zone 4, near the Resonance Beacon in the area. |
| 2 | 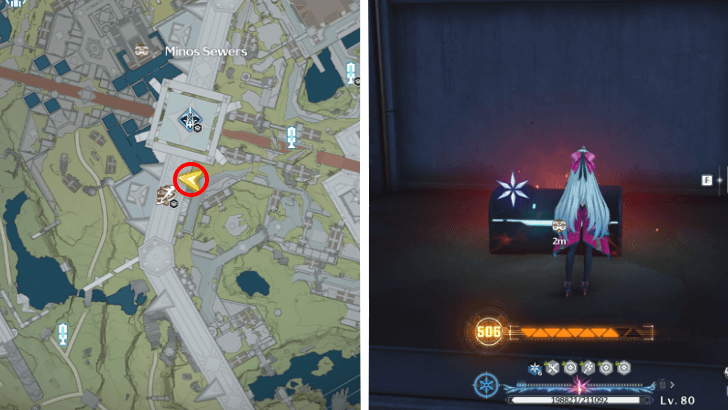 Located at a small raised platform southwest from challenge banner 15. If you haven't defeated them yet, there will be a group of Drakes near the area. |
| 3 | 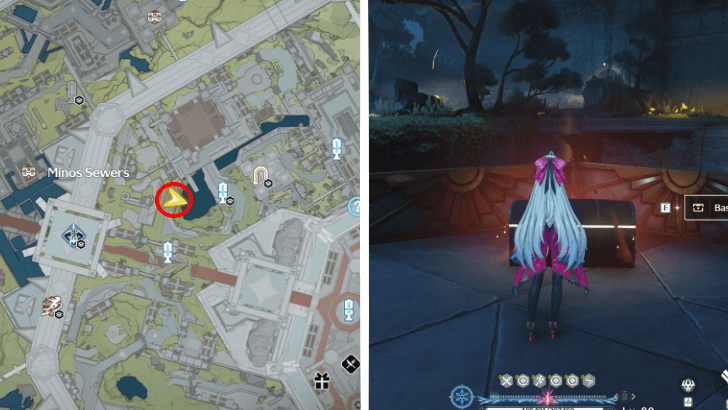 Found by the railing overlooking the deep pond where Elite challenge banner 16 is located. |
| 4 | 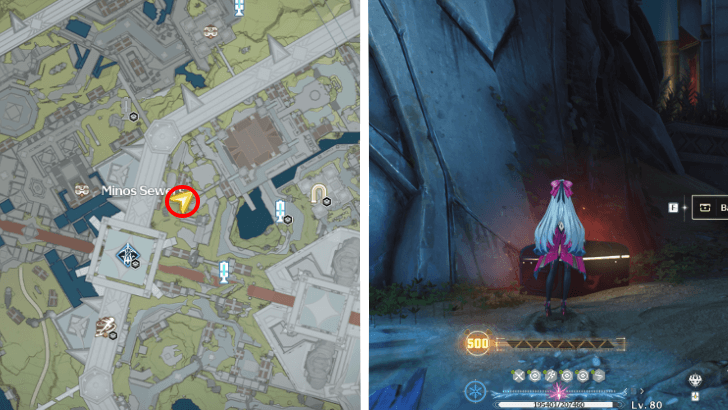 Found at the base of an ruined old guard statue, located south from where challenge banner 12 is located. |
| 5 | 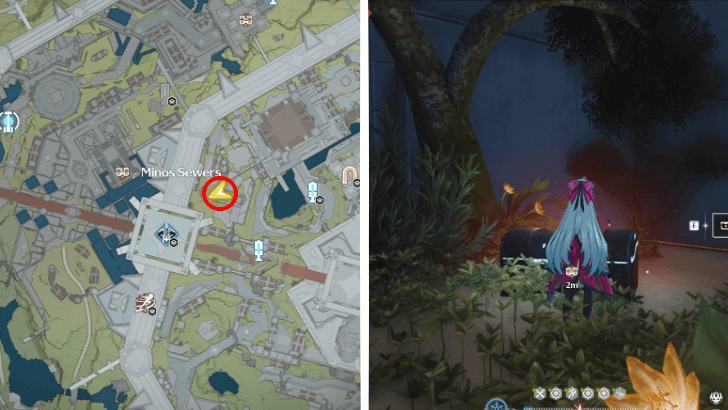 Located on top of a square pillar south from Trophy Chest number 4. |
| 6 | 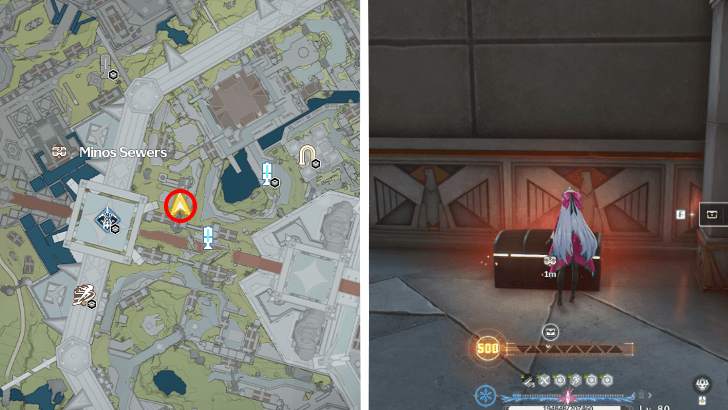 Found next to an archway northeast from the area's Resonance Beacon. |
| 7 |  Can be found underneath the staircase leading up to Capitoline Hill. Enter through the crack located on the left side of the stairs to immediately see the chest. |
| 8 | 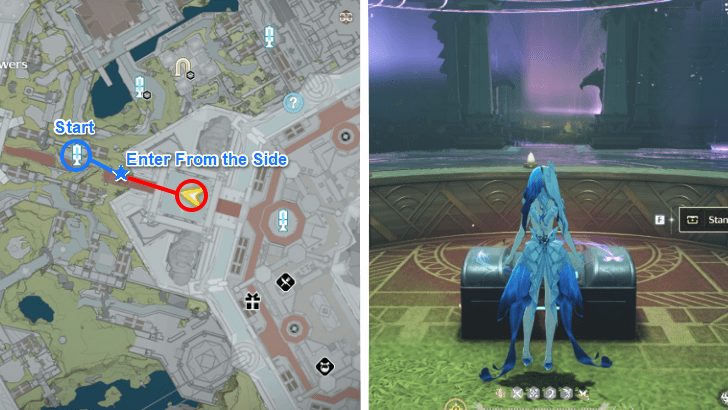 Can be found in the same area underneath the staircase that Trophy Chest number 7 is located in. Simply walk toward the end of the hallway and find it in the middle of a hollow circle. |
Banner Trophy Chest Locations
| All Banner Trophy Chests | |
|---|---|
| 1 | 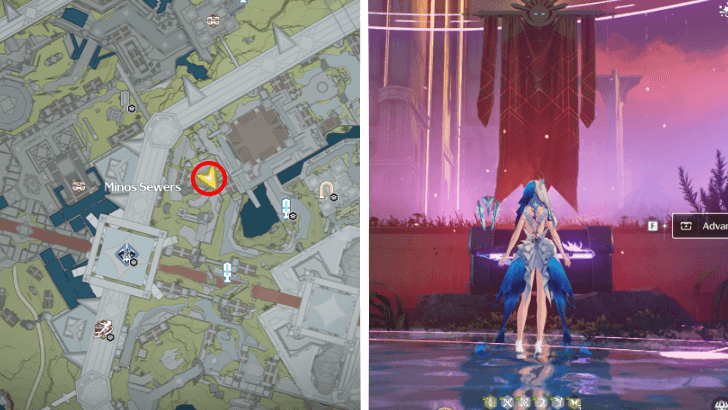 Awarded after completing challenge banner 12, located at an open area located at the top northeastern part of Zone 4. |
| 2 | 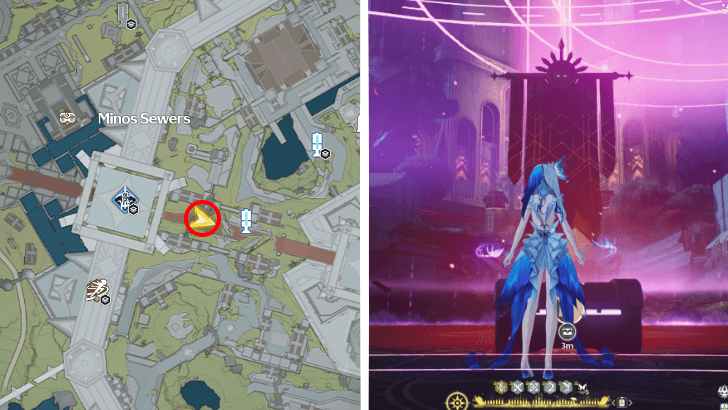 Awarded after completing challenge banner 13, located to the eat of the area's Resonance Beacon. |
| 3 | 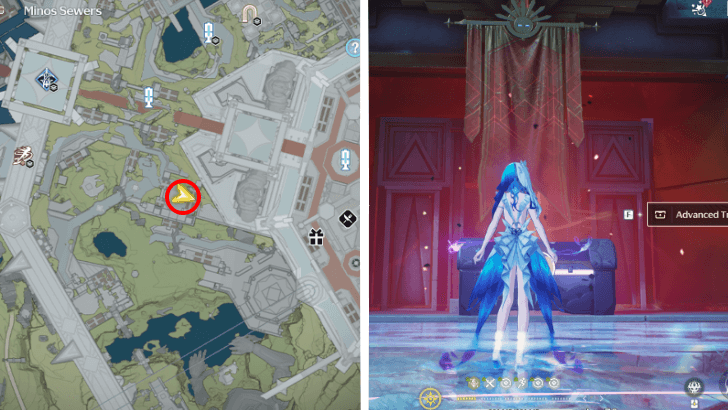 Awarded after completing challenge banner 14, located southeast from the staircase leading into Capitoline Hill. |
| 4 | 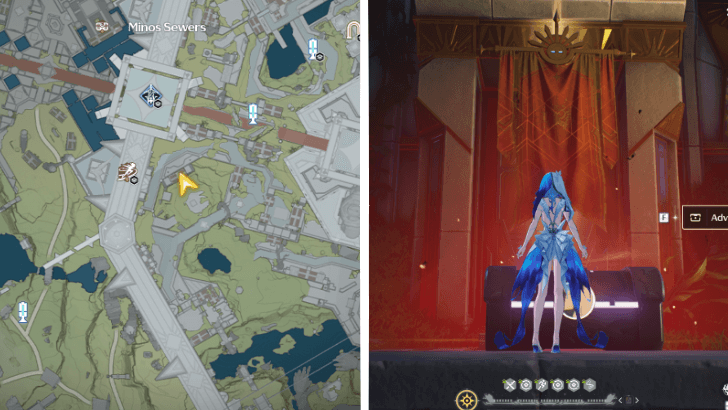 Awarded after completing challenge banner 15, located in an open area southwest from the area's Resonance Beacon. |
| 5-6 | 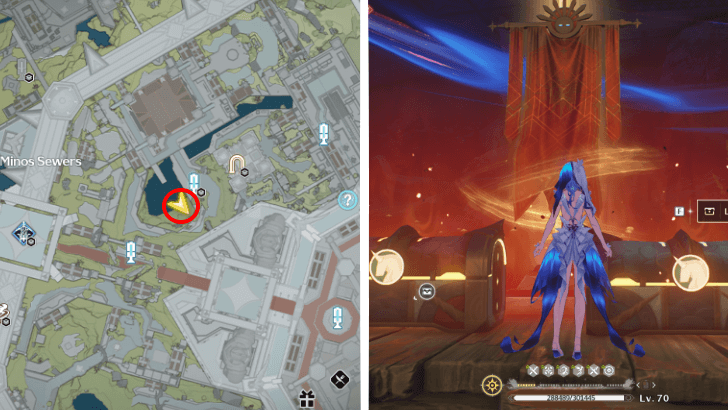 Two chests awarded after completing challenge banner 16, at a deep pond located northeast from the Zone's Resonance Beacon. |
Zone 4 Banner of Conquest Locations
All Zone 4 Banner of Conquest Locations
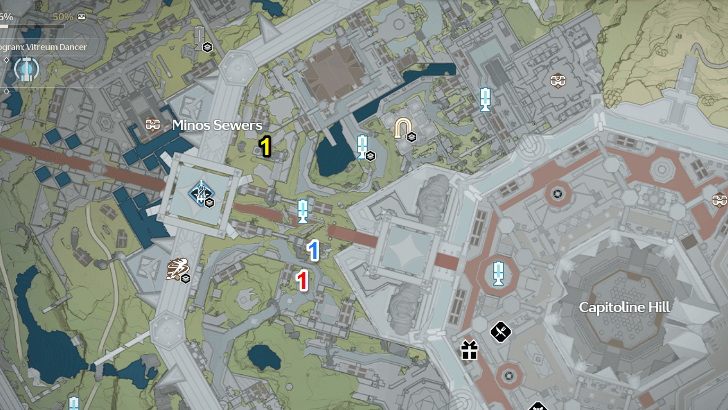
There are a total of 3 known unmarked banners in Zone 4. one of them is yellow, which you can activate and get extra Hunt Points from, one of them is red, where you can defeat a small group of enemies and gain Hunt Points, and one blue banner which grants the Smash buff.
Zone 4 Unmarked Blue Banner Location
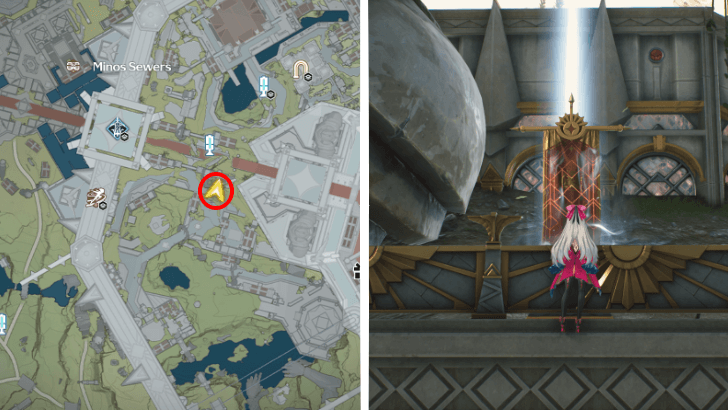
The only blue banner in Zone 4 is located southeast from the area's Resonance Beacon, next to a railing overlooking an open area with a red unmarked banner.
Activating this banner will unlock the Smash buff which amplifies your team's damage dealt to Common and Elite class enemies within the area by 100%.
Zone 4 Unmarked Red Banner Location
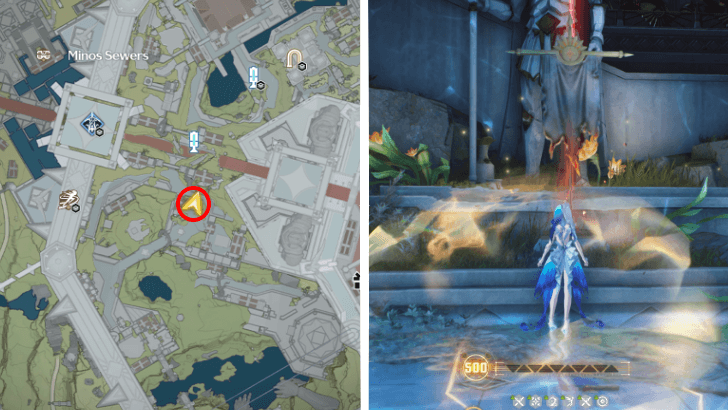
The only red banner in Zone 5 is located directly below the blue banner's location, southeast from the area's Resonance Beacon. This location is guarded by a Mimic and two Diamondclaws which you may defeat in order to activate the banner.
Zone 4 Umarked Yellow Banner Location
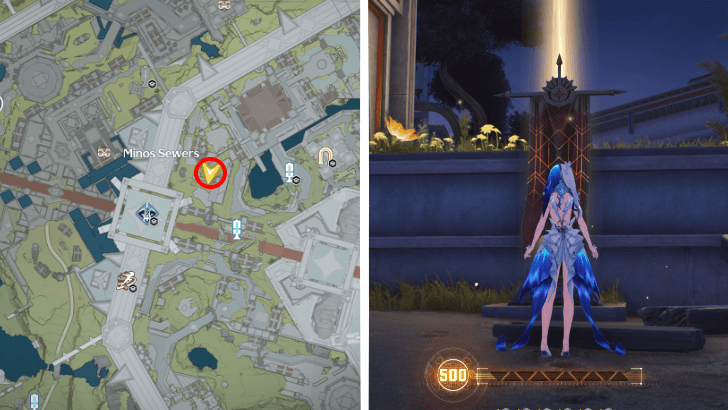
The yellow banner is located northeast from the Resonance Beacon and can be found at an elevated open area west of Elite challenge banner 16. If you haven't defeated them yet, there should be a group of Drakes in the location!
Recommended Team Composition
| Recommended Attribute | |
|---|---|
|
|
|
Best Premium Teams
| Main DPS | Sub-DPS | Support |
|---|---|---|
|
|
|
|
|
|
|
|
|
|
|
|
A Premium Team of Zani, Phoebe, and Shorekeeper is ideal for Zone 4, capitalizing on the Elite Enemy debuff that causes them to take 100% more damage from Spectro Frazzle, a status both Zani and Phoebe specialize in applying. If you don’t have Zani, Rover (Spectro) serves as a good replacement.
Alternatively, if you're lacking in Spectro options, a Cartethyia-led Aero team is a strong fallback, especially against enemies with high Spectro RES. Ultimately, go with the best-built team in your roster that can handle challenging enemies!
Best F2P Teams
| Main DPS | Sub-DPS | Support |
|---|---|---|
|
|
|
|
|
|
|
|
A good free-to-play option features Spectro Rover as the main DPS, capable of applying Spectro Frazzle which is essential for the Zone's Elite Enemy. If Phoebe is unavailable, you can substitute her with Yangyang to buff Spectro Rover.
Alternatively, an Aero-centric team led by Aero Rover, supported by Aalto for his Aero DMG buff and Baizhi for consistent healing and secondary ATK buff application, offers a sustainable setup.
Zone 4 Challenge Banner Guides
| Jump to a Banner Guide! | |||||
|---|---|---|---|---|---|
| Banner 12 | Banner 13 | Banner 14 | |||
| Banner 15 | Banner 16 | ||||
Challenge Banner 12
| Enemies |
|---|
 Galecrest Gladiator Galecrest Gladiator
Glory Level: 340 |
| Enemy Details |
| The enemies have a higher RES against Aero DMG. |
The Galecrest Gladiator accompanied by a randomized Aero-based Echo are manageable at Glory Level 340+, thanks to their slow attack speed despite some ranged attacks. Use your strongest team composition, but avoid Aero-based teams, as they are less effective in this challenge.
Challenge Banner 13
| Enemy |
|---|
 Rage Against the Statue Rage Against the Statue
Glory Level: 360 |
| Enemy Details |
| The enemies have a higher RES against Spectro DMG. |
Rage Against the Statue is a slow-moving foe with high defense. Use Counterattacks or Dodge-Counters whenever it charges, as these actions raise your in-battle Glory Level, empowering your attacks.
Capitalize on the brief moments it takes to recover after a charge to dish out steady damage, and stay alert for its heavy stomps as it walks across the battlefield.
Challenge Banner 14
| Enemy |
|---|
 Nocturnus Knight Nocturnus Knight
Glory Level: 380 |
| Enemy Details |
| The enemies have a higher RES against Havoc DMG. |
The Nocturnus Knight thrives on dealing burst combos, then pausing briefly after each sequence. Time your Dodge-Counters to rack up Battle Engagement Points, then seize the brief windows during his recovery to land consistent, uninterrupted strikes.
Do note that you can use any well-built team composition to take down this enemy so long as they are not Havoc-centric!
Challenge Banner 15
| Enemy |
|---|
 Lumiscale Construct Lumiscale Construct
Glory Level: 390 |
| Enemy Details |
| The enemies have a higher RES against Glacio DMG. |
The Lumiscale Construct is highly mobile with the ability to dish out rapid attacks. It's best tackled at or near Glory Level 400 when the Robustness buff is unlocked, granting unlimited stamina for constant dodging. Aim for its core and break its Vibration Strength to bring it down quickly!
Elite Challenge Banner 16
| Elite Enemy |
|---|
 Lorelei Lorelei
Glory Level: 475 |
| Elite Enemy Details |
| The enemies have a higher RES against Havoc DMG. When inflicted with Spectro Frazzle, Lorelei takes 100% more damage. When Lorelei hits a target, the target's Resonance Skill and Resonance Liberation's cooldown is extended by 5s, triggered once every 5s. |
Bring a Spectro Frazzle-focused team such as one with Zani, Phoebe, and Shorekeeper to exploit Lorelei’s weakness. Keep note that she takes double damage while affected by Spectro Frazzle.
It's also best to challenge her by Glory Level 400+, with the Robustness buff unlocked, granting unlimited Stamina. This is crucial, as Lorelei's high attack speed makes frequent dodging is essential to keep her Resonance Liberation debuff at bay.
Zone 4 Rewards
Challenge Banner 12 Rewards
| Challenge Banner 12 Rewards | ||
|---|---|---|
|
|
|
|
|
|
||
Challenge Banner 13 Rewards
| Challenge Banner 13 Rewards | ||
|---|---|---|
|
|
|
|
|
|
||
Challenge Banner 14 Rewards
| Challenge Banner 14 Rewards | ||
|---|---|---|
|
|
|
|
|
|
||
Challenge Banner 15 Rewards
| Challenge Banner 15 Rewards | ||
|---|---|---|
|
|
|
|
|
|
||
Elite Challenge Banner 16 Rewards
| Elite Challenge Banner 16 Rewards | |||||
|---|---|---|---|---|---|
|
|
|
|
|||
|
|
|
||||
Wuthering Waves Related Guides
Banners Never Fall Event Guide
All Banners Never Fall Zone Guides
| All Zone Guides | |
|---|---|
| Zone 1 | Zone 2 |
| Zone 3 | Zone 4 |
| Zone 5 | |
Other Banners Never Fall Guides
| Other Guides | |
|---|---|
| All Trophy Chest Locations | All Banner of Conquest Locations |
Comment
Author

Banners Never Fall Zone 4 Chests and Guide
Please participate in our site
improvement survey
02/2026
improvement survey
02/2026
Would you assist in
improving Game8's site?
improving Game8's site?

×
We are listening to our users' valuable opinions and discussing how to act on them.
The information collected through this survey will be used for the purpose of improving our services. In addition, the information will only be disclosed a part of a statistic in a format that will not allow identification of personal information.
Begin Survey
Not Now
×
Please rate each item regarding Game8.co's Advertisements.
Amount of Ads
Very Dissatisfied
Somewhat Dissatisfied
Fine
Somewhat Satisfied
Highly Satisfied
Placement of Ads
Timing of Ad Display
Ad Loading Speed
Safeness of Ads
Content of Ads
×
Please rate each item regarding Game8.co's Quality of Articles.
Amount of information
Very Dissatisfied
Somewhat Dissatisfied
Fine
Somewhat Satisfied
Highly Satisfied
Frequency of updates
Speed of new information
Accuracy of articles
Understandibility of articles
Readability of sentences
×
Please rate each item regarding Game8.co's Usability of the Site.
Ease of finding information
Very Dissatisfied
Somewhat Dissatisfied
Fine
Somewhat Satisfied
Highly Satisfied
Loading Speed
Use of Color
Font Size
Visibility of Images
Easy to Understand Layout
×
Please rate each item regarding Game8.co's Message Boards, Comments.
Ease of Writing
Very Dissatisfied
Somewhat Dissatisfied
Fine
Somewhat Satisfied
Highly Satisfied
Readability
Ease in Finding Information
Comment Quality
Comment Quantity
Admin Response
×
Please rate each item regarding Game8.co's Site's new design.
Please rate our site's new design
Very Dissatisfied
Somewhat Dissatisfied
Fine
Somewhat Satisfied
Highly Satisfied
Do you think that the website's design change makes the site easier to use?
Has the new design made it easier for you to find information on the site?
Has the new design improved the overall visual appeal of the site?
How would you rate your overall satisfaction with the new design of the site?
×
How likely are you to recommend Game8 to someone you know?
Very Unlikely
0
1
2
3
4
5
6
7
8
9
10
Very Likely
If you have other opinions regarding potential improvement to the website, please share them with us. We would appreciate your honest opinion.
Note: This is a free response section, so you can proceed without entering anything.
Note: Please be sure not to enter any kind of personal information into your response.
Note: Please be sure not to enter any kind of personal information into your response.
×
Thank You
×
Thank you for participating in our survey! Your answers will help us to improve the quality of our website and services.
We hope you continue to make use of Game8.
We hope you continue to make use of Game8.
Close
Premium Articles

Rankings
Gaming News
![MENACE Review [Early Access] | Menacing, But Only at the Start](https://img.game8.co/4406385/400fc86faf7e41a4a05455d432d4d303.png/show)


Popular Games

Genshin Impact Walkthrough & Guides Wiki
Arknights: Endfield Walkthrough & Guides Wiki
Honkai: Star Rail Walkthrough & Guides Wiki
Wuthering Waves Walkthrough & Guides Wiki
Umamusume: Pretty Derby Walkthrough & Guides Wiki
Zenless Zone Zero Walkthrough & Guides Wiki
Pokemon TCG Pocket (PTCGP) Strategies & Guides Wiki
Clair Obscur: Expedition 33 Walkthrough & Guides Wiki
Digimon Story: Time Stranger Walkthrough & Guides Wiki
Where Winds Meet Walkthrough & Guides Wiki


Recommended Games
Diablo 4: Vessel of Hatred Walkthrough & Guides Wiki
Fire Emblem Heroes (FEH) Walkthrough & Guides Wiki
Super Smash Bros. Ultimate Walkthrough & Guides Wiki
Yu-Gi-Oh! Master Duel Walkthrough & Guides Wiki
Pokemon Brilliant Diamond and Shining Pearl (BDSP) Walkthrough & Guides Wiki
Elden Ring Shadow of the Erdtree Walkthrough & Guides Wiki
Monster Hunter World Walkthrough & Guides Wiki
The Legend of Zelda: Tears of the Kingdom Walkthrough & Guides Wiki
Persona 3 Reload Walkthrough & Guides Wiki
Cyberpunk 2077: Ultimate Edition Walkthrough & Guides Wiki


All rights reserved
Copyright© 2024-2025 Kuro Games. All Rights Reserved.
The copyrights of videos of games used in our content and other intellectual property rights belong to the provider of the game.
The contents we provide on this site were created personally by members of the Game8 editorial department.
We refuse the right to reuse or repost content taken without our permission such as data or images to other sites.