Level 16 to 20 Guide - Cube, Cubic n Cubie
★ Version 3.2 Banners → Livestream Codes
┣ Sigrika → Materials, Weapon, Banner
┣ Qiuyuan → Builds, Materials, Weapon
┗ Phase 2 → Lynae, Zani, Phoebe
★ Tapes of Last Words | Soliskin | 3.1 Trophies
★ Exclusives: Tier Maker | State of the Meta
This is a guide for Levels 16 to 20 of the Cube, Cubic n Cubie event in Wuthering Waves. Check out guides for Levels 16 to 20, as well as the best teams and cubes to use in this guide!
List of Contents
Tips to Beat Level 16 to Level 20
| Level 16 to 20 General Tips |
|---|
|
|
Fully Upgrade Your Cubes
Before you begin Levels 16 to 20, make sure that your Cubes are fully leveled and equipped with the highest rarity Data Modules tailored to their roles and abilities.
Since these Cubes will serve as your primary DPS hypercarries and stay on-field for most of the levels, we highly recommend preparing them thoroughly!
Reduce Vibration Strength With Resonators
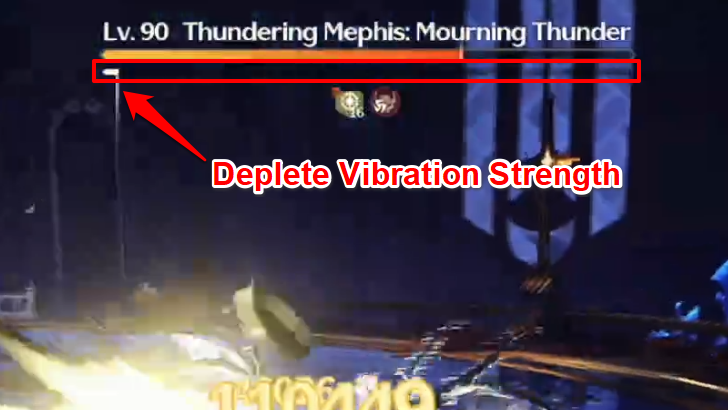
Use the best Resonator team composition available that can quickly whittle down the level boss' Vibration Strength. A DPS hypercarry Cube team excels in these stages, delivering uninterrupted damage while the boss is recovering its shields.
With that said, your team's synergy still remains important. Your Resonators must keep up the pressure during Cube cooldowns to maintain consistent DPS and control over the battle flow.
How to Reduce Vibration Strength
Follow an Optimal Rotation
| Team Rotation |
|---|
| Activate all Cubes -> Complete Full Resonator Rotation -> Trigger All Cubes Again -> *Use Roccia and Jinhsi Cube when Enemy Vibration Strength is depleted |
At the start of a boss fight, deploy all of your Cubes immediately to trigger their cooldowns. Once done, complete your Resonator team’s core rotation to maintain pressure. When your Cubes are ready again, unleash them until you fully deplete the enemy’s Vibration Strength, rendering them vulnerable to uninterrupted damage.
During this phase, use Roccia Cube to shred enemy DEF and provide supplementary DPS, while Jinhsi Cube delivers focused damage to the boss. This rotation serves as a reliable rule of thumb across all stages!
Pay Attention to Level Debuffs
| Debuffs | Effects |
|---|---|
|
|
・Deals Spectro DMG over time. ・Spectro DMG over time increases with more stacks. ・Stacks gradually decrease when affected. ・Dodge attacks to remove stacks. |
|
|
・Deals Aero DMG over time. ・Aero DMG increases with more stacks. ・Dodge attacks to remove stacks. |
|
|
・Slows move speed. ・Move speed reduction increases with stacks. ・Resonator is frozen at 10 Stacks. ・Dodge attacks to remove stacks. |
|
|
・Explodes when status effect reaches 10 Stacks. ・Dodge attacks to remove stacks. |
|
|
・1-4 Stacks: ATK -5%. ・5-9 Stacks: ATK -7%. ・10 Stacks ATK -10% and reduced move speed. |
Each stage from Levels 16 to 20 features a negative elemental status effect, with secondary enemy team-wide buffs that will make them tougher to take down. Stay vigilant in preventing debuffs from stacking against you, and work around the enemy's buffs to pass through the levels with ease!
Negative Status Effects Explained
Best Team Composition
Premium Spectro Frazzle
| Best Team Composition | ||
|---|---|---|
|
|
|
|
Zani, Phoebe, and Shorekeeper form the optimal Resonator team for levels 16 to 20, thanks to the two DPS' exceptional Spectro Frazzle synergy, and Zani’s ability to rapidly deplete enemy Vibration Strength in both Ready and Block stances.
The team’s core strategy centers on efficiently breaking enemy Vibration Strength, with Zani triggering a powerful Spectro Frazzle burst after Phoebe builds its stacks in Confession mode. Meanwhile, Shorekeeper keeps the team sustained through healing, while her Stellarealm buffs further amplify Zani’s damage output.
Best Cube Composition
Triple DPS Cube Comp
| Best Cube Composition | ||
|---|---|---|
|
|
|
|
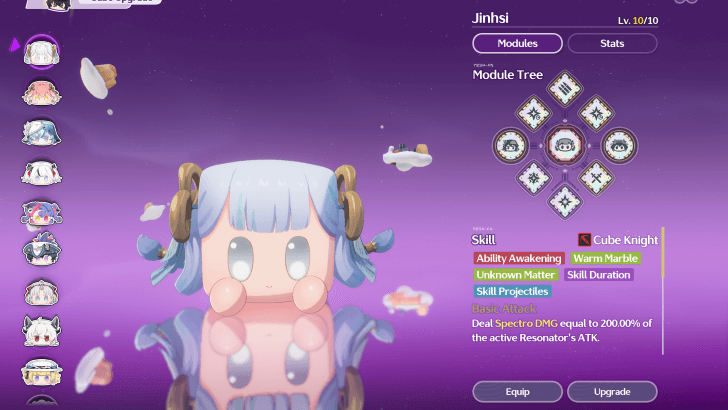
The best Cubes to bring into these levels are Jinhsi Cube, Camellya Cube, and Roccia Cube, as they function as powerful DPS hypercarries when fully leveled, and properly equipped with the right Awakening, Ability, and Standard Modules.
Jinhsi Cube burns through enemies effortlessly with her pinpoint laser beams, Camellya Cube deals excellent mobile AoE damage with her whip attacks at a rapid rate, and Roccia Cube excels at crowd control and shredding enemy DEF.
Best Cube Builds
| Jinhsi Cube Best Data Modules |
|---|
| Awakening Module: Stirred Heart Hitting a target with Light Beam gives Jinhsi Cube additional 4.5% DMG Bonus for 4s, stacking up to 40 times. Ability Modules: Orange Slice III Equip to use Carlotta Cube's Ability Theme Park Annual Pass III Equip to use Camellya's Cube's Ability Standard Modules: It's Bullet Time! VI Skill Projectiles Lv.4 (x2) Conqueror of Eternity VI Skill Duration Lv.4 (x2) The King's New Armory VI ATK +75% (x2) |
| Camellya Cube Best Data Modules |
|---|
| Awakening Module: When Spring Arrives The duration of Vining Waltz is increased by 5s. Ability Modules: Orange Slice III Equip to use Carlotta Cube's Ability The Magistrate's Fortune Stick III Equip to use Jinhsi Cube's Ability Standard Modules: Ultra Frequency Conversion Solvent VI Attack Frequency -0.06s (x2) Conqueror of Eternity VI Skill Duration Lv.4 (x2) The King's New Armory VI ATK +75% (x2) |
| Roccia Cube Best Data Modules |
|---|
| Awakening Module: Sotto Voce The DEF of targets pulled by Mind Storm is reduced by 40%. Ability Modules: Broken Staff III Equip to use Phoebe Cube's Ability Fish Head Fish Tail, Fish Bones III, Equip to use Cartethyia Cube's Ability Standard Modules: Conqueror of Eternity VI Skill Duration Lv.4 (x2) Ultra Frequency Conversion Solvent VI Attack Frequency -0.06s (x2) The King's New Armory VI ATK +75% (x2) |
For these levels, ensure all three Cubes are equipped with the highest rarity Data Modules available. Each Cube should have at least 100% Crit Rate and 100% Crit DMG or higher.
For example, you can equip two Skill Buff Standard Modules with a 100% Crit DMG substat and another two Skill Buff Standard Modules with 50% Crit Rate. Afterwards, you can pad out the two remaining slots with either ATK% or General DMG bonus.
You may adjust this accordingly, though the priority is to maximize Crit Rate and Crit DMG to make their damage output much more efficient, especially Jinhsi Cube's.
All Cubes Builds and List of Cubes
Level 16 to Level 20 Information and Guides
Level 16
| Level Overview | |
|---|---|
| Level Details |
・Enemies apply 1 stack of Spectro Frazzle when dealing damage to a target, triggered once every 3s. ・When not being attacked for 5s, Common Class enemies recover 5% of their Max HP every 2s. Revival Time: 10s / 6 Revives (Solo & Coop) Trial Resonators will be available in solo mode. |
| Trial Characters | |
In this first stage of challenges, we recommend using Camellya Cube and Roccia Cube to group enemies together and shred their DEF while dishing out wide-range damage, as enemies will spawn spread out. The key is to maintain consistent DPS across all targets to prevent them from triggering HP regeneration when left untouched.
Additionally, be sure to dodge incoming attacks both proactively and reactively! Enemies can stack Spectro Frazzle on their targets, dealing damage over time and steadily draining your Resonators' health when hit. Dodging further attacks will gradually dispel this debuff.
Level 17
| Level Overview | |
|---|---|
| Level Details |
・Enemies apply 1 stack of Glacio Chafe when dealing damage to a target, triggered once every 3s. ・Elite Class enemies gain the following effect: DEF of nearby friendly units is increased by 60%. Revival Time: 10s / 6 Revives (Solo & Coop) Trial Resonators will be available in solo mode. |
| Trial Characters | |
For this level, prioritize using Roccia Cube with her Awakening Module equipped to shred enemy DEF, while Jinhsi Cube focuses her precise damage on the Elite enemy. Eliminating the Elite first is crucial, as their DEF buff makes it harder to break through with attacks. In groups with two Elites, keep rotating back to Roccia Cube’s ability to steadily chip away at their DEF.
Stay vigilant when dodging enemy attacks. Glacio Chafe stacks slow you down with each application, and stuns you briefly when maxed out, leaving your Resonators vulnerable. Like other negative statuses, dodging incoming attacks will remove one stack at a time.
Level 18
| Level Overview | |
|---|---|
| Level Details |
・Enemies apply 1 stack of Aero Erosion when dealing damage to a target, triggered once every 3s. ・Enemies deal 30% more DMG to targets with HP below 100%. Revival Time: 10s / 6 Revives (Solo & Coop) Trial Resonators will be available in solo mode. |
| Trial Characters | |
Similar to previous levels, rely on Jinhsi Cube, Roccia Cube, and Camellya Cube to handle most of the damage, while maintaining optimal Resonator rotations to keep DPS up and steadily chip away at Vibration Strength during Cube cooldowns.
Always dodge enemy attacks when possible. Aero Erosion stacks will chip away at your Resonator's HP, making enemy attacks hit 30% harder when it's below maximum. Mitigate this by making sure that your support Resonator keeps the group's health up.
Level 19
| Level Overview | |
|---|---|
| Level Details |
・Enemies apply 1 stack of Fusion Burst when dealing damage to a target, triggered once every 3s. ・Elite Class enemies deal DMG equal to 4% of the target's Max HP to nearby targets every second. This effect is not stackable. Revival Time: 10s / 6 Revives (Solo & Coop) Trial Resonators will be available in solo mode. |
| Trial Characters | |
Level 19 follows the same strategy: focus all DPS through your Cubes, with your Resonator team providing supplemental damage during Cube cooldowns. Prioritize taking down Elite enemies first to remove their DoT effects, then clean up the rest of the enemies in their group afterward.
Be especially cautious, as failing to dodge enemy attacks during this stage will apply double DoTs, due to the Fusion Burst status effect and Elite Class enemy buff. Keep your team's health up with your support Resonator to prevent being overwhelmed.
Level 20
| Level Overview | |
|---|---|
| Level Details |
・Enemies apply 1 stack of Electro Flare when dealing damage to a target, triggered once every 3s. ・When the Resonator's attack hits an Overlord or Calamity Class target, lightning is summoned at the hit location to attack all nearby targets, dealing DMG equal to 10% of their Max HP, triggered once every 3s. Revival Time: 10s / 6 Revives (Solo & Coop) Trial Resonators will be available in solo mode. |
| Trial Characters | |
This stage assumes usage of the best Resonator team and Cubes you've relied on in previous levels. Stick to the proven rotation of using your Cubes as the main DPS carries, with your Resonators filling in during their cooldowns.
The Electro Flare challenge in this level can be punishing. Accumulating stacks will reduce your ATK DMG, while Overlord and Calamity-class enemies periodically strike your Resonators with lightning. Proper positioning and dodging are essential to avoid damage falloff. Ensure your Cubes are fully optimized to maintain strong DPS even while debuffed!
Wuthering Waves Related Guides

Cube, Cubic n Cubie Event Guide
Cube, Cubic n Cubie Level Guides
| All Level Guides | |
|---|---|
| Levels 1-5 | Levels 6-10 |
| Levels 11-15 | Level 16-20 |
| Warrior Level | |
Cube, Cubic n Cubie Tips and Tricks
| All Tips and Tricks | |
|---|---|
| Best Cubes Tier List | Cube Builds and List of Cubes |
| How to Farm Cookies and Coins (Lv. 10 Abbowser) |
How to Farm Lv. 6 Modules (Lv. 15 Abbowser) |
Comment
Author

Level 16 to 20 Guide - Cube, Cubic n Cubie
Premium Articles

Rankings
- We could not find the message board you were looking for.

Gaming News


![Monster Hunter Stories 3 Review [First Impressions] | Simply Rejuvenating](https://img.game8.co/4438641/2a31b7702bd70e78ec8efd24661dacda.jpeg/thumb)
Popular Games

Genshin Impact Walkthrough & Guides Wiki
Honkai: Star Rail Walkthrough & Guides Wiki
Umamusume: Pretty Derby Walkthrough & Guides Wiki
Pokemon Pokopia Walkthrough & Guides Wiki
Resident Evil Requiem (RE9) Walkthrough & Guides Wiki
Monster Hunter Wilds Walkthrough & Guides Wiki
Wuthering Waves Walkthrough & Guides Wiki
Arknights: Endfield Walkthrough & Guides Wiki
Pokemon FireRed and LeafGreen (FRLG) Walkthrough & Guides Wiki
Pokemon TCG Pocket (PTCGP) Strategies & Guides Wiki


Recommended Games
Diablo 4: Vessel of Hatred Walkthrough & Guides Wiki
Cyberpunk 2077: Ultimate Edition Walkthrough & Guides Wiki
Fire Emblem Heroes (FEH) Walkthrough & Guides Wiki
Yu-Gi-Oh! Master Duel Walkthrough & Guides Wiki
Super Smash Bros. Ultimate Walkthrough & Guides Wiki
Pokemon Brilliant Diamond and Shining Pearl (BDSP) Walkthrough & Guides Wiki
Elden Ring Shadow of the Erdtree Walkthrough & Guides Wiki
Monster Hunter World Walkthrough & Guides Wiki
The Legend of Zelda: Tears of the Kingdom Walkthrough & Guides Wiki
Persona 3 Reload Walkthrough & Guides Wiki


All rights reserved
Copyright© 2024-2025 Kuro Games. All Rights Reserved.
The copyrights of videos of games used in our content and other intellectual property rights belong to the provider of the game.
The contents we provide on this site were created personally by members of the Game8 editorial department.
We refuse the right to reuse or repost content taken without our permission such as data or images to other sites.