This survey will take about 1 minute.
Your answers will help us to improve our website.
Wuthering Waves (WuWa)
Banners Never Fall Zone 5 Chests and Guide
★ Version 3.1 → Phase 2 Pull Strategy
┣ Luuk Herssen: Builds, Asc. Materials, Sig. Weapon
┣ Rerun: Gabrena Build, Asc. Materials, Sig. Weapon
┣ Mansion Event Guide | Bartending Recipes
┗ Tapes of Last Words | Soliskin | 3.1 Hidden Trophies
★ Exclusives: Tier List Maker | State of the Meta
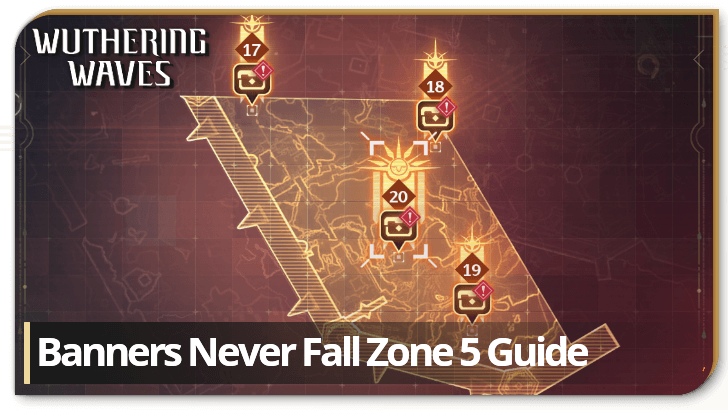
This is a guide for Challenge Zone 5 under the Banners Never Fall event in Wuthering Waves 2.4. See the recommended team comp, all Zone 5 Banner guides, as well as trophy chest and banner of conquest locations in Zone 5 here!
List of Contents
Zone 5 Full Clear Route
Full Clear Route
To fully clear Zone 5's challenge banners while also collecting all Trophy Chests within the area, start from challenge banner 17 and work your way around the zone, starting north, then heading down south.
After clearing challenge banner 19, this should place you near Elite challenge banner 20's location which you can clear last to complete the entire Zone.
Zone 5 Trophy Chest Locations
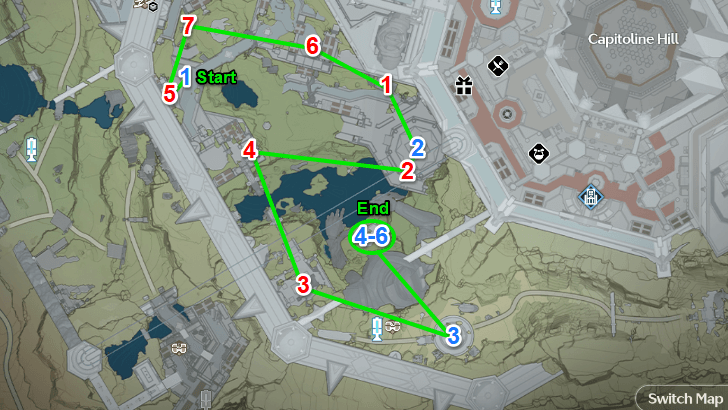
All Zone 5 Trophy Chest Locations
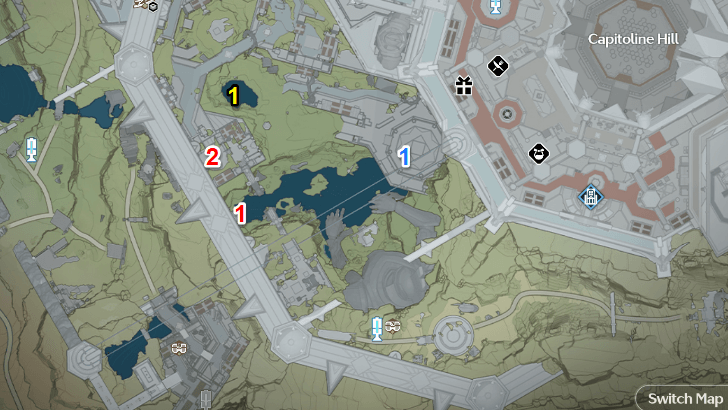
There are a total of 13 Trophy Chests you can find in Zone 5, 6 of which can be gained by completing all banners in the Zone, and 7 of which can be found by tracking its location after defeating the area's Elite Enemy.
Exploration Tropy Chest Locations
| All Exploration Trophy Chest Locations | |
|---|---|
| 1 | 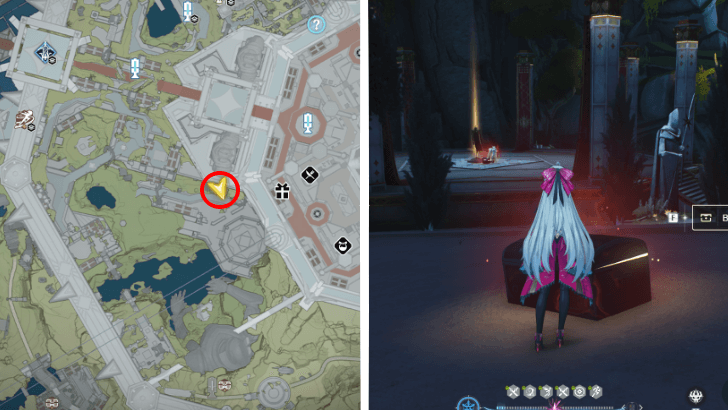 Found on top of a platform facing the area where challenge banner 18 is located. |
| 2 | 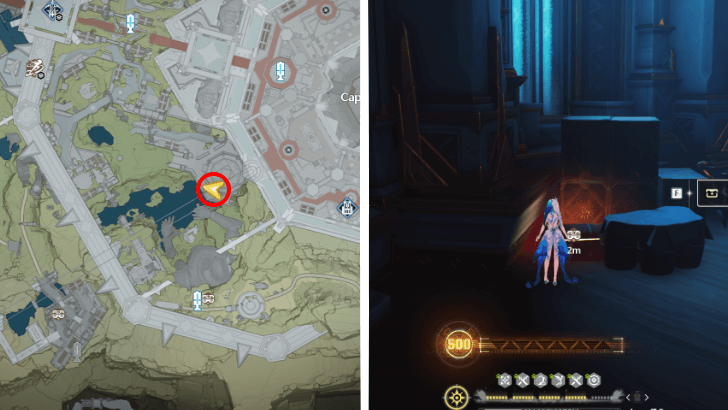 Found inside the building west of where the Zone's Elite enemy is located, behind a few crates at the right side of the room. |
| 3 | 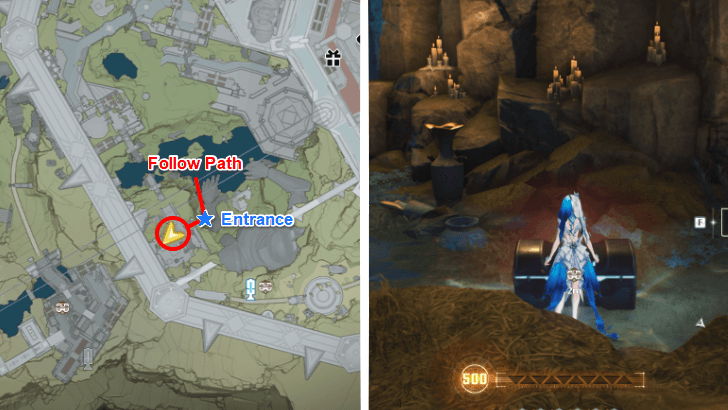 Enter the small cave southwest of the Elite enemy. Follow the stream beside the large hand statue to find the opening and the chest inside. |
| 4 | 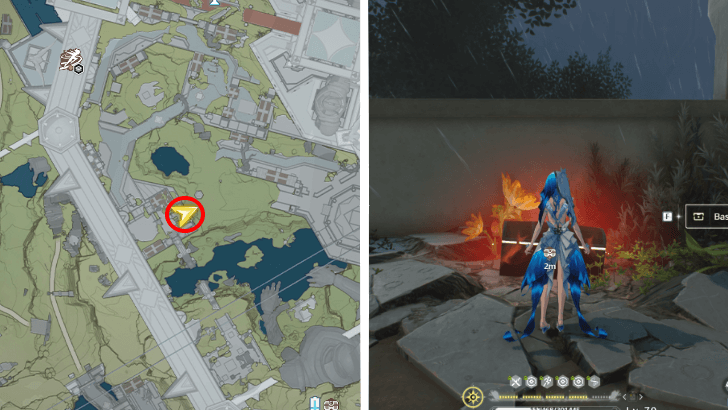 Found in an open-area ruin, southwest from challenge banner 17. |
| 5 | 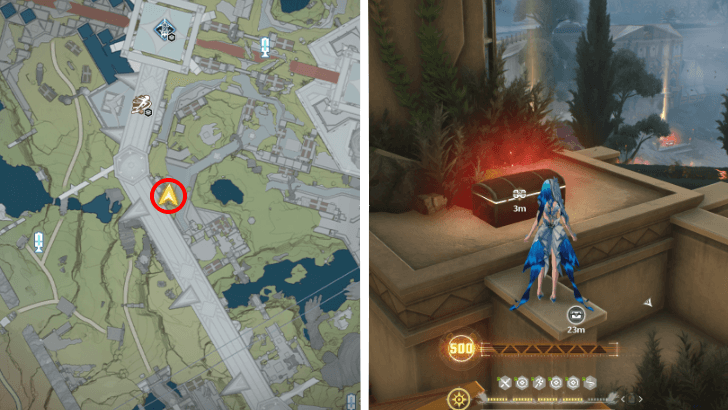 Located on top of the building where challenge banner 17 is located at. |
| 6 | 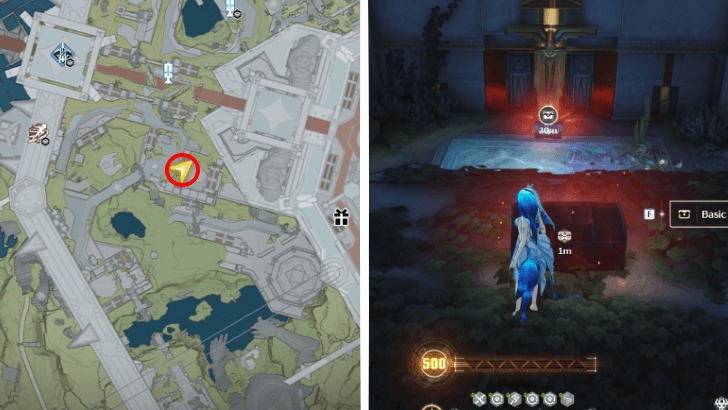 Found on top of the arch facing challenge banner 14 in Zone 4, and still counts as a Zone 5 chest. |
| 7 | 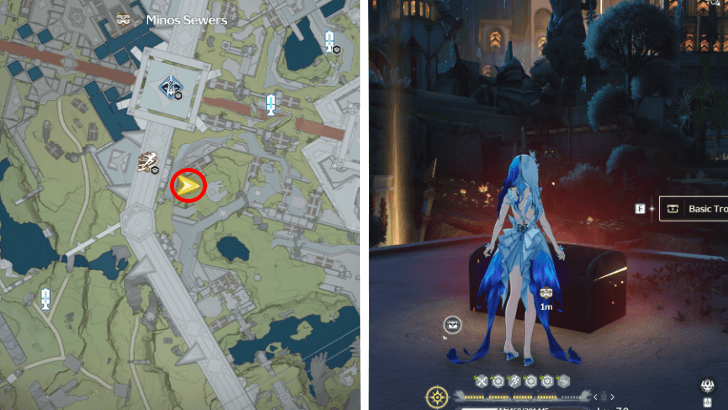 Located on top of a building where challenge banner 15 of Zone 4 is located, and still counts as a Zone 5 chest. |
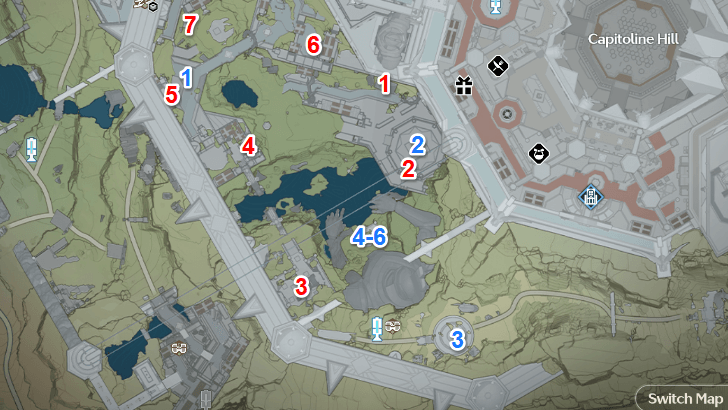
Banner Trophy Chest Locations
| All Banner Trophy Chest Locations | |
|---|---|
| 1 | 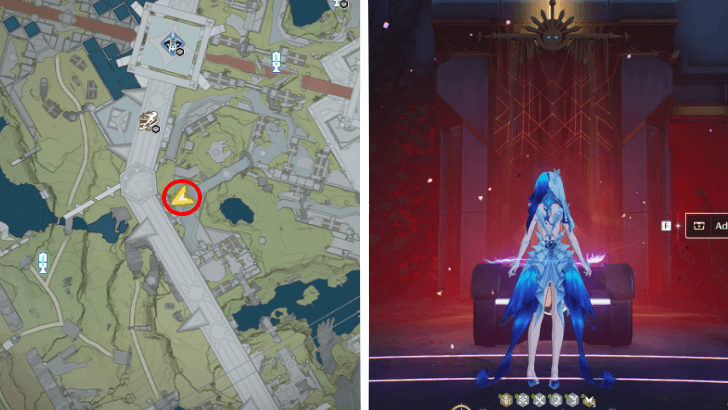 Awarded for completing challenge banner 17, located near the southeastern wall of Capitoline Hill. |
| 2 | 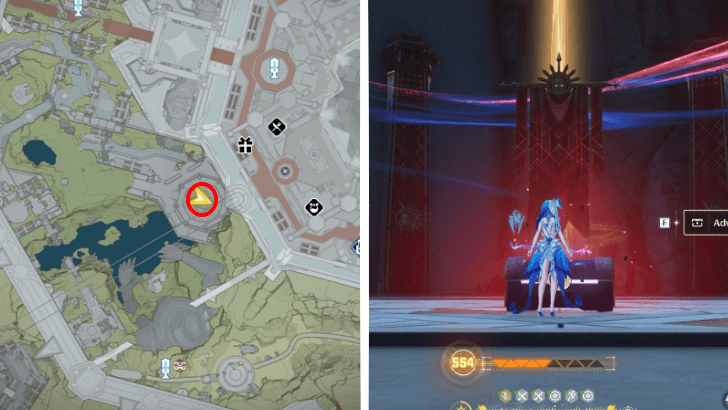 Awarded for completing challenge banner 18, located at an open-air platform near the inner walls of Capitoline Hill. |
| 3 | 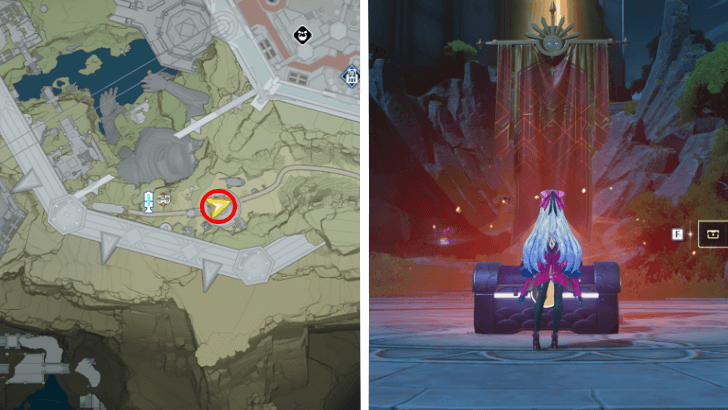 Awarded for completing challenge banner 19, located at the pathway behind the old ruined guard statue. |
| 4-6 | 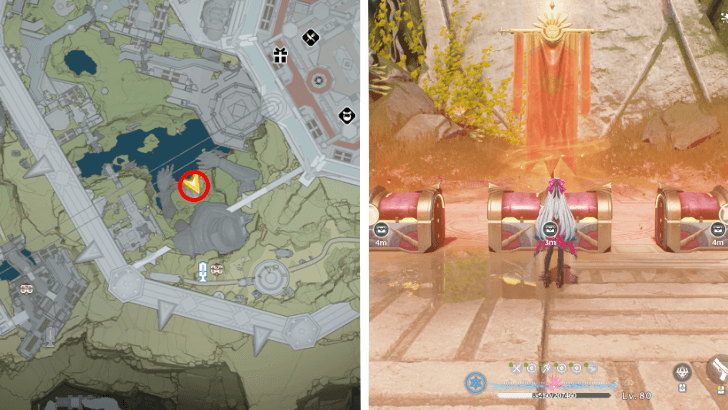 Three chests rewarded for completing Elite challenge banner 20, located at the base of the old ruined guard statue |
Zone 5 Banner of Conquest Locations
All Zone 5 Banner of Conquest Locations
There are a total of 4 unmarked banners in Zone 5. Two of them are red, where players can defeat a group of enemies and earn Hunt Points, one Yellow banner where players can directly get extra Hunt Points, and one blue banner in the area which gives the Mirror Blessing buff when activated.
Zone 5 Blue Banner of Conquest Location
The only Blue Banner of Conquest is located inside the building west within the boundaries of Elite challenge banner 20. Walking to the building will trigger the battle with the Lioness of Glory if you haven't defeated her yet, so remain cautious!
Upon activating the blue banner, you'll be granted the Mirror Blessing buff which unlocks all locked glory Level buffs though their effects are reduced by half.
Zone 5 Red Banner of Conquest Locations
| All Red Banner Locations | |
|---|---|
| 1 | 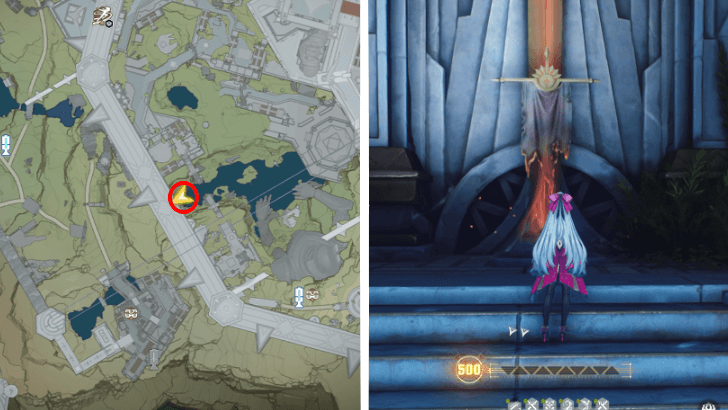 Located down the stream east from where the Zone's Elite challenge is located. This banner is guarded by three Dreadmanes. |
| 2 | 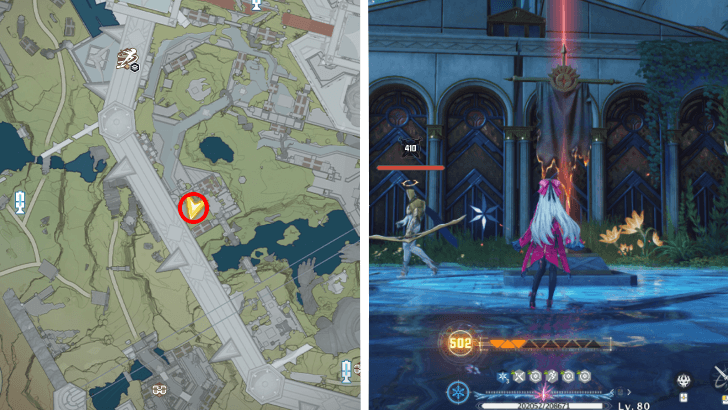 Located in an open area accessed by going through the arch southeast from challenge banner 17. This banner is guarded by three Saggitarios and one La Guardia. |
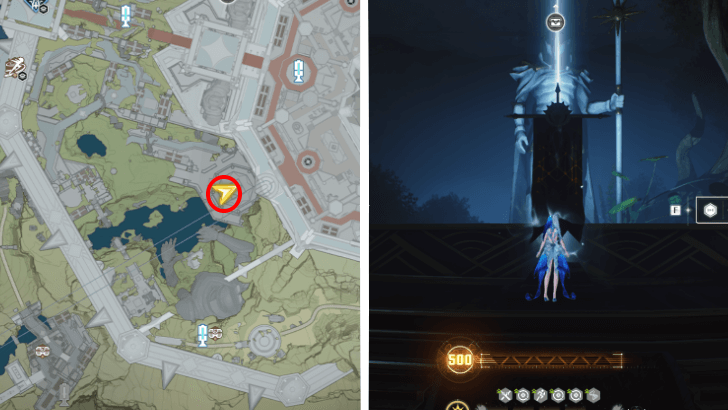
Zone 5 Yellow Banner of Conquest Location
The only Yellow banner within the area can be found at the northeastern area of Zone 5, at a small pond bordering near Zone 4. Activate this banner to receive an ample amount of Hunt Points which helps you increase your Glory Level!
Recommended Team Composition
| Recommended Attribute | |
|---|---|
|
|
|
Best Premium Teams
| Main DPS | Sub-DPS | Support |
|---|---|---|
|
|
|
|
|
|
|
|
The best Premium team for this Zone, despite some enemies with high spectro RES in the area, features Zani, Phoebe, and Shorekeeper. Zani’s strong Vibration Strength depletion synergizes well with the Glory Level buff that increases damage against immobilized enemies. Partnered with Phoebe's support in Spectro Frazzle application and Shorekeeper's Crit buffs, you're guaranteed to melt through the Elite boss thoroughly!
A secondary option includes Carlotta, Zhezhi, and Shorekeeper. The Lioness of Glory relies on fast-paced attacks and shielding, but Carlotta’s freeze and consistent pressure counter her well. Zhezhi boosts her Glacio DMG, while Shorekeeper support with heals and Crit buffs, making this trio highly effective for both the Elite and general enemies.
Best F2P Teams
| Main DPS | Sub-DPS | Support |
|---|---|---|
|
|
|
|
|
|
|
|
A good free-to-play team would include Spectro Rover, Yuanwu, and Baizhi. This composition places Spectro Rover at the core, with Yuanwu serving as the team's Vibration Strength depleter, while Baizhi provides ATK buffs and reliable healing support.
For a Glacio team, consider Zhezhi, Sanhua, and Baizhi. Zhezhi and Sanhua have strong synergy through their Outro Skills, enhancing each other’s strengths, while Baizhi rounds out the team with consistent healing and additional buffs. If Zhezhi is unavailable, you may still replace her with Spectro Rover!
Zone 5 Challenge Banner Guides
| Jump to a Banner Guide! | |||
|---|---|---|---|
| Banner 17 | Banner 18 | ||
| Banner 19 | Banner 20 | ||
Challenge Banner 17
| Enemies |
|---|
 Flamecrest Gladiator Flamecrest Gladiator
Glory Level: 440 |
| Enemy Details |
| The enemies have a higher RES against Fusion DMG. |
Much like its counterparts, the Flamecrest Gladiator also uses slow, predictable attacks, giving you plenty of windows to strike and melt them. This is especially effective if you're not running a Fusion-based team against him.
Before initiating this combat, we recommend activating the blue banner in Zone 4 first to boost your damage against Common and Elite enemies.
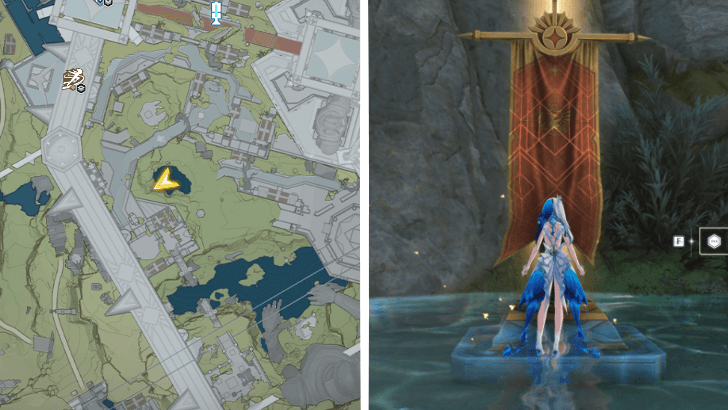
Challenge Banner 18
| Enemy |
|---|
 Diurnus Knight Diurnus Knight
Glory Level: 465 |
| Enemy Details |
| The enemies have a higher RES against Spectro DMG. |
The Diurnus Knight is a master of dishing out fast-paced combos, and gives you a window of opportunity to strike as they recover from each combo. Capitalize on those moments of rest and melt through their HP!
If you haven't yet, make sure you've activated the Smash buff from the blue flag in Zone 4, as this'll make your encounters with Elite enemies much easier.
Challenge Banner 19
| Enemy |
|---|
 Lightcrusher Lightcrusher
Glory Level: 480 |
| Enemy Details |
| The enemies have a higher RES against Spectro DMG. |
Climbing higher on the attack speed scale is the Lightcrusher, a fast and highly mobile foe. Carlotta is ideal for this fight thanks to her freezing abilities, which can halt its momentum. If she’s unavailable, focus on dodge-counters and counterattacks to maximize bonus damage from the Glory Level buffs you've already accumulated.
Ideally, face this enemy at or near Glory Level 500, where the Vibration buff becomes available. This lets you significantly reduce its Vibration Strength through attacks and counterattacks.
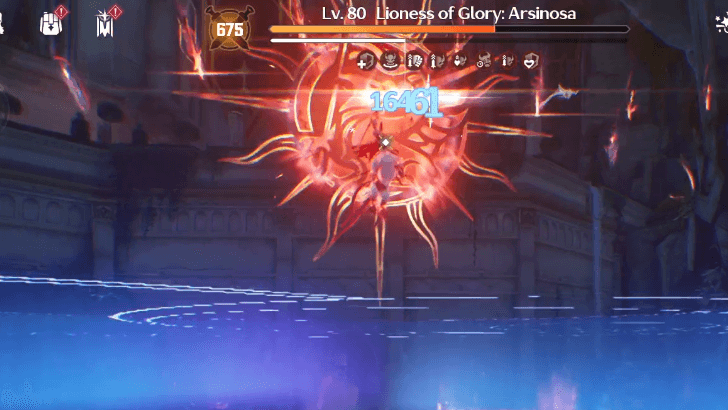
Elite Challenge Banner 20
| Elite Enemy |
|---|
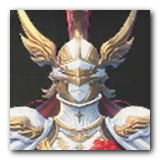 Lioness of Glory Lioness of Glory
Glory Level: 675 |
| Elite Enemy Details |
| The enemies have a higher RES against Fusion DMG. When Arsinosa hits a target, the target's STA is reduced by 100%, triggered once every 10s. Upon entering the battle, Arsinosa gains a Shield equal to 20% of her Max HP. If she hasn't taken damage for over 10s, she gains a Shield equal to 20% of her Max HP. When Arsinosa hits a target, the target's Resonance Skill and Resonance Liberation's cooldown is extended by 5s, triggered once every 5s. |
Before facing the Lioness of Glory, make sure your Glory Level is at 500, the maximum. During battle, your in-battle Glory Level can rise up to 200 Levels more, unlocking exclusive buffs that significantly enhance your performance.
She starts the fight with a shield covering 20% of her HP. Break it quickly and maintain constant pressure to prevent it from regenerating. Focus on reducing her Vibration Strength to immobilize her, which is made easy with the Vibration buff unlocked at Glory Level 500.
Once immobilized, the Crushmark buff, unlocked at Glory Level 550, doubles your damage against her, letting you capitalize on her vulnerability and potentially melt through her HP easily.
Optional: Have a Ranged Character in The Team
Optionally, bringing a Pistol Resonator can prove useful in this battle, as they can hit the Lioness of Glory even when she levitates and rains attacks from above. Landing just one hit during this phase prevents her from gaining a 20% Shield, which activates if she remains unhit for 10 seconds.
Strong premium picks include Carlotta and Ciaccona, while Aalto serves as a solid free-to-play alternative.
Zone 5 Rewards
Challenge Banner 17 Rewards
| Challenge Banner 17 Rewards | ||
|---|---|---|
|
|
|
|
|
|
||
Challenge Banner 18 Rewards
| Challenge Banner 18 Rewards | ||
|---|---|---|
|
|
|
|
|
|
||
Challenge Banner 19 Rewards
| Challenge Banner 19 Rewards | ||
|---|---|---|
|
|
|
|
|
|
||
Elite Challenge Banner 20 Rewards
| Challenge Banner 20 Rewards | ||
|---|---|---|
|
|
|
|
|
|
||
Wuthering Waves Related Guides
Banners Never Fall Event Guide
All Banners Never Fall Zone Guides
| All Zone Guides | |
|---|---|
| Zone 1 | Zone 2 |
| Zone 3 | Zone 4 |
| Zone 5 | |
Other Banners Never Fall Guides
| Other Guides | |
|---|---|
| All Trophy Chest Locations | All Banner of Conquest Locations |
Author

Banners Never Fall Zone 5 Chests and Guide
Please participate in our site
improvement survey
03/2026
improvement survey
03/2026
Would you assist in
improving Game8's site?
improving Game8's site?

×
We are listening to our users' valuable opinions and discussing how to act on them.
The information collected through this survey will be used for the purpose of improving our services. In addition, the information will only be disclosed a part of a statistic in a format that will not allow identification of personal information.
Begin Survey
Not Now
×
Please rate each item regarding Game8.co's Advertisements.
Amount of Ads
Very Dissatisfied
Somewhat Dissatisfied
Fine
Somewhat Satisfied
Highly Satisfied
Placement of Ads
Timing of Ad Display
Ad Loading Speed
Safeness of Ads
Content of Ads
×
Please rate each item regarding Game8.co's Quality of Articles.
Amount of information
Very Dissatisfied
Somewhat Dissatisfied
Fine
Somewhat Satisfied
Highly Satisfied
Frequency of updates
Speed of new information
Accuracy of articles
Understandibility of articles
Readability of sentences
×
Please rate each item regarding Game8.co's Usability of the Site.
Ease of finding information
Very Dissatisfied
Somewhat Dissatisfied
Fine
Somewhat Satisfied
Highly Satisfied
Loading Speed
Use of Color
Font Size
Visibility of Images
Easy to Understand Layout
×
Please rate each item regarding Game8.co's Message Boards, Comments.
Ease of Writing
Very Dissatisfied
Somewhat Dissatisfied
Fine
Somewhat Satisfied
Highly Satisfied
Readability
Ease in Finding Information
Comment Quality
Comment Quantity
Admin Response
×
Please rate each item regarding Game8.co's Site's new design.
Please rate our site's new design
Very Dissatisfied
Somewhat Dissatisfied
Fine
Somewhat Satisfied
Highly Satisfied
Do you think that the website's design change makes the site easier to use?
Has the new design made it easier for you to find information on the site?
Has the new design improved the overall visual appeal of the site?
How would you rate your overall satisfaction with the new design of the site?
×
How likely are you to recommend Game8 to someone you know?
Very Unlikely
0
1
2
3
4
5
6
7
8
9
10
Very Likely
If you have other opinions regarding potential improvement to the website, please share them with us. We would appreciate your honest opinion.
Note: This is a free response section, so you can proceed without entering anything.
Note: Please be sure not to enter any kind of personal information into your response.
Note: Please be sure not to enter any kind of personal information into your response.
×
Thank You
×
Thank you for participating in our survey! Your answers will help us to improve the quality of our website and services.
We hope you continue to make use of Game8.
We hope you continue to make use of Game8.
Close
Premium Articles

Rankings
Gaming News


![Monster Hunter Stories 3 Review [First Impressions] | Simply Rejuvenating](https://img.game8.co/4438641/2a31b7702bd70e78ec8efd24661dacda.jpeg/thumb)
Popular Games

Genshin Impact Walkthrough & Guides Wiki
Honkai: Star Rail Walkthrough & Guides Wiki
Umamusume: Pretty Derby Walkthrough & Guides Wiki
Pokemon Pokopia Walkthrough & Guides Wiki
Resident Evil Requiem (RE9) Walkthrough & Guides Wiki
Monster Hunter Wilds Walkthrough & Guides Wiki
Wuthering Waves Walkthrough & Guides Wiki
Arknights: Endfield Walkthrough & Guides Wiki
Pokemon FireRed and LeafGreen (FRLG) Walkthrough & Guides Wiki
Pokemon TCG Pocket (PTCGP) Strategies & Guides Wiki


Recommended Games
Diablo 4: Vessel of Hatred Walkthrough & Guides Wiki
Fire Emblem Heroes (FEH) Walkthrough & Guides Wiki
Yu-Gi-Oh! Master Duel Walkthrough & Guides Wiki
Super Smash Bros. Ultimate Walkthrough & Guides Wiki
Pokemon Brilliant Diamond and Shining Pearl (BDSP) Walkthrough & Guides Wiki
Elden Ring Shadow of the Erdtree Walkthrough & Guides Wiki
Monster Hunter World Walkthrough & Guides Wiki
The Legend of Zelda: Tears of the Kingdom Walkthrough & Guides Wiki
Persona 3 Reload Walkthrough & Guides Wiki
Cyberpunk 2077: Ultimate Edition Walkthrough & Guides Wiki


All rights reserved
Copyright© 2024-2025 Kuro Games. All Rights Reserved.
The copyrights of videos of games used in our content and other intellectual property rights belong to the provider of the game.
The contents we provide on this site were created personally by members of the Game8 editorial department.
We refuse the right to reuse or repost content taken without our permission such as data or images to other sites.
Lioness of glory is unreasonable strong. I can't even break her efficientally. Also why capping player level at 500 while boss is 675? How do I compense 175 extra levels?