This survey will take about 1 minute.
Your answers will help us to improve our website.
Wuthering Waves (WuWa)
Banners Never Fall Zone 1 Chests and Guide
★ Version 3.1 → Map Update: Roya Frostlands
┣ Aemeath: Builds, Materials, Sig. Weapon
┣ Reruns & Builds: Lupa, Chisa
┣ Tapes of Last Words | Vista Views
┗ Smartprint Cubes | Soliskin | 3.1 Hidden Trophies
★ Exclusives: Tier List Maker | State of the Meta
This is a guide for Challenge Zone 1 under the Banners Never Fall event in Wuthering Waves 2.4. See the recommended team comps, all Zone 1 Banner guides, as well as Trophy Chest and Banner of Conquest locations in Zone 1 here!
List of Contents
Zone 1 Full Clear Route
All Chests and Banners Clear Route
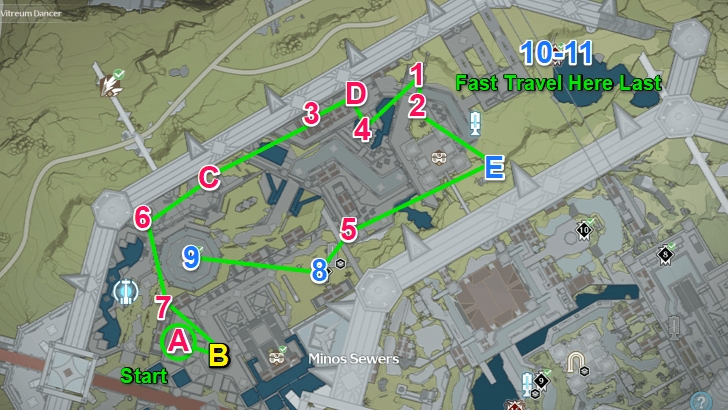
To clear all of Zone 1's chests and banners, start from Banner A and make your way northeast, then circle back around to the higher-leveled mini-boss Banners. Fast Travel to the Final Zone Boss at Chests 10-11 to end this route.
Zone 1 Trophy Chest Locations
All Zone 1 Trophy Chest Locations

There are 11 Chests in total for Zone 1. 4 are tied to the Zone's bosses, and will only appear as a reward for defeating them (Chests 8 to 11).
Zone 1 Exploration Trophy Chest Locations
| # | Chests |
|---|---|
| 1 | 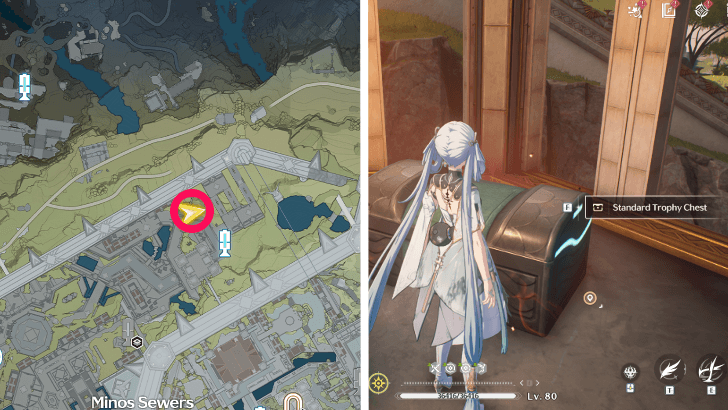 |
| 2 | 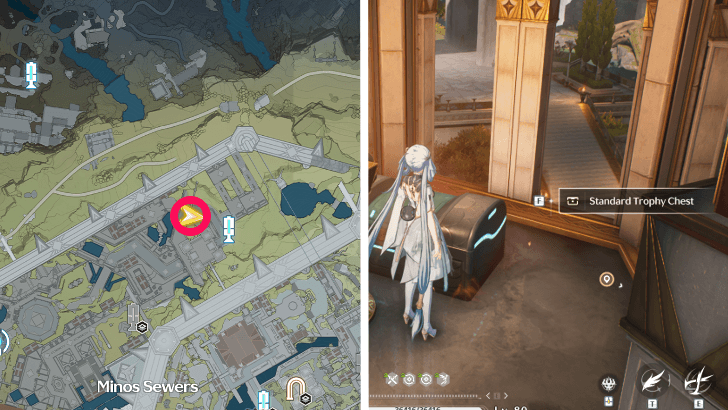 Also inside another parapet, on the same archway as Chest 1. |
| 3 | 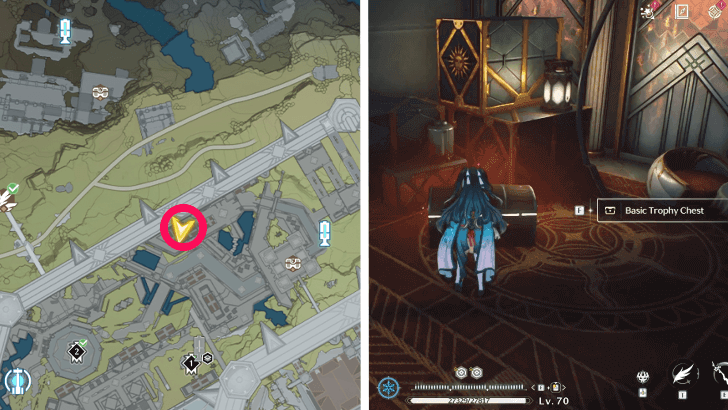 Behind a small building by the outer wall of the Capitoline Hill. |
| 4 |  In a small pool of water, west of the northernmost Resonance Beacon. |
| 5 | 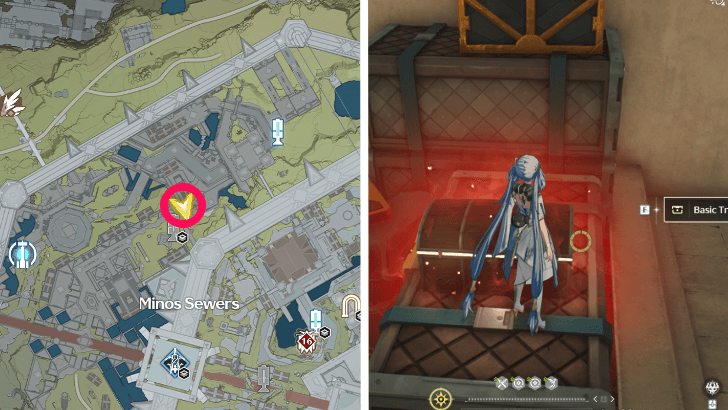 On a stack of boxes in a corner to the right of the stairs. |
| 6 | 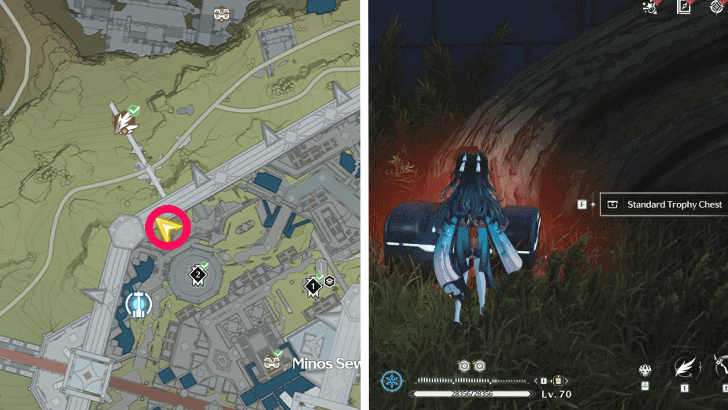 In the shrubs by the corner of the outer Capitoline Hill wall. |
| 7 | 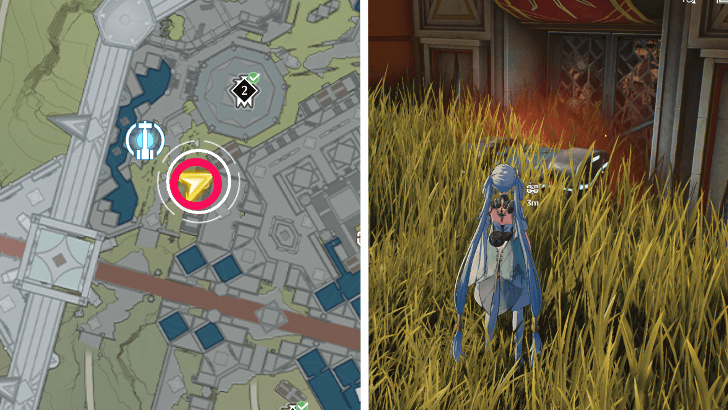 Southeast of the Resonance Nexus, in the shrubs. |
Exploration Chests can be found at any point during the event. Do note that beating the Zone's boss will unlock a tracking feature for unclaimed chests in the Zone.
Zone 1 Boss Fight Trophy Chest Locations
| # | Chests |
|---|---|
| 8 | 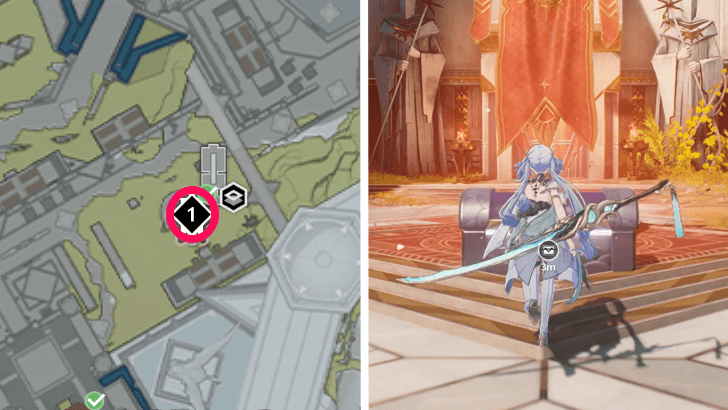 Unlocked after defeating two Glory Lvl. 50 Vitreum Dancers. |
| 9 | 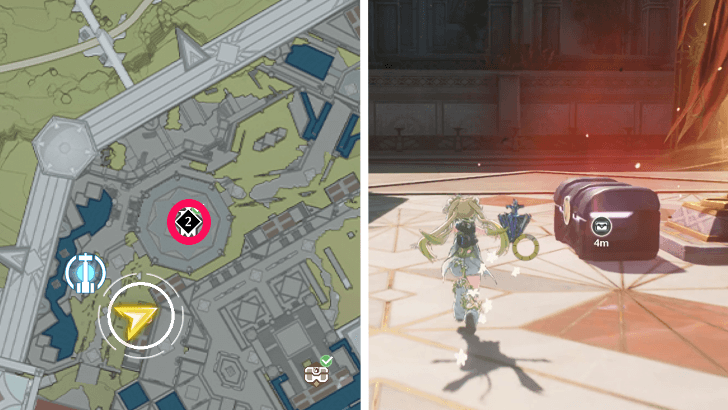 Unlocked after defeating a Glory Lvl. 90 Kerasaur. |
| 10-11 | 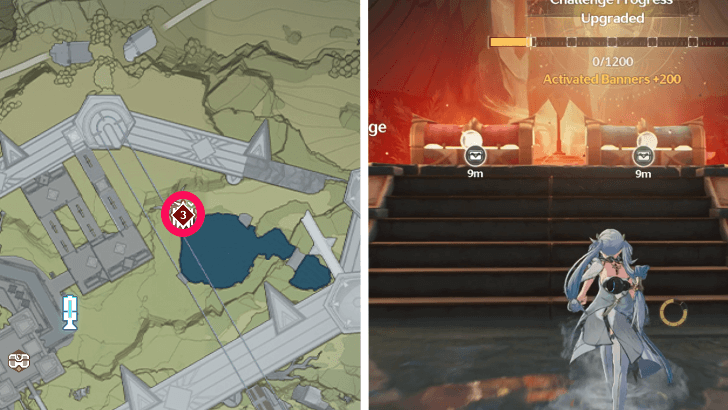 Unlocked after defeating Glory Lvl. 125 Lampylumen Myriad. |
Four chests are tied to defeating each of the Bosses in Zone 1. It is recommended to be at the suggested Glory Level before fighting each boss, as going in underlevelled may prove difficult due to enemy scaling.
Zone 1 Banner of Conquest Locations
All Zone 1 Unmarked Banner Locations
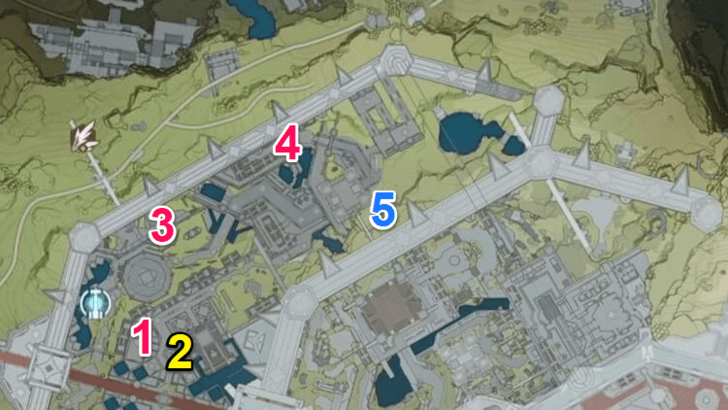
There are 5 Unmarked Banners in Zone 1. The Blue Banner will provide a buff, the Yellow Banner provides free Glory, while the Red Banners are all guarded by enemies.
Zone 1 Blue Banner of Conquest Locations
The Blue Banner of Conquest can be found to the south of the northernmost Resonance Beacon in the Capitoline Hill area. It provides the Unbound buff, reducing Flight Stamina Cost to 0 when inside the Capitoline Hill.
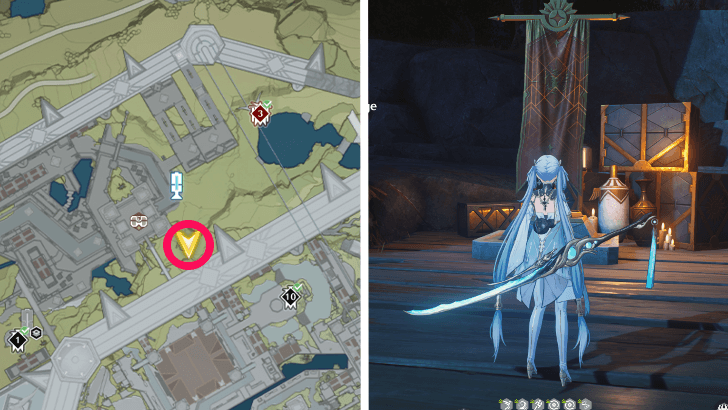
Zone 1 Yellow Banner of Conquest Locations
The Yellow Banner of Conquest grants free Glory to level up when interacted with for the first time. It is to the southeast of the Resonance Nexus, in front of a small statue in the middle of the elevated plaza.
Zone 1 Red Banner of Conquest Locations
| # | Banners |
|---|---|
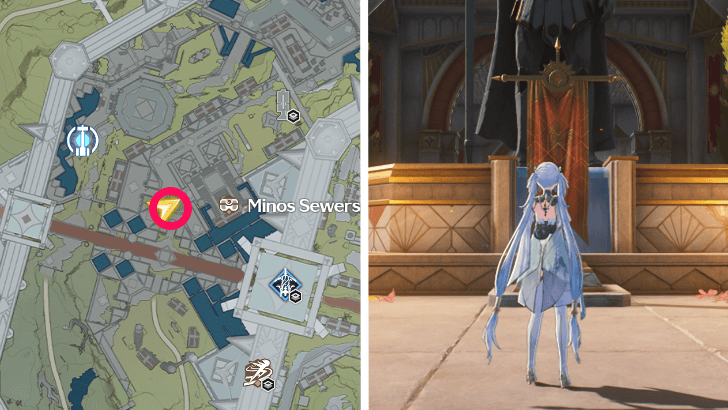
| 1 | 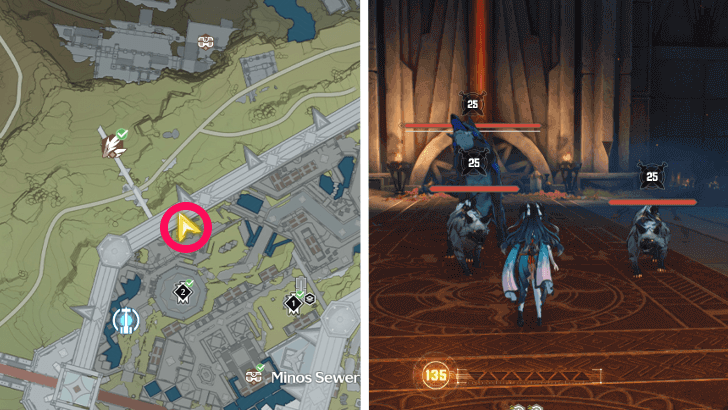 Northeast of the Resonance Nexus, by the outermost wall of the Capitoline Hill. |
| 2 | 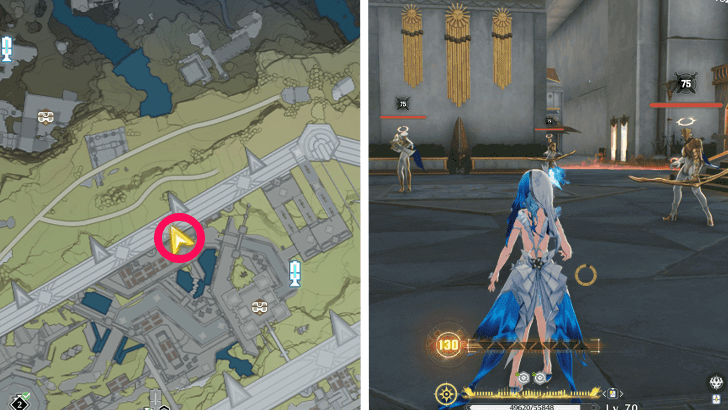 West of the northernmost Resonance Beacon, by the outermost Capitoline Hill wall. |
| 3 | 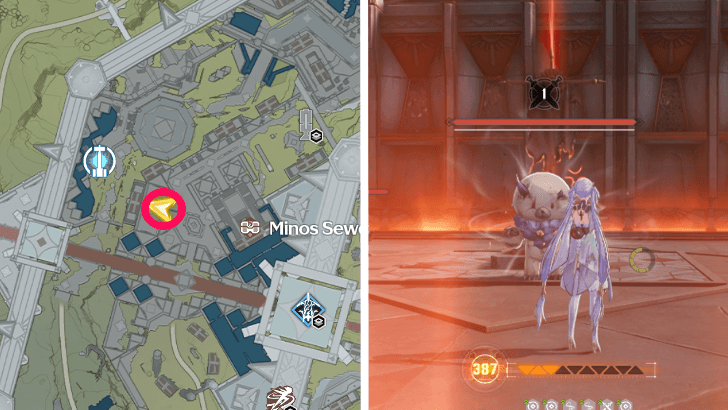 Southeast of the Resonance Nexus, in a small courtyard. |
Each of these three Red unmarked Banners of Conquest are guarded by a group of enemies that you can defeat for a large sum of Glory, quickly raising your rank.
Recommended Team Composition
| Recommended Attribute | ||
|---|---|---|
|
|
|
|
Best Premium Teams
| Main DPS | Sub-DPS or 2nd Main DPS |
Sub-DPS or Support |
|
|---|---|---|---|
| 1 |
|
|
|
| 2 |
|
|
|
| 3 |
|
|
|
Zone 1's bosses are resistant to Electro, Aero, and Glacio respectively; as such, teams centered around Fusion, Spectro, and Havoc are recommended.
Some examples are a Mono-Fusion Aggro team featuring the newest Resonator, Lupa, or a Jinhsi/Camellya Hypercarry team. It is also fine to use what you have on hand, or characters that you prefer, as the Glory Levels are more important for helping clear enemies.
Best F2P Teams
| Main DPS | Sub-DPS or 2nd Main DPS |
Sub-DPS or Support |
|
|---|---|---|---|
| 1 |
|
|
|
| 2 |
|
|
|
For F2P players, using a team with either Havoc Rover or Danjin as a main carry will also work to clear out the stages.
Feel free to upgrade these teams with 5-Star alternatives, such as a Verina or Shorekeeper for your Support, or a Roccia for your Sub-DPS.
Zone 1 Challenge Banner Guides
Challenge Banner 1
| Enemy |
|---|
 Vitreum Dancer Vitreum Dancer
Glory Level: 50 |
| Enemy Details |
| The enemies have a higher RES against Electro DMG. |
The first Challenge Banner of Zone 1 are two Vitreum Dancers with a higher Electro DMG Resistance. Avoid using Electro Resonators into them, and challenge them only when you are at or close to Glory Level 50.
Challenge Banner 2
| Enemy |
|---|
 Kerasaur Kerasaur
Glory Level: 90 |
| Enemy Details |
| The enemies have a higher RES against Aero DMG. |
The second Challenge Banner is a Kerasaur. If you were at around Glory Level 50 after defeating the previous Vitreum Dancer, you should have gained enough levels to be at the appropriate Glory Level to fight this opponent.
Avoid using Aero Resonators against it due to its higher Aero DMG Resistance.
Elite Challenge Banner 3
| Elite Enemy |
|---|
 Lampylumen Myriad Lampylumen Myriad
Glory Level: 125 |
| Elite Enemy Details |
| The enemies have a higher RES against Glacio DMG. When Lampylumen Myriad deals damage, it inflicts 3 stacks of Glacio Chafe n the target, triggered once every 6s. |
Similarly, the levels from defeating the Kerasaur should allow you to challenge the final boss of Zone 1, the Lampylumen Myriad. It resists Glacio DMG, so try not to use Glacio Resonators for this fight.
It can inflict Glacio Chafe on you with its attacks, which can freeze your characters if enough stacks have been accumulated. If this happens, quickly mash the left and right directional inputs to break free.
Zone 1 Rewards
Challenge Banner 1 Rewards
| Challenge Banner 1 Rewards | ||
|---|---|---|
|
|
|
|
|
|
||
Challenge Banner 2 Rewards
| Challenge Banner 1 Rewards | ||
|---|---|---|
|
|
|
|
|
|
||
Elite Challenge Banner 3 Rewards
| Elite Challenge Banner 1 Rewards | |||||
|---|---|---|---|---|---|
|
|
|
|
|||
|
|
|
||||
Wuthering Waves Related Guides
Banners Never Fall Event Guide
All Banners Never Fall Zone Guides
| All Zone Guides | |
|---|---|
| Zone 1 | Zone 2 |
| Zone 3 | Zone 4 |
| Zone 5 | |
Other Banners Never Fall Guides
| Other Guides | |
|---|---|
| All Trophy Chest Locations | All Banner of Conquest Locations |
Comment
Author

Banners Never Fall Zone 1 Chests and Guide
Please participate in our site
improvement survey
02/2026
improvement survey
02/2026
Would you assist in
improving Game8's site?
improving Game8's site?

×
We are listening to our users' valuable opinions and discussing how to act on them.
The information collected through this survey will be used for the purpose of improving our services. In addition, the information will only be disclosed a part of a statistic in a format that will not allow identification of personal information.
Begin Survey
Not Now
×
Please rate each item regarding Game8.co's Advertisements.
Amount of Ads
Very Dissatisfied
Somewhat Dissatisfied
Fine
Somewhat Satisfied
Highly Satisfied
Placement of Ads
Timing of Ad Display
Ad Loading Speed
Safeness of Ads
Content of Ads
×
Please rate each item regarding Game8.co's Quality of Articles.
Amount of information
Very Dissatisfied
Somewhat Dissatisfied
Fine
Somewhat Satisfied
Highly Satisfied
Frequency of updates
Speed of new information
Accuracy of articles
Understandibility of articles
Readability of sentences
×
Please rate each item regarding Game8.co's Usability of the Site.
Ease of finding information
Very Dissatisfied
Somewhat Dissatisfied
Fine
Somewhat Satisfied
Highly Satisfied
Loading Speed
Use of Color
Font Size
Visibility of Images
Easy to Understand Layout
×
Please rate each item regarding Game8.co's Message Boards, Comments.
Ease of Writing
Very Dissatisfied
Somewhat Dissatisfied
Fine
Somewhat Satisfied
Highly Satisfied
Readability
Ease in Finding Information
Comment Quality
Comment Quantity
Admin Response
×
Please rate each item regarding Game8.co's Site's new design.
Please rate our site's new design
Very Dissatisfied
Somewhat Dissatisfied
Fine
Somewhat Satisfied
Highly Satisfied
Do you think that the website's design change makes the site easier to use?
Has the new design made it easier for you to find information on the site?
Has the new design improved the overall visual appeal of the site?
How would you rate your overall satisfaction with the new design of the site?
×
How likely are you to recommend Game8 to someone you know?
Very Unlikely
0
1
2
3
4
5
6
7
8
9
10
Very Likely
If you have other opinions regarding potential improvement to the website, please share them with us. We would appreciate your honest opinion.
Note: This is a free response section, so you can proceed without entering anything.
Note: Please be sure not to enter any kind of personal information into your response.
Note: Please be sure not to enter any kind of personal information into your response.
×
Thank You
×
Thank you for participating in our survey! Your answers will help us to improve the quality of our website and services.
We hope you continue to make use of Game8.
We hope you continue to make use of Game8.
Close
Premium Articles

Rankings
- We could not find the message board you were looking for.
Gaming News
Popular Games

Genshin Impact Walkthrough & Guides Wiki
Arknights: Endfield Walkthrough & Guides Wiki
Honkai: Star Rail Walkthrough & Guides Wiki
Wuthering Waves Walkthrough & Guides Wiki
Umamusume: Pretty Derby Walkthrough & Guides Wiki
Zenless Zone Zero Walkthrough & Guides Wiki
Pokemon TCG Pocket (PTCGP) Strategies & Guides Wiki
Clair Obscur: Expedition 33 Walkthrough & Guides Wiki
Digimon Story: Time Stranger Walkthrough & Guides Wiki
Where Winds Meet Walkthrough & Guides Wiki


Recommended Games
Diablo 4: Vessel of Hatred Walkthrough & Guides Wiki
Fire Emblem Heroes (FEH) Walkthrough & Guides Wiki
Super Smash Bros. Ultimate Walkthrough & Guides Wiki
Yu-Gi-Oh! Master Duel Walkthrough & Guides Wiki
Pokemon Brilliant Diamond and Shining Pearl (BDSP) Walkthrough & Guides Wiki
Elden Ring Shadow of the Erdtree Walkthrough & Guides Wiki
Monster Hunter World Walkthrough & Guides Wiki
The Legend of Zelda: Tears of the Kingdom Walkthrough & Guides Wiki
Persona 3 Reload Walkthrough & Guides Wiki
Cyberpunk 2077: Ultimate Edition Walkthrough & Guides Wiki


All rights reserved
Copyright© 2024-2025 Kuro Games. All Rights Reserved.
The copyrights of videos of games used in our content and other intellectual property rights belong to the provider of the game.
The contents we provide on this site were created personally by members of the Game8 editorial department.
We refuse the right to reuse or repost content taken without our permission such as data or images to other sites.