Dream: Infinite I Stage Guide | Phantasma Dreamland Stage 4
★ Version 3.2 Banners → Livestream Codes
┣ Sigrika → Materials, Weapon, Banner
┣ Qiuyuan → Builds, Materials, Weapon
┗ Phase 2 → Lynae, Zani, Phoebe
★ Tapes of Last Words | Soliskin | 3.1 Trophies
★ Exclusives: Tier Maker | State of the Meta

Dream: Infinite I is the Fourth Stage under the Phantasma Dreamland event in Wuthering Waves. See the Best Dreamland Attributes and Echoes for Dream: Infinite I, Blessing, Props for this stage, and tips to clear it here!
List of Contents
Dream: Infinite I Best Dreamland Attributes
Dream of Gradation and Dream of Devouring
| Best Attributes | |
|---|---|
 Dream of Gradation Dream of Gradation |
 Dream of Devouring Dream of Devouring |
This stage locks you into using both Dream of Gradation and Dream of Devouring, with no boosted appearance rates for either. While the two can synergize through investment and gain, it’s generally more effective to focus on one.
In this case, Dream of Devouring is the stronger pick, offering more consistent and faster payouts for a streamlined strategy.
Best Dreamland Echoes
| Recommended Echoes |
 Dragon of Dirge Dragon of Dirge Dragon of Dirge Devour: Devour 1 adjacent Echo every day and gain the Daily Coupon yield of the Devoured target. When Devouring Echoes with the same Dream Attribute, ther is a 50% chance to Devour again. You can Devour up to 5 times a day.
|
 Lightcrusher Lightcrusher Lightcrusher Devour: Devour 1 to 4 adjacent Echo(es) of grey or blue rarity every day, and gain 110% of the Devoured target's Daily Coupon yield.
|
 Kerasaur Kerasaur Kerasaur This Echo cannot be Devoured. When any adjacent Echo is Devoured, there is a 30% chance to generate 1 random Prism Echo on a blank block.
|
|---|---|---|
 Fusion Prism Fusion Prism Fusion Prism When an adjacent Prism Echo is Devoured, there is a 50% chance to generate 1 random Prism Echo o a blank block.
|
 Glacio Prism Glacio Prism Glacio Prism When Devoured, increase the Daily Coupon yield of adjacent Prism Echoes by 2.
|
 Violet-Feathered Heron Violet-Feathered Heron Violet-Feathered Heron Devour: Devour 1 adjacent Echo of grey or blue rarity every day, and gain the Devoured target's Daily Coupon yield. It will Devour Prism Echoes first.
|
 Lottie Lost Lottie Lost Lottie Lost Gradation: Gradation occurs once every 3 days and increases the Daily Coupon yield of 1 random Echo on the field by 2.
|
 Gulpuff Gulpuff Gulpuff At the start of each day, there is a 30% change to generate 1 grey-rarity Echo with the same Dream Attribute on a blank block.
|
 Spectro Prism Spectro Prism Spectro Prism When an adjacent Prism Echo is Devoured, increasee this Echo's Daily Coupon yield by 2.
|
 Havoc Prism Havoc Prism Havoc Prism When an adjacent Prism Echo is Devoured, gain 5 Dreamland Coupons.
|
 Chest Mimic Chest Mimic Chest Mimic Gradation: Gradation occurs once every 3 days and increases the Daily Coupon yield by 1.
|
|
We recommend focusing primarily on Dream of Devouring Echoes. To support this, ensure a steady stream of consumables for your Devourers. Select Gradation units like Lottie Lost and Chest Mimic early on if you come across them, as they are meant to be Coupon banks for the Lightcrusher or Violet-Feathered Heron to profit from.
To maximize their value, deploy these investment Echoes during the first 3 phases, allowing them time to scale before any Devourers enter the board. This ensures their benefits are fully realized before they’re consumed.
Dream: Infinite I Best Blessing
Equip Transience

Transience is single-handedly the best Blessing in this event, so be sure to equip it. It is best triggered during Day 3 in order to fully maximize its effects, as it adds the current phase number to your Echoes' Coupon yield for three days.
Considering that this mode is infinite, the higher your phases get, the bigger its addition to your Echoes.
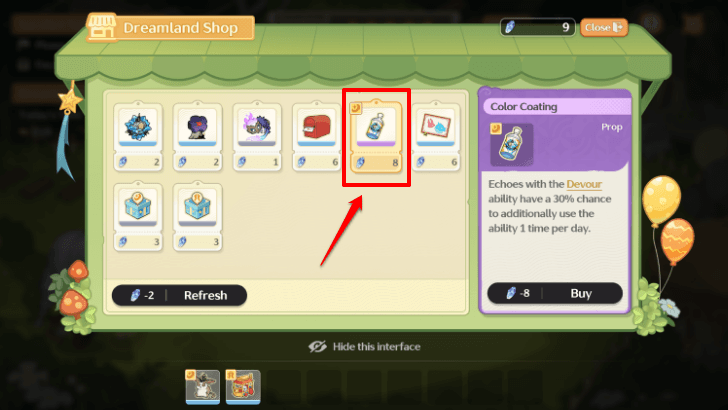
Dream: Infinite I Best Props to Get
| Prop | Explanation | |
|---|---|---|
| 1 |
 Color Coating Color Coating Color Coating Echoes with the Devour ability have a 30% chance to additionally use the ability 1 time per day.
|
An excellent choice for a Devouring board, as it grants the chance to increase the number of times your Devourers get to consue other Echoes. |
| 2 |
 Figurine: Excarat Figurine: Excarat Figurine: Excarat Every time Devour happens, gain 5 Dreamland Coupons.
|
The second-best option that synergizes with Devouring triggers by granting you 5 Coupons each time an Echo is consumed. |
| 3 |
 Time Mailbox Time Mailbox Time Mailbox Generate 1 Echo of one of the Dream Attributes activated in this Stage on a blank block every 4 days.
|
Generally good for Devouring boards as it passively generates a potential consumable Echo for your Devourers without having to spend recruitment chances or Frequency Crystals. |
| 4 |
 Pinwheel Pinwheel Pinwheel At the start of each day, the Daily Coupon yield of a random Echo increases by 2.
|
A helpful Prop that can ideally aid in increasing your Consumable Echoes' Coupon Yield, maximizing their profit before being devoured. |
| 5 |
 Surprise Box Surprise Box Surprise Box The shop offers 1 random Dream Box for free starting from the next phase.
|
A situationally good Prop to purchase, especially considering that it gives you three free Echoes to potentially act as fodder on your board. Do consider buying it later on, or when you find yourself running short on consumable Echoes! |
These are all of the best Props you should consider buying as they appear in the Shop. These will greatly help you as you further your progression through the infinite stages, so be sure to purchase them if you have enough Frequency Crystals!
Dream: Infinite I Stage Tips
| Phantasma Dreamland Event Guide |
|---|
|
|
Upgrade Your Dream Boon

Before entering this stage, make sure your Dream Boon is upgraded to its maximum reach. A this point, you should be able to unlock up until the Shop Bonus node, and have 10 extra Lost Mirror Pieces for another Dream Boon.
The best Boon to pick first within the three branching paths is Paradise Overhaul, as this grants you a recruitment refresh chance each phase, allowing you to reroll your Echo recruitment pool for something more favorable.
Purchase Props
Props become increasingly valuable as you progress through the infinite phases, as a majority of them will aid in your ability to earn more Coupons.
It's best to save up Frequency Crystals and avoid spending on low-quality Props or unnecessary Echoes that don’t align with your strategy. Prioritize long-term gains by buying valuable Props that complement your board instead!
Manage Your Echo Population
As with most Devouring-focused boards, maintaining a balanced population is key. Avoid overcrowding with Devourers, and choose Echoes that generate consumables, such as Fusion Prism, Gulpuff, and Kerasaur. For the best results, limit yourself to two Violet-Feathered Herons and one Lightcrusher to ensure a steady, sustainable income stream.
Optional: Start With Gradation Then Switch to Devouring
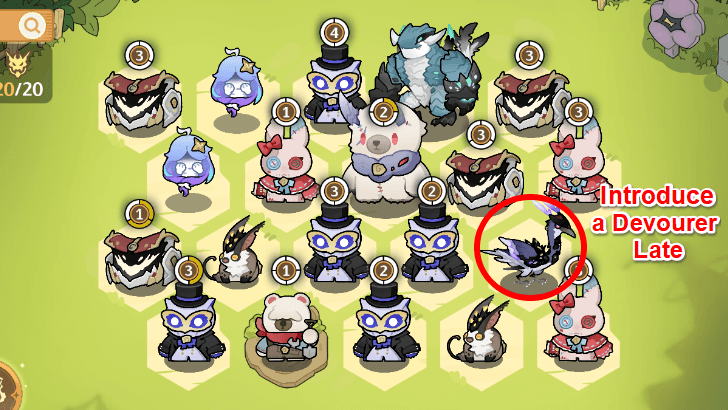
An alternative strategy is to build a full Dream of Gradation board during the early phases, focusing on getting investment-type Echoes like Chest Mimic and Lottie Lost. You can also use the Hocus Pocus + Nimbus Wraith combo to steadily increase daily income and tide over the phases.
Before or upon reaching Phase 5, start transitioning by introducing the very first Lightcrusher or Violet-Feathered Heron you come across to capitalize on the built-up Coupon yield. Gradually shift the board toward Devouring as your Gradation units are consumed.
This route relies heavily on a steady supply of Gradation Echoes, so only pursue it if your recruitment pool and Shop in the earlier phases seem to favor them!
Dream: Infinite I Stage Summary
Stage Overview
| Stage Goal | Completion Rewards |
|---|---|
| Complete the goal of 5 Phases | |
| Stage Environment | |
| Phase Goals are harder to reach. The infinite mode is available after clearing the Stage Goal. Start with the Props Figurine: Gulpuff Figurine: Gulpuff For every 10 Echoes obtained (Except from Echo Recruitment, Shop or Phantasma Blessing), receive 2 Frequency Crystals. and Dreaming Round n' Round Dreaming Round n' Round There is a 10% chance to gain 1 extra Echo during Echo Recruitment. . |
|
| Echo Dream Attribute | |
Wuthering Waves Related Guides

Phantasma Dreamland Event Guide
All Phantasma Dreamland Stage Guides
| Stage Guides | |
|---|---|
| Celestial Stairway | Whirling Rapids |
| Dream: Infinite I | |
| Barter Street | Scriptless Show |
| Dream: Infinite II | |
| Sacrifice Night | Mirror Maze |
| Dream: Infinite III | |
Phantasma Dreamland Guides
| All Dreamland Guides | |
|---|---|
| List of All Dreamland Echoes | Best Dream Attributes to Use |
| Best Dream Boons to Get First | List of Props |
Comment
Author

Dream: Infinite I Stage Guide | Phantasma Dreamland Stage 4
Premium Articles

Rankings
- We could not find the message board you were looking for.

Gaming News

![Monster Hunter Stories 3 Review [First Impressions] | Simply Rejuvenating](https://img.game8.co/4438641/2a31b7702bd70e78ec8efd24661dacda.jpeg/show)
![Monster Hunter Stories 3 Review [First Impressions] | Simply Rejuvenating](https://img.game8.co/4438641/2a31b7702bd70e78ec8efd24661dacda.jpeg/thumb)
![The Seven Deadly Sins: Origin [First Impressions] | A Promising Start](https://img.game8.co/4440581/584e0bfb87908f12c4eab6e846eb1afd.png/thumb)

Popular Games

Genshin Impact Walkthrough & Guides Wiki
Umamusume: Pretty Derby Walkthrough & Guides Wiki
Pokemon Pokopia Walkthrough & Guides Wiki
Honkai: Star Rail Walkthrough & Guides Wiki
Monster Hunter Stories 3: Twisted Reflection Walkthrough & Guides Wiki
Arknights: Endfield Walkthrough & Guides Wiki
Wuthering Waves Walkthrough & Guides Wiki
Zenless Zone Zero Walkthrough & Guides Wiki
Pokemon TCG Pocket (PTCGP) Strategies & Guides Wiki
Monster Hunter Wilds Walkthrough & Guides Wiki


Recommended Games
Diablo 4: Vessel of Hatred Walkthrough & Guides Wiki
Cyberpunk 2077: Ultimate Edition Walkthrough & Guides Wiki
Fire Emblem Heroes (FEH) Walkthrough & Guides Wiki
Yu-Gi-Oh! Master Duel Walkthrough & Guides Wiki
Super Smash Bros. Ultimate Walkthrough & Guides Wiki
Pokemon Brilliant Diamond and Shining Pearl (BDSP) Walkthrough & Guides Wiki
Elden Ring Shadow of the Erdtree Walkthrough & Guides Wiki
Monster Hunter World Walkthrough & Guides Wiki
The Legend of Zelda: Tears of the Kingdom Walkthrough & Guides Wiki
Persona 3 Reload Walkthrough & Guides Wiki


All rights reserved
Copyright© 2024-2025 Kuro Games. All Rights Reserved.
The copyrights of videos of games used in our content and other intellectual property rights belong to the provider of the game.
The contents we provide on this site were created personally by members of the Game8 editorial department.
We refuse the right to reuse or repost content taken without our permission such as data or images to other sites.