How to Make Dirt Pathways | The Path
★ Update 3.0 and NS2 Editions are out now!
┗ Unlock the Hotel & the Special Nintendo Catalog.
┗ Collab Guides with LEGO, Splatoon, and Zelda
☆ Switch 2 Edition Features and Price
★ Enjoy sandbox building in Slumber Islands.
☆ New Villagers: Cece, Viche, Tulin, and Mineru!
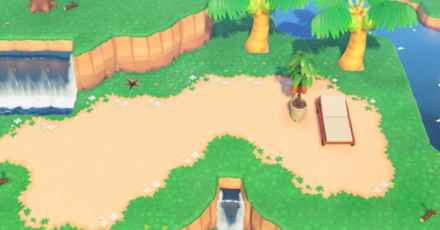
Let's bring out your island's natural beauty with dirt pathways using the Custom Design Editor in Animal Crossing: New Horizons (ACNH). Read on to learn how to recreate "The Path", the famous custom design loved by the Animal Crossing community!
List of Contents
Tileset Preparation
Free Up 9 Custom Designs Slots
This dirt pathway design was originally created by @Denim2_mori on Twitter, which is now known as The Path in the Animal Crossing community.
This is the perfect path design if you want to retain the natural look of your island. Many players have shared their own takes and variations with this design.
Now, you can learn how to make your own too! First thing, you need 9 custom design slots for this tileset.
How to Create a Dirt Pathway
| Click to jump to a section! | |
|---|---|
| 1 | Draw the tile base for each slot. |
| 2 | Paint the dirt. |
| 3 | Add gradients. |
| 4 | Add personal touches! |
| 5 | Lay the tiles on the ground, and you are finished! |
1. Draw the Tile Base
| Click the image to expand. | ||
|---|---|---|
 Enlarge Enlarge |
 Enlarge Enlarge |
 Enlarge Enlarge |
 Enlarge Enlarge |
 Enlarge Enlarge |
 Enlarge Enlarge |
 Enlarge Enlarge |
 Enlarge Enlarge |
 Enlarge Enlarge |
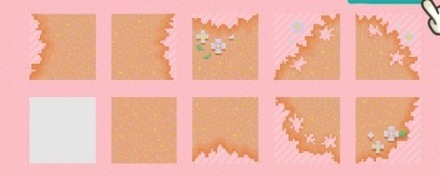
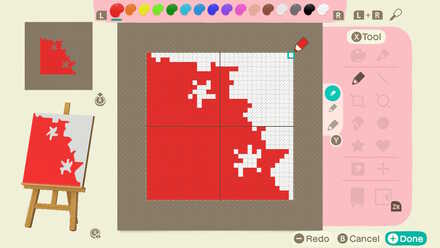
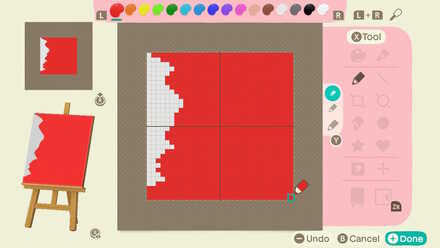
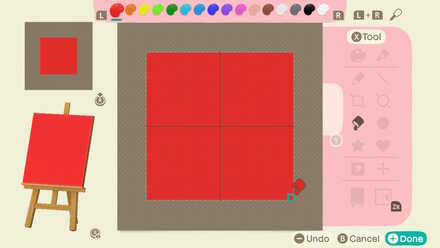
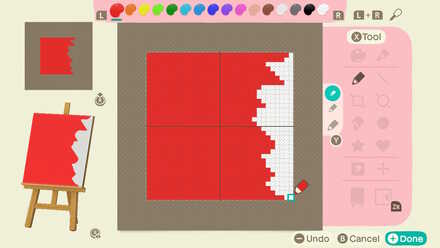
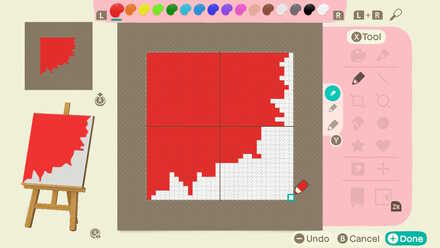
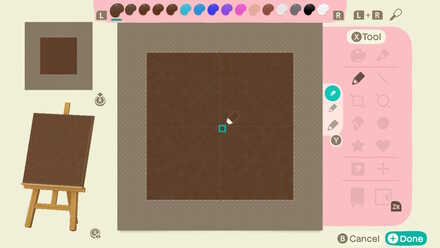
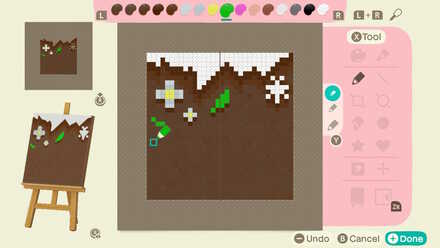
Once securing the 9 design slots, let us first draw the base of the 9 tiles. You can click on the images above to expand it.
For the grass patches, the actual grass will be seen, so we will use the transparent option to create holes, or grass spots, into the tiles.
After drawing the tiles, try placing them on the ground first to make sure that everything lines up.
Be careful not to shift the edge dots!

When drawing the base, it is okay if the middle parts are misaligned, but make sure that you have the edge dots in place.
If you want to change it position, you will need to change the edge dots of the other tiles too, so keep that in mind while creating this.
2. Paint the Dirt
Decide on the base color
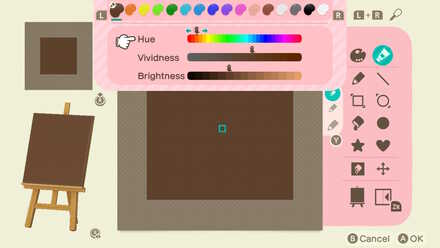
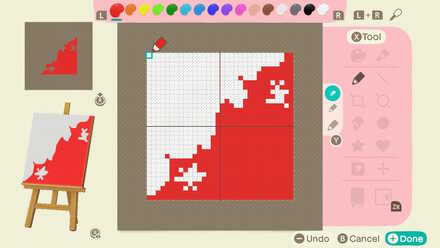
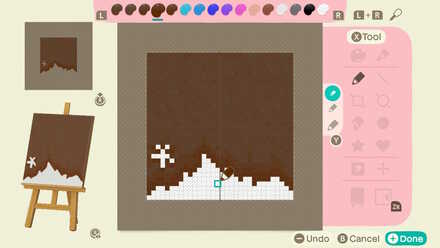
Next, decide on the base color. Depending on the path type, you might want to consider different shades. Since we are creating a dirt pathway, we will use a dark shade of brown. Fill in the tile base with this color.
Create texture by randomly drawing dots
To mimic the texture of the ground, let's place dots of adjacent colors in random spots. We will be using different shades of brown, adjusting the hue as needed, to make it lively. We will be using 3 colors.
| Colors Used | |||
|---|---|---|---|
| Color | Hue | Vividness | Brightness |
| 1 (Base) | 3 | 9 | 6 |
| 2 | 3 | 8 | 6 |
| 3 | 3 | 10 | 6 |
3. Add Gradients
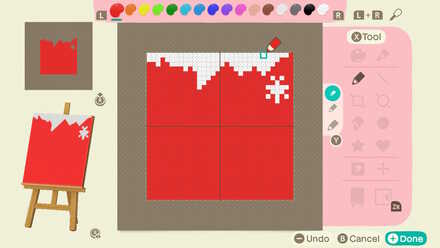
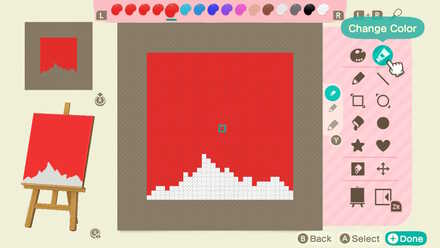
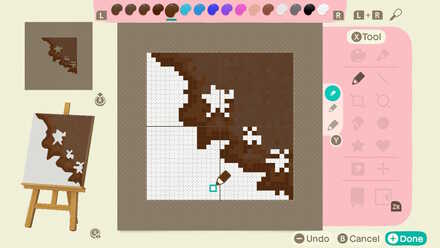
Add gradient to the edges
Next, to blend in with the grass, we will be adding gradients to the tile edges.
For the farthest part of the gradient, use your base color, and go darker as you reach the tile edge. For the gradient, we will be using 3 colors.
| Colors Used | |||
|---|---|---|---|
| Color | Hue | Vividness | Brightness |
| 1 (Base) | 3 | 9 | 6 | 4 (Core Shadow) | 3 | 13 | 5 |
| 5 (Light Shadow) | 3 | 12 | 6 |
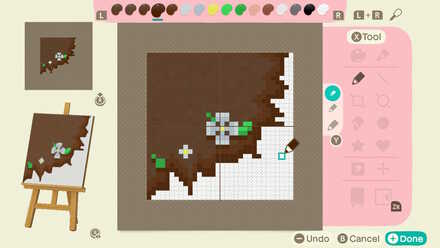
Add shadows to the grass patches
Similar to adding gradients, add highlights and shadows around the grass spots so it looks three-dimensional.
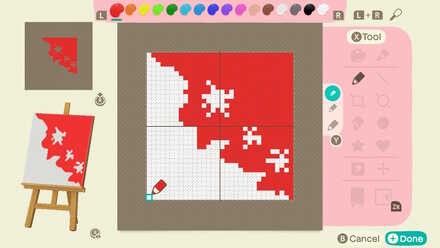
4. Add Personal Touches
 Enlarge Enlarge |
 Enlarge Enlarge |
Add more details to your liking! You can add flowers, leaves, or vines; draw whatever you want to make it yours!
If you would like to learn how to draw flowers, check out this guide!
How to Make Flower Patches
5. Lay the Tiles on the Ground!
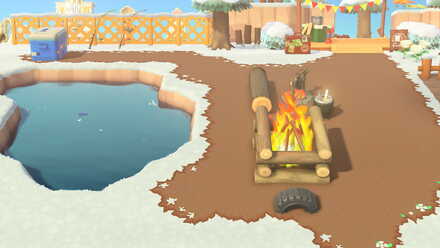
Once you are satisfied, place them on the ground. It is faster to do it with the Custom Design Path Permit using the Island Designer app. Decorate with furniture or greenery, and you are done!
How to Place the Tiles | Pathway Layout
| Tile Number Guide |
|---|
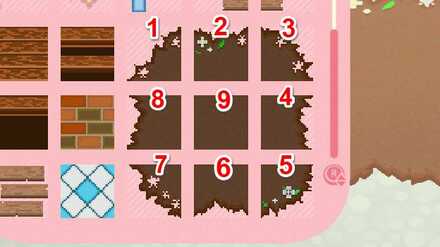 |
Create Patches
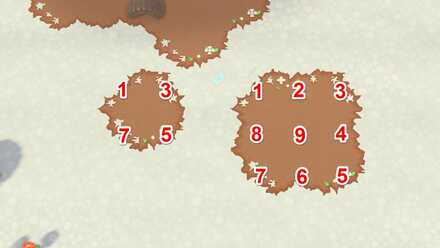
Because of the flexibility of the tileset, you can make small or big circles or patches for a natural look. The small patch uses 4 tiles, while the larger patch uses 9 tiles, the whole tilesets.
Create Paths of Different Widths
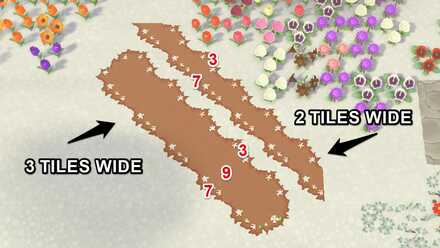
You can also make pathways of different widths. You can create thin paths with 2 tiles, or wider paths with 3 or more tiles wide.
Create Curved Paths

The best way to use the dirt pathway design is by placing it in a curved manner. It looks natural, and you can place plants and trees around for that forest vibe!
The Path by @Denim2_mori
Original Work
This design, called Kemonomichi ("Monster Road") was created by @Denim2_mori on Twitter. It was instantly loved by the Animal Crossing community, and has been going around, used by a lot of users, and is now known as "The Path".
Using #ThePathACNH
Notes on usage and permission on recreating their design. (JP)
This instantly gained numbers on Twitter when it was posted, and a number of players also have created their own variations. However, if you would like to preserve @Denim2_mori's original work, feel free to use the hashtag #ThePathACNH.
Related Guides

Hand Picked Custom Designs


How to Make Custom Design Patterns
 How to Make Custom Fireworks Designs
 How to Make Wooden Paths
 How to Make Brick Paths
 How to Make Platforms
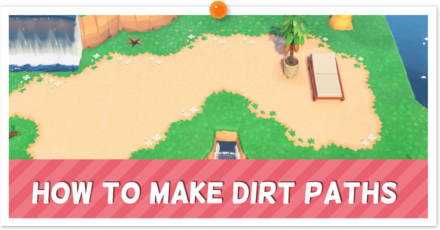 How to Make Dirt Paths | The Path
 How to Make Tatami Mats
 How to Make Seashell Paths
 How to Make Sweets Floor Designs
 How to Make Flowerbeds
 How to Make Flower Patches
 How to Make Tile Patterns
 How to Make Stepping Stones
 How to Make Large Stone Tiles and Slabs
Best Dream Towns on the Web!
| Inspirational Dream Towns | |
|---|---|
 Top Dream Addresses and Dream Towns Top Dream Addresses and Dream Towns |
|
 Japanese-Themed Japanese-Themed |
 European-Themed European-Themed |
 Horror-Themed Horror-Themed |
 Nature-Themed Nature-Themed |
Share Your Own Designs!
| QR and Creator Code Sharing |
|---|
| Custom Design Share (281) |
| Dream Address Code Share Board (531) |
Custom Design Help
Comment
So you have an example for the narrow path? Going vertical and horizontal(single tile)
Author
How to Make Dirt Pathways | The Path
Rankings
Gaming News

![Monster Hunter Stories 3 Review [First Impressions] | Simply Rejuvenating](https://img.game8.co/4438641/2a31b7702bd70e78ec8efd24661dacda.jpeg/show)


![Monster Hunter Stories 3 Review [First Impressions] | Simply Rejuvenating](https://img.game8.co/4438641/2a31b7702bd70e78ec8efd24661dacda.jpeg/thumb)
Popular Games

Genshin Impact Walkthrough & Guides Wiki
Umamusume: Pretty Derby Walkthrough & Guides Wiki
Pokemon Pokopia Walkthrough & Guides Wiki
Honkai: Star Rail Walkthrough & Guides Wiki
Monster Hunter Stories 3: Twisted Reflection Walkthrough & Guides Wiki
Arknights: Endfield Walkthrough & Guides Wiki
Wuthering Waves Walkthrough & Guides Wiki
Zenless Zone Zero Walkthrough & Guides Wiki
Pokemon TCG Pocket (PTCGP) Strategies & Guides Wiki
Monster Hunter Wilds Walkthrough & Guides Wiki


Recommended Games
Diablo 4: Vessel of Hatred Walkthrough & Guides Wiki
Cyberpunk 2077: Ultimate Edition Walkthrough & Guides Wiki
Fire Emblem Heroes (FEH) Walkthrough & Guides Wiki
Yu-Gi-Oh! Master Duel Walkthrough & Guides Wiki
Super Smash Bros. Ultimate Walkthrough & Guides Wiki
Pokemon Brilliant Diamond and Shining Pearl (BDSP) Walkthrough & Guides Wiki
Elden Ring Shadow of the Erdtree Walkthrough & Guides Wiki
Monster Hunter World Walkthrough & Guides Wiki
The Legend of Zelda: Tears of the Kingdom Walkthrough & Guides Wiki
Persona 3 Reload Walkthrough & Guides Wiki


All rights reserved
©2020 Nintendo
The copyrights of videos of games used in our content and other intellectual property rights belong to the provider of the game.
The contents we provide on this site were created personally by members of the Game8 editorial department.
We refuse the right to reuse or repost content taken without our permission such as data or images to other sites.
could you show all the finished tiles in grid view like come on i dont have superhuman vision i cant scan and make the tiles myself i have adhd