How to Make Tatami Mats
★ Update 3.0 and NS2 Editions are out now!
┗ Unlock the Hotel & the Special Nintendo Catalog.
┗ Collab Guides with LEGO, Splatoon, and Zelda
☆ Switch 2 Edition Features and Price
★ Enjoy sandbox building in Slumber Islands.
☆ New Villagers: Cece, Viche, Tulin, and Mineru!
Learn how to make tatami mats using the Custom Design Editor in Animal Crossing: New Horizons (ACNH). See different types of tatami mats as well as how to place them indoors and outdoors.
List of Contents
How to Create Tatami Mats
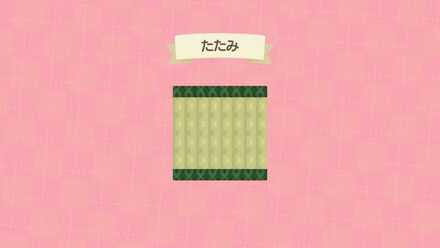
Resulting Look
Now you can recreate tatami mats using the Custom Design Editor. Take note that this design takes up 4 custom design slots.
Steps to Create Tatami Mats
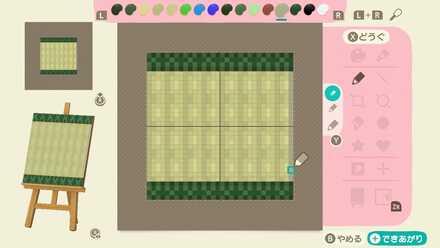
Vertical Tiles
| 1 |  Enlarge EnlargeWe will use the default palette. Fill the whole canvas with red. |
|---|---|
| 2 | 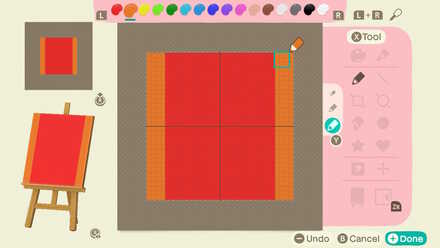 Enlarge EnlargeUse orange to draw the tatami mat edges. They are 4 pixels wide. |
| 3 | 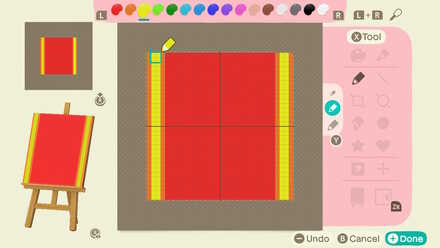 Enlarge EnlargeUse yellow to a 2-pixel wide line inside the edge. |
| 4 | 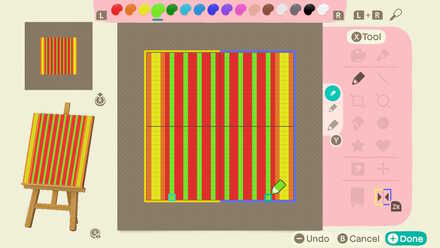 Enlarge EnlargeUse light green to and draw thin vertical lines. |
| 5 | 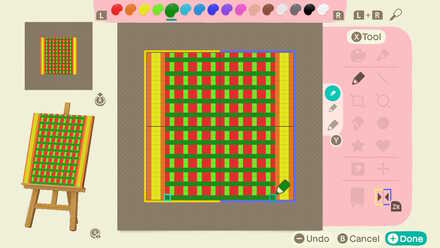 Enlarge EnlargeUse the dark green to draw thin horizontal lines. |
| 6 | 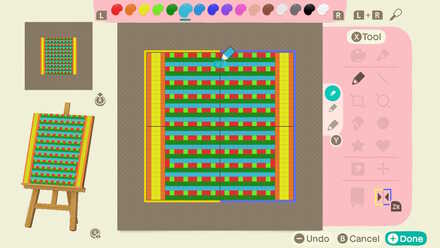 Enlarge EnlargeUse light blue and draw lines below the dark green lines to soften the mesh. |
| 7 | 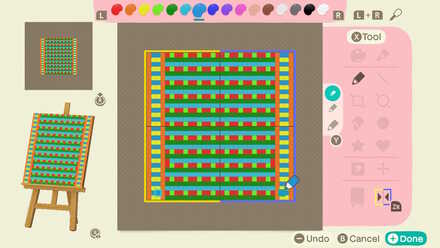 Enlarge EnlargeWith the darker blue color, make horizontal lines on the mat edges. |
| 8 | 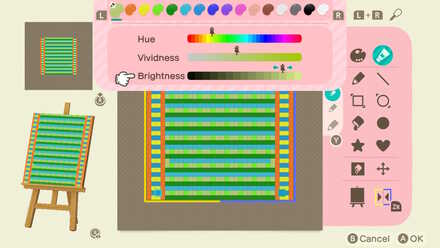 Enlarge EnlargeChange the red color to the main green color. Hue: 7th from the left Vividness: 7th from the left Brightness: 3rd from the right |
| 9 | 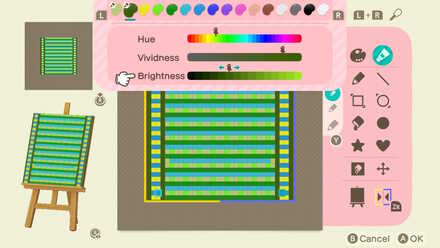 Enlarge EnlargeChange orange to a dark green color. Hue: 8th from the left Vividness: 2nd from the right Brightness: 6th from the left |
| 10 | 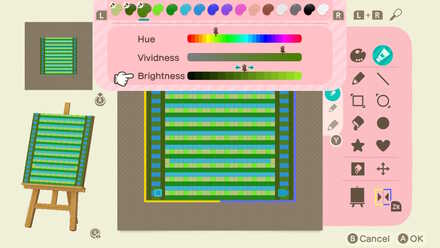 Enlarge EnlargeChange yellow to a green color. Hue: 8th from the left Vividness: 2nd from the right Brightness: 7th from the right |
| 11 | 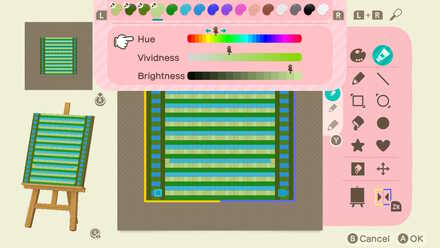 Enlarge EnlargeChange the light green color. Hue: 8th from the left Vividness: 8th from the left Brightness: 2nd from the right |
| 12 | 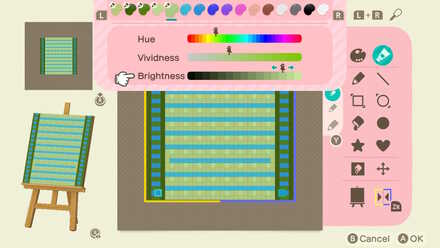 Enlarge EnlargeHue: 8th from the left Vividness: 6th from the left Brightness: 2nd from the right |
| 13 | 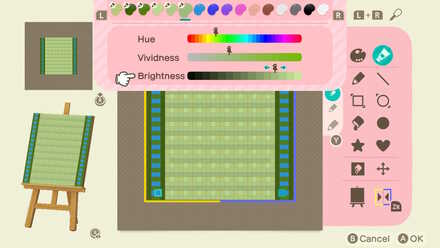 Enlarge EnlargeChange the light blue color. Hue: 8th from the left Vividness: 6th from the left Brightness: 4th from the right |
| 14 | 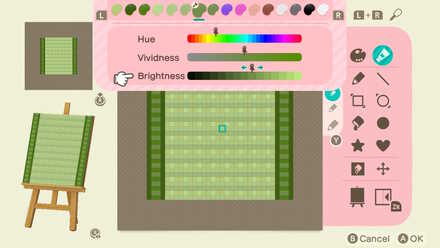 Enlarge EnlargeChange the dark blue color. Hue: 8th from the left Vividness: 7th from the left Brightness: 7th from the right |
| 15 | 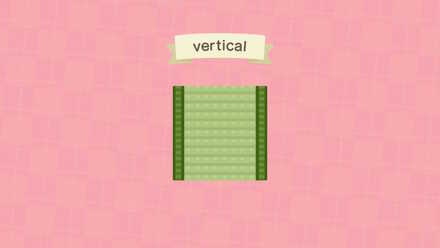 Enlarge EnlargeCheck if you are satisfied, and the first tile is finished! |
| 16 |  Enlarge Enlarge |
| 17 | 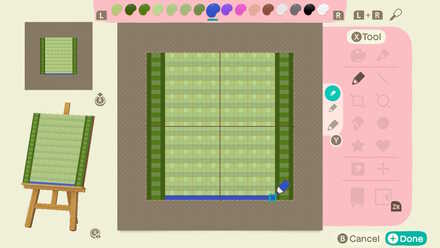 Enlarge EnlargeUse the dark blue to draw a thin line at the bottom to make a crease. |
| 18 |  Enlarge EnlargeChange the color. Hue: 8th from the left Vividness: 5th from the right Brightness: 7th from the right |
| 19 | 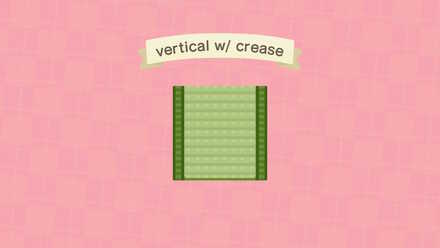 Enlarge EnlargeThe second tile is now completed! |
Horizontal Tiles
| 1 |  Enlarge EnlargeCopy an existing tile to use as reference by pressing Y on the design, and selecting Copy. |
|---|---|
| 2 | 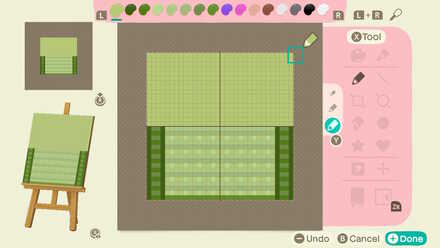 Enlarge EnlargeWe will first create the top half by filling it up with the main green color. |
| 3 | 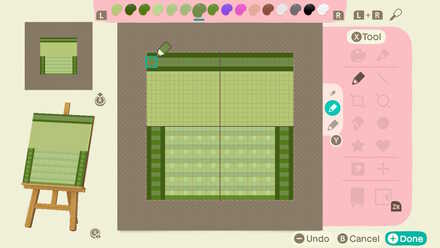 Enlarge EnlargeDraw the tatami edge by using the lower half as a reference. |
| 4 | 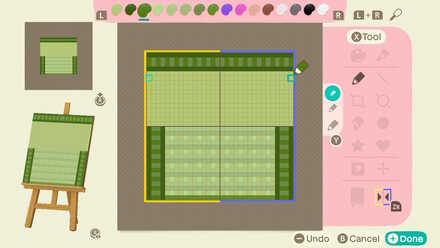 Enlarge EnlargeDraw vertical lines along the edge. |
| 5 |  Enlarge EnlargeDraw thin horizontal lines along the mat using the light green color. |
| 6 | 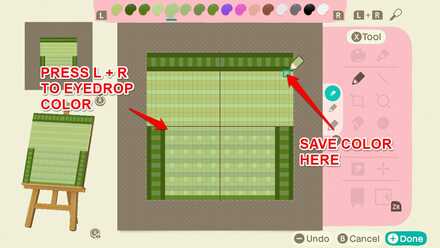 Enlarge EnlargeEyedrop the color on top and draw a dot on the top part for later use. |
| 7 |  Enlarge EnlargeDo the same for the second color. |
| 8 | 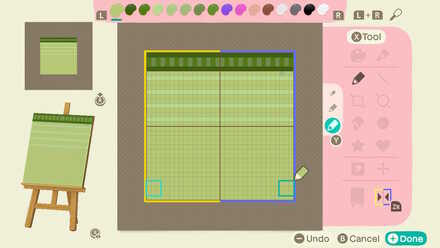 Enlarge EnlargeClear the bottom half of the design by filling it with the main green color. |
| 9 | 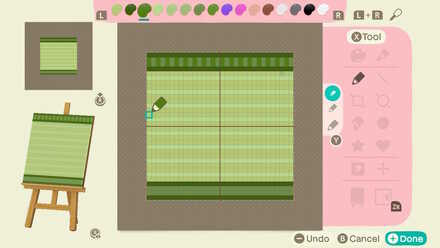 Enlarge EnlargeContinue working on the lower half. |
| 10 | 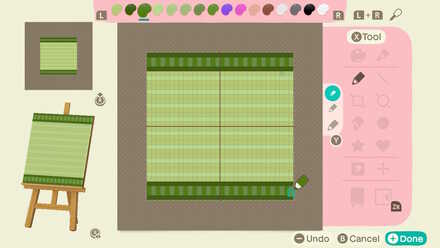 Enlarge EnlargeDraw the vertical lines using the color you eyedropped and saved. |
| 11 | 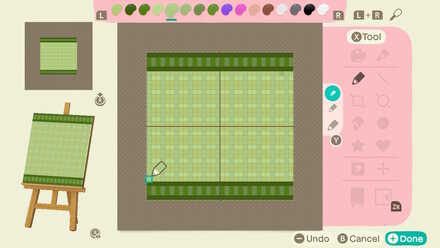 Enlarge EnlargeDo the same for the second color. |
| 12 | 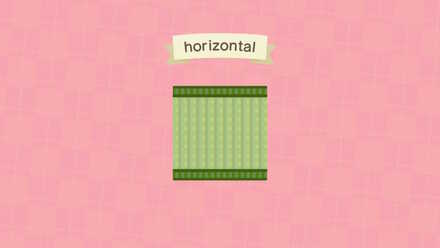 Enlarge EnlargeCheck if you are satsified, and the third piece is completed! |
| 13 |  Enlarge EnlargeCopy the horizontal mat design. |
| 14 | 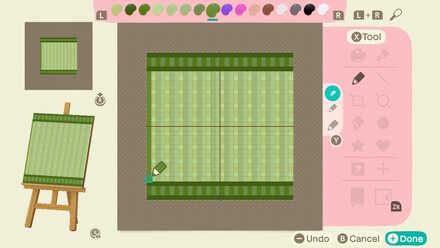 Enlarge EnlargeDraw a horizontal line at the left edge to make a crease. |
| 15 | 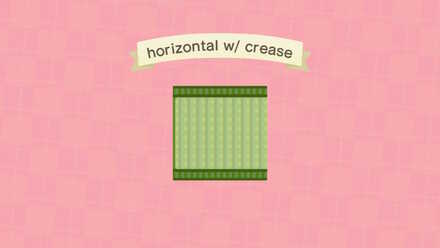 The final and fourth piece is completed! |
How to Change Colors on a Palette
| 1 | In the tools section, select Change Color. |
|---|---|
| 2 | Select a color with the L and R button and adjust the sliders as needed. |
How to Create Custom Designs & Use the Custom Design Pro Editor
How to Lay Out Tatami Mats
Tatami Mat Layout Sample
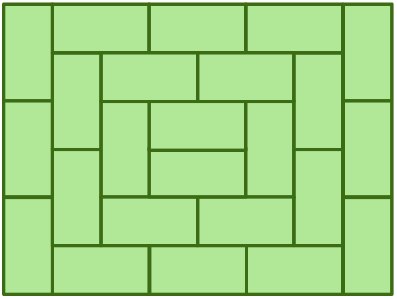
| Tatami mat layout image from Itou Tatami Store. |
This is an example of how to lay out tatami mats. You can use this as reference when placing your tatami mat designs on the ground.
You Can Use 2 Custom Design Slots Indoors
When placing the tatami mats inside rooms, you can use only 2 design slots, since custom designs placed as mats can be rotated using Designer Mode. You can use the 2 horizontal tiles, or the 2 vertical tiles, and just rotate them as needed.
You Need to use 4 Custom Design Slots Outdoors
If you want to place the mats outside, you will need to use the 4 design slots that we created in the section above, since you cannot rotate designs outside.
Feel Luxurious with Wide Tatami Mats
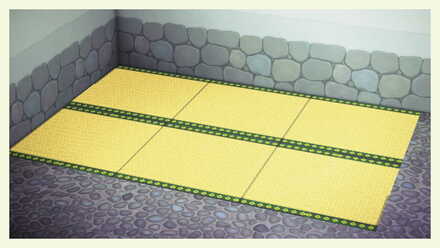
This tatami mat design is created by Micho-san. It has a fresh look, and you can lay out 4 to 6 tiles as a single tatami mat, giving you a luxurious feeling.
Micho's Links
| Creator ID | MA-4725-8779-3689 |
|---|---|
| @hanaanaru | |
| Blog | Micho-san's Blog |
How to Create Tatami Mats (Advanced)
Draw More Intricate Designs
The edges and the weave patterns are more complicated and give off a 3D appearance. If you want realistic-looking tatami mats, try drawing more intricate designs.
Custom Design Editor Drawing
| Tatami Mat with Crease |
|---|
 Enlarge Enlarge |
You can click Enlarge to view the whole image.
The design may look complicated at first, but they are just dots in a repeating pattern. Add more variations of colors to make it look realistic.
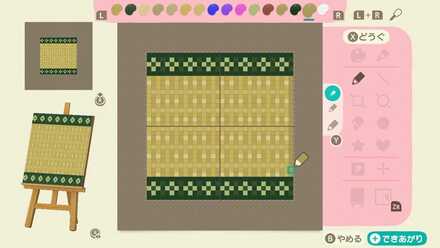
Design the Tatami Mat Border
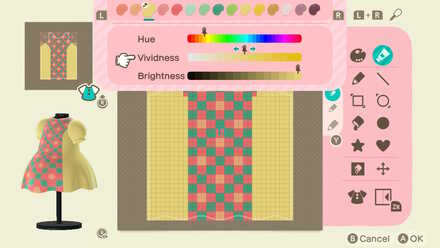
A realistic tatami mat design that has firm weaves. The edges have gorgeous patterns, which we recommend for people who want to make flashy tatami mats.
Custom Design Editor Drawing
| Tatami Mat with Crease |
|---|
 Enlarge Enlarge |
You can click Enlarge to view the whole image.
Most of the dots are placed in fixed areas, but the bright dots are placed randomly. You can refer to the image above when creating this.
Tatami Mat Layout Examples
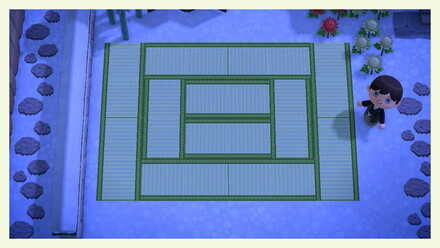
Basic Tatami Mats Outdoors
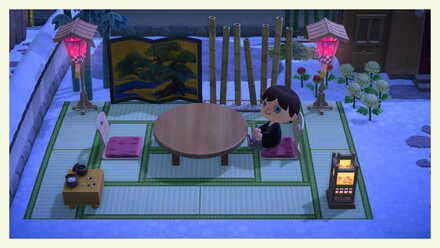
Even with this basic design, you can combine this with Japanese-style furniture to instantly upgrade your area.
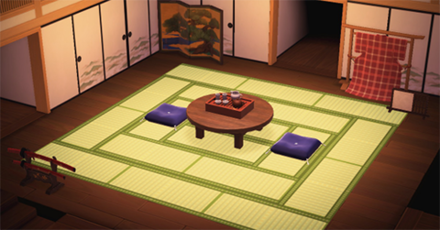
Basic Tatami Mats Indoors
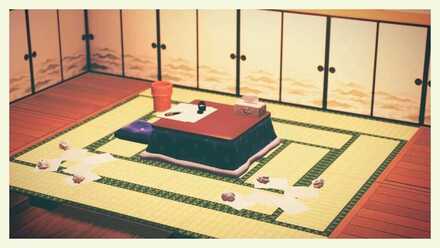
By placing a kotatsu and a zen cushion, you can mimic a Japanese writer's room. This is recommended for those who want a Japanese-style architecture in their homes.
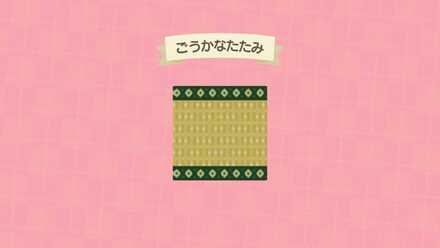
Elegant Tatami Mats
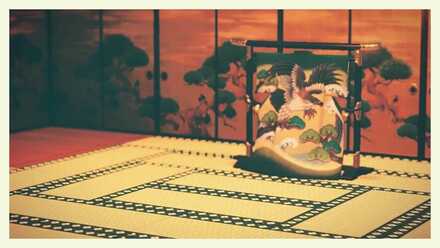
Just by using a different design of tatami mats, you can give off a royal vibe. Pair this up with large Japanese furniture such as the Kimono Stand to create an elegant room.
Related Guides

Hand Picked Custom Designs


How to Make Custom Design Patterns
 How to Make Custom Fireworks Designs
 How to Make Wooden Paths
 How to Make Brick Paths
 How to Make Platforms
 How to Make Dirt Paths | The Path
 How to Make Tatami Mats
 How to Make Seashell Paths
 How to Make Sweets Floor Designs
 How to Make Flowerbeds
 How to Make Flower Patches
 How to Make Tile Patterns
 How to Make Stepping Stones
 How to Make Large Stone Tiles and Slabs
Best Dream Towns on the Web!
| Inspirational Dream Towns | |
|---|---|
 Top Dream Addresses and Dream Towns Top Dream Addresses and Dream Towns |
|
 Japanese-Themed Japanese-Themed |
 European-Themed European-Themed |
 Horror-Themed Horror-Themed |
 Nature-Themed Nature-Themed |
Share Your Own Designs!
| QR and Creator Code Sharing |
|---|
| Custom Design Share (281) |
| Dream Address Code Share Board (531) |
Custom Design Help
Author

How to Make Tatami Mats
Rankings
Gaming News


![Monster Hunter Stories 3 Review [First Impressions] | Simply Rejuvenating](https://img.game8.co/4438641/2a31b7702bd70e78ec8efd24661dacda.jpeg/thumb)
Popular Games

Genshin Impact Walkthrough & Guides Wiki
Honkai: Star Rail Walkthrough & Guides Wiki
Umamusume: Pretty Derby Walkthrough & Guides Wiki
Pokemon Pokopia Walkthrough & Guides Wiki
Resident Evil Requiem (RE9) Walkthrough & Guides Wiki
Monster Hunter Wilds Walkthrough & Guides Wiki
Wuthering Waves Walkthrough & Guides Wiki
Arknights: Endfield Walkthrough & Guides Wiki
Pokemon FireRed and LeafGreen (FRLG) Walkthrough & Guides Wiki
Pokemon TCG Pocket (PTCGP) Strategies & Guides Wiki


Recommended Games
Diablo 4: Vessel of Hatred Walkthrough & Guides Wiki
Cyberpunk 2077: Ultimate Edition Walkthrough & Guides Wiki
Fire Emblem Heroes (FEH) Walkthrough & Guides Wiki
Yu-Gi-Oh! Master Duel Walkthrough & Guides Wiki
Super Smash Bros. Ultimate Walkthrough & Guides Wiki
Pokemon Brilliant Diamond and Shining Pearl (BDSP) Walkthrough & Guides Wiki
Elden Ring Shadow of the Erdtree Walkthrough & Guides Wiki
Monster Hunter World Walkthrough & Guides Wiki
The Legend of Zelda: Tears of the Kingdom Walkthrough & Guides Wiki
Persona 3 Reload Walkthrough & Guides Wiki


All rights reserved
©2020 Nintendo
The copyrights of videos of games used in our content and other intellectual property rights belong to the provider of the game.
The contents we provide on this site were created personally by members of the Game8 editorial department.
We refuse the right to reuse or repost content taken without our permission such as data or images to other sites.
Thanks so much, I don't have online so super useful :D