Beginner's Guide to Animal Crossing New Horizons
★ Update 3.0 and NS2 Editions are out now!
┗ Unlock the Hotel & the Special Nintendo Catalog.
┗ Collab Guides with LEGO, Splatoon, and Zelda
☆ Switch 2 Edition Features and Price
★ Enjoy sandbox building in Slumber Islands.
☆ New Villagers: Cece, Viche, Tulin, and Mineru!

Animal Crossing: New Horizons has a lot of mechanics in store for new players. See all usefull tips you can follow at the beginning of the game, including tips on how to pay back your first load and build your house!
List of Contents
Things to Do Before Getting to the Island
| Before Getting to the Island | |
|---|---|
| 1 | Put in Your Name and Birthday |
| 2 | Set Up Your Look |
| 3 | Select a Hemisphere |
| 4 | Select an Island Layout |
| 5 | Choose What You Want to Bring |
Put in Your Name and Birthday

To start with, you first need to put your name and your birthday. Do note that these cannot be changed later on, so make sure to pick the name and birthday you want to enter!
Set Up Your Look

Next, customize your villager to however you like. You can choose your skin color, facial features, hairstyle, and more!
These can be changed later on, so no need to think too hard about it in the beginning. The hairstyles available to you in the beginning are scarce, but you'll get more later on.
How to Change Your Face and Hair
Select a Hemisphere

After choosing your name, birthday, and features, you will be able to select the hemisphere you want to live.
The main difference is that the seasons experienced will be polar opposites, meaning that the bugs and fish you can get in each month will differ.
If you don't have a preference, you can just go with the hemisphere you live in. For those in the US, you can select northern hemisphere
Which Hemisphere Should You Choose?
Select an Island Layout
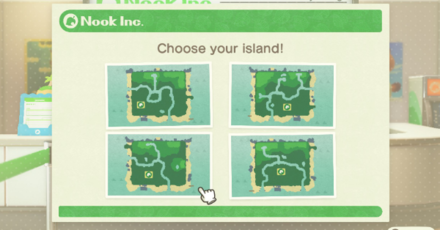
After selecting a hemisphere, you will then be asked to choose a layout for your island. This will be the initial look of your island, but do note that you can make any changes later once you unlock terraforming.
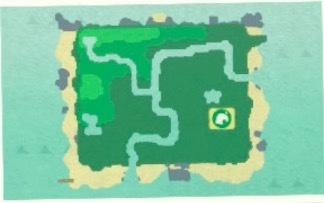
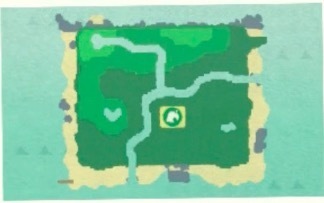
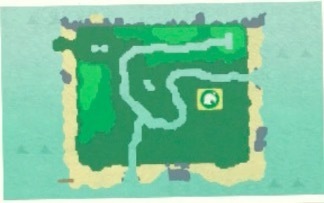
Rare Island Layouts
| Rare Layouts | |
|---|---|
 |
 |
 |
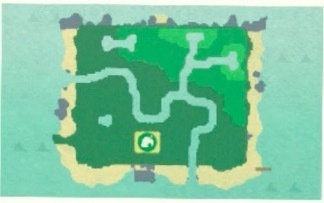 |
You'll be given four island layouts to choose from. If you're lucky, you might get one with a pond that has some kind of special shape! Your lifestyle will be slightly affected by the shape of island that you choose.
If you're particular about the layout you have, you could always reroll!
How to Choose the Best Island Layout
Choose What You Want to Bring to the Island

The Nooklings will ask you what thing you would bring to a deserted island. Though it may seem like an important choice, it actually has no effect on the game, so answer with whatever first comes to mind!
What Should You Choose to Bring to the Island?
Things to Do Before Getting Your NookPhone
| Before Getting Your NookPhone | |
|---|---|
| 1 | Greet Your Starting Villagers |
| 2 | Choose Your Tent Location |
| 3 | Get 10 Branches and 6 Fruits |
| 4 | Decide on Your Island Name |
| 5 | Get Your NookPhone |
Greet Your Starting Villagers

The first thing you will need to do is greet the first villagers. You will always have a male Jock and female Sisterly villagers as your starting ones.
Choose Your Tent Location

Next, decide the location of your tent. After getting ahead a bit, you'll be able to spend 50,000 Bells and move your house. If you want to avoid having to pay this later, we suggest picking a good spot.
Do note that you can also set up your neighbors' tents!
Best Tent Location and How to Move
Get 10 Branches and 6 Fruits
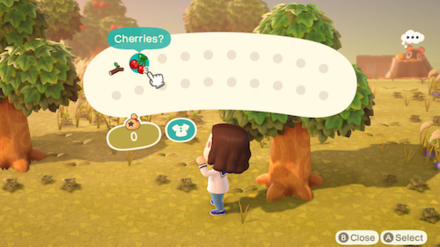
After choosing your tent's location, Tom Nook will ask you for 10 Branches and 6 Fruits.
There's a limit to the number of fallen branches that you can pick up, so you'll need to shake the trees to get more. Each tree has three fruit on it, so shaking two trees and picking up the fallen fruit should be enough.
 How to Get Tree Branches Fast How to Get Tree Branches Fast |
 How to Get All Fruits How to Get All Fruits |
Decide on Your Island Name

Next, Nook will ask you to come up with an island name. This can't be changed later on, so pick something that you won't regret later.
Take note that you also can't change the location of your town hall, so choose wisely!
What Will You Name Your Island?
Get Your NookPhone After Going to Bed

After going to bed in your tent and waking up, Tom Nook will stop by to deliver your NookPhone. This will allow you to participate in various activities throughout the island, so be sure to check your apps!
List of NookPhone Apps and How to Unlock Them
Things to Do Before Unlocking the Museum
| Before Unlocking the Museum | |
|---|---|
| 1 | Make a Fishing Rod and Net |
| 2 | Hand 5 Critters Over to Tom Nook |
| 3 | Choose the Museum's Location |
Make a Fishing Rod and Net at Resident Services

Once the payback of your first loan begins, the first thing you'll want to do is make a Flimsy Fishing Rod and a Flimsy Net.
Both of these recipes are obtained by inspecting the DIY workbench at Resident Services and taking part in the DIY tutorial. Get the recipes for free and make the tools right away.
How to Get DIY Crafting Recipes
Hand 5 Critters Over to Tom Nook

After giving a total of five bugs or fish to Tom Nook, he will call his old friend Blathers, who will come to the island to set up a pre-museum tent.
You'll get an item or recipe each time you show Tom Nook a creature, so go out and get the five critters he needs!
Critter Reward List
| Item Number | Reward |
|---|---|
| 1st Critter | Critterpedia |
| 2nd Critter | Flimsy Axe and Wooden Furniture Recipes |
| 3rd Critter | Flower Seeds (Random Type) |
| 4th Critter | Flimsy Watering Can Recipe |
| 5th Critter | Museum Unlocked After choosing a location, the museum will be open from the next day. |
Choose the Museum's Location

You will need to give five creatures (bugs and fish) to Tom Nook, at which point you will be able to choose the location of the museum.
After you do this, Blathers will come to your island on the next day, so start saving up things to donate!
Tips to Pay Back Your First Loan
Save 5,000 Miles

After you pay back your first loan, you will be able to do a lot more on your island. After building your first fishing rod, shoot for 5000 Miles to pay back your initial loan.
How to Get 5,000 Nook Miles Fast
Ask to Upgrade Your Home Right Away
After paying of the 5,000 Nook Miles, go ahead and ask Nook for a home renovation. This will allow you to pick up even more Nook Miles, giving you access to Nook Mile-exclusive items from the Nook Stop.
How to Pay Off Your Loan and Upgrade Your Tent and House
How to Unlock Nook's Cranny
Gather 30 of Each Required Material
In order to unlock Nook's Cranny, gather up 30 wood, hardwood, softwood, and iron nuggets. Resources will drop from trees and rocks once per day. Collect lots of materials to craft items!
Resources to Collect Daily
You can collect the following items each day on your island. Make it a habit to collect resources on your trees and rocks everyday to stock up on materials!
| Source | Material Gained |
|---|---|
| Trees (Including Fruit Trees) | 3 of the following: ・Softwood ・Wood ・Hardworrd |
| Rocks | 8 of the following: ・Stones ・Clay ・Iron Nuggets Occasionally Bells will appear from a Money Rock |
Decide on a Location

After you've finally gotten all of the materials above, feel free to choose the shop's location. Anywhere open should be fine, but since you'll be going there a lot, try and pick a spot near your own house!
Talk to Timmy again after to complete the preparations.
How to Unlock Nook's Cranny and Upgrade It
Tips on Building Your House
Unlock Nook Miles+

The Nook Stop terminal will be accessible after asking Tom Nook for a home upgrade. This terminal lets you exchange miles for items, such as more durable tools.
After paying off your initial loan, you'll be able to upgrade to Nook Miles+.
What Should You Spend Nook Miles on First?
Sell Fishes and Bugs for Bells

You have to repay a new loan of 98,000 Bells after upgrading your home. This time, you have to pay in Bells instead of Miles, so sell fish and bugs and start saving!
Frequenty Asked Questions (FAQs)
What Should I Do After Day 2?
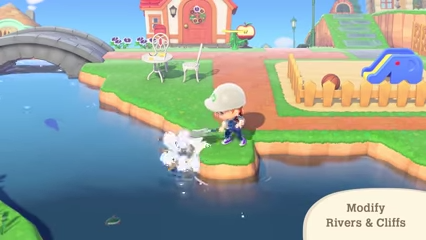
Become an Island Designer
One of the main goals in Animal Crossing: New Horizons is to become an Island Designer, which unlocks the terraforming feature. To do this, complete Tom Nook's tasks to earn as many items, Bells, and Nook Miles as possible.
What You Can Do with Island Designer
How Do I Chop Down Trees?

Chop Down Trees with an Axe
Though you can easily obtain the Flimsy Axe and the Stone Axe, early in the game, you won't be able to chop down trees until you have the Axe.
Once you've paid the initial loan of 5,000 Miles to Tom Nook, you can purchase the Pretty Good Tools Recipes for 3,000 Miles from Nook Stop on the “Redeem Your Miles” screen. This will give you access to a variety of non-Flimsy tools, including the Axe.
How Do I Get Across the River?

Use a Vaulting Pole
Cross the river after obtaining the Vaulting Pole. To obtain it, give Tom Nook 5 distinct creatures, obtain the DIY recipe from Blathers, then craft it in the DIY workbench.
Do I Have to Wait a Day for Events to Pass?

Change Settings to Time Travel
If you can't wait for the actual day to pass, manually change the date and time of your Switch. However, there are pros and cons to time travelling, so do it wisely.
Check the button below to learn how to time travel.
How Do I Climb a Cliff?
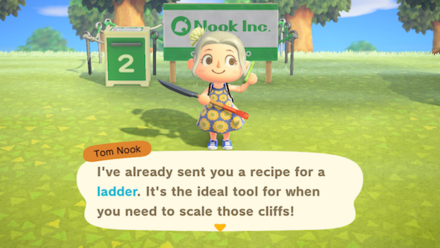
Get a Ladder
After crossing the river, you will still be limited by cliffs. The ladder won't be obtained until later in the game, but don't worry! You'll be able to progress through the game without obtaining it right away.
Can I Break Rocks?

Eat a Fruit and Hit a Rock
It's possible to break rocks by eating food to gain stamina, then breaking rocks with an Axe or a Shovel. You can break one rock per one fruit eaten.
Rocks return after a day, so don't worry about running out of rocks to break!
Click the button below for detailed instructions of how to break rocks.
When Will the Airport Be Available?

One Day After Starting
The Airport is open for business from the second day of play, which allows online play. When you start playing, Tom Nook will announce that the Airport has been opened.
How Do I Raise My Island Rating?
Decorate Your Island
Increase the island's star rating by decorating it with lots of furniture and add more flowers and trees. Placing DIY furniture will significantly increase your ratings, so rack up those materials and recipes!
How to Increase Island Star Rating
Can You Proceed With the Story As The Second Player?
Only Island Representative Has Story Progress
The second and subsequent players cannot affect the story directly. Instead, they have to help the Island Representative to gather materials and furniture necessary to advance the story.
How Do You Make a Second Island?
You Need a Second Switch
To create a second island, you need to have a second Switch. The way save files work in Animal Crossing: New Horizons is that each save file contains one island for one Switch. Every user on a Switch will have to share that island.
Animal Crossing: New Horizons (ACNH) Related Guides
Beginner Guides
 Beginner's Guide to Animal Crossing New Horizons
 Unchangeable Features
 Which Hemisphere Should You Choose?
 Best Island Layouts
 What Should You Choose to Bring to the Island?
 Island Names
 Best House and Tent Location
 How to Cross Rivers and Waters
 How to Get Furniture and Materials for House Kits
 How to Climb Cliffs
 What is the Bulletin Board?
 How to Get Pocket Camp Items
 How to Get Nook Points
Comment
Just get a huge stuffed toy! Cheaper and Smaller. You can also sleep with it in bed so its functional hehe
Author
Beginner's Guide to Animal Crossing New Horizons
Rankings
Gaming News


![Marathon Cryo Archive Map Teased as [REDACTED] on Selection Screen](https://img.game8.co/4442236/6357203e58172f6de57f1991e7c39b22.png/thumb)


Popular Games

Genshin Impact Walkthrough & Guides Wiki
Umamusume: Pretty Derby Walkthrough & Guides Wiki
Pokemon Pokopia Walkthrough & Guides Wiki
Honkai: Star Rail Walkthrough & Guides Wiki
Monster Hunter Stories 3: Twisted Reflection Walkthrough & Guides Wiki
Arknights: Endfield Walkthrough & Guides Wiki
Wuthering Waves Walkthrough & Guides Wiki
Zenless Zone Zero Walkthrough & Guides Wiki
Pokemon TCG Pocket (PTCGP) Strategies & Guides Wiki
Monster Hunter Wilds Walkthrough & Guides Wiki


Recommended Games
Diablo 4: Vessel of Hatred Walkthrough & Guides Wiki
Cyberpunk 2077: Ultimate Edition Walkthrough & Guides Wiki
Fire Emblem Heroes (FEH) Walkthrough & Guides Wiki
Yu-Gi-Oh! Master Duel Walkthrough & Guides Wiki
Super Smash Bros. Ultimate Walkthrough & Guides Wiki
Pokemon Brilliant Diamond and Shining Pearl (BDSP) Walkthrough & Guides Wiki
Elden Ring Shadow of the Erdtree Walkthrough & Guides Wiki
Monster Hunter World Walkthrough & Guides Wiki
The Legend of Zelda: Tears of the Kingdom Walkthrough & Guides Wiki
Persona 3 Reload Walkthrough & Guides Wiki


All rights reserved
©2020 Nintendo
The copyrights of videos of games used in our content and other intellectual property rights belong to the provider of the game.
The contents we provide on this site were created personally by members of the Game8 editorial department.
We refuse the right to reuse or repost content taken without our permission such as data or images to other sites.
I don't think those are costumes. I think those are stuffed toys that looks like they're as big as costumes because of the scaled tables.