This survey will take about 1 minute.
Your answers will help us to improve our website.
Wuthering Waves (WuWa)
Neon Tower Challenge Best Teams and Guide
★ 3.2 Phase 2 out now! → Best Pull Strategy
┣ Lynae → Builds, Materials, Sig. Weapon
┣ Zani → Builds, Materials, Sig. Weapon
┗ Phoebe → Builds, Materials, Sig. Weapon
★ Upcoming Characters: Hiyuki, Denia
★ Exclusives: Tier Maker | State of the Meta
This is a guide for the Neon Tower Challenge in Wuthering Waves' Stranger Things in Honami Version 2.8 event. See the best teams to use in the Neon Tower, an overview of the challenge, and some tips for beating it here!
List of Contents
Neon Tower Best Teams
| Recommended Neon Tower Teams | |
|---|---|
| Spectro Frazzle | Aero Erosion |
| Galbrena Hypercarry | Augusta Hypercarry |
Spectro Frazzle Team
| Character | Recommended Loadout |
|---|---|
|
|
Namipon ・Zani Sticker I, II, III ・Flawless Act ・Coating Removal ・Heavens Piercer |
|
|
Bowtie Butler ・Phoebe Sticker I, II, III ・Photon Tunneling ・Structural Damage ・Fresh Cut Fruit |
|
|
Sweet Tooth Namipon ・Shorekeeper Sticker I, II, III ・Fresh Cut Fruit ・Quick Meal ・Fried Delicacy |
One recommended team is a high-end Spectro Frazzle team with Zani as the main DPS, with Phoebe as a Sub-DPS and enabler for Zani, and Shorekeeper as a support for them both.
Shorekeeper's stickers and Namipon are purely supportive, providing constant healing. Phoebe's set-up allows her to deal damage and apply Spectro Frazzle, while Zani is geared to deal as much damage as possible.
Aero Erosion Team
| Character | Recommended Loadout |
|---|---|
|
|
Polmes ・Cartethyia Sticker I, II, III ・Full Combo ・Street Art ・Flawless Act |
|
|
Sales Champ ・Abby Sticker I, II, III ・Swift Pursuit ・Chain Reaction ・Full Combo |
|
|
Bowtie Butler ・Chisa Sticker I, II, III ・Fresh Cut Fruit ・Frequency Fracture ・Structural Damage |
Another viable team is an Aero Erosion lineup with Cartethyia being supported by the healing and Sub-DPS prowess of both Aero Rover and Chisa.
Aero Rover and Chisa are both capable of pulling double duty, putting out damage and negative statuses while providing constant sustain. Cartethyia can then take full advantage of the statuses from her teammates.
Galbrena Hypercarry Team
| Character | Recommended Loadout |
|---|---|
|
|
Namipon ・Galbrena Sticker I, II, III ・Honami Rock ・Flawless Act ・Time Trick |
|
|
Sales Champ ・Qiuyuan Sticker I, II, III ・Full Combo ・Coating Removal ・Chain Reaction |
|
|
Sweet Tooth Namipon ・Shorekeeper Sticker I, II, III ・Fresh Cut Fruit ・Quick Meal ・Fried Delicacy |
The trial characters provided can be used to put together a Galbrena Hypercarry team, with its namesake being buffed by both Qiuyuan and Shorekeeper to deal massive damage.
Shorekeeper's build will help her provide big heals and boost the next incoming character, while Qiuyuan's aims to increase his damage. Finally, Galbrena both boosts her damage if not hit, while letting her spam her Namipon.
Augusta Hypercarry Team
| Character | Recommended Loadout |
|---|---|
|
|
Platform Guardian ・Augusta Sticker I, II, III ・Unending Tea Time ・Prime Ingredient ・Soda Shock |
|
|
Sales Champ ・Iuno Sticker I, II, III ・Full Combo ・Coating Removal ・Chain Reaction |
|
|
Sweet Tooth Namipon ・Shorekeeper Sticker I, II, III ・Fresh Cut Fruit ・Quick Meal ・Fried Delicacy |
Another team that can be opted for is an Augusta Hypercarry team, having her supported by Iuno and Shorekeeper to have Augusta deal as much damage as possible.
Shorekeeper is built to provide as much healing as she can, and Iuno is built to increase her damage output when on-field. Finally, Augusta is set-up to use the Boost state to amp her damage.
Neon Tower Challenge Overview
Bosses and Challenge Details
| # | Enemy | Danger Level IV Difficulty | Danger Level V Difficulty | Danger Level VI Difficulty |
|---|---|---|---|---|
| 1 |
|
155 | 220 | 310 |
| 2 |
|
160 | 230 | 330 |
| 3 |
|
165 | 240 | 350 |
| 4 |
|
170 | 250 | 370 |
| 5 |
|
175 | 260 | 390 |
There are three Danger Levels available for the Neon Tower Challenge, from Danger Level IV to VI. Each level will pit the player against the same 5 bosses, with their Difficulty Level increasing in higher Danger Levels.
Once in a stage, players will have 8 Minutes and 20 Seconds to defeat all five bosses for a successful clear. Note that the Stability mechanic is still present, and you will fail the challenge if this hits zero.
Neon Tower Challenge Tips
| Tips for Clearing Neon Tower |
|---|
|
|
Activate Namipon Set Effects

Given that the bosses in this challenge are exceptionally powerful, it is highly recommended to activate your chosen Namipon's bonuses by equipping the correct sticker tags and shapes.
Each Namipon has up to three unique bonuses activated by equipping the denoted number of stickers that fit the requirement. These requirements come in 2, 4, or 6 needed stickers.
Equip Stickers With Better Stats

Your collected stickers also provide bonus stats in addition to their main effect. Higher-rarity stickers grant more stats, making your team stronger.
This makes it ideal to not only use stickers that synergize with your chosen team, but also provide relevant stats to the character they are equipped to.
Use Namipon in Combat
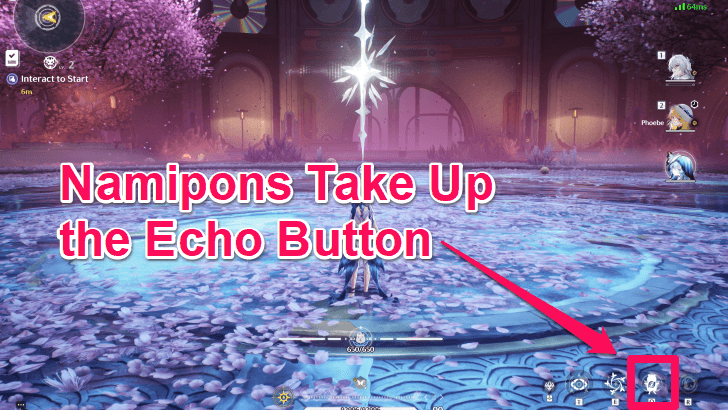
Lastly, don't forget to activate your Namipons in combat! Each Namipon scales with the Resonator, and can do significant damage provide healing and buffing with their abilities, helping you turn the tide.
Wuthering Waves Related Guides

Stranger Things in Honami Event Guide
All Area Exploration Guides
| Honami City Exploration Guides | |
|---|---|
| Sakura Quarter | Meishin Passageway |
| Hanakage Underground Street | Honami Central Park |
| Neon Tower | |
Honami City Map and 100% Exploration Guide
All Points of Interest Guides
| Honami City Points of Interest Guides | ||
|---|---|---|
Namipon Lightbox |
Irideglow Portal |
|
Other Stranger Things in Honami Guides
| Cafe Decor Nodes to Unlock First | How to Farm Rice Dangos |
| How to Get Star of Solaris and Collectibles | Namipon Tier List |
| List of All Support Namipon | |
Comment
Author

Neon Tower Challenge Best Teams and Guide
Please participate in our site
improvement survey
04/2026
improvement survey
04/2026
Would you assist in
improving Game8's site?
improving Game8's site?

×
We are listening to our users' valuable opinions and discussing how to act on them.
The information collected through this survey will be used for the purpose of improving our services. In addition, the information will only be disclosed a part of a statistic in a format that will not allow identification of personal information.
Begin Survey
Not Now
×
Please rate each item regarding Game8.co's Advertisements.
Amount of Ads
Very Dissatisfied
Somewhat Dissatisfied
Fine
Somewhat Satisfied
Highly Satisfied
Placement of Ads
Timing of Ad Display
Ad Loading Speed
Safeness of Ads
Content of Ads
×
Please rate each item regarding Game8.co's Quality of Articles.
Amount of information
Very Dissatisfied
Somewhat Dissatisfied
Fine
Somewhat Satisfied
Highly Satisfied
Frequency of updates
Speed of new information
Accuracy of articles
Understandibility of articles
Readability of sentences
×
Please rate each item regarding Game8.co's Usability of the Site.
Ease of finding information
Very Dissatisfied
Somewhat Dissatisfied
Fine
Somewhat Satisfied
Highly Satisfied
Loading Speed
Use of Color
Font Size
Visibility of Images
Easy to Understand Layout
×
Please rate each item regarding Game8.co's Message Boards, Comments.
Ease of Writing
Very Dissatisfied
Somewhat Dissatisfied
Fine
Somewhat Satisfied
Highly Satisfied
Readability
Ease in Finding Information
Comment Quality
Comment Quantity
Admin Response
×
Please rate each item regarding Game8.co's Site's new design.
Please rate our site's new design
Very Dissatisfied
Somewhat Dissatisfied
Fine
Somewhat Satisfied
Highly Satisfied
Do you think that the website's design change makes the site easier to use?
Has the new design made it easier for you to find information on the site?
Has the new design improved the overall visual appeal of the site?
How would you rate your overall satisfaction with the new design of the site?
×
How likely are you to recommend Game8 to someone you know?
Very Unlikely
0
1
2
3
4
5
6
7
8
9
10
Very Likely
If you have other opinions regarding potential improvement to the website, please share them with us. We would appreciate your honest opinion.
Note: This is a free response section, so you can proceed without entering anything.
Note: Please be sure not to enter any kind of personal information into your response.
Note: Please be sure not to enter any kind of personal information into your response.
×
Thank You
×
Thank you for participating in our survey! Your answers will help us to improve the quality of our website and services.
We hope you continue to make use of Game8.
We hope you continue to make use of Game8.
Close
Premium Articles

Rankings

Gaming News


![Forza Horizon 6 Review [Preview] | Beautiful Roads With a Whole Lot of Oversteer](https://img.game8.co/4460981/a7254c24945c43fbdf6ad9bea52b5ce9.png/thumb)
![Borderlands Mobile Review [Playtest] | The Same Borderlands Made Easy](https://img.game8.co/4465500/aac0c880a39ec5cd46073e49d18f3ed5.png/thumb)
Popular Games

Genshin Impact Walkthrough & Guides Wiki
Crimson Desert Walkthrough & Guides Wiki
Umamusume: Pretty Derby Walkthrough & Guides Wiki
Honkai: Star Rail Walkthrough & Guides Wiki
Monster Hunter Stories 3: Twisted Reflection Walkthrough & Guides Wiki
Wuthering Waves Walkthrough & Guides Wiki
The Seven Deadly Sins: Origin Walkthrough & Guides Wiki
Pokemon TCG Pocket (PTCGP) Strategies & Guides Wiki
Pokemon Pokopia Walkthrough & Guides Wiki
Zenless Zone Zero Walkthrough & Guides Wiki


Recommended Games
Monster Hunter World Walkthrough & Guides Wiki
Fire Emblem Heroes (FEH) Walkthrough & Guides Wiki
Pokemon Brilliant Diamond and Shining Pearl (BDSP) Walkthrough & Guides Wiki
Super Smash Bros. Ultimate Walkthrough & Guides Wiki
Diablo 4: Vessel of Hatred Walkthrough & Guides Wiki
Cyberpunk 2077: Ultimate Edition Walkthrough & Guides Wiki
Yu-Gi-Oh! Master Duel Walkthrough & Guides Wiki
Elden Ring Shadow of the Erdtree Walkthrough & Guides Wiki
The Legend of Zelda: Tears of the Kingdom Walkthrough & Guides Wiki
Persona 3 Reload Walkthrough & Guides Wiki


All rights reserved
Copyright© 2024-2025 Kuro Games. All Rights Reserved.
The copyrights of videos of games used in our content and other intellectual property rights belong to the provider of the game.
The contents we provide on this site were created personally by members of the Game8 editorial department.
We refuse the right to reuse or repost content taken without our permission such as data or images to other sites.