Rellana, Twin Moon Knight Weakness and Location
This is a boss guide for Rellana, Twin Moon Knight in Elden Ring DLC Shadow of the Erdtree. Learn about Rellana's weakness, location, and cheese strategies, as well as the best build against Rellana here.
| Rellana Guides | ||
|---|---|---|
| Rellana Weakness and Location | What to Do After Rellana | How to Skip Rellana |
Rellana Twin Moon Knight Weakness
Weak to Pierce Damage
Rellana, like most bosses in Elden Ring, is weak to Pierce-type weapons, which incentivizes using weapon classes such as Spears and Great Spears, Thrusting Swords and Heavy Thrusting Swords, and the DLC-exclusive Light Greatswords and Thrusting Shields.
Susceptible to Lightning Damage
Rellana takes more Lightning damage compared to the other elements, and is most resistant to Magic damage. Take note that her weakness to lightning attacks is due to the large pool of water at the center of the boss room.
Use Heavy Thrusting Swords for Strength or Dexterity Builds
Dragon King's Cragblade would be the best choice of weapon here for Dex/Str builds as it deals both piercing and lightning damage. It can also break Rellana's poise easily, even more with its Thundercloud Form skill.
Alternatively, you can use a normal Heavy Thrusting Sword like the Great Epee and just change its affinity to lightning or imbue it with Lightning Grease.
Use Lightning Dragon Incantations for Faith Builds
If you're using incantations, stick to lightning Dragon Incantations while equipped with Radagon Icon and fire them when you find an opening. This can be difficult due to Rellana's aggresiveness but summons should help keep her busy.
Best Builds Against Rellana Twin Moon Knight
Pierce Weapons are Recommended
DEX builds can easily exploit Rellana's Pierce and Lightning damage weaknesses by using the Dragon King's Cragblade, Bolt of Gransax, or a Lightning-infused Godskin Stitcher. If you don't like the Thrusting Sword or Spear moveset, you can instead opt to use a Lightning-infused Milady for the fight.
Pure STR builds, however, are better off forgoing the Lightning infusion and instead using a Heavy-infused Great Spear like the Lance or Messmer Soldier's Spear. These can be buffed during the fight using Lightning Grease to add a flat Lightning damage bonus to them.
Use Thrusting Shields or Greatshields for Guard Pokes
If you're having a tough time keeping up with Rellana's long combos and tricky attack delays, you can opt to go with a Thrusting Shield build, instead. Since these can be infused with Lightning and deal pierce damage, you get the best of both worlds against Rellana with the added protection of guard blocks and counters.
If you prefer to off-hand shields, aim to equip Greatshields with 100% physical damage negation and around 60 Guard Boost. High-STR builds can opt to use Black Steel Greatshield, while low Strength DEX builds can manage with the Golden Beast Crest Shield if infused with Barricade Shield.
Equip Talismans for Increased Attack and Counter Damage
 Curved Sword Talisman Curved Sword Talisman |
The talismans you equip to boost your attack will depend on if you are two-handing a typical Pierce-damage weapon, shield poking, or two-handing a Thrusting Shield (with a Shard of Alexander if you're a heavy ash of war user).
Aggressive two-handed sword or spear wielders can use Two-Handed Sword Talisman to boost their attack damage. Thrusting Shield builds can pair these with the Curved Sword Talisman for better guard counter damage.
Use Lightning Incantations and Ashes of War
 Lightning Spear Lightning Spear
|
 Thunderbolt Thunderbolt |
|
Unless a Mimic Tear or other summon is distracting Rellana, she is difficult to keep at a distance against due to her ranged attacks and fast gap-closing moves. Your safest spell and Ash of War options, due to fast casting speed, would be Lightning Spear, Honed Bolt and Thunderbolt.
However, if you're just casting incantations to buff yourself, then Vyke's Dragonbolt is a great way to infuse Lightning damage into your right-hand weapon for extra attack power against Rellana.
Use Talismans and Armor for Magic Damage Negation
 Pearldrake Talisman +2 Pearldrake Talisman +2 |
 Spelldrake Talisman +3 Spelldrake Talisman +3 |
 Scaled Armor Scaled Armor |
Throughout the fight, Rellana will regularly use magic attacks (and fire during the 2nd phase). This early in the DLC, the Pearldrake Talisman +2 provides the most flexibility, but we recommend getting the Spelldrake Talisman +3 since her ranged magic attacks are deadlier.
For a full defensive build against even her physical attacks, you can add the Dragoncrest Greatshield Talisman to your loadout. For armor options, you can't go wrong with Scaled Armor due to its decent non-physical damage negation stats and its offered poise.
Cast Incantations and Ashes of War for Defense Buffs
 Barrier of Gold Barrier of Gold
|
 Golden Vow Golden Vow
|
 Endure Endure |
Rellana's relentless attacks can be mitigated using a variety of incantations and Ashes of War. Barrier of Gold is the strongest magic negation incantation, capable of tanking even Rellana's Twin Moons attack.
Golden Vow is also a go-to incantation or Ash of War to cast, for both a defensive and offensive buff. Similarly, Endure on your primary weapon can be used to both reduce your damage taken and increase your poise, allowing you to trade damage when using a multi-hit build.
Use Spells and Ashes of War That Deflect Magic
 Eternal Darkness Eternal Darkness
|
|
 Carian Retaliation Carian Retaliation
|
While INT users are at an attack disadvantage against Rellana's resistances, they have a niche advantage in defense with specific spells that can deflect or reflect Rellana's ranged magic attacks.
Eternal Darkness is the easiest spell to use: simply cast it and it will linger in the arena, diverting Rellana's Glintstone Blades away from you. On the other hand, Thops's Barrier can be timed to redirect her wave attacks.
Lastly, even though Rellana is more resistant to magic damage, you can still parry with Carian Retaliation as a spell or Ash of War to absorb and reflect her magic projectiles as glintblades.
Specific Recommended Build: Bolt of Gransax Shield Poke Build
| Main Hand Weapon | Off-Hand Weapon | ||||||||
|---|---|---|---|---|---|---|---|---|---|
Skill: Ancient Lightning Spear |
Skill: Barricade Shield Affinity: Any |
||||||||
| Character Stat Distribution | |||||||||
| VIG | 60 | MND | 11 | ||||||
| END | 30 | STR | 24 | ||||||
| DEX | 62 | INT | 9 | ||||||
| FAI | 25 | ARC | 8 | ||||||
Stats above are based on Samurai class's stat distribution at RL 150.
This build combines the decent defense, and relatively low STR-requirement, of the Golden Beast Crest Shield with the excellent poke damage and reach of the Bolt of Gransax to deal both Pierce and Lightning damage.
If you prefer the moveset of the Thrusting Sword, you can swap out the Bolt of Gransax for the Dragon King's Cragblade. Naturally, these weapon choices also work without the shield, especially if you're running a pure DEX build for the DLC.
Equip Armor and Talismans for Maximum Guard Protection
| Helm | Armor | Gauntlets | Greaves |
|---|---|---|---|
| Scaled Armor |
 Scaled Gauntlets Scaled Gauntlets |
 Scaled Greaves Scaled Greaves |
|
| Talismans | |||
 Erdtree's Favor +2 Erdtree's Favor +2 |
Curved Sword Talisman |
 Greatshield Talisman Greatshield Talisman |
|
Your armor and talismans for this poke build will revolve around damage negation and enhanced guarding capability. Your biggest defense will come from the Scaled Armor set to boost your non-physical damage negations, while the Fire Knight Helm and Erdtree's Favor +2 will be equipped for slight increases to equip load and max stamina.
The Greatshield Talisman and Pearl Shield Talisman are valuable for decreasing stamina drain while guarding and significantly boosting non-physical damage negation to complement your Greatshield's 100% physical damage negation, allowing you to safely and repeatedly attack with Guard Counters enhanced by the Curved Sword Talisman.
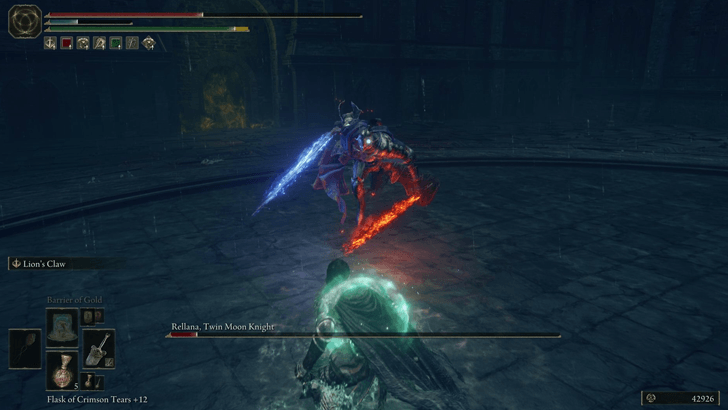
Manage Stamina Between Dodging and Guarding
The gameplay clip above was recorded in NG+ at Scadutree Blessing Level 20.
Even with the Greatshield Talisman, Barricade Shield and high guard boost, you still need to mind your stamina bar to avoid having your guard broken while poking Rellana.
Try to mix in dodge rolls to create space, and stop guarding during safe times to recover stamina more quickly. You can also use the Deflecting Hardtear for less stamina consumption when using timed blocks.
Play for Stance Breaks Versus Rellana
When using this build, take full advantage of guard counters since these can easily set you up for a stance break and critical hit against Rellana.
Time your guard counters for the end of her combos, combining them with jump attacks and charged heavy attacks to break the Twin Moon Knight's stance, easily.
Rellana Twin Moon Knight General Tips
| Tips for Beating Rellana |
|---|
|
|
Level Up and Gather Scadutree Fragments
| Recommended Levels | |
|---|---|
| Rune Level | Level 150 or Higher |
| Scadutree Blessing | Level 6 or Higher |
Rellana is a brutal boss that uses long physical attack chains that combo into her Carian sorcery casts (that only gets worse in phase 2 due to the fire damage mix-up). Make sure you get all the Scadutree Fragments you can from Gravesite Plain to avoid getting one-shot during the fight.
All Scadutree Fragment Locations
Wait for Her to Finish Her Attack Chain Before Attacking
Rellana has incredibly long attack chains that flow seamlessly into delayed attack mix-ups. If you are fighting her at a lower level (or without any buffs), wait for her to finish her attack chain to get some damage in safely.
Watch for Her Gap Closers
The Twin Moon Knight has plenty of gap closing attacks that propel her forward towards the player. Try not to spam your dodge since these lunges tend to roll catch panicking players.
Get Ready to Dodge if Her Sword Lights Up
If you are at long range from Rellana, she may opt to perform a ranged horizontal slash attack in your direction. Dodge this or you will take substantial damage.
Be Wary if She Summons Daggers Close to the Ground
If you are at medium range from Rellana, she may opt to summon a few dagger projectiles. The move to look out for is when she summons daggers near the ground. These fire off almost instantly and she usually does a follow-up thrust that can catch you off guard.
Watch for Crucial Fight Checkpoints
Rellana will power up over the course of the fight, going from using a small percentage of her arsenal to going all out in the final phase. Each phase will usually have a transition move that has a long wind up animation - perfect for getting damage in, safely.
Dodge Twice Against Her Carian Greatsword
Once Rellana's HP drops around 60%, she may use her Carian Greatsword Combo. This is an incredibly telegraphed attack as she will summon a Carian Greatsword to first slam down vertically, then do a spinning horizontal slash.
Both can be dodged, and the player should watch for when the Carian Greatsword shines for a split second as the cue to dodge.
Be Wary of Elemental Afterdamage During the Second Phase
During the Second Phase at roughly 50% HP, Rellana will empower her Twin Blades with magic, causing her combos to extend, and may sometimes leave flaming afterslashes that explode after a while.
Dodge her 5-Hit Ranged Slash Attacks
When Rellana reaches 50% HP, she may perform a 5-hit ranged slash attack if the player is standing far from Rellana. This move will kill the player if they are caught in the middle of the combo.
To dodge this, step back and evade the first two, then dodge roll the next two, wait for a bit, then dodge roll the last one.
Jump Thrice to Dodge Her Twin Moon AoE Attack
During Phase 2, Rellana will use a Twin Moon AoE attack that hits the entire arena once her HP reaches around 30%. To dodge it, jump thrice in quick succession as each moon (and Rellana) hits the ground. If timed correctly, you should take no damage at all.
Cast Spells or Equip Items that Boost Your Magic Resistance
Equipping items like the Spelldrake Talisman +3 or using Incantations like Barrier of Gold will do wonders for your survivability in this fight. Since Rellana does a lot of magic damage, boosting your magic resistance can allow you to tank even her Twin Moon attack.
Rellana Twin Moon Knight Cheese
Summon and Spirit Ash Cheese Strategy
For most players of the DLC, Rellana's difficulty stems from how aggressive she is, especially in melee. This makes it tricky for builds likes Faith or Int spellcasters to really get going during her boss fight.
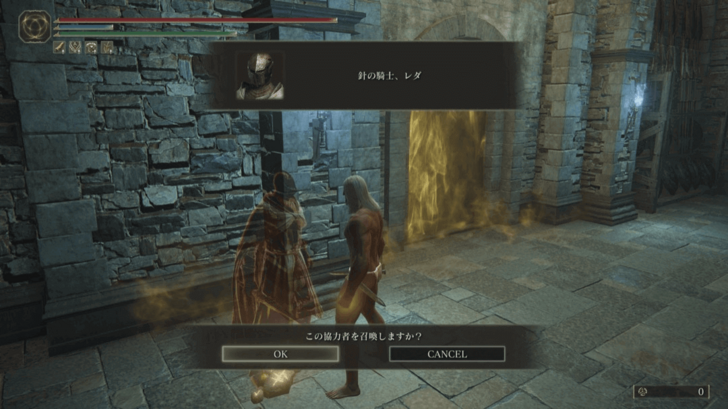
For some much needed assistance during the fight, consider using Spirit Ashes as well as the Needle Knight Leda Gold Summon sign outside her boss room. The added allies in the fight help draw aggro, giving you more breathing room to heal, cast spells, or re-apply buffs.
Save Your Spirit Ash for the Second Phase
If the fight is proving too difficult, try saving your summons for this boss battle. First, summon Needle Knight Leda to assist you in the first half. Once you trigger Rellana's second phase, summon your spirit ash. This method allows you to have one surviving summon that draws aggro for both boss phases.
Rellana Twin Moon Knight Cheese Strategy
Attack Rellana From Outside the Arena With Flame of the Fell God
It's possible to cheese Rellana by casting Flame of the Fell God from outside the back of her arena. You'll need to space out your recasts to avoid resetting the projectile, but in practice, the initial detonation and lingering flames will slowly eat away at her HP (indicated by sound effects of getting hit), until she dies and the fog wall dissipates.
Unless you're a high-Faith build to start with, this will require some hefty respeccing, as Flame of the Fell God requires 41 FAI to cast. Also ensure you have enough Cerulean Flasks allocated to continuously cast the incantation until you defeat Rellana.
Get Flame of the Fell God in Liurnia
Requires Doing the Rellana Skip Method
This cheese method only works from the back of the arena, as Flame of the Fell God's range can't reach Rellana from the front fog wall near the Castle Lord's Chamber.
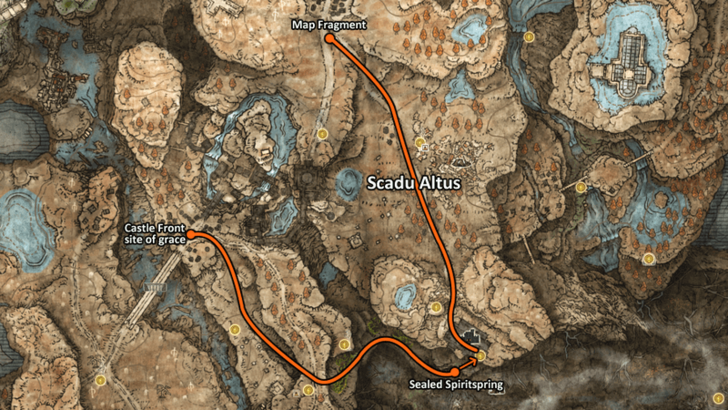
Players will have to do the Rellana Skip method first to reach Scadu Altus through the Sealed Spiritspring into Fort Reprimand, then ride towards Highroad Cross to get to the fog wall from where the incantation will be able to hit Rellana.
Rellana Twin Moon Knight Location
Found at the Top of Castle Ensis
| World View | Map Location |
|---|---|
 |
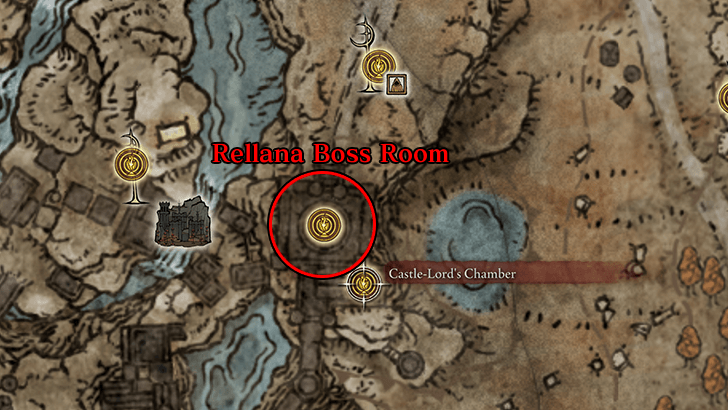 |
Rellana, Twin Moon Knight, is found at the top of the Castle Ensis Legacy Dungeon to the north west of the Gravesite Plains. Her boss room door is a short walk from the Castle-Lord's Chamber site of grace.
How to Get to Rellana
| 1 | 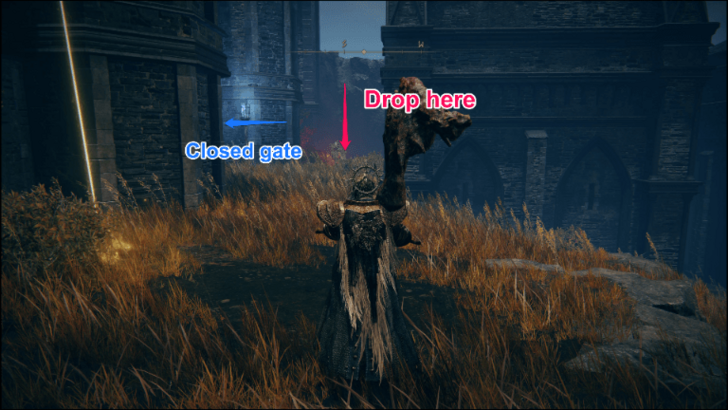 From the Castle Ensis Checkpoint site of grace, walk southwest past the closed gate and drop down the hole. |
|---|---|
| 2 |  Exit the cave and turn left towards the waterfall. There are rocks sticking out the waterfall where you can hop onto to reach the stream above. |
| 3 | 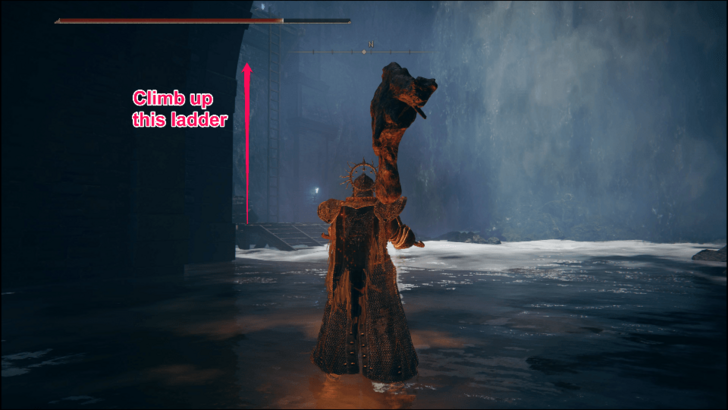 Head north to find a long ladder on your left that leads back to the same floor as the checkpoint. |
| 4 | 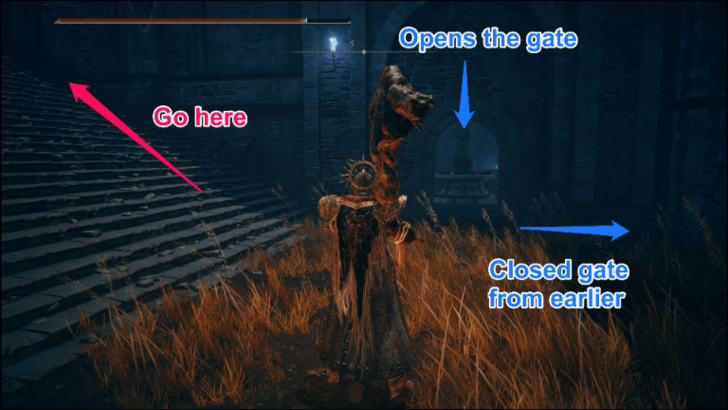 Exit the room with the guards and you will find a wheel inside the room across. Turn this wheel to open the gate on your right for a shortcut to the Castle Ensis Checkpoint site of grace. |
| 5 |  Go up the stairs and cross the bridge with more guards before going up the slope to your right. |
| 6 |  Turn right again and enter the chapel on the other side. |
| 7 |  Once inside, move one room south then turn right to the hallway. |
| 8 |  Follow the hallway to the end until you find a door that leads back outside. |
| 9 | 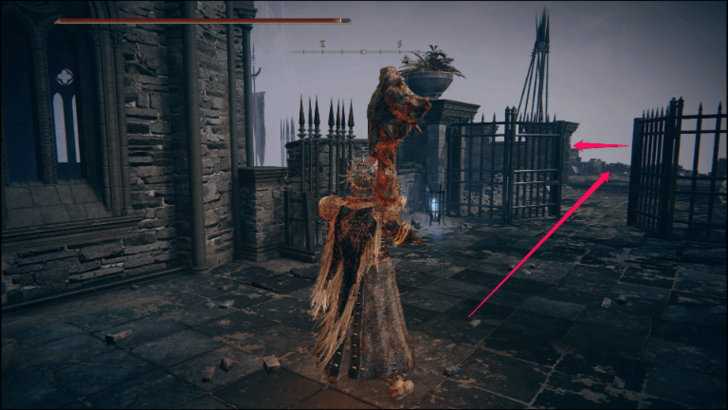 Go up the stairs (there will be another mage on the roof that you can either kill or ignore) and follow the path to your right. |
| 10 | 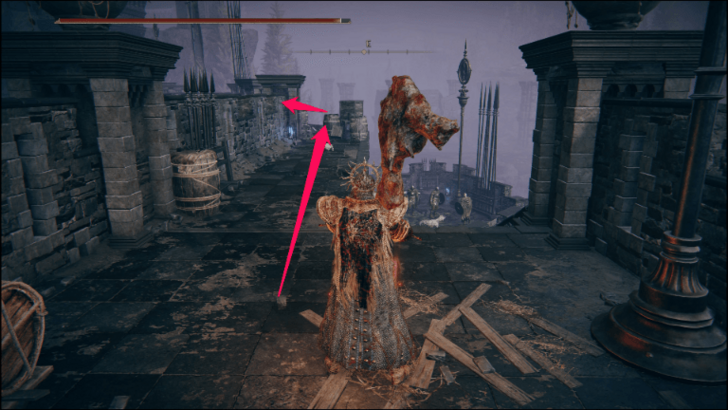 There are two paths here but both will lead you to the tower that you need to climb. |
| 11 | 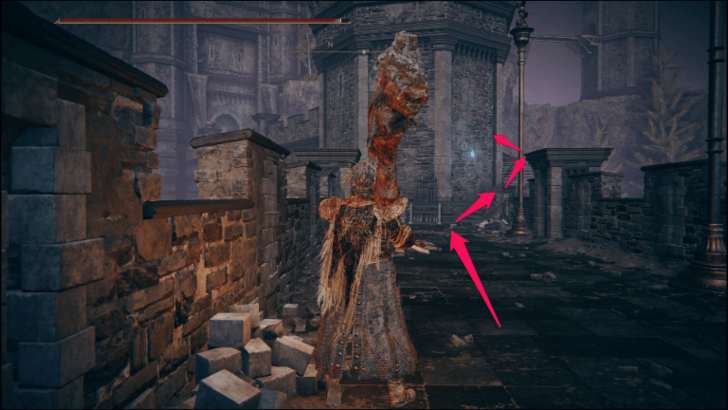 Reach the tower and climb the stairs around it until you see a Black Knight. |
| 12 | 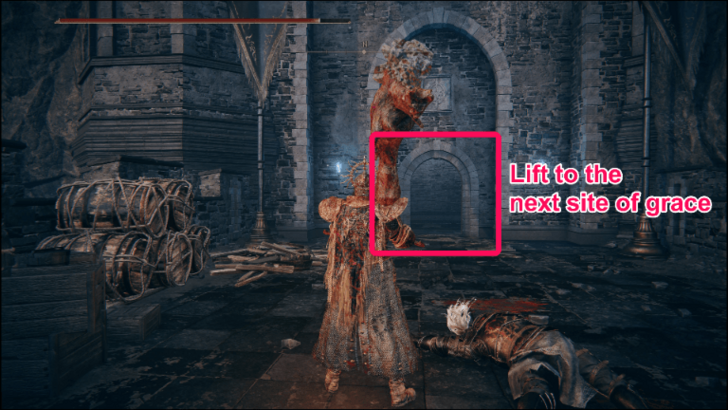 Behind the Black Knight is a lift that will take you up to the Castle Lord's Chamber site of grace. |
| 13 | 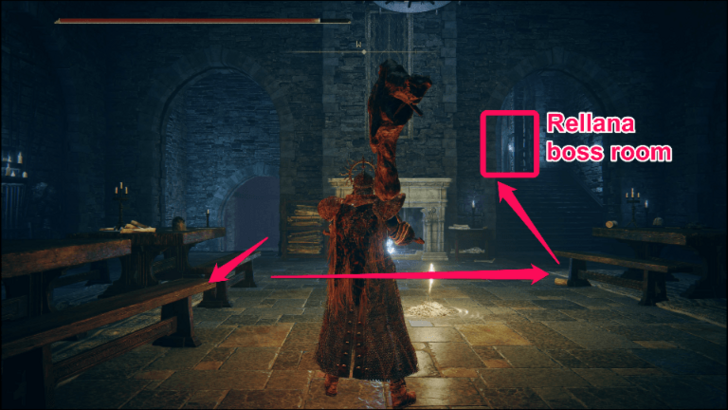 Northwest past the site of grace are the last stairs that will take you to Rellana's boss room. |
Rellana Twin Moon Knight Rewards
| Rellana Twin Moon Knight Rewards | |
|---|---|
| Runes | 180000 |
| Drops |
・Remembrace of the Twin Moon Knight |
Remembrance of the Twin Moon Knight Rewards
 Rellana's Twin Blades Rellana's Twin Blades |
 Rellana's Twin Moons Rellana's Twin Moons |
The Remembrance of the Twin Moon Knight can be turned in to Finger Reader Enia at the Roundtable Hold. Doing so lets the player choose either Rellana's Twin Blades (weapon) or Rellana's Twin Moons (sorcery) for their reward.
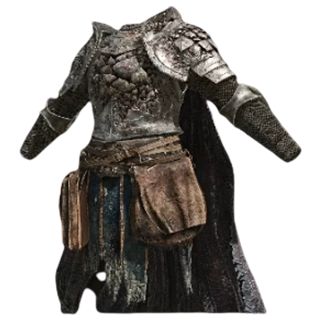
Unlocks Rellana's Armor Set
| Rellana's Armor Set | |||
|---|---|---|---|
 Rellana's Helm Rellana's Helm |
 Rellana's Armor Rellana's Armor |
 Rellana's Gloves Rellana's Gloves |
 Rellana's Greaves Rellana's Greaves |
An additional reward for defeating Rellana is the option to purchase her entire armor set from Finger Reader Enia in the Roundtable Hold. Each armor piece will cost 10,000 Runes except her Armor itself which costs 15,000 Runes.
Elden Ring Related Guides
DLC Bosses
Main Bosses
Optional Bosses
Mini-Bosses
| All Bosses in Elden Ring | |
|---|---|
| Elder Dragon Greyoll | Lion Guardian |
| Valiant Gargoyle (Leyndell) | - |
Hostile NPCs and Invaders
| Limgrave Invaders and Hostile NPCs | |
|---|---|
| Bloody Finger Nerijus | Old Knight Istvan |
| Recusant Henricus | - |
| Liurnia of the Lakes Invaders and Hostile NPCs | |
| Great Horned Tragoth | Festering Fingerprint Vyke |
| Altus Plateau Invaders and Hostile NPCs | |
| Eleonora, Violet Bloody Finger | Inquisitor Ghiza |
| Maleigh Marais, Shaded Castle Castellan | Rileigh the Idle |
| Vargram the Raging Wolf & Errant Sorcerer Wilhelm | Magnus the Beast Claw |
| Mountaintops of the Giants Invaders and Hostile NPCs | |
| Juno Hoslow, Knight of Blood | - |
| The Roundtable Hold Invaders and Hostile NPCs | |
| Mad Tongue Alberich | - |
| Multiple Location Invaders and Hostile NPCs | |
| Anastasia, Tarnished-Eater | - |
Comment
Author

Rellana, Twin Moon Knight Weakness and Location
Rankings
- We could not find the message board you were looking for.
Gaming News


![Monster Hunter Stories 3 Review [First Impressions] | Simply Rejuvenating](https://img.game8.co/4438641/2a31b7702bd70e78ec8efd24661dacda.jpeg/thumb)
Popular Games

Genshin Impact Walkthrough & Guides Wiki
Honkai: Star Rail Walkthrough & Guides Wiki
Umamusume: Pretty Derby Walkthrough & Guides Wiki
Pokemon Pokopia Walkthrough & Guides Wiki
Resident Evil Requiem (RE9) Walkthrough & Guides Wiki
Monster Hunter Wilds Walkthrough & Guides Wiki
Wuthering Waves Walkthrough & Guides Wiki
Arknights: Endfield Walkthrough & Guides Wiki
Pokemon FireRed and LeafGreen (FRLG) Walkthrough & Guides Wiki
Pokemon TCG Pocket (PTCGP) Strategies & Guides Wiki


Recommended Games
Diablo 4: Vessel of Hatred Walkthrough & Guides Wiki
Cyberpunk 2077: Ultimate Edition Walkthrough & Guides Wiki
Fire Emblem Heroes (FEH) Walkthrough & Guides Wiki
Yu-Gi-Oh! Master Duel Walkthrough & Guides Wiki
Super Smash Bros. Ultimate Walkthrough & Guides Wiki
Pokemon Brilliant Diamond and Shining Pearl (BDSP) Walkthrough & Guides Wiki
Elden Ring Shadow of the Erdtree Walkthrough & Guides Wiki
Monster Hunter World Walkthrough & Guides Wiki
The Legend of Zelda: Tears of the Kingdom Walkthrough & Guides Wiki
Persona 3 Reload Walkthrough & Guides Wiki


All rights reserved
ELDEN RING™ & ©BANDAI NAMCO Entertainment Inc. / ©2021 FromSoftware, Inc.
The copyrights of videos of games used in our content and other intellectual property rights belong to the provider of the game.
The contents we provide on this site were created personally by members of the Game8 editorial department.
We refuse the right to reuse or repost content taken without our permission such as data or images to other sites.