How to Beat Crucible Knight Ordovis: Boss Fight Guide

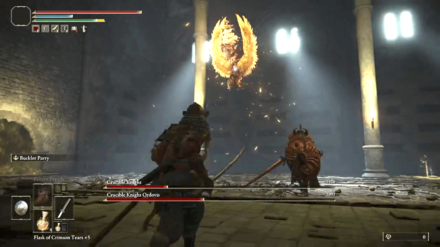
This is a guide on how to beat Crucible Knight Ordovis, an optional boss in Elden Ring. Read on to learn more about Crucible Knight Ordovis's drops, weaknesses, and recommended level!
List of Contents
Crucible Knight Ordovis General Info
Stats and Rewards
| Crucible Knight Ordovis | ||
|---|---|---|

|
||
| Weakness | Resistance | Immune |
| ━ |
Bleed Frost Scarlet Rot Sleep Poison |
Madness Instant Death |
| Affected By | Bleed, Frost, Scarlet Rot, Poison, Sleep | |
| Spirit Ashes Available? | Yes | |
| Rune Rewards |
28000 (NG) |
|
| Summonable NPCs |
None
|
|
| Location | ||
| Item Drops |
・Ordovis' Greatsword
・Crucible Axe Armor ・Crucible Axe Helm ・Crucible Gauntlets ・Crucible Greaves |
|
Crucible Knight Ordovis Location
Where to Find Crucible Knight Ordovis
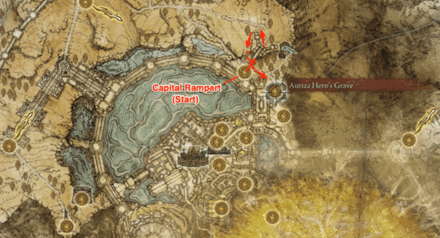
From the Capital Rampart site of grace found just after defeating the Draconic Tree Sentinel, head Northwest and then take a sharp turn going South. Follow the cliffside on to your left and jump over the gap and drop down facing Southeast and enter Auriza Hero's Grave.
The double boss fight with Crucible Knight Ordovis is found at the end of this dungeon.
When to Fight Crucible Knight Ordovis
| Location | Recommended Level |
|---|---|
|
Auriza Hero's Grave |
Lv. 85 |
How to Beat Crucible Knight Ordovis
| Tips for Beating Crucible Knight Ordovis |
|---|
Parry with the Buckler
The Crucible Knights have predictable attack patterns which you can exploit once you are familiar with their parry timings. Using the Buckler Parry will give you an advantage as it has more active frames on the parry, thereby increasing the likelihood of landing a successful parry and riposte.
To get the Buckler, go back to Godrick's Arena and kill the NPC stomping on his corpse. He will drop a Bell Bearing that allows you to buy the buckler back at the Round Table Hold.
Focus Your Attacks on One Target
As always with fights that have multiple targets, you should focus on taking out one target first to even the odds. It's recommended that you first focus on the Crucible Knight whose second phase attacks you are more comfortable with dodging, since you will still be dealing with two targets at that point in the fight.
Summon Mimic Tear
Summoning Mimic Tear is a good way to distract one of the two Crucible Knights and can give you some much needed breathing room. Also if Mimic Tear can help you inflict status effects like Scarlet Rot, although keep in mind that Crucible Knights have a high resistance to status effects.
Inflict Scarlet Rot
If you successfully manage to inflict Scarlet Rot on one or both of the bosses, you can focus on dodging as their health gradually drains. It can be difficult to inflict Scarlet Rot though, as Crucible Knights have a high resistance to status effects. Even so, once they are inflicted, the damage dealt over time takes out a massive amount of HP.
At the start of the fight you can cast Rotten Breath, but it has a very slow start up animation so that first cast is the only one you can get semi-safely. If you have the Scorpion's Stinger which has a Scarlet Rot buildup passive effect, you can use that to inflict Scarlet Rot as well as use it for higher crit damage on ripostes. This strategy is especially effective when paired with Mimic Tear.
Elden Ring Related Guides

DLC Bosses
Main Bosses
Optional Bosses
Mini-Bosses
| All Bosses in Elden Ring | |
|---|---|
| Elder Dragon Greyoll | Lion Guardian |
| Valiant Gargoyle (Leyndell) | - |
Hostile NPCs and Invaders
| Limgrave Invaders and Hostile NPCs | |
|---|---|
| Bloody Finger Nerijus | Old Knight Istvan |
| Recusant Henricus | - |
| Liurnia of the Lakes Invaders and Hostile NPCs | |
| Great Horned Tragoth | Festering Fingerprint Vyke |
| Altus Plateau Invaders and Hostile NPCs | |
| Eleonora, Violet Bloody Finger | Inquisitor Ghiza |
| Maleigh Marais, Shaded Castle Castellan | Rileigh the Idle |
| Vargram the Raging Wolf & Errant Sorcerer Wilhelm | Magnus the Beast Claw |
| Mountaintops of the Giants Invaders and Hostile NPCs | |
| Juno Hoslow, Knight of Blood | - |
| The Roundtable Hold Invaders and Hostile NPCs | |
| Mad Tongue Alberich | - |
| Multiple Location Invaders and Hostile NPCs | |
| Anastasia, Tarnished-Eater | - |
Author
How to Beat Crucible Knight Ordovis: Boss Fight Guide
improvement survey
03/2026
improving Game8's site?

Your answers will help us to improve our website.
Note: Please be sure not to enter any kind of personal information into your response.

We hope you continue to make use of Game8.
Rankings
- We could not find the message board you were looking for.
Gaming News
Popular Games

Genshin Impact Walkthrough & Guides Wiki

Honkai: Star Rail Walkthrough & Guides Wiki

Umamusume: Pretty Derby Walkthrough & Guides Wiki

Pokemon Pokopia Walkthrough & Guides Wiki

Resident Evil Requiem (RE9) Walkthrough & Guides Wiki

Monster Hunter Wilds Walkthrough & Guides Wiki

Wuthering Waves Walkthrough & Guides Wiki

Arknights: Endfield Walkthrough & Guides Wiki

Pokemon FireRed and LeafGreen (FRLG) Walkthrough & Guides Wiki

Pokemon TCG Pocket (PTCGP) Strategies & Guides Wiki
Recommended Games

Diablo 4: Vessel of Hatred Walkthrough & Guides Wiki

Fire Emblem Heroes (FEH) Walkthrough & Guides Wiki

Yu-Gi-Oh! Master Duel Walkthrough & Guides Wiki

Super Smash Bros. Ultimate Walkthrough & Guides Wiki

Pokemon Brilliant Diamond and Shining Pearl (BDSP) Walkthrough & Guides Wiki

Elden Ring Shadow of the Erdtree Walkthrough & Guides Wiki

Monster Hunter World Walkthrough & Guides Wiki

The Legend of Zelda: Tears of the Kingdom Walkthrough & Guides Wiki

Persona 3 Reload Walkthrough & Guides Wiki

Cyberpunk 2077: Ultimate Edition Walkthrough & Guides Wiki
All rights reserved
ELDEN RING™ & ©BANDAI NAMCO Entertainment Inc. / ©2021 FromSoftware, Inc.
The copyrights of videos of games used in our content and other intellectual property rights belong to the provider of the game.
The contents we provide on this site were created personally by members of the Game8 editorial department.
We refuse the right to reuse or repost content taken without our permission such as data or images to other sites.


![Everwind Review [Early Access] | The Shaky First Step to A Very Long Journey](https://img.game8.co/4440226/ab079b1153298a042633dd1ef51e878e.png/thumb)

![Monster Hunter Stories 3 Review [First Impressions] | Simply Rejuvenating](https://img.game8.co/4438641/2a31b7702bd70e78ec8efd24661dacda.jpeg/thumb)


