How to Beat Rykard, Lord of Blasphemy: Boss Fight Guide

This is a guide on how to beat Rykard, Lord of Blasphemy, a boss in Elden Ring. Read on to learn more about Rykard, Lord of Blasphemy's drops, weaknesses, and recommended level!
List of Contents
Rykard, Lord of Blasphemy General Info
Stats and Rewards
| Rykard, Lord of Blasphemy | ||
|---|---|---|

|
||
| Weakness | Resistance | Immune |
|
Frost |
Magic Fire Holy |
━ |
| Affected By | Bleed, Frostbite, Poison, Scarlet Rot | |
| Spirit Ashes Available? | Yes | |
| Rune Rewards |
130000 (NG) |
|
| Summonable NPCs |
None
|
|
| Location | ||
| Item Drops |
・Remembrance of the Blasphemous
・Rykard's Great Rune |
|
Rykard, Lord of Blasphemy Location
Where to Find Rykard, Lord of Blasphemy
| Map Location | |
|---|---|
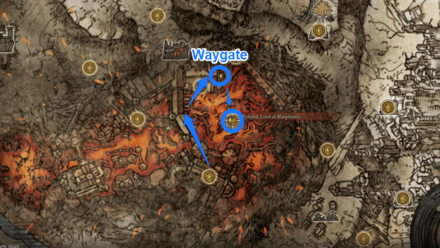 View Full Image |
|
| Recommended Level | Lv.80 |
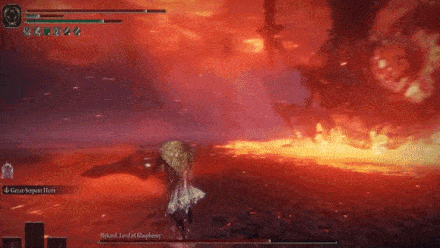
Rykard, Lord of Blasphemy can be found deep in Volcano Manor, which is situated at the top of Mount Gelmir, in the Altus Plateau region.
Rykard's boss room is separated from the rest of the area, and can only be entered via a waygate portal. After defeating the Godskin Noble, Make your way north from the Temple of Eiglay Site of Grace, and find the waygate portal to Rykard's boss room.
Volcano Manor Legacy Dungeon Walkthrough and Location
How to Beat Rykard, Lord of Blasphemy
| Tips for Beating Rykard, Lord of Blasphemy |
|---|
| How to Beat Strategies | ||
|---|---|---|
| Ranged Strategy | Serpent-Hunter Strategy | |
Click a link above to take you to that section.
Ranged Strategy
| Rykard, Lord of Blasphemy Boss Tips |
|---|
Summon a Spirit Ash with long-range attacks
Rykard generates lava wherever he steps. A good Spirit Ash summon with long-range attacks like Latenna the Albinauric or Spirit Jellyfish Ashes will be able to avoid Rykard's lava. Likewise, a tanky spirit like Mimic Tear will have high enough defense to withstand almost any attack thrown at it.
Equip the Serpent-Hunter
As you enter the boss room for the first time, there will be a great spear you can pick up in front of you called the Serpent-Hunter. The Serpent-Hunter is capable of making long-range slashes and will easily hit Rykard from afar. If you've run out of FP and flasks for your spells, falling back to the Serpent-Hunter is an excellent plan B. Anyone will be able to equip this weapon, regardless of stats.
Serpent-Hunter Stats, Upgrades, and How to Get
Serpent-Hunter Strategy
| Rykard, Lord of Blasphemy Boss Tips |
|---|
Equip the Serpent-Hunter
As you enter the boss room for the first time, there will be a great spear you can pick up in front of you called the Serpent-Hunter. This weapon is capable of making long-range slashes and will make the fight several times easier. Equip it before engaging with the boss. Note that this effect will only work while fighting Rykard.
Serpent-Hunter Stats, Upgrades, and How to Get
Keep Your Distance
Rykard generates lava wherever he steps. Always keep away, and swing the Serpent-Hunter from a safe distance. Staying away will also help you dodge his fire and poison AoE attacks.
Equip Fire-Resistant Talismans or Armor
This boss uses a lot fo fire attacks, so make sure to defend against it. The Flamedrake Talisman is a good choice for this fight, as it helps you resist Fire attacks.
Rykard, Lord of Blasphemy Attack Patterns
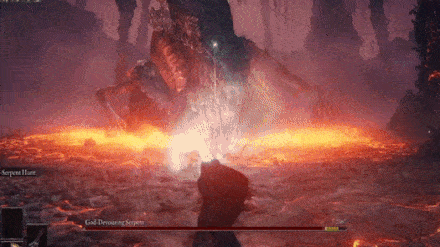
God-Devouring Serpent (Phase 1)
This boss is Rykard's first phase. It has slow, predictable moves and should prove easy to dodge once you've figured out its attack patterns.
Bite Attacks
| Bite Attack Variations |
|---|
 Grab Bite: The Serpent curls upward with its mouth open and lunges at you sideways. This is a grab attack that is avoided by dodging left or right at the right time. |
 Triple Bite Combo: The God-Devouring Serpent does three consecutive bite attacks that go right, left, then center. This combo can be avoided by dodging into its attacks: dodge left, dodge right, then dodge forward. Be careful of the third attack, as it has a slight delay and can trip you up. |
 Bite Swipe: The God-Devouring Serpent makes a low-stance roar and does a bite swipe to either the left or right, depending on where it's facing. This is easily avoided by stepping or dodging backwards. |
 Thrust Bite: The God-Devouring Serpent does a long, forward-reaching bite at you. Avoid this by dodging to the left or right. To distinguish this move from its grab attack, The thrust bite starts off with the Serpent moving its head to the side instead of upward with the grab attack. |
 Bite Barrage: The God-Devouring Serpent does a series of quick bites while moving toward you. Once you see the first bite, disengage and run away from it as fast as you can, for this move is very dangerous. |
AoE Attacks
| AoE Attack Variations |
|---|
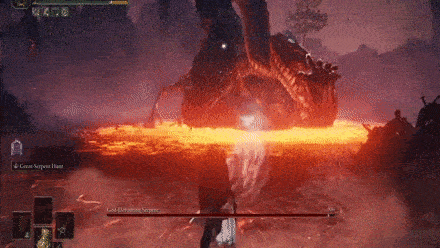 Lava Shockwave: The God-Devouring Serpent's head points upward, then buries into the ground, after which it unleashes a lava shockwave from the earth. This shockwave travels a narrow, straight path, so it's avoidable if you run or dodge to the side. |
 Lava Spray: The God-Devouring Serpent raises its head and hits the ground, splashing lava at you. If you're close to the boss, dodge forward to avoid all the lava. If you're far away, you might not need to dodge at all. |
 Poison Spray: The God-Devouring Serpent's mouth foams with poison and then sprays it at you. Avoiding this move is similar to the Lava Spray. If you're close to the boss, dodge forward. If you're far away, you don't need to dodge. |
 Spinning Lava Rampage: The God-Devouring Serpent begins with a headslam, then spins around, madly biting and spraying lava everywhere. It's best to stay away while this move is happening. |
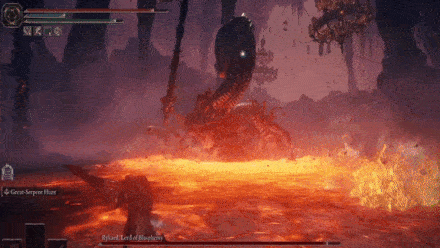
Rykard, Lord of Blasphemy (Phase 2)
This fight will be significantly harder, as Rykard can now use a giant sword and cast magic attacks which all do a ton of damage.
Bite Attacks
| Bite Attack Variations |
|---|
 Triple Bite Combo: Rykard does three consecutive bite attacks that go right, left, then center. This combo can be avoided by dodging into its attacks: dodge left, dodge right, then dodge forward. Be careful of the third attack, as it has a slight delay and can trip you up. |
 Grab Bite: Rykard roars upward with its mouth open and lunges at you sideways. This is a grab attack that is avoided by dodging left or right at the right time. |
Sword Attacks
| Sword Attack Variations |
|---|
 Triple Sword Smash: Rykard raises his sword, tip pointed at you, then smashes his sword on the ground thrice. Three very quick dodges will avoid all hits. |
 Thrust and Swipe: Rykard very quickly does a thrust attack and follows it up with a sweep to the right. Dodge them both by dodging to the left twice. |
 Large Sweep to Thrust: Rykard holds his sword to his chest, then winds up for a huge swing. Dodge right into his swing to avoid getting hit. Sometimes, he follows this sweep with a long thrust, and a ground-breaking pull. Stay away from his sword as he starts to pull it formt he ground, as it does AoE damage. |
 Quadruple Combo: Rykard does four consecutive sword moves. A downward slash to the right, dodged to the left. Then, a sword-drag to the left, which you dodge to the right. Then, a thrust into the ground, which you can dodge in any direction. And finally, a sword-pull from the ground, which is evaded simply by staying away. |
 Ultimate Sword Smash: Rykard hold his sword to the sky and summons a great amount of power into his sword. Then, he slams it down with devastating force. This move can be avoided by running left or right, and dodging away at the exact moment of impact. |
Magic/AoE Attacks
| Magic/AoE Attack Variations |
|---|
 Flame Skull Summoning: Rykard brings his face forward and summons a red skull from his mouth. This red skull will fly around the field, chasing you, while leaving a trail of explosions in its wake. It would be wise to wait for this skull to disappear before you attempt to do any further damage to Rykard. |
 Body Slam: Rykard jumps into the air and slams his body onto the ground. It takes a while for him to charge up this attack so make sure to run away in time. |
 Geysers and Skulls Summoning: Rykard stomps his foot on the ground and triumphantly raises his sword to the sky. This is his ultimate attack, where he summons flame geysers from the ground and flame skulls and fireballs from the sky. |
Elden Ring Related Guides

DLC Bosses
Main Bosses
Optional Bosses
Mini-Bosses
| All Bosses in Elden Ring | |
|---|---|
| Elder Dragon Greyoll | Lion Guardian |
| Valiant Gargoyle (Leyndell) | - |
Hostile NPCs and Invaders
| Limgrave Invaders and Hostile NPCs | |
|---|---|
| Bloody Finger Nerijus | Old Knight Istvan |
| Recusant Henricus | - |
| Liurnia of the Lakes Invaders and Hostile NPCs | |
| Great Horned Tragoth | Festering Fingerprint Vyke |
| Altus Plateau Invaders and Hostile NPCs | |
| Eleonora, Violet Bloody Finger | Inquisitor Ghiza |
| Maleigh Marais, Shaded Castle Castellan | Rileigh the Idle |
| Vargram the Raging Wolf & Errant Sorcerer Wilhelm | Magnus the Beast Claw |
| Mountaintops of the Giants Invaders and Hostile NPCs | |
| Juno Hoslow, Knight of Blood | - |
| The Roundtable Hold Invaders and Hostile NPCs | |
| Mad Tongue Alberich | - |
| Multiple Location Invaders and Hostile NPCs | |
| Anastasia, Tarnished-Eater | - |
Author

How to Beat Rykard, Lord of Blasphemy: Boss Fight Guide
Rankings
- We could not find the message board you were looking for.
Gaming News
![Animal Crossing: New Horizons Review [Switch 2] | Needlessly Crossing Over to a New Generation](https://img.game8.co/4391759/47d0408b0b8a892e453a0b90f54beb8a.png/show)


Popular Games

Genshin Impact Walkthrough & Guides Wiki
Honkai: Star Rail Walkthrough & Guides Wiki
Arknights: Endfield Walkthrough & Guides Wiki
Umamusume: Pretty Derby Walkthrough & Guides Wiki
Wuthering Waves Walkthrough & Guides Wiki
Pokemon TCG Pocket (PTCGP) Strategies & Guides Wiki
Abyss Walkthrough & Guides Wiki
Zenless Zone Zero Walkthrough & Guides Wiki
Digimon Story: Time Stranger Walkthrough & Guides Wiki
Clair Obscur: Expedition 33 Walkthrough & Guides Wiki


Recommended Games
Fire Emblem Heroes (FEH) Walkthrough & Guides Wiki
Pokemon Brilliant Diamond and Shining Pearl (BDSP) Walkthrough & Guides Wiki
Diablo 4: Vessel of Hatred Walkthrough & Guides Wiki
Super Smash Bros. Ultimate Walkthrough & Guides Wiki
Yu-Gi-Oh! Master Duel Walkthrough & Guides Wiki
Elden Ring Shadow of the Erdtree Walkthrough & Guides Wiki
Monster Hunter World Walkthrough & Guides Wiki
The Legend of Zelda: Tears of the Kingdom Walkthrough & Guides Wiki
Persona 3 Reload Walkthrough & Guides Wiki
Cyberpunk 2077: Ultimate Edition Walkthrough & Guides Wiki


All rights reserved
ELDEN RING™ & ©BANDAI NAMCO Entertainment Inc. / ©2021 FromSoftware, Inc.
The copyrights of videos of games used in our content and other intellectual property rights belong to the provider of the game.
The contents we provide on this site were created personally by members of the Game8 editorial department.
We refuse the right to reuse or repost content taken without our permission such as data or images to other sites.