This survey will take about 1 minute.
Your answers will help us to improve our website.
Elden Ring
How to Beat Margit the Fell Omen: Boss Fight Guide

This is a guide on how to beat Margit the Fell Omen, a boss in Elden Ring. Read on to learn more about Margit the Fell Omen's strengths, weaknesses, attack patterns, lore, and the recommended level to beat Margit!
List of Contents
Margit the Fell Omen General Info
Stats and Rewards
| Margit the Fell Omen | ||
|---|---|---|
|
||
| Weakness | Resistance | Immune |
|
Slash Pierce Holy |
━ | ━ |
| HP | 4174 (NG) | |
| Affected By | Poison, Scarlet Rot, Bleed, Frost, Sleep | |
| Spirit Ashes Available? | Yes | |
| Rune Rewards |
12000 (NG) 60000 (NG+1) |
|
| Summonable NPCs |
・Rogier |
|
| Location | ||
| Item Drops |
・Talisman Pouch
|
|
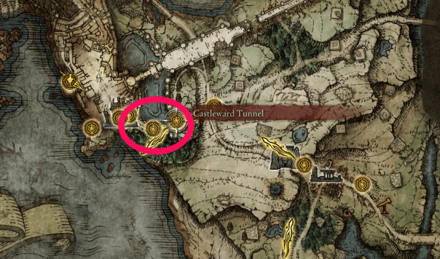
Margit the Fell Omen Location
Where to Find
| Map Location | |
|---|---|
 View Full Image |
|
| Recommended Level | Lv.25 |
Margit is the first Main Boss that can be found in Stormhill near the entrance to the Legacy Dungeon Stormveil Castle. The closest Site of Grace to him is the Castleward Tunnel.
How to Beat Margit the Fell Omen
Video Walkthrough
| Tips for Beating Margit the Fell Omen |
|---|
| How to Beat Strategies | ||
|---|---|---|
| Ranged Build Strategy | Melee Build Strategy | Margit's Shackles Strategy |
Click a link above to take you to that section.
Ranged Build Strategy
| Margit the Fell Omen Boss Tips |
|---|
Be Mindful of Margit's Daggers
Margit tends to throw his daggers as you maintain distance from him. Pace your attacks and always be ready to dodge at a moment's notice.
Bait Cane Plunges and Hammer Swings
Margit takes longer to recover Cane Plunges and Hammer Swings. Force him to use these distance-closing moves to land easy shots during his recovery. They're also easy to dodge, making it an easy strategy to pull out overall.
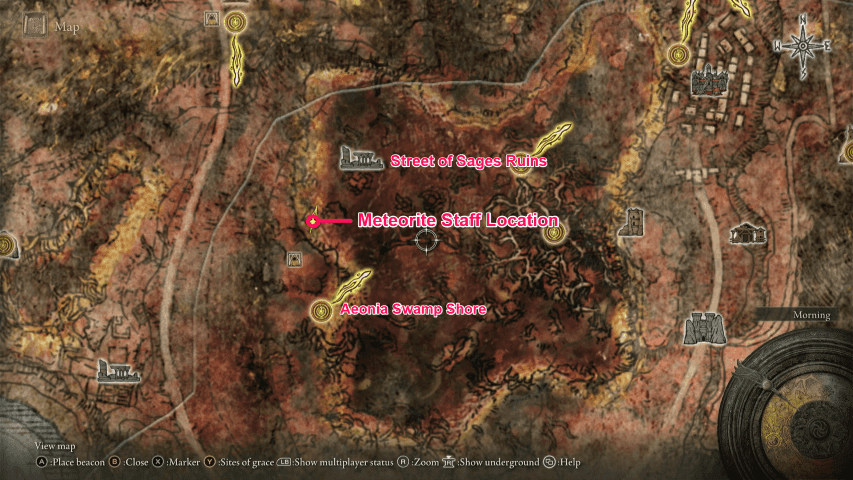
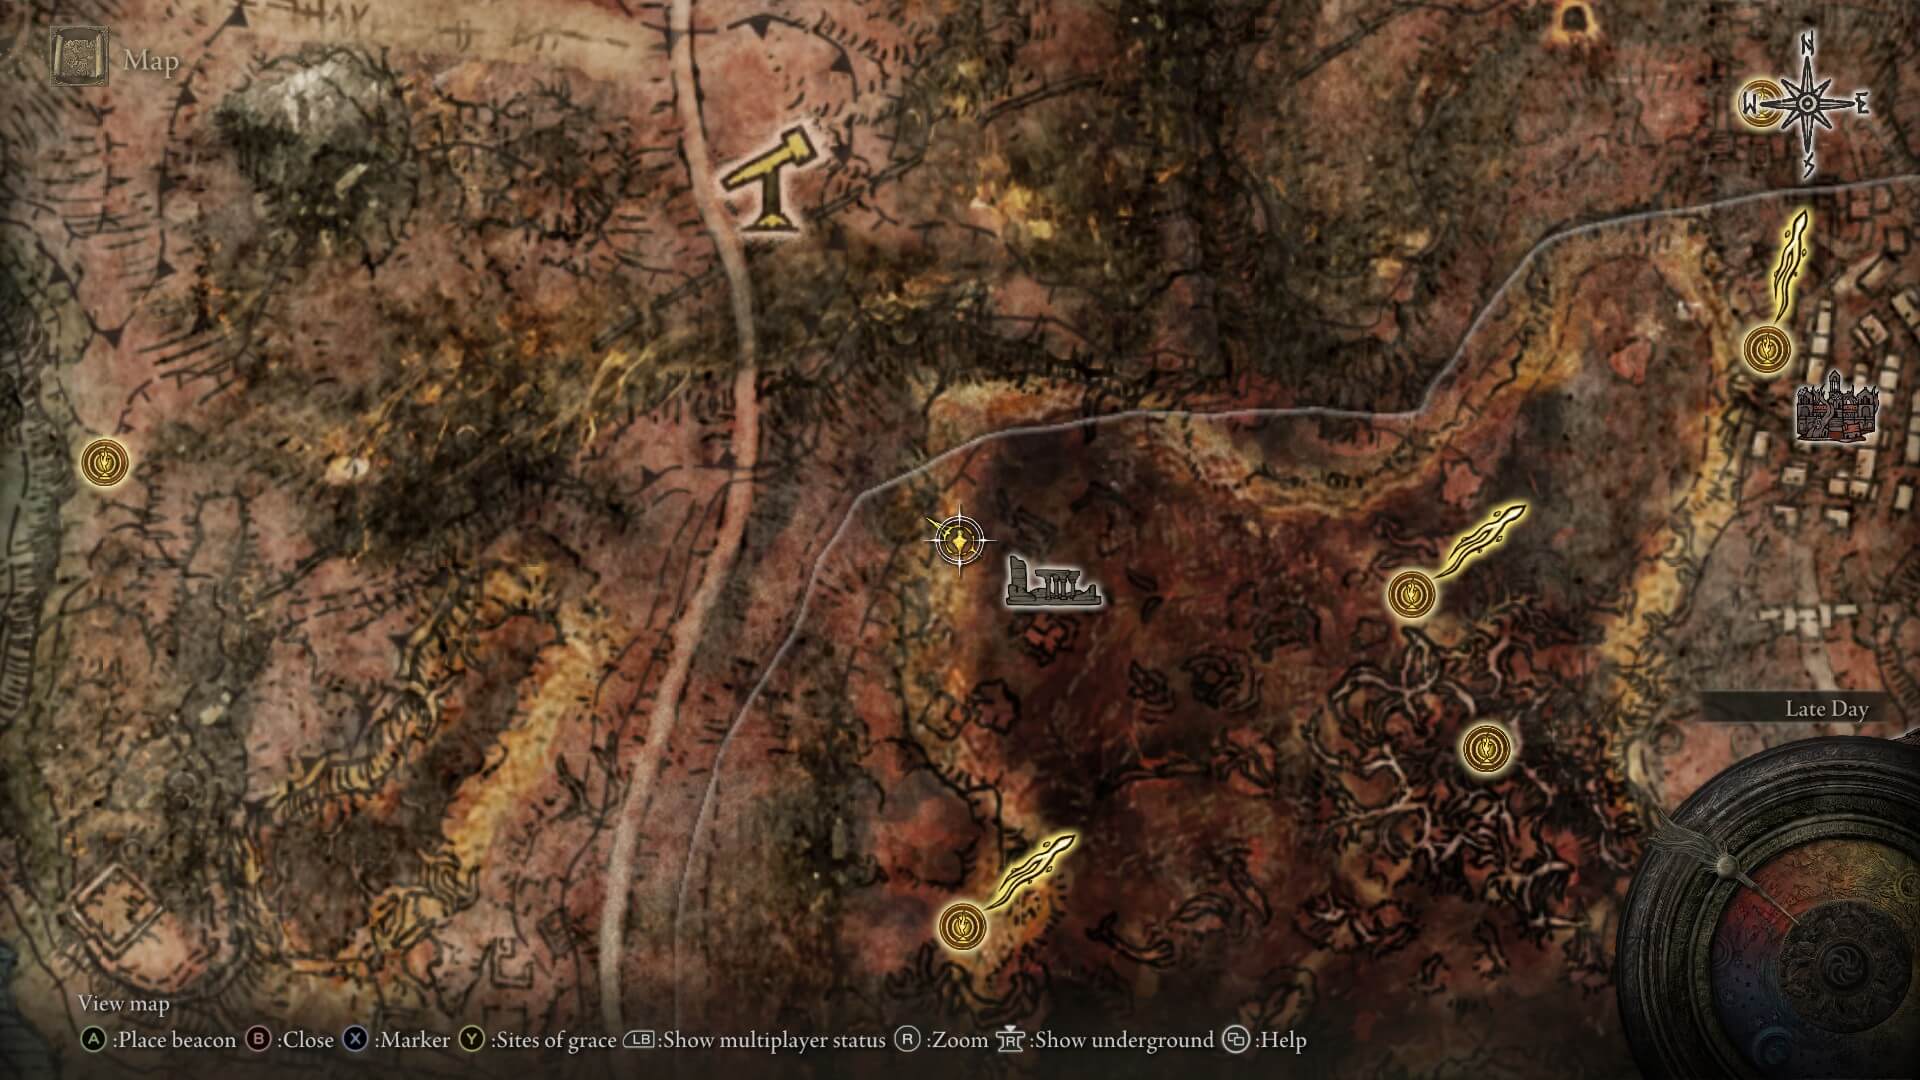
Use Meteorite Staff and Rock Sling
 View Full Image View Full Image
|
 View Full Image View Full Image
|
If you started out your playthrough as an Astrologer and have placed at least 18 points into intelligence, then consider bringing both the Rock Sling and Meteorite staff when fighting against Margit.
Rock Sling deals a ton of damage if all 3 rocks hit and has a high chance to stagger Margit, giving you an opportunity to perform a critical hit. Pair this up with Meteorite Staff, and your damage gets boosted, making it easier for you to clear the fight.
They can easily be both obtained by going to the Street of Sages Ruins in Caelid. If you haven't been to Caelid and want to get there fast, you can travel to the Dragon-Burnt Ruins at the center of Agheel Lake. Underneath the Ruins is a trapped chest that will teleport you to Sellia Crystal Tunnel in Caelid.
Melee Build Strategy
| Margit the Fell Omen Boss Tips |
|---|
Attack From Behind
Attacking Margit the Fell Omen from the front is incredibly difficult due to how aggressive he can be with his own attacks. Like most bosses, if you manage to land a hit on Margit while he attempts to launch an attack will not interrupt him, leaving him still capable of landing hits on a player.
Instead, divert your attention to attacking from the back, particularly the tail where he is most vulnerable. The combined assault from yours and the Lone Wolf or Jellyfish Ashes' attack will be enough to stagger Margit. This gives the player enough time for a Riposte Attack that can take massive chunks of Margit's health from him.
Study Margit's Attack Combos
Margit the Fell Omen has a ferocious moveset that he will aggressively use against you with little rest in between. It is difficult to tell when his attack runs will end, as he can mix up his attacks to extend his combos. It is highly suggested that you stick to rolling or dodging out of the way of his attacks and use blocks sparingly when you have little room or choice. Getting the timing right may also take a while, as Margit can stagger its swings, then strike when you least expect him to.
Patience plays a key-factor in this battle, as getting caught in just one of Margit's attacks is enough to stun-lock you to death. Save your stamina and only push inward for attacks when you have an opening (the Jellyfish Ashes help tremendously here).
Margit's Shackles Strategy
| Margit the Fell Omen Boss Tips |
|---|
Acquire Margit's Shackles from Patches
Players can obtain a Key Item that makes the fight against Margit a lot easier by finding Patches at the center of Limgrave first. Midway through the boss fight with this annoying Souls' staple, you have a choice to either spare or kill Patches. Sparing him will turn him into a merchant that sells Margit's Shackles for 5000 runes. Return to Patches after one in-game day to browse his wares.
 Heads Up! Heads Up! |
If you killed Patches beforehand and still want to get Margit's Shackles, give Patches' bell bearing to the twin maiden husks in Roundtable Hold. You can browse his wares from them afterward. |
|---|
Patches Fight Guide and Location
Use the Shackles on Margit to Lock Him Down
Once you have Margit's Shackles, you can use it to pin Margit down for a few valuable seconds. Equip it on your Pouch before entering the boss area for easy access. Take note that you can only use it twice during the battle.
Margit the Fell Omen Attack Patterns
Cane Attacks
| Cane Attack Variations |
|---|
 Cane Swings: Margit's primary means of damage revolves around his massive cane. This boss can swing his cane from almost every angle with different timings and speeds. These can be anywhere from simple lateral sweeps, to charged overhead slams. It's also important to note that every cane attack can be chained with other attacks in Margit's arsenal. Maintain a safe distance, get a feel for the timings of each variation, then close the distance to counterattack. |
 Cane Plunge: An attack where he attempts to impale you with his cane as he leaps forward. Run under him and dodge inward as soon as you see him leap towards you. This will cause him to overshoot the plunge and be vulnerable to strikes from the back. |
 Two-Handed Cane Slam: Margit slings his cane over his shoulder with both hands before slamming it back down for a heavy diagonal attack. This is very slow and easy to dodge but take note that he can easily follow up with any of his other attacks afterward. Margit is often vulnerable after he does the initial swing, so get a few hits in before returning to a safe distance. |
 Lunging Double Swing: Margrit winds up for two swings with his cane. These cover a wide area, so dodge inward before he reaches you, then move a few steps towards the direction you dodged to avoid the follow-up swipe. |
Dagger Attacks
| Dagger Attack Variations |
|---|
 Dagger Throw: An attack where Margit throws a dagger at you from a distance and depending on your location, he'll sometimes follow it up with a cane swing or hammer strike. |
 Dagger Flurry: Margit uses his dagger to strike you with it, swinging it at you twice in a row. During second phase, he adds an additional swing to his attacks using the sword. This move has very little telegraph, so you'll have to pay attention to his left hand at all times. If the hand is raised, then there's a good chance he'll follow any of his attacks up with this one. |
Hammer Attacks
| Hammer Attack Variations |
|---|
 Hammer Swing: An attack where Margit uses his hammer to hit anyone in front of him. Dodge towards him just before the attack hits you to avoid the attack. |
 Jumping Hammer Slam: Margit conjures his hammer and jumps high up in the sky to slam it down to the ground, damaging anyone near the impact. He always tries to use this move whenever he transitions to second phase. Avoid getting hit with this attack, as this will instantly kill you. Run away from him and dodge backward to avoid the large AoE of the impact. If you're confident enough, you can dodge towards him instead just before he lands to dodge the attack to get your own attack in. |
Tail Swing
Margit swings his tail 180 or 360 degrees around him, depending on your position. Dodge inwards just before the attack hits to avoid this.
Backward Hop
A move where Margit hops away from you, usually used before or after an attack. This attack is followed up by a sword or dagger throw. In rare occassions, he'll start to charge up for a Hammer or Cane Slam.
Sword Flurry
Similarly to Dagger Flurry, Sword Flurry behaves the same way and starts when Margit hits at least 50% HP. Be mindful of its long range and high damage.
Margit the Fell Omen Lore
Margit the Fell Omen Trivia
- Margit the Fell Omen is voiced by Anthony Howell.
- It is possible to skip Margit's fight at Stormveil Castle by heading straight to Leyndell, Royal Capital and defeating Morgott, the Omen King. This will cause Margit to disappear, allowing you to proceed to Stormveil Castle without ever fighting him.
Margit the Fell Omen Quotes
| "Foul Tarnished, In search of the Elden Ring. Emboldened by the flame of ambition. Hrah! Someone must extinguish thy flame. Let it be Margit the Fell!" |
|---|
| "Well, thou art of passing skill. Warrior blood must truly run in thy veins, Tarnished." |
|---|
| "Put these foolish ambitions to rest." |
|---|
| "I shall remember thee, Tarnished. Smould'ring with thy meagre flame. Cower in fear. Of the night. The hands of the Fell Omen shall brook thee no quarter." |
|---|
| "I see thee, little Tarnished. Smouldering with thy wretched flame of ambition." |
|---|
Elden Ring Related Guides
DLC Bosses
Main Bosses
Optional Bosses
Mini-Bosses
| All Bosses in Elden Ring | |
|---|---|
| Elder Dragon Greyoll | Lion Guardian |
| Valiant Gargoyle (Leyndell) | - |
Hostile NPCs and Invaders
| Limgrave Invaders and Hostile NPCs | |
|---|---|
| Bloody Finger Nerijus | Old Knight Istvan |
| Recusant Henricus | - |
| Liurnia of the Lakes Invaders and Hostile NPCs | |
| Great Horned Tragoth | Festering Fingerprint Vyke |
| Altus Plateau Invaders and Hostile NPCs | |
| Eleonora, Violet Bloody Finger | Inquisitor Ghiza |
| Maleigh Marais, Shaded Castle Castellan | Rileigh the Idle |
| Vargram the Raging Wolf & Errant Sorcerer Wilhelm | Magnus the Beast Claw |
| Mountaintops of the Giants Invaders and Hostile NPCs | |
| Juno Hoslow, Knight of Blood | - |
| The Roundtable Hold Invaders and Hostile NPCs | |
| Mad Tongue Alberich | - |
| Multiple Location Invaders and Hostile NPCs | |
| Anastasia, Tarnished-Eater | - |
Author

How to Beat Margit the Fell Omen: Boss Fight Guide
Please participate in our site
improvement survey
03/2026
improvement survey
03/2026
Would you assist in
improving Game8's site?
improving Game8's site?

×
We are listening to our users' valuable opinions and discussing how to act on them.
The information collected through this survey will be used for the purpose of improving our services. In addition, the information will only be disclosed a part of a statistic in a format that will not allow identification of personal information.
Begin Survey
Not Now
×
Please rate each item regarding Game8.co's Advertisements.
Amount of Ads
Very Dissatisfied
Somewhat Dissatisfied
Fine
Somewhat Satisfied
Highly Satisfied
Placement of Ads
Timing of Ad Display
Ad Loading Speed
Safeness of Ads
Content of Ads
×
Please rate each item regarding Game8.co's Quality of Articles.
Amount of information
Very Dissatisfied
Somewhat Dissatisfied
Fine
Somewhat Satisfied
Highly Satisfied
Frequency of updates
Speed of new information
Accuracy of articles
Understandibility of articles
Readability of sentences
×
Please rate each item regarding Game8.co's Usability of the Site.
Ease of finding information
Very Dissatisfied
Somewhat Dissatisfied
Fine
Somewhat Satisfied
Highly Satisfied
Loading Speed
Use of Color
Font Size
Visibility of Images
Easy to Understand Layout
×
Please rate each item regarding Game8.co's Message Boards, Comments.
Ease of Writing
Very Dissatisfied
Somewhat Dissatisfied
Fine
Somewhat Satisfied
Highly Satisfied
Readability
Ease in Finding Information
Comment Quality
Comment Quantity
Admin Response
×
Please rate each item regarding Game8.co's Site's new design.
Please rate our site's new design
Very Dissatisfied
Somewhat Dissatisfied
Fine
Somewhat Satisfied
Highly Satisfied
Do you think that the website's design change makes the site easier to use?
Has the new design made it easier for you to find information on the site?
Has the new design improved the overall visual appeal of the site?
How would you rate your overall satisfaction with the new design of the site?
×
How likely are you to recommend Game8 to someone you know?
Very Unlikely
0
1
2
3
4
5
6
7
8
9
10
Very Likely
If you have other opinions regarding potential improvement to the website, please share them with us. We would appreciate your honest opinion.
Note: This is a free response section, so you can proceed without entering anything.
Note: Please be sure not to enter any kind of personal information into your response.
Note: Please be sure not to enter any kind of personal information into your response.
×
Thank You
×
Thank you for participating in our survey! Your answers will help us to improve the quality of our website and services.
We hope you continue to make use of Game8.
We hope you continue to make use of Game8.
Close
Rankings
- We could not find the message board you were looking for.
Gaming News


![Monster Hunter Stories 3 Review [First Impressions] | Simply Rejuvenating](https://img.game8.co/4438641/2a31b7702bd70e78ec8efd24661dacda.jpeg/thumb)
Popular Games

Genshin Impact Walkthrough & Guides Wiki
Honkai: Star Rail Walkthrough & Guides Wiki
Umamusume: Pretty Derby Walkthrough & Guides Wiki
Pokemon Pokopia Walkthrough & Guides Wiki
Resident Evil Requiem (RE9) Walkthrough & Guides Wiki
Monster Hunter Wilds Walkthrough & Guides Wiki
Wuthering Waves Walkthrough & Guides Wiki
Arknights: Endfield Walkthrough & Guides Wiki
Pokemon FireRed and LeafGreen (FRLG) Walkthrough & Guides Wiki
Pokemon TCG Pocket (PTCGP) Strategies & Guides Wiki


Recommended Games
Diablo 4: Vessel of Hatred Walkthrough & Guides Wiki
Cyberpunk 2077: Ultimate Edition Walkthrough & Guides Wiki
Fire Emblem Heroes (FEH) Walkthrough & Guides Wiki
Yu-Gi-Oh! Master Duel Walkthrough & Guides Wiki
Super Smash Bros. Ultimate Walkthrough & Guides Wiki
Pokemon Brilliant Diamond and Shining Pearl (BDSP) Walkthrough & Guides Wiki
Elden Ring Shadow of the Erdtree Walkthrough & Guides Wiki
Monster Hunter World Walkthrough & Guides Wiki
The Legend of Zelda: Tears of the Kingdom Walkthrough & Guides Wiki
Persona 3 Reload Walkthrough & Guides Wiki


All rights reserved
ELDEN RING™ & ©BANDAI NAMCO Entertainment Inc. / ©2021 FromSoftware, Inc.
The copyrights of videos of games used in our content and other intellectual property rights belong to the provider of the game.
The contents we provide on this site were created personally by members of the Game8 editorial department.
We refuse the right to reuse or repost content taken without our permission such as data or images to other sites.