This survey will take about 1 minute.
Your answers will help us to improve our website.
Elden Ring Shadow of the Erdtree
Messmer the Impaler Weakness and Location

This is a boss guide for Messmer the Impaler in Elden Ring DLC Shadow of the Erdtree. Learn about Messmer's weakness and location, how to get to Messmer, as well as the best build against Messmer here.
| Messmer Guides | |
|---|---|
| Messmer Weakness and Location | What to Do After Messmer |
List of Contents
Messmer the Impaler Weakness
Weak to Bleed and Frostbite
Messmer the Impaler is weak to attacks that apply Bleed and Frostbite. These dealt the most damage and procs the easiest when we tested each affinity using the same weapon against Messmer the Impaler.
Bleed Weapons such as power-stanced Great Stars or a Blood-infused Greatsword are great options if you want to easily proc Blood Loss against Messmer. For Frostbite and Bleed options, you can look to katanas like a Cold-Infused Nagakiba or Great Katana.
Slash Weapons are Most Effective
Messmer is less resistant to Slash damage than any other type of damage, so equip weapons that have classes or movesets which deal Slash damage, such as Reapers, Curved Swords, Katanas, and Great Katanas.
The previously mentioned Nagakiba and Great Katana are excellent choices to double-down on Messmer's weakness to Bleed and Slash.
Takes More Damage from Holy
Messmer takes increased Holy damage, so consider applying Holy Grease, or using weapons with Sacred affinity or innate Holy damage like the Winged Scythe and Black Knife, to target his weakness.
On the other hand, he is more resistant to Fire damage, so avoid using Fire-based weapons if you have the alternative arsenal to do so.
Best Builds Against Messmer the Impaler
Slash Weapons are Recommended
DEX builds can opt for a Cold-infused Great Katana or Nagakiba to proc Frostbite and Blood Loss on Messmer, while the STR users can go for the Nightrider Glaive with Blood infusion using the Black Whetblade.
Faith users have a variety of choices since Messmer is weak to Holy. The Winged Scythe has Bleed buildup, Holy damage, and Slash damage, while a Sacred-infused Backhand Blade is also viable.
Equip Talismans and Armor that Increase Your Damage
 Lord of Blood's Exultation Lord of Blood's Exultation |
||
 Millicent's Prosthesis Millicent's Prosthesis |
If you are using fast weapons, the Winged Sword Insignia or its upgraded version, and Millicent's Prosthesis will help increase your damage since you will be constantly attacking Messmer. Combine this with the Lord of Blood's Exultation and White Mask to increase more of your damage for every proc of Blood Loss.
Shard of Alexander is great for those that tend to use their Ash of War, while the Rakshasa Armor Set will help max out all the damage you deal.
Use Holy Incantations or Frost Sorceries
 Discus of Light Discus of Light |
 Black Blade Black Blade |
 Glintstone Icecrag Glintstone Icecrag |
 Adula's Moonblade Adula's Moonblade |
For Faith users, opening with Black Blade after Messmer's first attack will take a huge chunk of health from him at the start. If you are eyeing for Holy damage, the Discus of Light is a low FP cost incantation with a short cast time.
INT users can use most of the Cold Sorceries including Zamor Ice Storm since Frostbite can easily proc on Messmer.
Use Talismans and Armor for Fire Damage Negation
 Fire Prelate Armor Fire Prelate Armor |
Most of Messmer's attacks deal fire damage so the Flamedrake Talisman +3 will help you immensely against this. The Fire Prelate Set also gives the highest fire damage negation when fully equipped.
If you are looking for more defense, the Pearldrake Talisman +3 and Dragoncrest Greatshield Talisman are great alternatives against Messmer.
Specific Recommended Build: Blood Tax Build
| DEX Main Weapon | STR Main Weapon | ||||||||
|---|---|---|---|---|---|---|---|---|---|
Skill: Blood Tax |
Skill: Blood Tax |
||||||||
| Character Stat Distribution | |||||||||
| STR | 14 (Katana) 40 (Glaive) |
ARC | 60 | ||||||
| VIG | 50 | ||||||||
| DEX | 40 (Katana) 18 (Glaive) |
MIND | 13 | ||||||
| INT/FAI | N/A | ||||||||
If you are willing to respec and do a stat distribution overhaul, we recommend going with the Blood Tax Build to defeat Messmer the Impaler. This build is recommended to be at RL 150 and above.
The Blood Tax Build emphasizes an Occult-infused Great Katana for DEX users, or an Occult-infused Nightrider Glaive for STR users, paired with the Blood Tax Ash of War to proc Blood Loss as fast as possible by constantly attacking and staying near the boss. With this, just two uses of Blood Tax will proc the Blood Loss immediately.
Equip Armor and Talismans for More Damage
| Helm | Armor | Gauntlets | Greaves |
|---|---|---|---|
| Talismans | |||
| Lord of Blood's Exultation |
|||
If you have most of these items equipped, your damage will increase immensely by the time you reach second phase since you will be procing Blood Loss most of the time.
Proc Blood Loss on Every Two Blood Tax Uses
As soon as you enter Messmer's boss room, he will lunge at you with his fire orb and explode. Dodge both of these and use Blood Tax immediately to quickly stack bleed buildup. Keep using the Ash of War whenever you have an opening to proc Blood Loss and deal large amounts of damage.
Messmer the Impaler General Tips
| Tips for Beating Messmer |
|---|
|
|
Recommended Level for Messmer the Impaler
| Recommended Levels | |
|---|---|
| Rune Level | Level 150 or Higher |
| Scadutree Blessing | Level 10 or Higher |
Messmer the Impaler is a difficult main boss in the DLC due to his extremely high damage output, quick moveset, and tricky 2nd phase. We recommend increasing your level to at least 150 and your Scadutree Blessings to at least 10 to avoid getting one-shot during the fight.
All Scadutree Fragment Locations
Increase Your Fire Resistance
You can prepare for the Messmer fight by increasing your Fire Resistance since a lot of his attacks are fire-based. Bringing consumables like Fireproof Dried Liver or using buffs like Flame, Protect Me will help you in this fight, immensely.
For an even better advantage, consider getting the Flamedrake Talisman +3 from the Fort of Reprimand in Scadu Altus. This powerful fire damage negation talisman can prevent you from getting one or two-shotted during the Messmer fight, easily.
Flamedrake Talisman +3 Location
Summon Hornsent or Jolan Inside the Arena
| Gold Sign Summons | |
|---|---|
| Jolan | Hornsent |
You can summon either Horsent or Jolan for the Messmer bossfight if you have progressed their questlines. Unlike most other gold summon signs, Horsent and Jolan's summon signs are found inside the arena.
At the start of the fight, immediately rush to either of their summoning signs by the entrance to summon them as fast as possible before Messmer can start using his own combos.
Use Cold Damage to Burst and Slow Messmer
Messmer is susceptible to frostbite, and slowing him down may make dodging his lengthy and long-reaching combos easier for you. Consider using Freezing Grease or the Chilling Mist Ash of War to infuse your weapon with cold damage to increase your damage and dodge windows against Messmer.
Dodge into Messmer's Attacks
The very first thing to keep in mind when starting to fight Messmer is the flame infusion on his attacks. Aside from visually impairing you, several of his flame-infused attacks will also throw flames forward from the actual swing, which will catch you if you roll backwards. Fight the habit to retreat, learn his timings, and roll forward.
This will be particularly important for spellcasters or ranged characters, as Messmer is capable of quickly closing the gap on you no matter how far you are, which means ranged players are at a disadvantage unless they use summons to taunt Messmer.
Learn Both his Fast and Delayed Moves
Messmer is capable of mixing up any of his combos that begin with him igniting his hands, which become hard to deal with as he likes to do both fast and delayed finishing attacks, and sometimes has moves with delayed explosions. Do not rush to attack him until his combo is finished.
Easy to Roll Through his Mid-Air Combo
One of Messmer's most threatening-looking combos is when he leaps into the air to thrust you repeatedly before slamming down with a delayed explosion. Do not panic by rolling backward or repeatedly.
All you need to do is roll forward once when he first lunges and swings at you and when he starts thrusting you. Stay close, walk under and around him as he delays his slam, then only roll after he slams the ground to i-frame the delayed explosion.
Dodge his Grab at the Last Second
Messmer has a grab move, marked by him stretching out his ignited hand and running towards you, that will annihilate your health bar if it hits. He will catch you if you dodge too early, so dodge at the very last second, as he's already in front of you, to avoid the grab.
Delayed Thrust Combo
There's one particular combo variation wherein he drags his spear along the ground before his finishing thrust that is particularly good to learn, as it is the most distinct and delayed from the rest of his fire combos.
Always Activate Lock On
Messmer's mobility is high, and he will constantly move laterally and vertically in both of his phases. Be sure to activate your Lock On to avoid losing track of Messmer's position and his current attack.
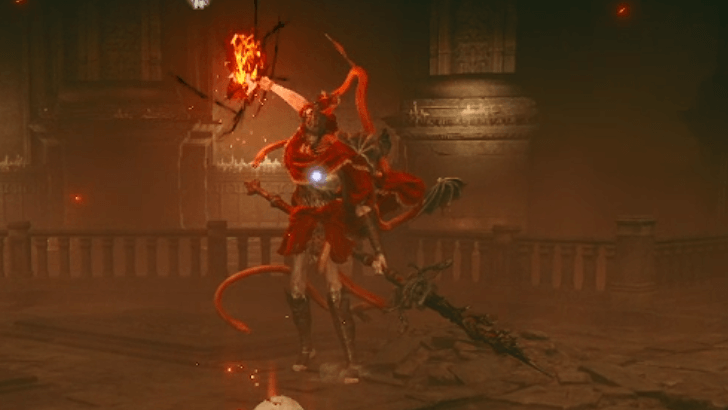
Transforms to Base Serpent Messmer at 50% HP
After you you deplete Messmer's HP to about 50%, he will change into Base Serpent Messmer. He will retain and use the combos from his first phase, while adding in new combos and moves where he summons serpents to strike you from range.
These serpents won't drastically change his original combos, so you just have to focus on adding his new moves to your memory.
Move and Roll Sideways during his Serpent Combo
Base Serpent Messmer's Serpent Combo is his longest attack string. Run away as soon as Messmer starts summoning the ooze. Then, dodge the two initial consecutive serpents. Delay your third and fourth rolls. Quickly dodge the fifth serpent, then delay your last roll if needed for Messmer's finisher.
Continuously moving and rolling sideways is the best approach here not just for the serpents, but to also mess up the tracking of Messmer's finishing attack.
Messmer the Impaler Location
Found in the Shadow Keep
| World View | Map Location |
|---|---|
 |
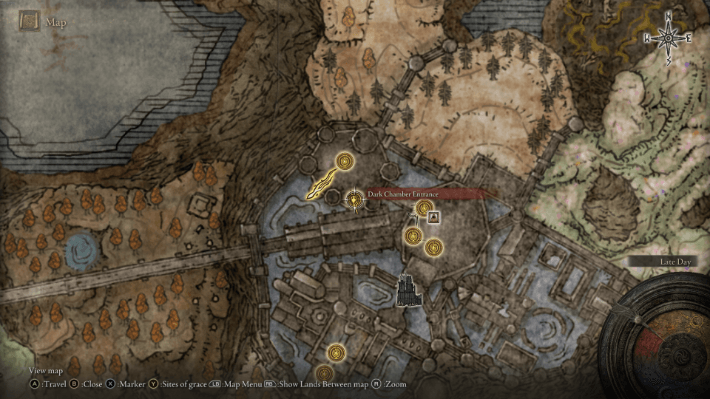 |
Messmer the Impaler is found at the end of the Shadow Keep's Specimen Storehouse Legacy Dungeon in the Land of Shadow. Make your way to the top of the tower and go through all the floors of the Shadow Keep and fight Messmer at the tower's last room.
How to Get to Messmer
| 1 |  After arriving at the main entrance of Shadow Keep, take the elevator up and you will find the Shadow Keep Main Gate site of grace. Defeat the Golden Hippopotamus ahead to progress further. You can summon Hornsent and Freyja for this fight if you have progressed their questline. |
|---|---|
| 2 | 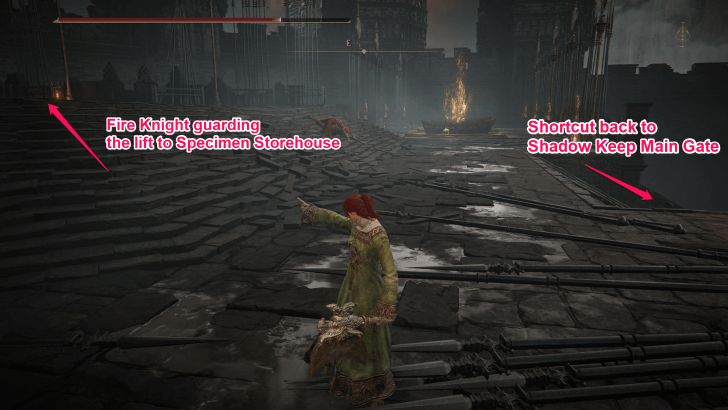 After defeating the boss, take the path to the west to progress further and go to the top of the wooden stairs on your right into the room with two Black Knights. Head past them and take the stairs on your left into a Fire Knight. Take the lift behind him to arrive at the Specimen Storehouse. |
| 3 |  From the Storehouse, First Floor site of grace, take the path to the left and into the narrow alley. Keep moving forward and once you are up the stairs, immediately take a left by the bookshelves. |
| 4 | 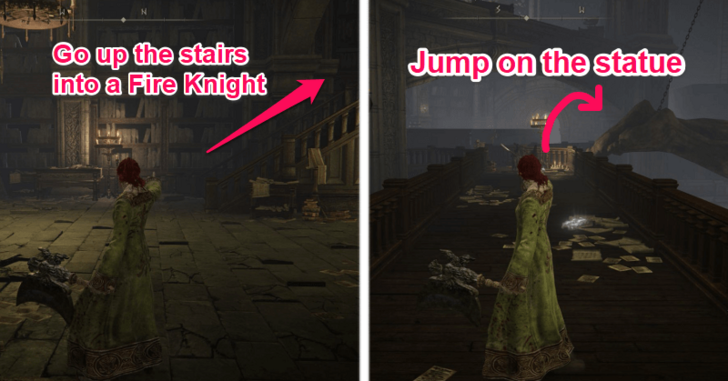 Go past the first intersection and take a right into the stairs leading up. Go up another set of stairs in front of you that leads to a Fire Knight in the middle. Head past him to his left onto the bridge and jump on the feet of the statue hanging on your right. You will find the Specimen Storehouse, Fourth Floor site of grace at the end. |
| 5 | 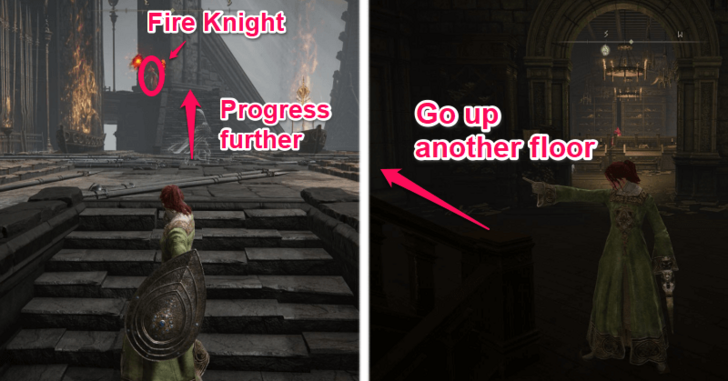 From the Storehouse, Fourth Floor site of grace, go out the doorway, take a left, and go up the stairs past the Fire Knight at the end. Head inside the doorway on the left, take a right and keep moving forward past another Fire Knight until you reach a set of stairs leading up. Take these stairs two more times going up another floor to find the Storehouse, Seventh Floor site of grace inside the room in front of you. |
| 6 |  Head back outside the room and go down a floor by the stairs into another room with a lever at the end. Pull the lever to rotate the pillar in the middle, opening a path leading up. Jump onto the wooden pillar and climb the goat statue leading to a small room with a Stake of Marika. |
| 7 |  Head out the doorway and go up the stairs on your right to find a Fire Knight guarding the double doors. Open the door and go up the stairs to find the Dark Chamber Entrance site of grace and Messmer the Impaler. |
Shadow Keep Legacy Dungeon Walkthrough and Location
Messmer The Impaler Rewards
| Messmer the Impaler Rewards | |
|---|---|
| Runes | 400000 |
| Drops |
・Remembrace of the Impaler ・Messmer's Kindling |
Remembrance of the Impaler Rewards
 Spear of the Impaler Spear of the Impaler |
 Messmer's Orb Messmer's Orb |
The Remembrance of the Impaler can be turned in to Finger Reader Enia at the Roundtable Hold. Doing so lets the player choose either the Spear of the Impaler (weapon) or Messmer's Orb (incantation) for their reward.
Messmer's Kindling is Required to Progress the DLC Story
|
|
Overview | ||||||||||
|---|---|---|---|---|---|---|---|---|---|---|---|
|
Effect: Burns the Sealing Tree.
Type: Key Item |
|||||||||||
Messmer's Kindling is a necessary item to progress the DLC's main story. You can use it to burn the brambles blocking the path at the top of the Belurat, Divine Tower.
However, do note that this triggers the point of no return for a lot of the DLC NPC Quests, so make sure to complete the NPC quests for Miquella's followers before using this item.
Messmer's Kindling Location and How to Use
Elden Ring Related Guides
DLC Bosses
Main Bosses
Optional Bosses
Mini-Bosses
| All Bosses in Elden Ring | |
|---|---|
| Elder Dragon Greyoll | Lion Guardian |
| Valiant Gargoyle (Leyndell) | - |
Hostile NPCs and Invaders
| Limgrave Invaders and Hostile NPCs | |
|---|---|
| Bloody Finger Nerijus | Old Knight Istvan |
| Recusant Henricus | - |
| Liurnia of the Lakes Invaders and Hostile NPCs | |
| Great Horned Tragoth | Festering Fingerprint Vyke |
| Altus Plateau Invaders and Hostile NPCs | |
| Eleonora, Violet Bloody Finger | Inquisitor Ghiza |
| Maleigh Marais, Shaded Castle Castellan | Rileigh the Idle |
| Vargram the Raging Wolf & Errant Sorcerer Wilhelm | Magnus the Beast Claw |
| Mountaintops of the Giants Invaders and Hostile NPCs | |
| Juno Hoslow, Knight of Blood | - |
| The Roundtable Hold Invaders and Hostile NPCs | |
| Mad Tongue Alberich | - |
| Multiple Location Invaders and Hostile NPCs | |
| Anastasia, Tarnished-Eater | - |
Comment
Author

Messmer the Impaler Weakness and Location
Please participate in our site
improvement survey
03/2026
improvement survey
03/2026
Would you assist in
improving Game8's site?
improving Game8's site?

×
We are listening to our users' valuable opinions and discussing how to act on them.
The information collected through this survey will be used for the purpose of improving our services. In addition, the information will only be disclosed a part of a statistic in a format that will not allow identification of personal information.
Begin Survey
Not Now
×
Please rate each item regarding Game8.co's Advertisements.
Amount of Ads
Very Dissatisfied
Somewhat Dissatisfied
Fine
Somewhat Satisfied
Highly Satisfied
Placement of Ads
Timing of Ad Display
Ad Loading Speed
Safeness of Ads
Content of Ads
×
Please rate each item regarding Game8.co's Quality of Articles.
Amount of information
Very Dissatisfied
Somewhat Dissatisfied
Fine
Somewhat Satisfied
Highly Satisfied
Frequency of updates
Speed of new information
Accuracy of articles
Understandibility of articles
Readability of sentences
×
Please rate each item regarding Game8.co's Usability of the Site.
Ease of finding information
Very Dissatisfied
Somewhat Dissatisfied
Fine
Somewhat Satisfied
Highly Satisfied
Loading Speed
Use of Color
Font Size
Visibility of Images
Easy to Understand Layout
×
Please rate each item regarding Game8.co's Message Boards, Comments.
Ease of Writing
Very Dissatisfied
Somewhat Dissatisfied
Fine
Somewhat Satisfied
Highly Satisfied
Readability
Ease in Finding Information
Comment Quality
Comment Quantity
Admin Response
×
Please rate each item regarding Game8.co's Site's new design.
Please rate our site's new design
Very Dissatisfied
Somewhat Dissatisfied
Fine
Somewhat Satisfied
Highly Satisfied
Do you think that the website's design change makes the site easier to use?
Has the new design made it easier for you to find information on the site?
Has the new design improved the overall visual appeal of the site?
How would you rate your overall satisfaction with the new design of the site?
×
How likely are you to recommend Game8 to someone you know?
Very Unlikely
0
1
2
3
4
5
6
7
8
9
10
Very Likely
If you have other opinions regarding potential improvement to the website, please share them with us. We would appreciate your honest opinion.
Note: This is a free response section, so you can proceed without entering anything.
Note: Please be sure not to enter any kind of personal information into your response.
Note: Please be sure not to enter any kind of personal information into your response.
×
Thank You
×
Thank you for participating in our survey! Your answers will help us to improve the quality of our website and services.
We hope you continue to make use of Game8.
We hope you continue to make use of Game8.
Close
Rankings
- We could not find the message board you were looking for.
Gaming News


![Monster Hunter Stories 3 Review [First Impressions] | Simply Rejuvenating](https://img.game8.co/4438641/2a31b7702bd70e78ec8efd24661dacda.jpeg/thumb)
Popular Games

Genshin Impact Walkthrough & Guides Wiki
Honkai: Star Rail Walkthrough & Guides Wiki
Umamusume: Pretty Derby Walkthrough & Guides Wiki
Pokemon Pokopia Walkthrough & Guides Wiki
Resident Evil Requiem (RE9) Walkthrough & Guides Wiki
Monster Hunter Wilds Walkthrough & Guides Wiki
Wuthering Waves Walkthrough & Guides Wiki
Arknights: Endfield Walkthrough & Guides Wiki
Pokemon FireRed and LeafGreen (FRLG) Walkthrough & Guides Wiki
Pokemon TCG Pocket (PTCGP) Strategies & Guides Wiki


Recommended Games
Diablo 4: Vessel of Hatred Walkthrough & Guides Wiki
Cyberpunk 2077: Ultimate Edition Walkthrough & Guides Wiki
Fire Emblem Heroes (FEH) Walkthrough & Guides Wiki
Yu-Gi-Oh! Master Duel Walkthrough & Guides Wiki
Super Smash Bros. Ultimate Walkthrough & Guides Wiki
Pokemon Brilliant Diamond and Shining Pearl (BDSP) Walkthrough & Guides Wiki
Elden Ring Shadow of the Erdtree Walkthrough & Guides Wiki
Monster Hunter World Walkthrough & Guides Wiki
The Legend of Zelda: Tears of the Kingdom Walkthrough & Guides Wiki
Persona 3 Reload Walkthrough & Guides Wiki


All rights reserved
ELDEN RING™ & ©BANDAI NAMCO Entertainment Inc. / ©2021 FromSoftware, Inc.
The copyrights of videos of games used in our content and other intellectual property rights belong to the provider of the game.
The contents we provide on this site were created personally by members of the Game8 editorial department.
We refuse the right to reuse or repost content taken without our permission such as data or images to other sites.