Putrescent Knight Weakness and Location

This is a guide for the Putrescent Knight in the Elden Ring DLC Shadow of the Erdtree. Learn about the Putrescent Knight's weakness and location, how to get to the Putrescent Knight, and the best build against the Putrescent Knight.
List of Contents
Putrescent Knight Weakness
Weak to Strike Weapons
Putrescent Knight is weak to attacks from Strike weapons, which ranked highest in our damage tests compared to the other damage types. Weapons in the Hammers, Great Hammers, Colossal Weapons, and the new Hand-to-Hand weapon classes are all great choices to hit the Putrescent Knight where it's weakest.
Weakness is Holy Damage
The Putrescent Knight is more susceptible to Holy damage, which ranked highest in our elemental damage tests compared to the other infusable elements. Focus on Sacred affinity weapons and weapons with innate Holy damage, or use Holy Grease if you don't have those kinds of armaments.
For weapons, Black Steel Greathammer and Devonia's Hammer are great Strike weapons that also deal huge amounts of Holy damage. Meanwhile, Discus of Light and Black Blade are reliable spells for casters to target the Knight's weakness to Holy.
Scarlet Rot is Also Effective
Although Putrescent Knight is immune to most status effects, the one thing it is not immune to is Scarlet Rot. Use Rotbone Arrows or the Rotten Staff to apply Rot buildup and effectively watch him die from damage over time.
List of All Scarlet Rot Weapons
Best Builds Against Putrescent Knight
Holy and Strike Weapons are Recommended
DEX users can go for a Sacred-infused Milady paired with the Sacred Blade Ash of War which can deal large amounts of Holy damage against Putrescent Knight. STR users have a variety of choices, but the best ones would either be the Devonia's Hammer or a Sacred-infused Black Steel Greathammer using the Sanctified Whetblade.
The Sword of Light is capable of increasing your Holy damage whenever you use its Ash of War Light, while the Sacred Relic Sword can deal Holy damage from afar with the Wave of Gold Ash of War. Treespear has the Sacred Order Ash of War that buffs your weapon with Holy essence which is great against Putrescent Knight.
Equip Talismans and Crystal Tears that Increase Your Damage
 Holy-Shrouding Cracked Tear Holy-Shrouding Cracked Tear |
 Faith-knot Crystal Tear Faith-knot Crystal Tear |
The Shard of Alexander is great for those who tend to use their Ash of War like Lion's Claw or Sacred Blade.
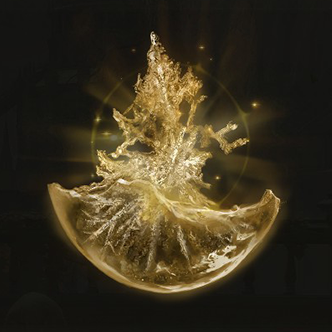
As for Crystal Tears, your best bet would be the Faith-knight Crystal Tear to give you a +10 Faith stat, while the Holy-Shrouding Cracked Tear increases your Holy damage as well and stacks with the Sacred Scorpion Charm.
Use Holy Incantations for More Damage
 Discus of Light Discus of Light |
Faith users can use almost all of the Holy incantations available in the game. The Multilayered Ring of Light is a new DLC Incantation that you can acquire along the way to the Putrescent Knight.
Discus of Light and Triple Rings of Light are great Holy incantations as well since they can hit twice. Additionally, you can also equip the Erdtree Greatshield and use the Golden Retaliation Ash of War to parry the rings as they return to you and create an even stronger holy attack.
Use Talismans for Magic Damage Negation
Putrescent Knight's attacks are mostly Magic damage so equipping the Spelldrake Talisman +3 will help you a lot, while the Pearldrake Talisman +3 will help with your overall damage negation.
Specific Recommended Build: Sacred Lion's Claw Build
| Main Hand Weapon | |||||||||
|---|---|---|---|---|---|---|---|---|---|
Skill: Lion's Claw |
|||||||||
| Character Stat Distribution | |||||||||
| STR | 40 | FAITH | 60 | ||||||
| DEX | 11 | END | 30 | ||||||
| MIND | 20 | INT/ARC | N/A | ||||||
If you're willing to respec and do a stat distribution overhaul, we recommend going with the Sacred Lion's Claw Build to defeat Putrescent Knight. This build is recommended to be at RL 150 and above.
The Sacred Lion's Claw Build uses a Sacred-infused Black Steel Greathammer for more Holy damage, paired with the Lion's Claw Ash of War to deal the highest amount of damage you can do in one hit. Ideally, you can defeat the Putrescent Knight within 6 to 8 uses of Lion's Claw.
Equip Talismans and Armor for Maximizing Damage
| Helm | Armor | Gauntlets | Greaves |
|---|---|---|---|
| Talismans | |||
 Carian Filigreed Crest Carian Filigreed Crest |
|||
If you have most of these items equipped, your damage will increase immensely for Lion's Claw which is your main damage dealer. The Two-Headed Turtle Talisman is great for stamina management, while the Carian Filigreed Crest will help manage your FP for constantly using your Ash of War.
Spam Lion's Claw
Putrescent Knight has a lot of combo moves with openings that make it perfect for landing Lion's Claw on him. This should deal close to 4k damage per use and can defeat him before he uses his flame attacks.
Putrescent Knight General Tips
| Tips for Beating the Putrescent Knight |
|---|
|
|
Always Dodge the Horse First
When the Putrescent Knight dismounts mid-fight, you will have to deal with separate attacks from both the knight and the horse. To dodge their combo chain, dodge twice in quick succession when the horse charges you - one to avoid the horse, and another immediately after to i-frame the knight's spinning attacks.
Jump to Avoid Its Flame Attacks
All of Putrescent Knight's flame attacks are ground attacks. Jump to evade the flames as using your roll may cause the flame's area to still hit you after rolling.
Dodge Towards the Horse to Close the Gap
The Putrescent Knight is not fast but the majority of its movement incorporates mobility in it which makes it difficult to counterattack. Dodge to the direction that the knight is moving to lessen the time it takes to get near it and land a hit.
Slam Attack Is Easily Punishable
One of the easiest moves to punish is the Putrescent Knight's Double Slam attack. During this attack, the boss will be stationary, giving you an opening to counterattack while it slams its sword into the ground twice.
Putrescent Knight Location
Found in the Deepest Area of the Fissure Depths
| World View | Map Location |
|---|---|
 |
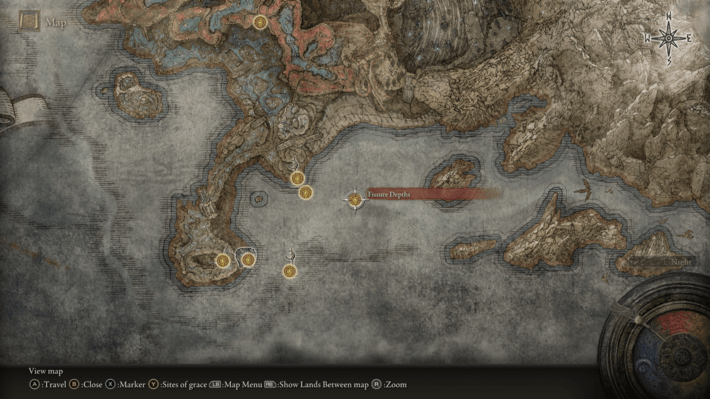 |
The Putrescent Knight is an optional Remembrance Boss that can be found in the deepest part of Fissure Depths. After reaching Fissure Cross, head to the platform and jump to encounter the Knight.
You Must Reach the Shadow Keep to Unlock the Stone Coffin Fissure

To access the Stone Coffin Fissure, you will first need to break the seal blocking its entrance. Head to Shadow Keep in Scadu Altus and trigger the shattering of Miquella's Great Rune. This should dispel the seal blocking the way to the Stone Coffin Fissure.
How to Get to Putrescent Knight
| 1 |  From the Castle Front site of grace, ride southeast until you reach a fork. This is where you turn right and through the small encampment. |
|---|---|
| 2 | 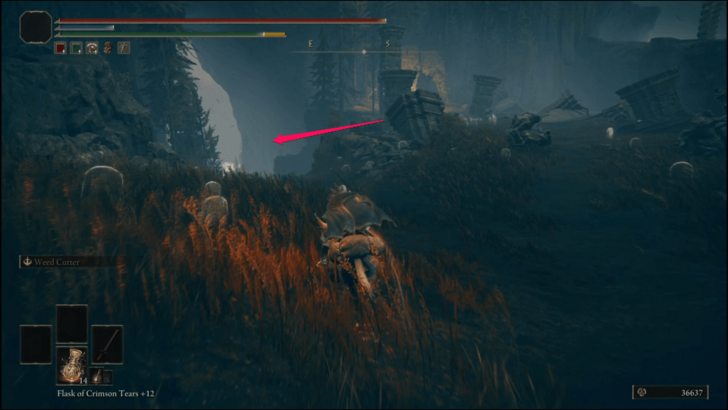 Shortly after passing the guards, turn left on the fork and ignore the commotion on your right. |
| 3 | 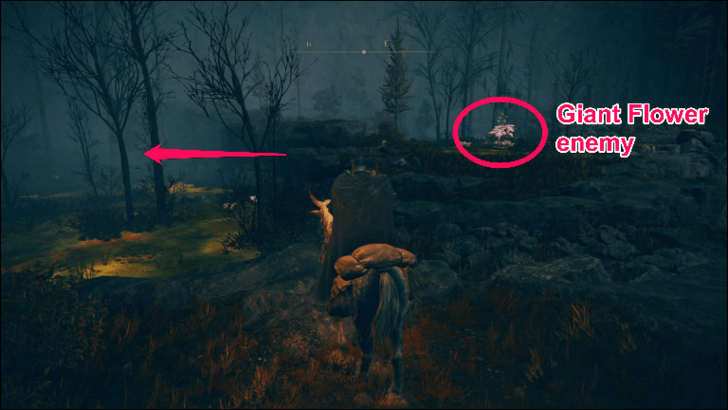 Follow this path until you reach the poisonous swamp area, so make sure you're on your steed before you continue. Once you see a giant flower enemy ahead, turn left. |
| 4 | 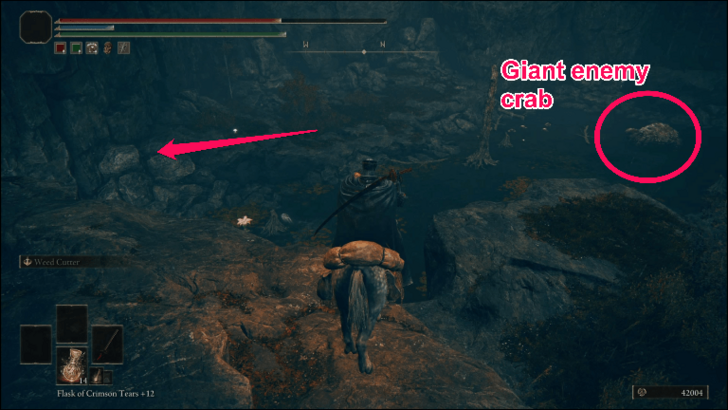 Jump down the edge once you see a giant crab, then turn left into the cave, passing the flower enemies. Pass through this linear tunnel and you should arrive shortly at the Ellac River Cave site of grace. |
| 5 | 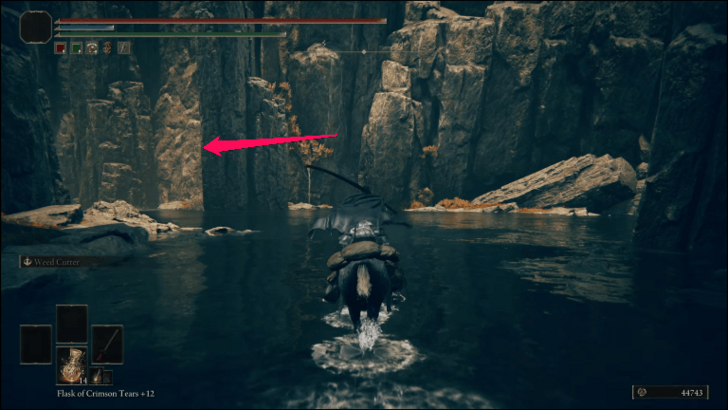 Exit the cave and immediately turn left to find a waterfall. Jump over the rocks while heading south until you reach another waterfall. |
| 6 | 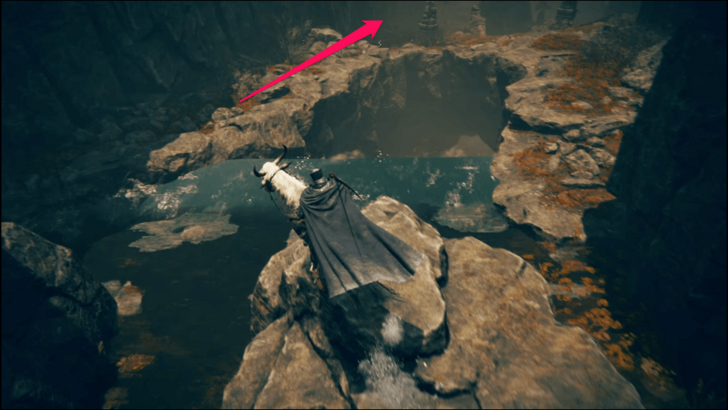 Take the left path that will shortly swerve you to the right side then keep following the path down to find the Ellac River Downstream site of grace. |
| 7 | 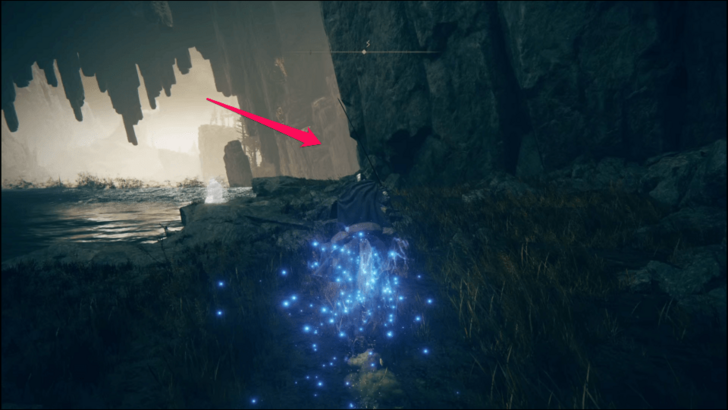 The next destination can be reached by hugging the right side of the path. Ride south and use the platforms to reach the base of the waterfall safely. |
| 8 |  Follow the river south, ignoring the giant crab and the Furnace Golem, and turn right through the trees marked on the image above to reach Cerulean Coast. |
| 9 | 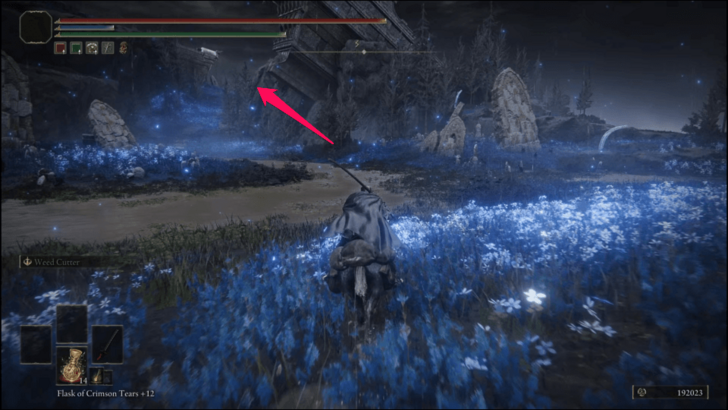 Continue heading south while staying on the left side this time. If this is your first time here, a Ghostflame Dragon will fly down towards you, but it can be ignored for now. |
| 10 |  Keep following the road south, past the area with the ghost worms and pot-throwing giant, until you reach a crater at the end. You now have to make it safely to the bottom of this pit. Head to the west side of the crater to find the first platform that will take you down. Be careful not to fall into the abyss and watch out for the slime enemies on every platform as you go down. |
| 11 |  Once you reach the site of grace at the bottom, it's only a short walk through the tunnel ahead until you reach the Fissure. |
| 12 |  From the Stone Coffin Fissure site of grace, walk south and jump down the coffin on your left. Go to the east end of the coffin and jump over to another path that leads southeast. |
| 13 |  At the end of this path is a platform that will suddenly crumble and take you to the bottom. If this isn't your first time here, you can simply jump down and you will land unscathed. |
| 14 | 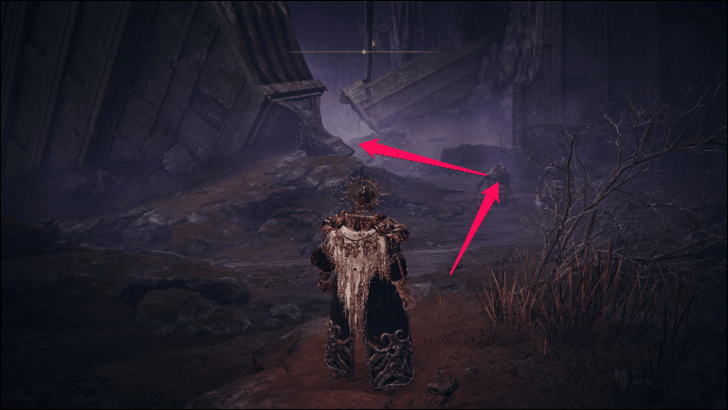 Head east past the Bloodfiend area to reach the Fissure Cross site of grace. |
| 15 | 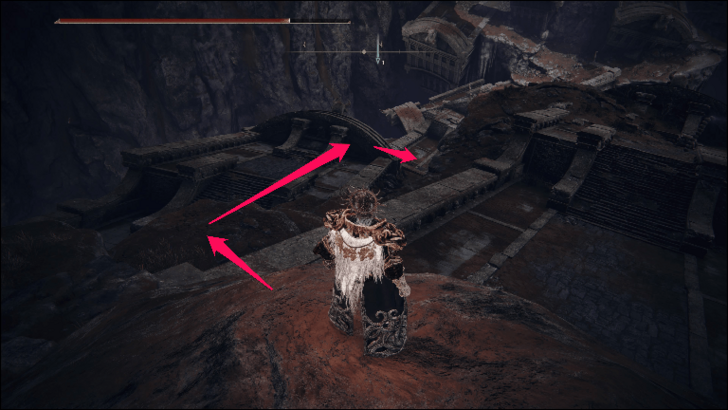 Walk north and you will find some more coffins. Walk along the coffin to your left and hop onto the platform to your right just before the next coffin. |
| 16 |  A stone worm enemy will snipe you as you head north, so make your way to it quick and take it out before landing on another coffin below. |
| 17 |  Two stone worm enemies will fire lasers at you this time, try to dodge their attacks as you reach for the one below then take it out. You can reach the stone worm above by taking the path to the right to another coffin. |
| 18 |  Walk towards the north end of the coffin, jump to the coffin below with the exploding stone worms, and down again to the Fissure Waypoint site of grace. |
| 19 | 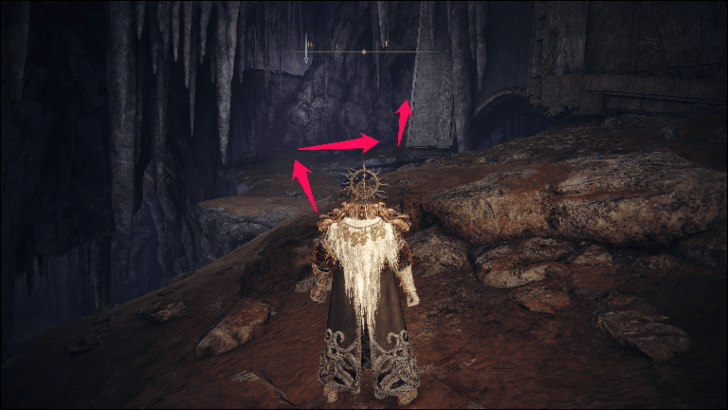 Head northeast and go up the platform where the skeleton enemies are coming from. You should see a tunnel with a large slime enemy ahead. |
| 20 | 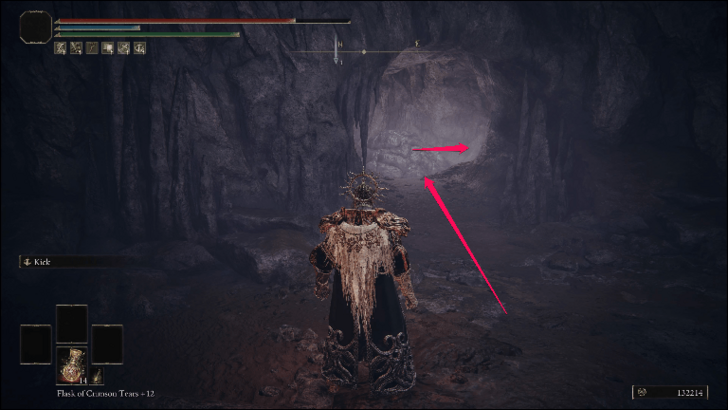 Enter the tunnel and exit to the other side. Be careful of the falling slimes as you exit as one of them might latch on you. |
| 21 | 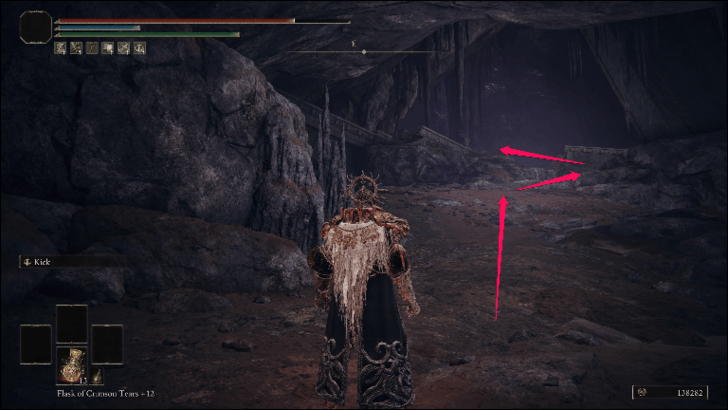 A misbegotten warrior can be found here if you haven't beaten it yet. Once it's taken care of, hop over the platform on your right and onto another on your left to reach the coffin ahead. Rest at the Fissure Depths site of grace and prepare for the boss fight. |
| 22 |  Climb up the stairs that leads south and make for the other end of the coffin. |
| 23 | 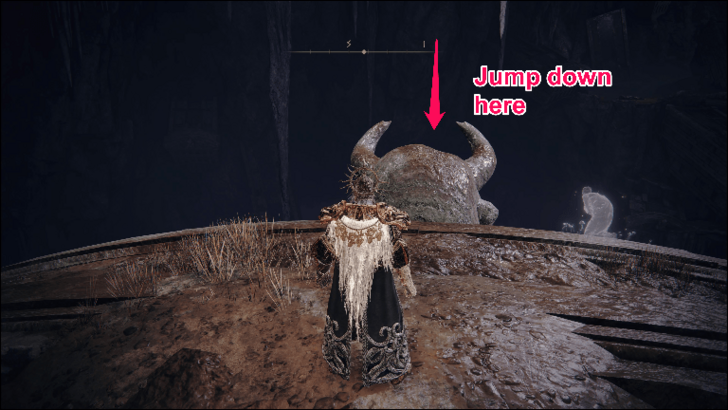 Jump down from the horned stone head for a long plunge into the Putrescent Knight boss arena. |
Putrescent Knight Rewards
| Putrescent Knight Details | |
|---|---|
 |
|
| Runes | 220000 |
| Drops | |
| Spirit Summons? | Spirit Ashes Allowed |
| Gold Summons? |
None
|
Elden Ring Related Guides

DLC Bosses
Main Bosses
Optional Bosses
Mini-Bosses
| All Bosses in Elden Ring | |
|---|---|
| Elder Dragon Greyoll | Lion Guardian |
| Valiant Gargoyle (Leyndell) | - |
Hostile NPCs and Invaders
| Limgrave Invaders and Hostile NPCs | |
|---|---|
| Bloody Finger Nerijus | Old Knight Istvan |
| Recusant Henricus | - |
| Liurnia of the Lakes Invaders and Hostile NPCs | |
| Great Horned Tragoth | Festering Fingerprint Vyke |
| Altus Plateau Invaders and Hostile NPCs | |
| Eleonora, Violet Bloody Finger | Inquisitor Ghiza |
| Maleigh Marais, Shaded Castle Castellan | Rileigh the Idle |
| Vargram the Raging Wolf & Errant Sorcerer Wilhelm | Magnus the Beast Claw |
| Mountaintops of the Giants Invaders and Hostile NPCs | |
| Juno Hoslow, Knight of Blood | - |
| The Roundtable Hold Invaders and Hostile NPCs | |
| Mad Tongue Alberich | - |
| Multiple Location Invaders and Hostile NPCs | |
| Anastasia, Tarnished-Eater | - |
Comment
Author
Putrescent Knight Weakness and Location
Rankings
- We could not find the message board you were looking for.
Gaming News
Popular Games

Genshin Impact Walkthrough & Guides Wiki

Honkai: Star Rail Walkthrough & Guides Wiki

Umamusume: Pretty Derby Walkthrough & Guides Wiki

Pokemon Pokopia Walkthrough & Guides Wiki

Resident Evil Requiem (RE9) Walkthrough & Guides Wiki

Monster Hunter Wilds Walkthrough & Guides Wiki

Wuthering Waves Walkthrough & Guides Wiki

Arknights: Endfield Walkthrough & Guides Wiki

Pokemon FireRed and LeafGreen (FRLG) Walkthrough & Guides Wiki

Pokemon TCG Pocket (PTCGP) Strategies & Guides Wiki
Recommended Games

Diablo 4: Vessel of Hatred Walkthrough & Guides Wiki

Cyberpunk 2077: Ultimate Edition Walkthrough & Guides Wiki

Fire Emblem Heroes (FEH) Walkthrough & Guides Wiki

Yu-Gi-Oh! Master Duel Walkthrough & Guides Wiki

Super Smash Bros. Ultimate Walkthrough & Guides Wiki

Pokemon Brilliant Diamond and Shining Pearl (BDSP) Walkthrough & Guides Wiki

Elden Ring Shadow of the Erdtree Walkthrough & Guides Wiki

Monster Hunter World Walkthrough & Guides Wiki

The Legend of Zelda: Tears of the Kingdom Walkthrough & Guides Wiki

Persona 3 Reload Walkthrough & Guides Wiki
All rights reserved
ELDEN RING™ & ©BANDAI NAMCO Entertainment Inc. / ©2021 FromSoftware, Inc.
The copyrights of videos of games used in our content and other intellectual property rights belong to the provider of the game.
The contents we provide on this site were created personally by members of the Game8 editorial department.
We refuse the right to reuse or repost content taken without our permission such as data or images to other sites.


![Monster Hunter Stories 3 Review [First Impressions] | Simply Rejuvenating](https://img.game8.co/4438641/2a31b7702bd70e78ec8efd24661dacda.jpeg/show)


![Monster Hunter Stories 3 Review [First Impressions] | Simply Rejuvenating](https://img.game8.co/4438641/2a31b7702bd70e78ec8efd24661dacda.jpeg/thumb)


