This survey will take about 1 minute.
Your answers will help us to improve our website.
Elden Ring
How to Beat Mohg, The Omen: Boss Fight Guide
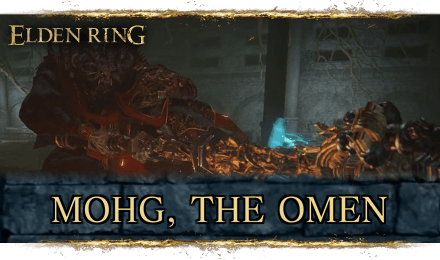
This is a guide on how to beat Mohg, The Omen, an optional boss in Elden Ring. Read on to learn more about Mohg, The Omen's drops, weaknesses, and recommended level!
List of Contents
Mohg, The Omen General Info
Stats and Rewards
| Mohg, The Omen | ||
|---|---|---|
|
||
| Weakness | Resistance | Immune |
| ━ | ━ |
Bleed Frost Scarlet Rot Poison |
| Affected By | ━ | |
| Spirit Ashes Available? | Yes | |
| Rune Rewards |
100000 (NG) |
|
| Summonable NPCs |
・Dung Eater |
|
| Location | ||
| Item Drops |
・Bloodflame Talons
|
|
Mohg, The Omen Location
Where to Find Mohg, The Omen

Mohg, The Omen can be found deep in the Subterranean Shunning Grounds, close to the Forsaken Depths Site of Grace.
The Subterranean Shunning Grounds can be reached by starting from the Avenue Balcony Site of Grace in the middle of Leyndell, Royal Capital, then going down a nearby well. Mohg's boss room can be found at the deep end of Subterranean Shunning Grounds.
Subterranean Shunning-Grounds Walkthrough and Location
How to Beat Mohg, The Omen
| Tips for Beating Mohg, The Omen |
|---|
| How to Beat Strategies | ||
|---|---|---|
| Ranged Strategy | Melee Strategy | |
Click a link above to take you to that section.
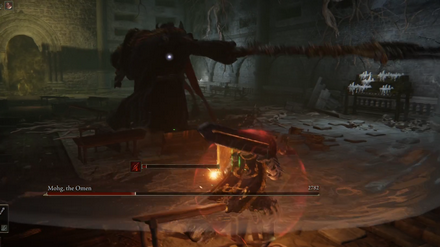
Ranged Strategy
| Mohg, The Omen Boss Tips |
|---|
Use Mohg's Shackle
Mohg's Shackle can be used twice during this fight to pin him to the ground, allowing you to get several hits in or cast your most powerful spells.
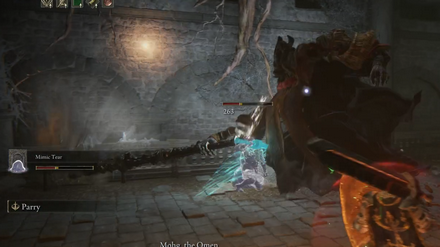
Summon a Tanky Spirit
Mohg has long reach with his weapon and his bleed attacks can overwhelm, so summon a tanky Spirit Ash such as Lhutel the Headless or an upgraded Mimic Tear so that they can distract him while you attack from afar. Use your strongest spells and attacks while his attention is diverted.
Keep your Distance
The room is slightly cramped, so backpedal around the room in a circular motion, while staying aware of how much room you have behind you to dodge. Getting cornered in this fight will end badly. Only move in to attack when Mohg's attention is diverted by your Spirit Ash.
Furthermore, keeping your distance will keep you safe from his bloodflame attacks, so you won't need to equip much Bleed resistance.
Melee Strategy
| Mohg, The Omen Boss Tips |
|---|
Boost Robustness and Fire Defense
Since you will be up close with Mohg, it's important to defend against his Bleed and fire-based attacks. Use equipment and items that increase your resistance, like Dappled Cured Meat, and Stanching Boluses to cure Bleed buildup.
Use Mohg's Shackle
Mohg's Shackle can be used twice during this fight to pin him to the ground, allowing you to get a few hits in that could stagger him for an easy crit.
Bolster Weapon Damage
Mohg, the Omen is immune to all status ailments, so it would be best to bolster your weapon damage with items like Magic Grease or a spell like Scholar's Armament.
Aim to Do Crits
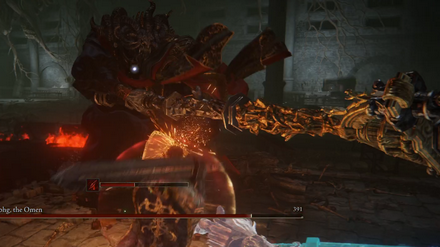
Mohg will be quicker to take down if you aim to crit him while he's staggered. Bring his stagger meter down with heavy attacks, jump attacks, and guard counters, then perform a critical attack on his face or back when he staggers.
With this tactic, it's best to always keep your distance from Mohg, since he does quick flame attacks that are difficult to dodge. Only hit him once or twice at the end of his combo string, and immediately retreat till it's safe to hit him once more.
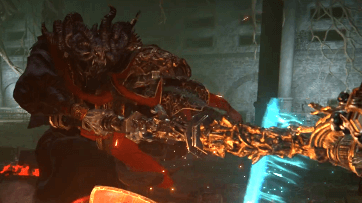
Mohg, The Omen Attack Patterns
Trident Attacks
| Trident Attack Variations |
|---|
Wide Sweep: Mohg, The Omen does a wide sweep with his trident. Easily blocked or dodged against the direction of the swing. Mohg sometimes couples this move with a second wide sweep. |

Two-Hand Slash: Mohg, The Omen grips his trident with two hands and does a diagonal slash to the ground. Easily blocked or dodged against the direction of the swing. |
Thrust: Mohg, The Omen visibly readies for a thrust and, quickly thrusts his trident forward. This attack hits quicker that you might expect, so dodge forward a split second earlier, then land a couple hits on him. |
Ground Smash: Mohg, The Omen runs at you and smashes his trident down on the ground. Easily dodged in any direction. It's good to get a hit in after he does this. |

Ground Thrust and Pull: Mohg, The Omen stabs his trident into the ground, causing damage. Then his violently pulls the trident from the ground, causing another count of damage. It's best to roll to his back while this is happening and punish him with a couple hits. |

Backstep Slash: Mohg, The Omen will slash while stepping backwards. He often uses this move to end a shoter combo. |
Bloodflame Attacks
| Blood Attack Variations |
|---|
Blood Spray: Mohg, The Omen casts blood magic over his head and sprays bloodfire in an arc in front of him. Easily dodge this by dodging forward, not backwards or sideways. |
Blood Throw: Mohg, The Omen casts blood magic over his head and throws bloodfire in a straight line, damaging anything in its path. This can be distinguished from Blood Spray since Blood Spray is cast directly over his head, while Blood Throw is cast a bit more to the side of his head. |

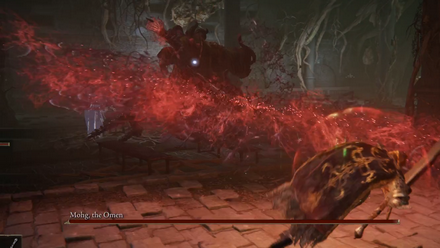
Blood Rain: Mohg, The Omen casts blood magic over his head and summons bloodfire rain from above. If he does this, stay away and do not approach him while the spell is still active. |
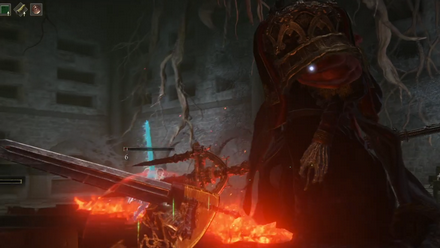
Exploding Swipe: This move is also known as Bloodflame Talons. Mohg, The Omen does a swift claw attack, which is immedately followed by a small explosion. Try not to stay too close to him when he does this attack. This attack can be avoided by dodging at the exact moment of explosion. |
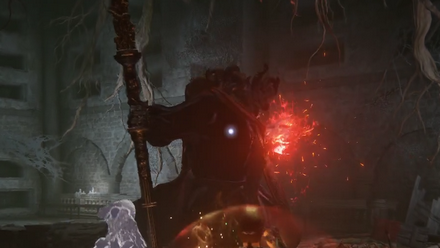
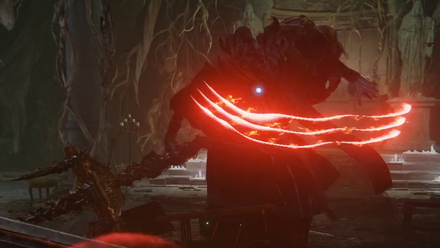
Combustion: Mohg, The Omen Mohg, Lord of Blood charges up briefly for a magic attack, and sends and even bigger explosion right at you. Once you see him do this, back away or try to dodge behind him. This move can be dodged at the exact moment it explodes. |
Elden Ring Related Guides
DLC Bosses
Main Bosses
Optional Bosses
Mini-Bosses
| All Bosses in Elden Ring | |
|---|---|
| Elder Dragon Greyoll | Lion Guardian |
| Valiant Gargoyle (Leyndell) | - |
Hostile NPCs and Invaders
| Limgrave Invaders and Hostile NPCs | |
|---|---|
| Bloody Finger Nerijus | Old Knight Istvan |
| Recusant Henricus | - |
| Liurnia of the Lakes Invaders and Hostile NPCs | |
| Great Horned Tragoth | Festering Fingerprint Vyke |
| Altus Plateau Invaders and Hostile NPCs | |
| Eleonora, Violet Bloody Finger | Inquisitor Ghiza |
| Maleigh Marais, Shaded Castle Castellan | Rileigh the Idle |
| Vargram the Raging Wolf & Errant Sorcerer Wilhelm | Magnus the Beast Claw |
| Mountaintops of the Giants Invaders and Hostile NPCs | |
| Juno Hoslow, Knight of Blood | - |
| The Roundtable Hold Invaders and Hostile NPCs | |
| Mad Tongue Alberich | - |
| Multiple Location Invaders and Hostile NPCs | |
| Anastasia, Tarnished-Eater | - |
Author

How to Beat Mohg, The Omen: Boss Fight Guide
Please participate in our site
improvement survey
03/2026
improvement survey
03/2026
Would you assist in
improving Game8's site?
improving Game8's site?

×
We are listening to our users' valuable opinions and discussing how to act on them.
The information collected through this survey will be used for the purpose of improving our services. In addition, the information will only be disclosed a part of a statistic in a format that will not allow identification of personal information.
Begin Survey
Not Now
×
Please rate each item regarding Game8.co's Advertisements.
Amount of Ads
Very Dissatisfied
Somewhat Dissatisfied
Fine
Somewhat Satisfied
Highly Satisfied
Placement of Ads
Timing of Ad Display
Ad Loading Speed
Safeness of Ads
Content of Ads
×
Please rate each item regarding Game8.co's Quality of Articles.
Amount of information
Very Dissatisfied
Somewhat Dissatisfied
Fine
Somewhat Satisfied
Highly Satisfied
Frequency of updates
Speed of new information
Accuracy of articles
Understandibility of articles
Readability of sentences
×
Please rate each item regarding Game8.co's Usability of the Site.
Ease of finding information
Very Dissatisfied
Somewhat Dissatisfied
Fine
Somewhat Satisfied
Highly Satisfied
Loading Speed
Use of Color
Font Size
Visibility of Images
Easy to Understand Layout
×
Please rate each item regarding Game8.co's Message Boards, Comments.
Ease of Writing
Very Dissatisfied
Somewhat Dissatisfied
Fine
Somewhat Satisfied
Highly Satisfied
Readability
Ease in Finding Information
Comment Quality
Comment Quantity
Admin Response
×
Please rate each item regarding Game8.co's Site's new design.
Please rate our site's new design
Very Dissatisfied
Somewhat Dissatisfied
Fine
Somewhat Satisfied
Highly Satisfied
Do you think that the website's design change makes the site easier to use?
Has the new design made it easier for you to find information on the site?
Has the new design improved the overall visual appeal of the site?
How would you rate your overall satisfaction with the new design of the site?
×
How likely are you to recommend Game8 to someone you know?
Very Unlikely
0
1
2
3
4
5
6
7
8
9
10
Very Likely
If you have other opinions regarding potential improvement to the website, please share them with us. We would appreciate your honest opinion.
Note: This is a free response section, so you can proceed without entering anything.
Note: Please be sure not to enter any kind of personal information into your response.
Note: Please be sure not to enter any kind of personal information into your response.
×
Thank You
×
Thank you for participating in our survey! Your answers will help us to improve the quality of our website and services.
We hope you continue to make use of Game8.
We hope you continue to make use of Game8.
Close
Rankings
- We could not find the message board you were looking for.
Gaming News


![Monster Hunter Stories 3 Review [First Impressions] | Simply Rejuvenating](https://img.game8.co/4438641/2a31b7702bd70e78ec8efd24661dacda.jpeg/thumb)

Popular Games

Genshin Impact Walkthrough & Guides Wiki
Honkai: Star Rail Walkthrough & Guides Wiki
Umamusume: Pretty Derby Walkthrough & Guides Wiki
Pokemon Pokopia Walkthrough & Guides Wiki
Resident Evil Requiem (RE9) Walkthrough & Guides Wiki
Monster Hunter Wilds Walkthrough & Guides Wiki
Wuthering Waves Walkthrough & Guides Wiki
Arknights: Endfield Walkthrough & Guides Wiki
Pokemon FireRed and LeafGreen (FRLG) Walkthrough & Guides Wiki
Pokemon TCG Pocket (PTCGP) Strategies & Guides Wiki


Recommended Games
Diablo 4: Vessel of Hatred Walkthrough & Guides Wiki
Fire Emblem Heroes (FEH) Walkthrough & Guides Wiki
Yu-Gi-Oh! Master Duel Walkthrough & Guides Wiki
Super Smash Bros. Ultimate Walkthrough & Guides Wiki
Pokemon Brilliant Diamond and Shining Pearl (BDSP) Walkthrough & Guides Wiki
Elden Ring Shadow of the Erdtree Walkthrough & Guides Wiki
Monster Hunter World Walkthrough & Guides Wiki
The Legend of Zelda: Tears of the Kingdom Walkthrough & Guides Wiki
Persona 3 Reload Walkthrough & Guides Wiki
Cyberpunk 2077: Ultimate Edition Walkthrough & Guides Wiki


All rights reserved
ELDEN RING™ & ©BANDAI NAMCO Entertainment Inc. / ©2021 FromSoftware, Inc.
The copyrights of videos of games used in our content and other intellectual property rights belong to the provider of the game.
The contents we provide on this site were created personally by members of the Game8 editorial department.
We refuse the right to reuse or repost content taken without our permission such as data or images to other sites.