This survey will take about 1 minute.
Your answers will help us to improve our website.
Elden Ring Shadow of the Erdtree
Needle Knight Leda Questline and Location
Needle Knight Leda is an NPC in the Elden Ring DLC, Shadow of the Erdtree, initially found in Mohgwyn Palace. Learn about Needle Knight Leda's questline walkthrough, should you help or kill her in both encounters, location, drops, and lore in this guide!
List of Contents
Needle Knight Leda Questline Walkthrough
| Quest Objectives |
|---|
|
|
1. Talk to Leda by the Cocoon of the Empyrean
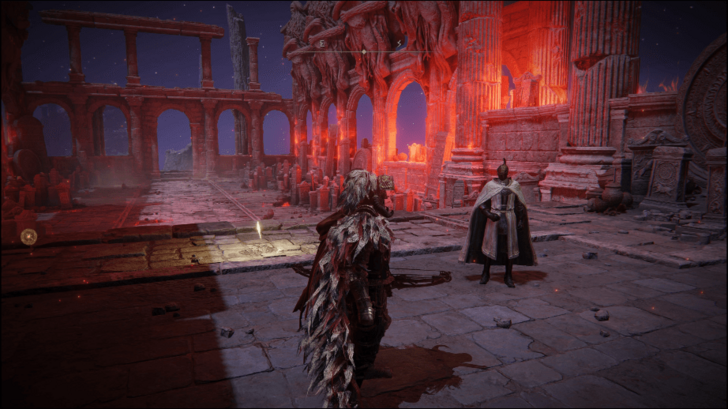
After defeating both Starscourge Radahn and Mohg, Lord of Blood, refresh Mohg's boss room (by resting at the site of grace) to find Needle Knight Leda standing in front of the Cocoon of the Empyrean.
Talk to her and she will tell you to touch the withered arm in front of you to be transported to the Realm of Shadow, starting your journey through the Shadow of the Erdtree DLC.
2. Obtain Leda's Message at Belurat
| Tower of Shadow Message Location | |
|---|---|
 |
 |
Since Leda is following after Miquella, your next interaction with her will still be a ways off. For now, seek out her messages detailing where she's headed next. The first of these can be found in Belurat, Tower Settlement.
After defeating the Divine Beast, Dancing Lion (the legacy dungeon boss), an elevator should now be accessible inside the boss arena (south east of the site of grace). Use it to go up and reach a new level of Belurat. Follow the grand staircase up to find Leda's first message.
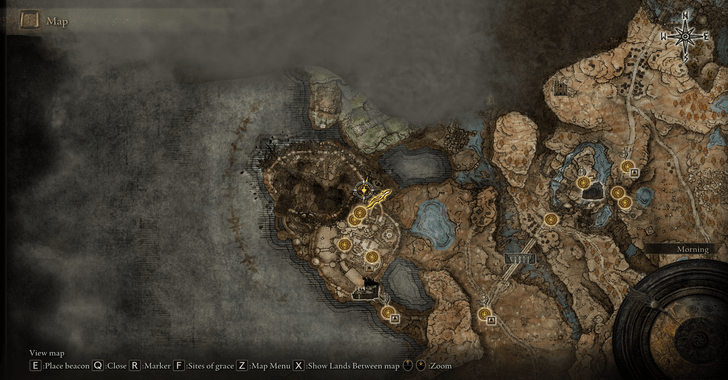
3. Obtain Leda's Message at Castle Ensis
| Castle Cross Message Location | |
|---|---|
 |
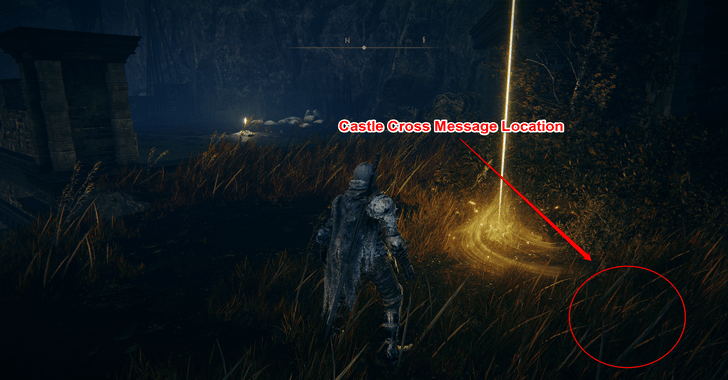 |
Leda's next message will be found midway through Castle Ensis, right next to the Castle Ensis Checkpoint site of grace. To reach this area, fight your way through the castle until you reach one of Miquella's crosses past a Black Knight enemy.
You'll see Leda's message by the cross that informs you that she's bound for the Shadow Keep. From this point on, you can either fight Rellana to access Scadu Altus or do the Fort of Reprimand skip to reach Scadu Altus without having to beat the boss of Castle Ensis.
Leda Appears as a Gold Summon for the Rellana Boss Fight
| Leda Summon in Rellana Fight | |
|---|---|
 |
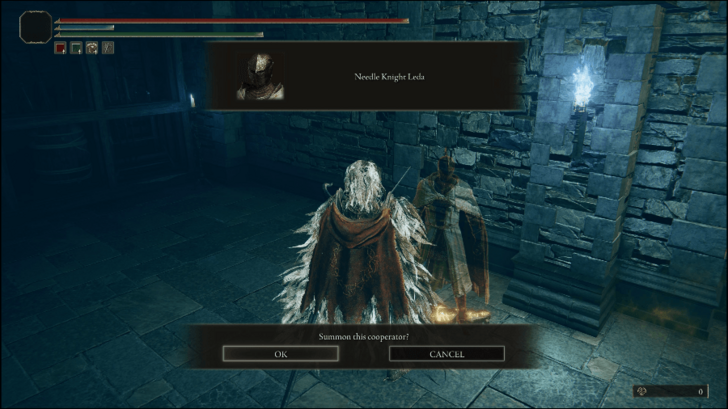 |
If you do decide to fight Rellana, Twin Moon Knight, you can recruit Needle Knight Leda as a gold summon just outside the boss room door. This interaction is optional and Leda's questline will still progress even if you decide not to enlist her aid.
4. Speak to Leda by the Highroad Cross
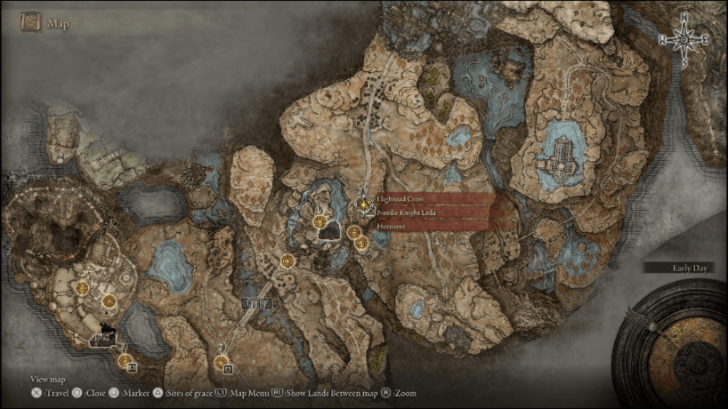
After defeating Rellana (or doing the Fort of Reprimand skip), you should arrive in Scadu Altus. Seek out Needle Knight Leda beside the Highroad Cross site of grace to the north of Castle Ensis and speak to her there.
Exhaust her dialogue here to progress her questline. You can also ask her about both the Hornsent and Dryleaf Dane if you spoke to either of the two before talking to her.
Exhaust Hornsent's Dialogue and Pick Up the Monk's Missive
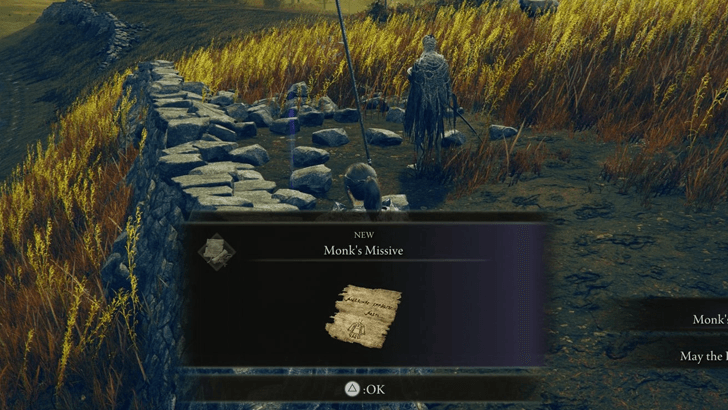
Before you leave the Highroad Cross to explore the rest of Scadu Altus, make sure to exhaust Hornsent's dialogue and pick up the Monk's Missive and gesture nearby.
Since the next step of Leda's questline will be a trigger for most NPC questlines in the DLC, getting these sorted before that happens should help prevent you from missing out on further NPC interactions.
5. Approach the Shadow Keep to Break Miquella's Charm
From the Highroad Cross Site of Grace continue following the road north until you reach the Shadow Keep. As you get closer to its gates, a message will appear on your screen saying:
| "Somewhere a great rune has broken. And so too, a powerful charm." |
This message references Miquella finally shedding his Great Rune (you'll find it in the possession of the Scadutree Avatar). When this triggers, NPC questlines will advance, so make sure to speak to Freyja, Ansbach, Moore, Thiollier, and the Hornsent before exploring any further.
Somewhere a Great Rune has Broken Meaning
6. Talk to Leda and Decide Who to Investigate
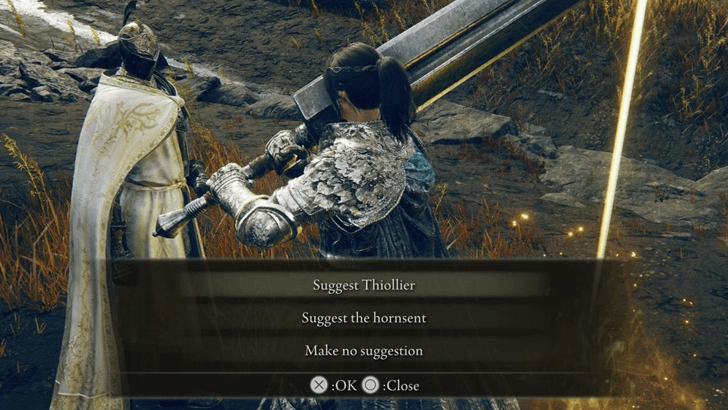
After Miquella's Great rune Breaks, return to the Highroad Cross and talk to Leda again. Since Miquella's Charm has worn off, she'll tell you that she's started to doubt the devotion of some of Miquella's followers, asking you you who you think she should investigate.
| Choice | Outcome |
|---|---|
| Suggest Thiollier | Leda will assure you that Thiollier is no threat. Thiollier will then be removed from the options. |
| Suggest the Hornsent | Leda will tell you she'll think about it first. If you reload the area (by sitting at the site of grace) and speak to her again, she will agree to pursue the Hornsent. |
| Make no suggestion | After speaking to Hornsent nearby and reloading the area, talking to Leda will have her tell you that she's made up her mind to go after Hornsent. |
Should You Suggest Hornsent or Thiollier?
You can respond using any of the three choices: suggest Thiollier (if you've already met him), suggest the Hornsent, or offer no suggestion. Regardless of your choice, Leda will still choose to go after the Hornsent.
In order to trigger the next interactions between Leda and the Hornsent, make sure to exhaust their dialogue at the Highroad Cross before exploring the Shadow Keep. Otherwise, the summon and invasion signs in the next step won't appear.
7. Assist Leda or the Hornsent
| Map Location | World View |
|---|---|
 |
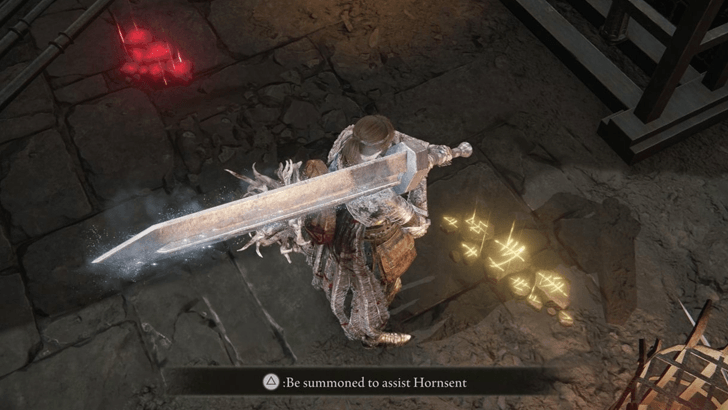 |
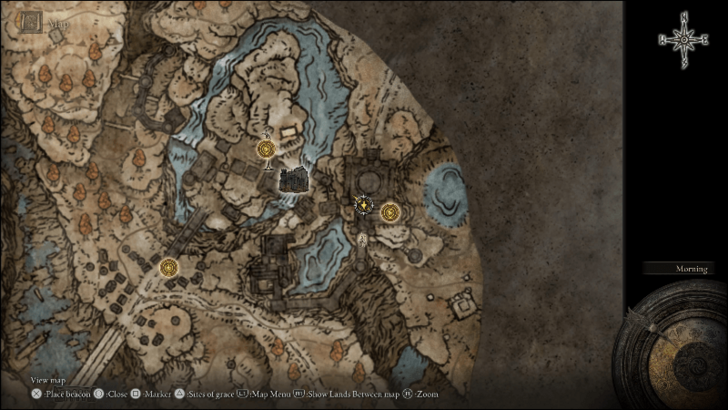
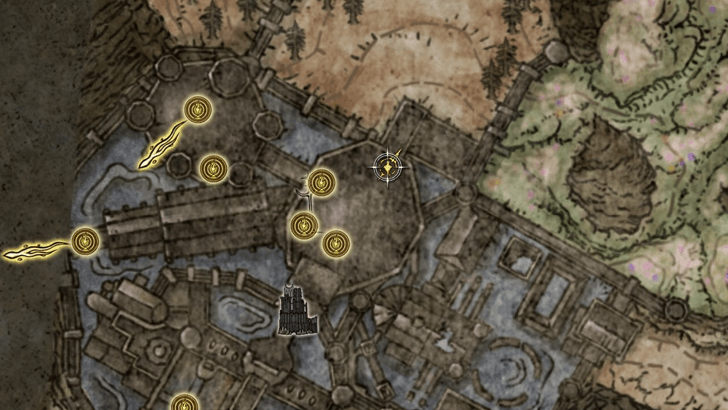
Once Leda has left the Highroad Cross to pursue the Hornsent, return to the Shadow Keep and continue exploring. Your next destination will be the ramparts just before the main elevator that leads to the Specimen Storehouse, First Floor.
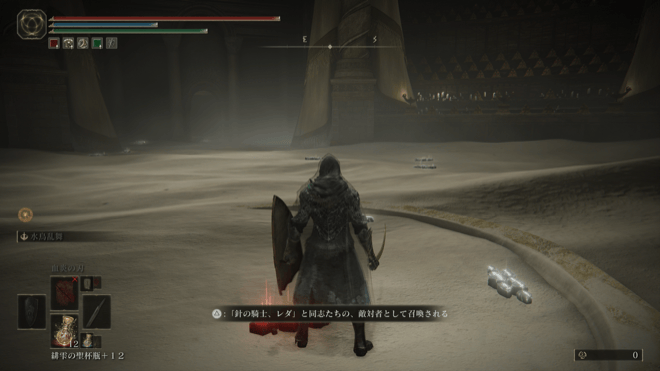
Along this stretch of wall with burning boats and Vulgar Militiamen, you will find the red and gold invasion signs for Leda and the Hornsent. Choose the gold summon sign to help the Hornsent, or choose the red summon sign to help Leda.
Should You Help Leda Against Hornsent?
| Choice | Outcome and Rewards |
|---|---|
| Be Summoned to Assist Leda (Red summon sign) |
Hornsent dies, ending his questline. Leda will target Ansbach next after talking to her back at the Highroad Cross. ・Hornsent's Armor Set ・Falx ・Lacerating Crossed-Tree |
| Be Summoned to Assist Hornsent (Gold summon sign) |
Hornsent's questline continues. Leda will no longer invade Ansbach during his quest and you will see her next in the final encounter at Enir-Ilim. ・Swift Slash ・Leda's Rune |
Ultimately, helping Leda or Hornsent boils down to what you want to get out of the invasion. The only missables from the rewards are the Lacerating Crossed-Tree Talisman (which you get for helping Leda), and the Swift Slash Ash of War (which you get for helping Hornsent).
For Backhand Blade users, we recommend helping out Hornsent since Swift Slash is a powerful ash of war for the weapon. However, if you want to collect all DLC talismans, then opt to help Leda instead.
8. Progress Sir Ansbach's Questline

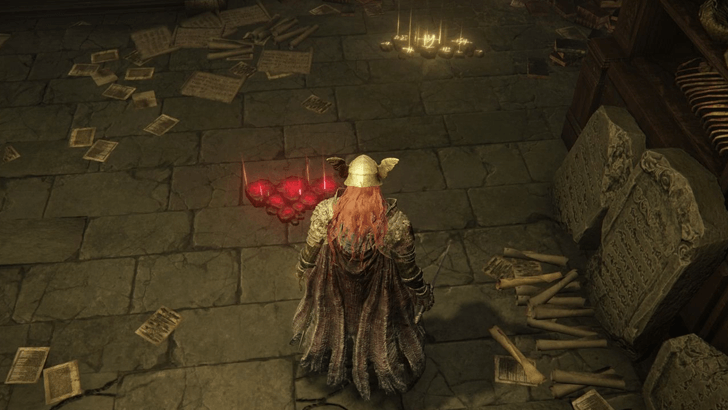
Before the next step, you'll have to progress Sir Ansbach's questline until he appears in the library area of the Shadow Keep's Storehouse, First Floor (Specimen Storehouse). Exhaust his dialogue to continue both his and Leda's story.
Sir Ansbach Quest and Location
9. Assist Leda or Sir Ansbach
| Map Location | World View |
|---|---|
 |
 |
After you've confirmed that Ansbach is at the Storehouse, First Floor, speak with Leda at the Highroad Cross again and she will tell you that she will go after him next. Return to the library where you previously found Sir Ansbach to find two more summon signs - Leda's and Ansbach's.
Take note that these signs will only appear if you assisted Leda against the Hornsent. Regardless of whose side you choose, Leda's questline will continue.
Should You Help Leda Against Ansbach?
| Choice | Outcome and Rewards |
|---|---|
| Be Summoned to Assist Leda (Red summon sign) |
Ansbach dies, ending his questline and making him unavailable as a gold summon against the two fights in Enir-Ilim. ・Ansbach's armor set ・Ansbach's Longbow ・Retaliatory Crossed-Tree Talisman |
| Be Summoned to Assist Sir Ansbach (Gold summon sign) |
Ansbach's questline will continue, and he will be able to assist you in the Enir-Ilim NPC fight and the final boss fight. ・Leda's Rune ・Ansbach's Longbow |
In this fight, we recommend assisting Ansbach (gold summon sign) against Leda to get the best rewards from both questlines.
Leda's quest will progress regardless of who you choose to side with, but killing Ansbach here will lock you out of the rest of his questline, including his gold summon sign in the Enir-Ilim fights, the Obsidian Lamina, and the Furious Blade of Ansbach.
After making your choice, you will then need to continue the DLC's story until you burn the Sealing Tree for the next interaction.
10. Fight Leda at Enir-Illim
Progress the DLC's story until you reach Enir-Illim. Once you find the Cleansing Chamber Anteroom site of grace, proceed to the large room ahead to find three summon signs.
You can ask Sir Ansbach and Thiollier's help through the gold signs before starting the fight against Leda and the other followers through the red sign.
Enir-Ilim NPC Summon Conditions
| NPC | Faction | Summon Conditions |
|---|---|---|
| Ansbach | Ally | Will be available as a gold summon if you gave him the Secret Rite Scroll and helped him against Leda's invasion. |
| Thiollier | Ally | Will be available as a gold summon if you completed his quest and told him St. Trina's last words at the end of it. |
| Sanguine Noble Nataan | Ally | Replaces Ansbach as a gold summon if Ansbach dies during his quest. |
| Leda | Hostile | Always appears as hostile. |
| Dryleaf Dane | Hostile | Always appears as hostile. |
| Freyja | Hostile | Freyja joins Leda as an invader if you delivered Ansbach's Letter to Freyja to her during her quest. |
| Moore | Hostile | Moore joins Leda as an invader if you chose the Put it behind you dialogue option during his quest. |
| Hornsent | Hostile | Hornsent fights you if he was not killed during his quest-related invasions before before burning the Sealing Tree. He will also fight you if you do not summon him for the Messmer boss fight. |
11. Defeat Leda's Group to Obtain Her Gear

Defeating Leda and the other hostile NPCs in the Enir-Illim fight allows you to retrieve Leda's Armor and Leda's Sword from her body.
Get Leda's Full Armor Set Near the Church of Benediction
| Map View | World View |
|---|---|
 |
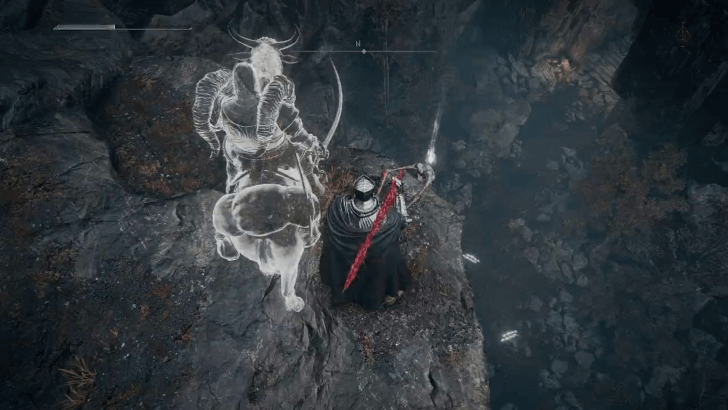 |
The Oathseeker Knight armor set completes Leda's armor. It can be obtained from a corpse hanging by a cliff near the Church of Benediction. You can get to this area by following the cliff edge south from the Main Gate Cross Site Grace, then continuing south past the Cliffroad Terminus Site of Grace.
How to Get the Oathseeker Knight Armor Set
Needle Knight Leda Location
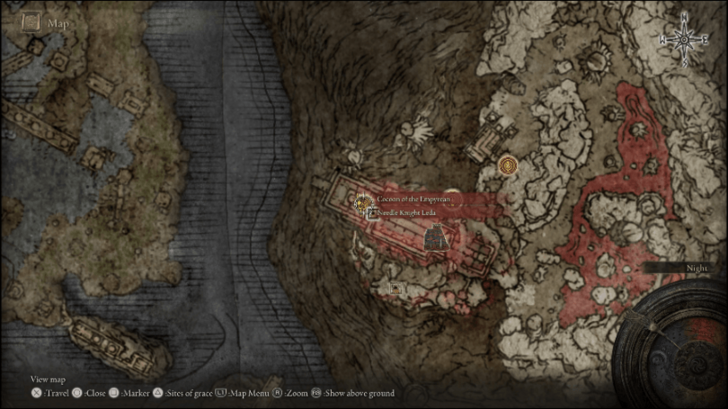
By the Cocoon of the Empyrean
| Map Location | World View |
|---|---|
 |
|
Your first encounter with Needle Knight Leda is at the Cocoon of the Empyrean after defeating Mohg, Lord of Blood.
Needle Knight Leda Armor and Weapon Drops
Leda Drops her Weapon and Chest Armor
| Weapon | ・Leda's Sword |
|---|---|
| Armor | ・ Leda's Armor |
| Items | ・ Leda's Rune |
Leda's Sword and Armor are only obtainable by winning the final encounter against her and the other Miquella followers at Enir-Illim, while Leda's Rune is rewarded if you side against her in either of the Hornsent's or Ansbach's events.
The rest of Leda's armor is part of the Oathseeker Knight armor set, and is looted separately from Leda's corpse.
Elden Ring Related Guides

| All NPC Guides | |
|---|---|
| All NPC Questlines | DLC NPC Questlines |
Shadow of the Erdtree NPCs
| All NPC Guides | |
|---|---|
| Needle Knight Leda | Hornsent |
| Redmane Freyja | Hornsent Grandam |
| Moore | Sir Ansbach |
| Dryleaf Dane | Thiollier |
| Fire Knight Queelign | Igon |
| Jolan | St. Trina |
| Dragon Communion Priestess | Ymir |
All Elden Ring NPCs
Other NPC Guides
| NPCs Guides | |
|---|---|
| All Merchant Locations | All Nomadic & Isolated Merchants |
| How to Make Hostile NPCs Friendly | |
Comment
Author

Needle Knight Leda Questline and Location
Please participate in our site
improvement survey
03/2026
improvement survey
03/2026
Would you assist in
improving Game8's site?
improving Game8's site?

×
We are listening to our users' valuable opinions and discussing how to act on them.
The information collected through this survey will be used for the purpose of improving our services. In addition, the information will only be disclosed a part of a statistic in a format that will not allow identification of personal information.
Begin Survey
Not Now
×
Please rate each item regarding Game8.co's Advertisements.
Amount of Ads
Very Dissatisfied
Somewhat Dissatisfied
Fine
Somewhat Satisfied
Highly Satisfied
Placement of Ads
Timing of Ad Display
Ad Loading Speed
Safeness of Ads
Content of Ads
×
Please rate each item regarding Game8.co's Quality of Articles.
Amount of information
Very Dissatisfied
Somewhat Dissatisfied
Fine
Somewhat Satisfied
Highly Satisfied
Frequency of updates
Speed of new information
Accuracy of articles
Understandibility of articles
Readability of sentences
×
Please rate each item regarding Game8.co's Usability of the Site.
Ease of finding information
Very Dissatisfied
Somewhat Dissatisfied
Fine
Somewhat Satisfied
Highly Satisfied
Loading Speed
Use of Color
Font Size
Visibility of Images
Easy to Understand Layout
×
Please rate each item regarding Game8.co's Message Boards, Comments.
Ease of Writing
Very Dissatisfied
Somewhat Dissatisfied
Fine
Somewhat Satisfied
Highly Satisfied
Readability
Ease in Finding Information
Comment Quality
Comment Quantity
Admin Response
×
Please rate each item regarding Game8.co's Site's new design.
Please rate our site's new design
Very Dissatisfied
Somewhat Dissatisfied
Fine
Somewhat Satisfied
Highly Satisfied
Do you think that the website's design change makes the site easier to use?
Has the new design made it easier for you to find information on the site?
Has the new design improved the overall visual appeal of the site?
How would you rate your overall satisfaction with the new design of the site?
×
How likely are you to recommend Game8 to someone you know?
Very Unlikely
0
1
2
3
4
5
6
7
8
9
10
Very Likely
If you have other opinions regarding potential improvement to the website, please share them with us. We would appreciate your honest opinion.
Note: This is a free response section, so you can proceed without entering anything.
Note: Please be sure not to enter any kind of personal information into your response.
Note: Please be sure not to enter any kind of personal information into your response.
×
Thank You
×
Thank you for participating in our survey! Your answers will help us to improve the quality of our website and services.
We hope you continue to make use of Game8.
We hope you continue to make use of Game8.
Close
Rankings
- We could not find the message board you were looking for.
Gaming News


![Monster Hunter Stories 3 Review [First Impressions] | Simply Rejuvenating](https://img.game8.co/4438641/2a31b7702bd70e78ec8efd24661dacda.jpeg/thumb)
Popular Games

Genshin Impact Walkthrough & Guides Wiki
Honkai: Star Rail Walkthrough & Guides Wiki
Umamusume: Pretty Derby Walkthrough & Guides Wiki
Pokemon Pokopia Walkthrough & Guides Wiki
Resident Evil Requiem (RE9) Walkthrough & Guides Wiki
Monster Hunter Wilds Walkthrough & Guides Wiki
Wuthering Waves Walkthrough & Guides Wiki
Arknights: Endfield Walkthrough & Guides Wiki
Pokemon FireRed and LeafGreen (FRLG) Walkthrough & Guides Wiki
Pokemon TCG Pocket (PTCGP) Strategies & Guides Wiki


Recommended Games
Diablo 4: Vessel of Hatred Walkthrough & Guides Wiki
Cyberpunk 2077: Ultimate Edition Walkthrough & Guides Wiki
Fire Emblem Heroes (FEH) Walkthrough & Guides Wiki
Yu-Gi-Oh! Master Duel Walkthrough & Guides Wiki
Super Smash Bros. Ultimate Walkthrough & Guides Wiki
Pokemon Brilliant Diamond and Shining Pearl (BDSP) Walkthrough & Guides Wiki
Elden Ring Shadow of the Erdtree Walkthrough & Guides Wiki
Monster Hunter World Walkthrough & Guides Wiki
The Legend of Zelda: Tears of the Kingdom Walkthrough & Guides Wiki
Persona 3 Reload Walkthrough & Guides Wiki


All rights reserved
ELDEN RING™ & ©BANDAI NAMCO Entertainment Inc. / ©2021 FromSoftware, Inc.
The copyrights of videos of games used in our content and other intellectual property rights belong to the provider of the game.
The contents we provide on this site were created personally by members of the Game8 editorial department.
We refuse the right to reuse or repost content taken without our permission such as data or images to other sites.