Ymir Quest and Location
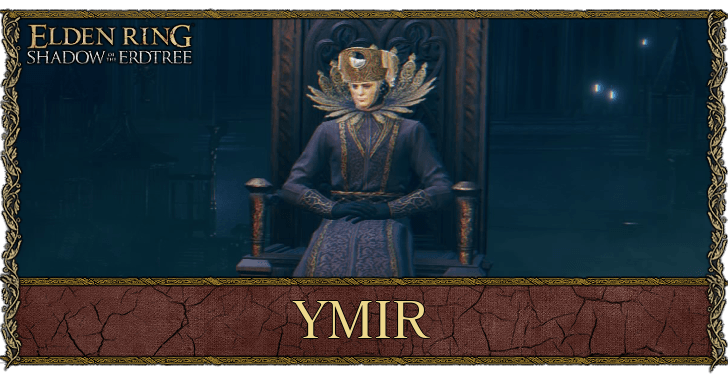
Ymir is an NPC in the Elden Ring DLC, Shadow of the Erdtree, initially found in Scadu Altus. Read on to learn more about Ymir's questline walkthrough, location, armor and weapon drops, and lore!
Ymir Quest Walkthrough
| Quest Objectives |
|---|
|
|
1. Talk to Ymir in the Cathedral of Manus Metyr
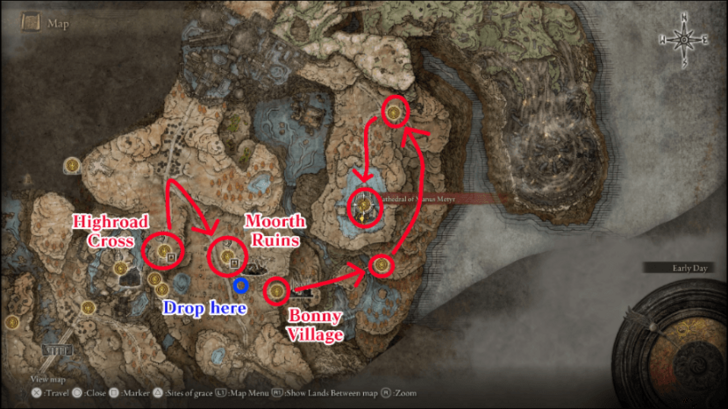
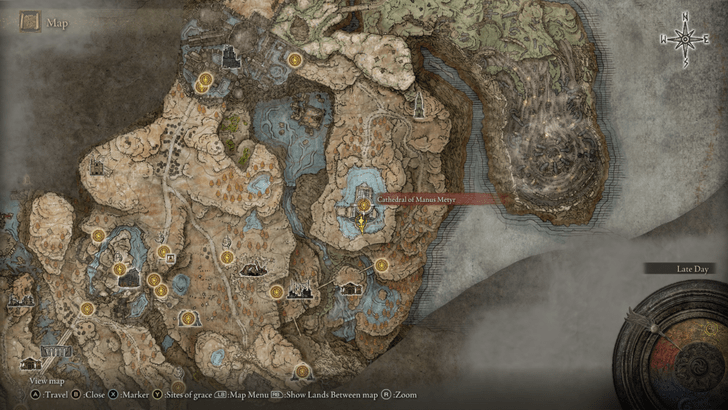
Ymir can be first found sitting on his throne at the Cathedral of Manus Metyr. You can reach this area by dropping down the hole in Moorth Ruins and passing through Bonny Village. Cross the bridge east of the village then go around the plateau to reach the cathedral.
Talk to Ymir inside and he will give you a Hole-Laden Necklace and a Ruins Map. He will also tell you to ring the bell in the ruins. Additionally, exhausting his dialogue here will allow you to learn spells from him.
Talk to Jolan for Additional Dialogue With Ymir

After your first conversation with Ymir, turn around to find Jolan standing next to one of the pillars. Talking to her adds more dialogue with Ymir, especially since their questlines progress in parallel.
2. Ring the Bell in the Finger Ruins of Rhia
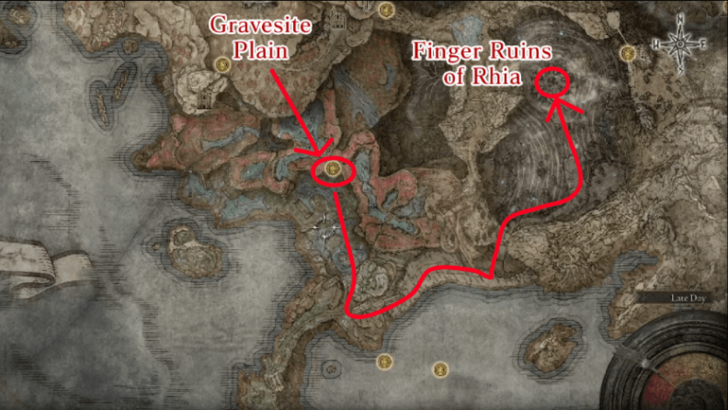
Sound the hanging bell at the Finger Ruins of Rhia to receive the Crimson Seed Talisman +1. You can reach the Ruins by heading to the Cerulean Coast south of Gravesite Plain first then going around the map until you reach the spot indicated on the Ruins Map.
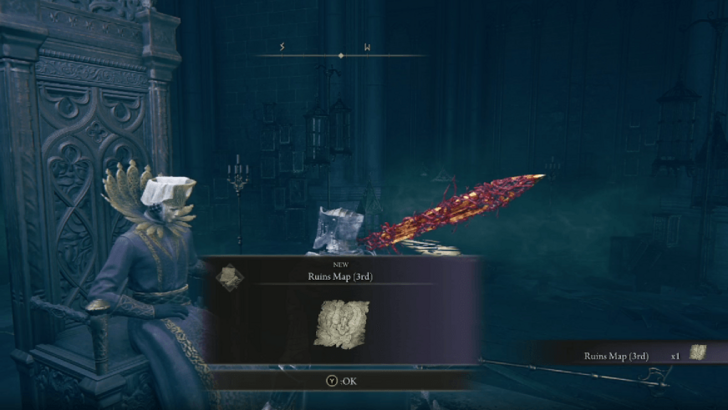
3. Report Back to Ymir for the Second Map

Return to Ymir and he will give you the Ruins Map (2nd) for your next step and the Beloved Stardust talisman. Exhaust both Ymir and Jolan's dialogue lines to progress their questlines again.
At this point, Jolan will be available as a gold summon against Messmer.
Defeat the Invader Beneath the Throne
This can be done later on, but reloading the area by fast traveling to the cathedral's site of grace makes Ymir disappear temporarily. Interact with Ymir's throne to reveal a secret passage leading to the Finger Ruins of Miyr beneath.
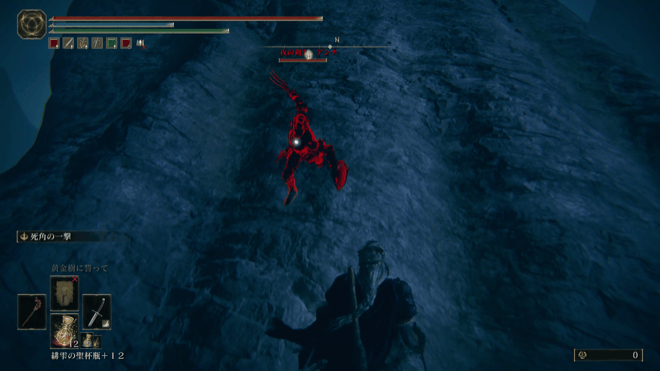
Here, you will be invaded by Swordhand of Night Anna who will drop the Claws of Night when beaten. You can still return here later in case you fail to take down the invader.
4. Find Scaduview
To reach the second ruins, you must first reach the site of grace of Shadow Keep, Back Gate, which is only accessible by going through the East Gate first. Follow the steps below for a detailed route on reaching this site of grace from the East Gate!
| 1 | 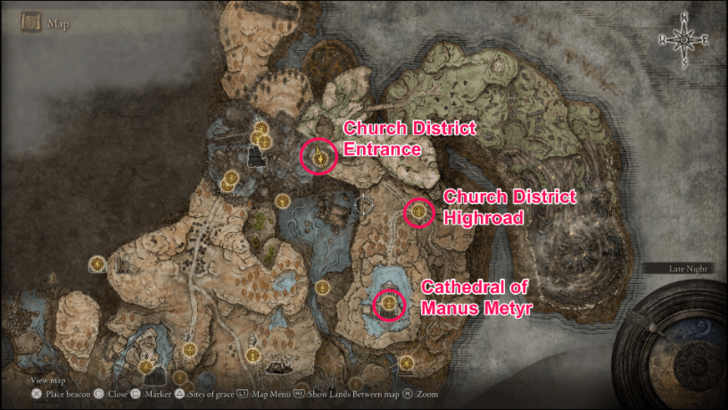 You can reach the east entrance of Shadow Keep by going west from the Church District Highroad until you reach the Church District Entrance. |
|---|---|
| 2 | 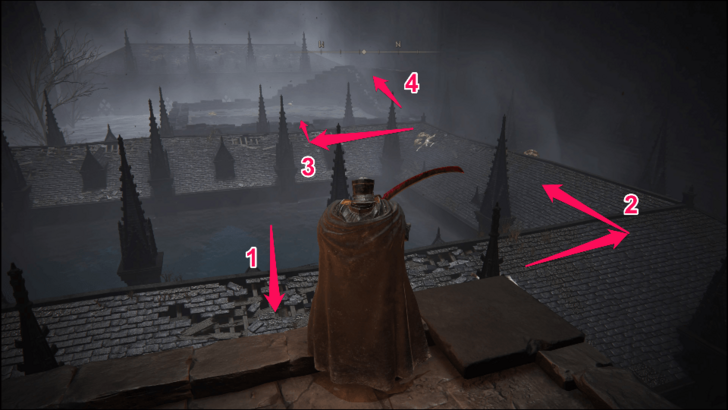 From the Church District Entrance, jump down the roof below you then go to the other side. You'll need to jump again to the next rooftop, but you'll have to be careful as you might fall into the water at the center. Now, go up the broken wall to your right to reach the ledge above. |
| 3 | 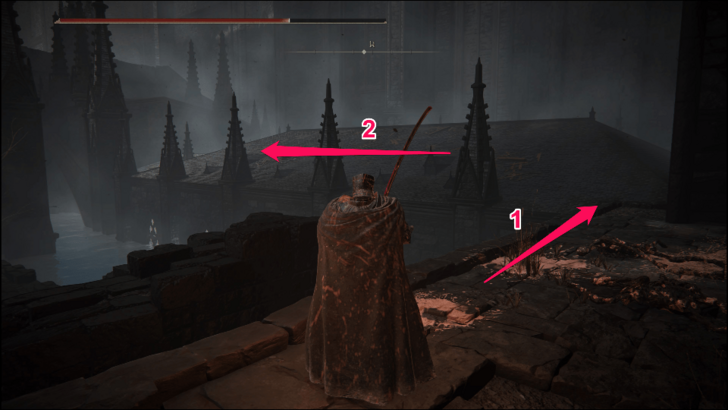 Run towards the edge of this ledge to easily reach the next rooftop, then run to the left until you see another roof. |
| 4 | 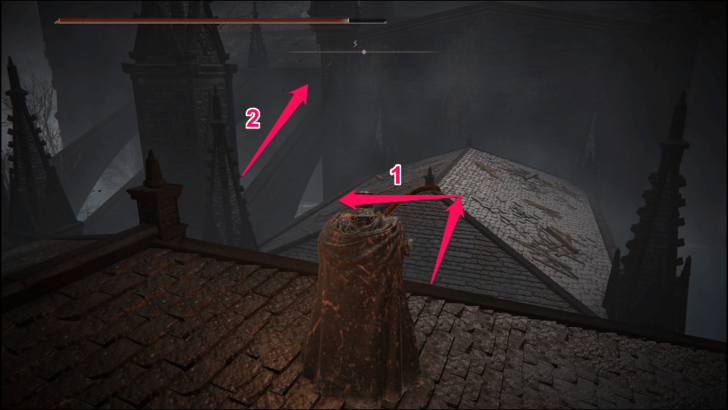 Jump down the roof below, onto the buttress on your left, and up to the next roof to find a large hole. |
| 5 | 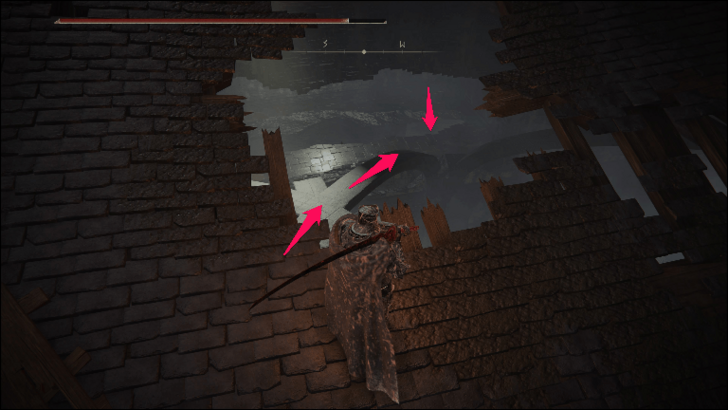 Drop down onto the beams below and down again on the floor below with the chandeliers. |
| 6 |  Follow the hallway to the west until you see a doorway with a bridge on your left. Go to the end of this bridge to find a lift that will take you several floors above. |
| 7 | 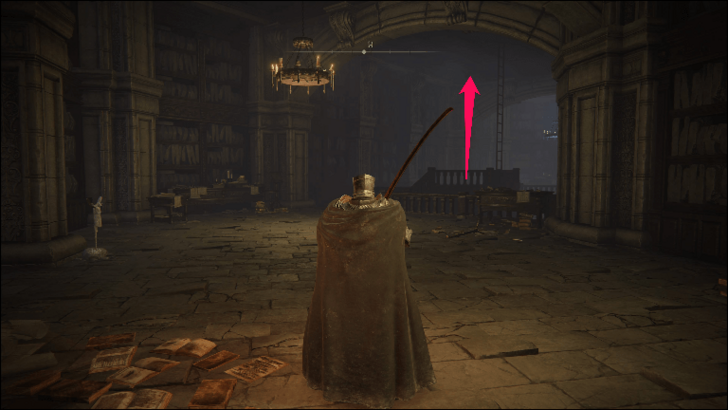 Turn left, run past the site of grace, and climb the first ladder that you will see. |
| 8 | 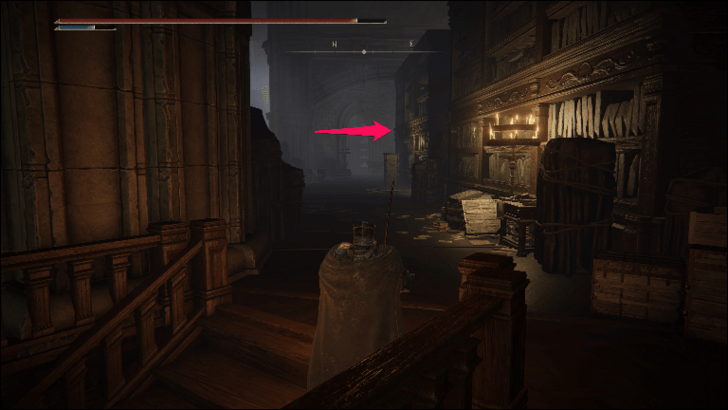 Turn right and go up the stairs to the upper floor. A large hole can be found on the northeast wall of this room that will take you outside the keep. Follow the path south to re-enter the keep and find a site of grace. |
| 9 |  Take the small lift up and look to the west where you will spot a ladder. Head for this ladder and climb up. |
| 10 | 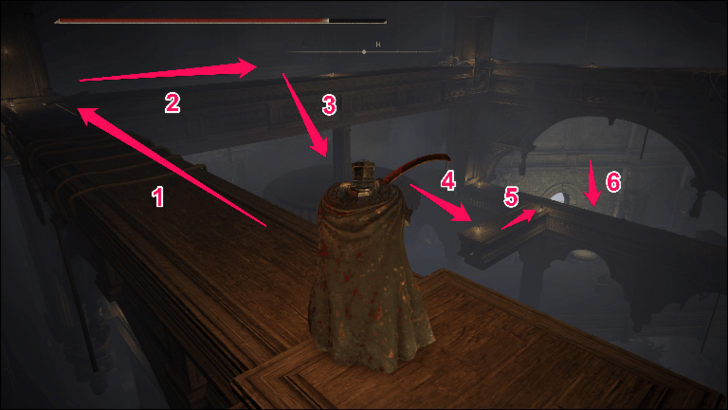 Walk west again and drop down the cog so you can safely land on the small room below. |
| 11 | 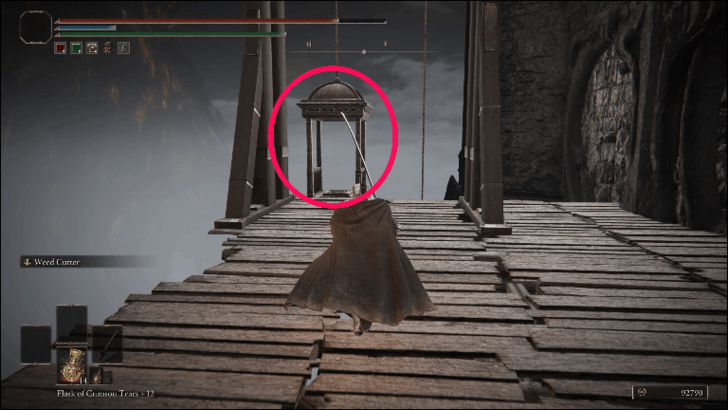 Go back outside and take the small lift down to another wooden path. You will find a bigger lift on other end of this path which will take you to a site of grace. |
| 12 |  Enter the room to your right and do the O Mother gesture in front of the statue to reveal a passage to Scaduview. |
5. Ring the Bell in the Finger Ruins of Dheo
Keep following the path in Scaduview until you reach the Finger Ruins of Dheo. Watch out for bolts of gravity magic while riding south as it will knock you off your steed or restrain you if you're on foot.
Sound the second bell once you reach it to receive the Cerulean Seed Talisman +1.
6. Report Back to Ymir for the Third Map
Return to Ymir to get the final Ruins Map (3rd). Sounding the second bell also unlocks more spells from Ymir's shop, as well as additional dialogue from Jolan.
The third ruins is the one beneath the throne, the Finger Ruins of Miyr. Players will have to exhaust Ymir's dialogue and wait for night time to get Ymir off the throne then climb down the ladder.
Defeat the invader here if you haven't done it earlier then proceed to the end of the path to sound the third bell.
7. Defeat Metyr, Mother of Fingers
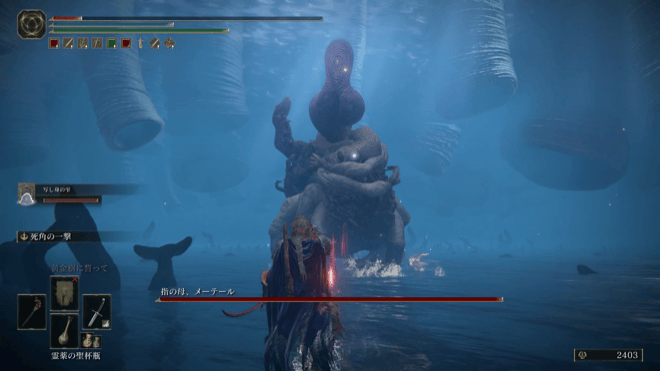
Sounding the third bell will teleport you to an area where you need to defeat Metyr, Mother of Fingers. Defeating this boss rewards you with the Remembrance of the Mother of Fingers and continues Ymir's questline.
Metyr, Mother of Fingers Boss Guide
8. Defeat Jolan and Ymir
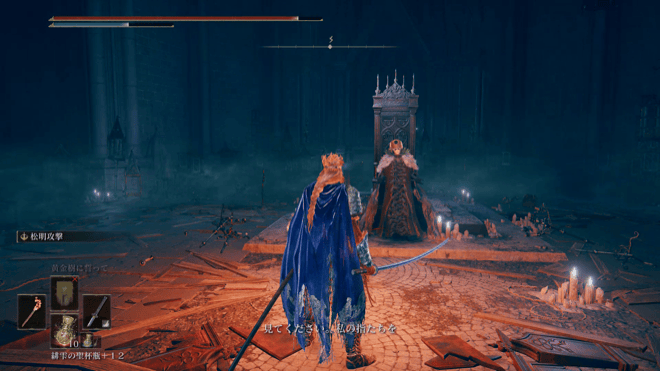
Return to the cathedral and you will find the throne still empty. Approach it and you will be invaded by Swordhand of Night Jolan.
Ymir will make an entrance after Jolan has been slain and will engage you in combat as Count Ymir, Mother of Fingers. Defeat him to obtain Ymir's Bell Bearing, the High Priest armor set, and the Maternal Staff.
9. Obtain the Cherishing Fingers

After defeating Ymir, you can go to the graveyard west of the cathedral to find the Cherishing Fingers sorcery. This concludes Ymir's story, while Jolan's questline continues after talking to her again inside the cathedral.
Ymir Location
In the Throne Room of Cathedral of Manus Metyr
 Can be found seated in the throne room of the Cathedral of Manus Metyr. |
Ymir is located inside the Cathedral of Manus Metyr, which you can reach by dropping down the hole in Moorth Ruins and going around the plateau where the cathedral is.
Cathedral of Manus Metyr Location
Ymir Armor and Weapon Drops
| Weapon | ・Maternal Staff |
|---|---|
| Armor | ・High Priest Hat ・High Priest Robe ・High Priest Gloves ・High Priest Undergarments |
| Items | ・ Ymir's Bell Bearing |
Ymir will drop his staff, armor set, and bell bearing after defeating him as the Count Ymir, Mother of Fingers at the end of his questline.
How to Beat Count Ymir, Mother of Fingers
| Tips for Beating Count Ymir |
|---|
|
|
Interrupt Ymir's Summons
Count Ymir will open the fight by summoning up to three Fingercreepers at a time to harass you. He will do this multiple times throughout the fight, so pay attention to his current move at all times.
It's best to break Ymir's animations with normal attacks to interrupt him before he can summon more Fingercreepers. Alternatively, you can also opt to kill the Fingercreepers immediately to prevent them from crowding the small arena.
Use Environment Against Glintstone Nails
Ymir's primary offensive attack will be repeatedly casting Glintstone Nails to pursue you. The tracking of this spell is delayed, so it should be easy to roll forward to lose the projectiles, but you can also bait them into the throne in the center to block them if you need to safely heal or restore FP.
Retreat During Cherishing Fingers
If you manage to box in Count Ymir, he will either teleport a short distance away or try to cast Cherishing Fingers. The latter has him summoning an AoE finger eruption attack around himself to zone you out.
If you don't have the attack speed to stagger him, you'll have to roll back and wait until he stops casting the spell to re-engage, as he might spam it multiple times even if you've rolled out of melee range.
Slashing Type Weapons Are Recommended
 Backhand Blades Backhand Blades |
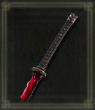 Rivers of Blood Rivers of Blood |
Weapons that deal slashing damage like the Backhand Blade and Rivers of Blood is perfect to use against Count Ymir. Not only is Ymir weak to this damage type, Ymir's hand summons are also weak to slash which makes this the best weapon type for dispatching the distractions that Ymir brings into the fight.
Use Tracking, Fast, or AoE Spells to Hit Count Ymir
|
|
|
|
|
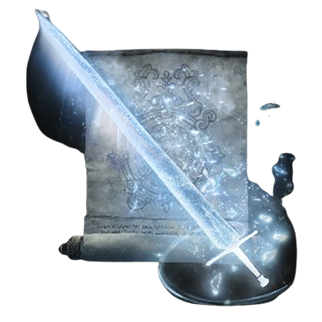 Adula's Moonblade Adula's Moonblade
|
Ymir will spend most of his time teleporting around the arena while using homing sorceries and summoning hand enemies to chase you. You can counter both of these by using spells that tracks Ymir or hits him immediately like Honed Bolt or Swarm of Flies.
An alternative way to hit Ymir is to use AoE spells like Ancient Dragons' Lightning Strike or Adula's Moonblade. Not only will the huge AoE hit Ymir, it will also damage or kill the summons if they're withing range.
Elden Ring Related Guides

| All NPC Guides | |
|---|---|
| All NPC Questlines | DLC NPC Questlines |
Shadow of the Erdtree NPCs
| All NPC Guides | |
|---|---|
| Needle Knight Leda | Hornsent |
| Redmane Freyja | Hornsent Grandam |
| Moore | Sir Ansbach |
| Dryleaf Dane | Thiollier |
| Fire Knight Queelign | Igon |
| Jolan | St. Trina |
| Dragon Communion Priestess | Ymir |
All Elden Ring NPCs
Other NPC Guides
| NPCs Guides | |
|---|---|
| All Merchant Locations | All Nomadic & Isolated Merchants |
| How to Make Hostile NPCs Friendly | |
Author

Ymir Quest and Location
Rankings
- We could not find the message board you were looking for.
Gaming News


![Monster Hunter Stories 3 Review [First Impressions] | Simply Rejuvenating](https://img.game8.co/4438641/2a31b7702bd70e78ec8efd24661dacda.jpeg/thumb)
Popular Games

Genshin Impact Walkthrough & Guides Wiki
Honkai: Star Rail Walkthrough & Guides Wiki
Umamusume: Pretty Derby Walkthrough & Guides Wiki
Pokemon Pokopia Walkthrough & Guides Wiki
Resident Evil Requiem (RE9) Walkthrough & Guides Wiki
Monster Hunter Wilds Walkthrough & Guides Wiki
Wuthering Waves Walkthrough & Guides Wiki
Arknights: Endfield Walkthrough & Guides Wiki
Pokemon FireRed and LeafGreen (FRLG) Walkthrough & Guides Wiki
Pokemon TCG Pocket (PTCGP) Strategies & Guides Wiki


Recommended Games
Diablo 4: Vessel of Hatred Walkthrough & Guides Wiki
Cyberpunk 2077: Ultimate Edition Walkthrough & Guides Wiki
Fire Emblem Heroes (FEH) Walkthrough & Guides Wiki
Yu-Gi-Oh! Master Duel Walkthrough & Guides Wiki
Super Smash Bros. Ultimate Walkthrough & Guides Wiki
Pokemon Brilliant Diamond and Shining Pearl (BDSP) Walkthrough & Guides Wiki
Elden Ring Shadow of the Erdtree Walkthrough & Guides Wiki
Monster Hunter World Walkthrough & Guides Wiki
The Legend of Zelda: Tears of the Kingdom Walkthrough & Guides Wiki
Persona 3 Reload Walkthrough & Guides Wiki


All rights reserved
ELDEN RING™ & ©BANDAI NAMCO Entertainment Inc. / ©2021 FromSoftware, Inc.
The copyrights of videos of games used in our content and other intellectual property rights belong to the provider of the game.
The contents we provide on this site were created personally by members of the Game8 editorial department.
We refuse the right to reuse or repost content taken without our permission such as data or images to other sites.
the image for the path is wrong the drop is up north to like north east and not south