Complete Walkthrough and Progression Guide

Learn how to complete the story and defeat all story bosses with Game8's complete story and progression walkthrough for Elden Ring. Read on to learn where to go first, what objectives you'll need to complete, as well as other helpful information!
List of Contents
- Recommended Level Per Area
- Story Progression Route
- Limgrave
- Stormveil Castle
- Academy of Raya Lucaria
- Redmane Castle
- Leyndell, Royal Capital
- Volcano Manor
- Mountaintops of the Giants
- Crumbling Farum Azula
- Leyndell, Ashen Capital
- Miquella's Haligtree
- Mohgwyn Dynasty Mausoleum
- Tips for Story Progression
- Related Guides
Recommended Level Per Area
Base Game
| Area | Rec. Level |
|---|---|
| Limgrave | 1-50 |
| Stormveil Castle | 50-55 |
| Academy of Raya Lucaria | 55-70 |
| Redmane Castle | 70-85 |
| Leyndell, Royal Capital | 85-100 |
| Volcano Manor | 85-100 |
| Mountaintops of the Giants | 100-110 |
| Crumbling Farum Azula | 110-120 |
| Leyndell, Ashen Capital | 120-130 |
| Miquella's Haligtree | 130-145 |
| Mohgwyn Palace | 130-145 |
Shadow of the Erdtree DLC
| Area | Rec. Level |
|---|---|
| Castle Ensis and Rellana | 150-160 |
| Shadow Keep and Messmer | 160-170 |
Story Progression Route
Limgrave Objectives
| 1 | Exit the building and follow the path until you cross the bridge to the north |
|---|---|
| 2 | Enter the next area and approach the statue to start the boss battle against the Grafted Scion The story will proceed even if you lose in this fight. ▶ Can you Beat the Tutorial Boss? | How to Beat Grafted Scion |
| 2.5 | If you managed to beat the Grafted Scion, exit to your right and follow the path until you reach the cliff to fall down, die, and proceed through the tutorial |
| 3 | After the cutscene, drop down the cliff where the sitting phantom is and pass through the cave to continue the tutorial |
| 4 | Pass through the fog to the next area and defeat the Soldier of Godrick This is a much easier boss than the first one so take your time to master the combat basics. ▶ How to Beat Soldier of Godrick |
| 5 | After defeating the boss, continue onward until you reach the area where you fell from earlier, then exit the building to reach Limgrave |
| 6 | Once in Limgrave, be sure to prioritize reaching the Site of Grace at Gatefront to meet Melina With Melina, you can use Runes to level up your character and increase attributes. You will also receive the Spectral Steed Whistle to call upon Torrent making travel much faster. ▶ Rune Farming Guide ▶ How to Find and Ride the Horse Mount |
| 7 | Head northwest while activating more Sites of Grace until you reach Stormhill, where you'll fight Margit, the Fell Omen ▶ How to Beat Margit the Fell Omen |
Limgrave Points of Interest
| Location | What You Can Find |
|---|---|
| Gatefront Site of Grace | ・Meet Melina and unlock the level up feature |
| Gatefront Ruins | ・West Limgrave Map Fragment |
| Mistwood | ・East Limgrave Map Fragment |
| Third Church of Marika | ・Sacred Tear ・Flask of Wondrous Physick |
Stormveil Castle Objectives
| 1 | Ascend the stairs and activate the Site of Grace at the gate |
|---|---|
| 2 | Enter the room on your left and exit on the other side |
| 3 | Jump on the ledge to your right, walk along the narrow path up, and drop down to a small area |
| 4 | Go right to find a Site of Grace, climb up the slope, and enter the first tower that you'll see |
| 5 | Enter the room on your right and climb the ladders until you reach a narrow passage You'll have to climb a total of 3 sets of stairs to reach the narrow path blocked by wooden barrels. You will run into a lot of enemies in this area, so utilize the roll action to dodge their attacks and destroy the barrels along the way. |
| 6 | From the narrow passage, take the stairs to the upper floor, then grab the Rusty Key from the room to your right. If you can't beat the knight, you can just grab the key in the room, get yourself killed, then return here to retrieve your Runes. The door will be unlocked on your next trip. |
| 7 | Drop down the hole nearby to unlock the room and climb the ladder inside |
| 8 | Once at the top, follow the path ahead of you until you get back outside |
| 9 | Climb the stairs on your left, re-enter the castle, and head to the upper floor where you can find a Site of Grace |
| 10 | Exit the room and proceed north until reach the stairs leading down to a roof that you can walk on The eagles that you will run into at the plaza attack fast so it's best to ignore them, even if you get hit. They have low HP and will go down just as fast, so if you're confident with your abilities or if you want to test them out, you can take them on instead. |
| 11 | Walk along the roof to the tower nearby then climb down the ladder at the end of the path |
| 12 | Enter the room on your right, take the narrow path on the other side, and follow the path to get back outside |
| 13 | Go through the next door ahead to reach a dining hall, then from there, pass through the narrow path to your east and go down the floor below |
| 14 | Run north while ignoring the enemies in the room to reach a plaza |
| 15 | Pass through the plaza and continue making your way north until you reach a room with a Site of Grace You can break the rectangular wooden barricades at the plaza by rolling through them. |
| 16 | Go back outside, but this time, head east until you find a giant guarding the stairs You can also find a Golden Seed on the curve leading to the giant. |
| 17 | Run past the giant and take a right halfway through the narrow passageway to find a Site of Grace before passing through the mist and fighting Godrick the Grafted ▶ How to Beat Godrick the Grafted |
Stormveil Castle Points of Interest
| Location | What You Can Find |
|---|---|
| Limgrave Tunnels | ・Farm Smithing Stones to improve your weapons |
| Stormveil Castle | ・Hookclaws (for Dex builds) |
| Caelid | ・Greatsword (for Str builds) |
Stormveil Castle Legacy Dungeon Walkthrough and Location
Academy of Raya Lucaria Objectives
| 1 | Enter the keep and exit to the other side to find the Lake-Facing Cliffs Site of Grace The path inside the keep is linear, so you'll be able to find the exit by moving from one room to another. You can also get a Sacred Tear at the Church of Irith south of the Site of Grace. |
|---|---|
| 2 | Travel northwest and activate the Site of Grace at Liurnia Lake Shore You can find a merchant nearby and a map fragment further to the north. |
| 3 | Head north and find the Academy Gate Town Site of Grace. |
| 4 | Follow the path leading northwest to reach the Site of Grace at South Raya Lucaria Gate and obtain the Meeting Place Map |
| 5 | Go around the academy until you reach the area on its west, then once in the area, sneak past Smarag and grab the Academy Glintstone Key |
| 6 | Return to the South Raya Lucaria Gate |
| 7 | Pass through the gate, activate the Site of Grace, then ride the elevator on your left You can find a Golden Seed at the end of the bridge opposite to the elevator. |
| 8 | Head south until you reach the chapel, then take a left to find the next Site of Grace |
| 9 | Follow the path outside until you reach lifts that you can jump on |
| 10 | Ride a lift to the top and head south to find a room with a Site of Grace |
| 11 | Enter the hallway to your right, follow it to the next room, then take another right to the stairs The room where the hallway leads to is filled with enemies so you might want to sneak past them. |
| 12 | Continue to the upper floor and pass through the mist to fight the Red Wolf of Radagon ▶ How to Beat Red Wolf of Radagon |
| 13 | Go outside and head northeast until you reach a staircase As you walk up, large iron balls will roll down the stairs so stick to the sides and time your dodges right! |
| 14 | Enter through the door, then head north to a courtyard where you'll fight a Carian Knight Don't let your attacks get parried or he'll execute a riposte and take a huge chunk off your health. The first time you bring the knight's HP down by a half, they will switch their shield with a wand, then you can start unleashing flurries of attacks without the risk of getting blocked. |
| 15 | Use the elevator up and open the door ahead to fight Rennala, Queen of the Full Moon Before you fight the boss, we recommend turning left first, then make your way to the bridge with a locked door that leads to the area where you fought the Red Wolf. This will save you a long trip to go back to Rennala if you fall in battle. ▶ How to Beat Rennala, Queen of the Full Moon |
Academy of Raya Lucaria Legacy Dungeon Walkthrough and Location
Redmane Castle Objectives
| Note: You can only continue to the events of Redmane Castle after you trigger the Radahn Festival. If the portal near the bridge isn't active, that means the festival is not being held yet and you're still missing the prerequisites. |
| 1 | Follow the path on the northeast corner of Limgrave to Rotview Balcony's Site of Grace |
|---|---|
| 2 | Follow the guidance of grace and unlock these 4 Sites of Grace along the way ・Caelem Ruins ・Caelid Highway South ・Cathedral of Dragon Communion ・Impassable Greatbridge |
| 3 | Use the portal near the Site of Grace to get transported inside the Redmane Castle |
| 4 | Go up the stairs toward the plaza and talk to the NPC above the gate to start the festival |
| 5 | After the cutscene, head north, ride the elevator down, and make your way to the shore |
| 6 | Travel through the portal and defeat Starscourge Radahn ▶ How to Beat Starscourge Radahn |
| 7 | After the battle, talk to Blaidd near the Site of Grace to end the festival Changes after the festival: ・Enemies will appear in the castle ・Doors in the castle will be unlocked ・Misbegotten Warrior and Crucible Knight will appear at the plaza |
Redmane Castle Legacy Dungeon Walkthrough and Location
Leyndell, Royal Capital Objectives
| 1 | Go to the Site of Grace at the Main Academy Gate of Raya Lucaria and examine the seal on the north path to warp straight to Bellum Highway |
|---|---|
| 2 | Head north from the highway until you reach the Grand Lift of Dectus The guards will rain down rocks and bolts at you as you approach the gate. Try to dodge them by veering alternately to left and right. |
| 3 | If you have the Dectus Medallion, you can use it to activate the lift You can find the left half of the medallion on Fort Haight at Limgrave and the right half on Fort Faroth at Caelid. |
| 4 | From Altus Plateau, head east along the road and make your way to the Outer Wall Phantom Tree Site of Grace |
| 5 | Go around the capital until you reach its northeastern gate |
| 6 | Defeat the Draconic Tree Sentinel so you can pass through and enter Leyndell ▶ How to Beat Draconic Tree Sentinel |
| 7 | Follow the path and you will find another Site of Grace on the bridge ahead |
| 8 | Enter the building, ride the lift on your left, then head southwest to the center until you reach the West Capital Rampart Site of Grace You'll have to pass through the Avenue Balcony Site of Grace and run up the giant dragon wing to reach the West Capital Rampart. |
| 9 | Pass through the capital and make your way to the overgrown keep at the center of the map |
| 10 | Run along the roots on the side and make your way to the top, where you'll go against Godfrey, First Elden Lord ▶ How to Beat Godfrey, First Elden Lord |
| 11 | After the battle against Godfrey, go to the balcony on your right, run along the giant root, and follow the path northeast until you reach the Site of Grace inside the Queen's Bedchamber |
| 12 | Climb the stairs south of the room and defeat Morgott, the Omen King ▶ How to Beat Morgott, the Omen King |
| 13 | Go up the stairs ahead and touch the wall of thorns to make a Site of Grace appear at the center of the arena |
| 14 | Rest at the Site of Grace for a dialogue with Melina who will give you the Rold Medallion |
| 15 | Warp to the Avenue Balcony Site of Grace then head east until you find a lift that you can ride up |
| 16 | Run to the other side of the bridge and ride the lift down |
| 17 | If you follow the path from the Forbidden Lands Site of Grace, you will reach the Grand Lift of Rold, which will take you to the Mountaintops of the Giants |
Leyndell, Royal Capital Points of Interest
| Location | What You Can Find |
|---|---|
| Leyndell, Royal Capital | ・Blessed Dew Talisman |
| Divine Tower of East Altus | ・Restore Morgott's Great Rune |
Leyndell, Royal Capital Legacy Dungeon Walkthrough and Location
Volcano Manor Objectives
| 1 | Warp back to the Grand Lift of Dectus and head north until you reach the Bridge of Iniquity |
|---|---|
| 2 | Press on to the area with iron maidens and find a ladder along the cliff on your left that leads to the top |
| 3 | Head further to the west to reach the First Mt. Gelmir Campsite |
| 4 | Keep following the path west until you reach the Ninth Mt. Gelmir Campsite, then head south to the Volcano Manor You can ignore the boss past the spirit spring. |
| 5 | Talk to the NPC near the Site of Grace to join the Volcano Manor and receive the Drawing-Room Key |
| 6 | Take the hallway nearby and use the key to unlock the drawing room (second door on the left side), then find the Letter from Volcano Manor on the table inside |
| 7 | Defeat Old Knight Istvan in Limgrave and report back to Tanith |
| 8 | Pick up another letter from the drawing room, defeat Rileigh the Idle in Altus Plateau, and report back to Tanith |
| 9 | Return to the drawing room again for the third letter, defeat Juno Hoslow, Knight of Blood at the Mountaintops of the Giants, and report back to Tanith |
| 10 | Select "See the Lord" when asked by Tanith to be sent straight to the Site of Grace near the next boss |
| 11 | Pass through the mist, grab the Serpent-Hunter from the corpse on your left, and defeat the God-Devouring Serpent We recommend using the Serpent Hunter against this boss (and the next) especially if you're using a Strength build. The weapon doesn't have stat requirements and has a B-scale with Strength. |
| 12 | A cutscene will play after defeating the serpent before moving on to the boss fight against Rykard, Lord of Blasphemy ▶ How to Beat Rykard, Lord of Blasphemy |
| 13 | If you return to Tanith at the manor, all the NPCs inside will leave |
Volcano Manor Legacy Dungeon Walkthrough and Location
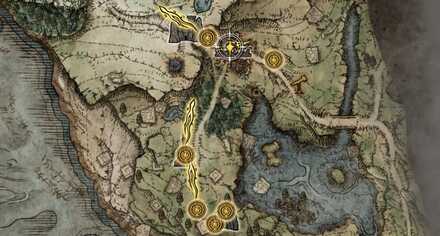
Mountaintops of the Giants Objectives
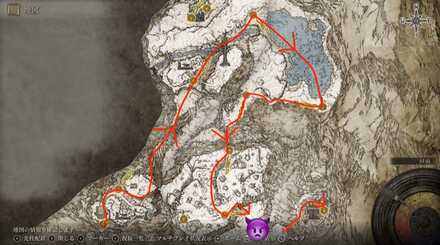 View Full Map View Full Map |
|
| 1 | Fast travel back to the Grand Lift of Rold and travel northeast to Zamor Ruins You can obtain the Smithing-Stone Miner's Bell Bearing [3] inside a cave in the ruins. |
|---|---|
| 2 | Travel northeast and cross the stone bridge Be careful of giant arrows when crossing the bridge! Take out the golem archer when you get to the other side to keep it from causing more trouble |
| 3 | Activate the Site of Grace nearby then travel further northeast, while climbing the hills, to another Site of Grace at the Freezing Lake |
| 4 | Travel southeast past the icy field until you reach the First Church of Marika A boss will appear as you pass by but you can ignore it and proceed to the church. |
| 5 | From the church, follow the guidance of grace west until you reach Whiteridge Road |
| 6 | Head south to the Giants' Gravepost, then further to the south around the hill until you reach the Foot of the Forge Site of Grace Be careful on your journey south as an invading NPC will appear halfway through. |
| 7 | Cross the bridge and defeat the Fire Giant ▶ How to Beat Fire Giant |
| 8 | Climb the giant chain and run around clockwise to reach the Site of Grace of the Forge of the Giants |
| 9 | Rest at the Site of Grace, talk to Melina, and tell her you're ready to proceed |
Mountaintops of the Giants Interactive Map and Region Guide
Crumbling Farum Azula Objectives
| 1 | After the cutscene, follow the path and drop down to the balcony on your right |
|---|---|
| 2 | Pass through the corridor and find the Crumbling Beast Grave Site of Grace near the end |
| 3 | Exit the room and continue heading west for the Crumbling Beast Grave Depths Site of Grace A dragon will swoop down along the way but you can just run past it. |
| 4 | Move two rooms north, drop down the hall, and exit east to find the Site of Grace of the Tempest-Facing Balcony You'll also find a Somberstone Miner's Bell Bearing [4] nearby. |
| 5 | Follow the path down to the west, then northeast once you reach a curve to find the Dragon Temple Site of Grace |
| 6 | Head east, turn right on the hallway, then go down the stairs to reach the boss room for the Godskin Duo ▶ How to Beat Godskin Duo |
| 7 | Exit north, drop down the area below, then left down the stairs |
| 8 | From the small room, run north until you reach the path with the dragon statues, then turn right and exit on the other side |
| 9 | Continue running north until you reach the balcony with a Crucible Knight, then jump down the platform below to reach the Dragon Temple Rooftop Site of Grace |
| 10 | Drop down the floating platform below, turn south, and run towards the dragon while dodging its lightning strikes Aside from the lightning, you also need to look out for the hawks' attacks along the way |
| 11 | Turn right from the dragon and follow the path until you cross a broken tower |
| 12 | Enter the building and ride the lift on the other side to reach the Site of Grace "Beside the Great Bridge" |
| 13 | Follow the path outside all the way to the top, past the Draconic Tree Sentinel, and defeat the Beast Clergyman, who will transform into Maliketh, the Black Blade on the second half of the battle. ▶ How to Beat Maliketh, The Black Blade |
Crumbling Farum Azula Legacy Dungeon Walkthrough and Location
Leyndell, Ashen Capital Objectives
| 1 | Go all the way south until you reach a staircase that leads to a lift |
|---|---|
| 2 | Take the lift up, follow the path outside, and defeat Sir Gideon Ofnir, the All-Knowing ▶ How to Beat Sir Gideon Ofnir, the All-Knowing |
| 3 | Go up to the Queen's Bedchamber and head south to fight Godfrey, First Elden Lord, who will shift into the brawler type Hoarah Loux, Warrior in phase two ▶ How to Beat Hoarah Loux, Warrior |
| 4 | Proceed to the burnt Erdtree and touch the light to start the boss battle against Radagon of the Golden Order ▶ How to Beat Radagon of the Golden Order |
| 5 | After beating Radagon, watch the cutscene and defeat the Elden Beast ▶ How to Beat Elden Beast |
| 6 | Proceed to the ending ▶ Endings Guide: How to Get All Endings |
Miquella's Haligtree Objectives
Miquella's Haligtree is an optional Legacy Dungeon where you can find one of the Shardbearers and her Great Rune.
| 1 | Use the Haligtree Secret Medallion on the Grand Lift of Rold and head north to Ordina, Liturgical Town at the Consecrated Snowfield |
|---|---|
| 2 | Remove the seal through the evergaol Mark the statues on your map before entering the evergaol to make them easier to find once you're inside. |
| 3 | Enter the portal to Mequilla's Haligtree |
| 4 | From the Site of Grace, head east, turn left on the fork, then jump down the thin branch below |
| 5 | Follow the branch north, then jump down the large branch below Make sure you have sufficient health as you'll take damage upon landing. |
| 6 | Run north until you hit a wall and the path curves left. Be sure to avoid the ants' attacks as well as the bubble barrage from above. |
| 7 | Jump down and activate the Site of Grace inside the building |
| 8 | Follow the path north to the next building and exit on the other side |
| 9 | Jump on the platform below, cross to the next area, and enter the room to your left |
| 10 | Exit on the other side and cross another bridge to reach a Site of Grace |
| 11 | Jump on the roof south and run for the giant trunk on the far end |
| 12 | Turn left once you reach the trunk, jump down, and enter the building |
| 13 | Make a left again, cross the bridge, then cross the other bridge on your left to reach a lift |
| 14 | Ride the lift up and activate the Site of Grace inside the nearby building |
| 15 | Take the lift back down, cross to the central building, then turn left to the next area and defeat Loretta, Knight of the Haligtree |
| 16 | Follow the path north and climb down the ladder |
| 17 | Enter the tower and ride the lift down to reach Elphael |
| 18 | Turn left and run to the Prayer Room to find another Site of Grace |
| 19 | Exit north, follow the path, then after climbing down the third stairway, jump down the platform on your right and onto the square on your left |
| 20 | Go up the beam on the other side, run along the ledge to the end, then jump down on another beam to your right |
| 21 | Climb the stairs north until you reach the ballistae |
| 22 | Run up the beam next to one of the ballistae and a column, then jump north on the platform to reach a building |
| 23 | Enter the building then jump down to find a Site of Grace |
| 24 | Go down the hallway south, turn right, and run along the branch that leads outside through a hole |
| 25 | Follow where the branch leads, head east, then jump on another extended branch to your right Avoid rolling while on the swamp as it will build up the Scarlet Rot even faster and linger even after moving to a safe spot. You can use either Quickstep or Bloodhound's Step weapon skills to maneuver across Scarlet Rot swamps. |
| 26 | Run along the branch, jump down on another near the end, and enter the building east |
| 27 | Climb down the ladder and activate the Site of Grace along the drainage |
| 28 | Go out of the drainage and run along the branch to your left |
| 29 | Right after you get past the branch that extends upward, look down on your right and jump on another branch |
| 30 | Jump down the branch that leads north then hop on the beam before it curves downward |
| 31 | Follow the path north until you reach a roof with a hole |
| 32 | Look down through the hole, drop on the joist below, and jump onto the platform on your left, where the enemies are |
| 33 | Drop down the area below and run west to reach a lift |
| 34 | Descend with the lift and activate the Site of Grace ahead |
| 35 | Pass through the mist at the far end of the hallway and defeat Malenia, Blade of Miquella ▶ How to Beat Malenia, Blade of Miquella |
Miquella's Haligtree Legacy Dungeon Walkthrough and Location
Mohgwyn Dynasty Mausoleum Objectives
Mohgwyn Dynasty Mausoleum is an optional Legacy Dungeon where you can find one of the Shardbearers and his Great Rune.
| 1 | From the Consecrated Snowfield Site of Grace, travel north to the Site of Grace of Inner Consecrated Snowfield |
|---|---|
| 2 | From there, travel to the western edge of the region until you reach an area with large rock spikes |
| 3 | Find the portal in the area to travel straight to Mohgwyn Palace |
| 4 | Head south until you reach the tunnel exit then west until you find a Site of Grace |
| 5 | Travel northwest to Mohgwyn Dynasty Mausoleum It's best to just run towards your destination as there are a lot of enemies along the way that can easily overwhelm you. |
| 6 | Follow the path south until you reach a bunch of praying enemies (past the giant lump of flesh), and enter the mausoleum |
| 7 | Turn right on the next two forks and get back outside where you can find another Site of Grace Take out your Lantern as you won't find any source of light inside other than signs written by other players |
| 8 | Go up the stairs and ride the lift on your right |
| 9 | Set foot on the temple and defeat Mohg, Lord of Blood ▶ How to Beat Mohg, Lord of Blood |
Mohgwyn Dynasty Mausoleum Legacy Dungeon Walkthrough and Location
Tips for Story Progression
Take your time to explore each area

If you waltz through each area without exploring them thoroughly, you might end up dying a lot due to being underleveled. The story walkthrough above only lists the main objectives to progress the main story. Defeat enemies you run into, explore dungeons, and defeat bosses to obtain more powerful items and Runes to strengthen your character.
Activate every Lost Grace

Activate every Lost Grace that you can find during your travels to unlock more Sites of Grace. These sites function as save points, resting spots, fast travel points, and more!
Follow the Guidance of Grace
Some of the Sites of Grace that you find will create a golden trail on your map that will guide you to your next objective. Open your map if you get lost and follow the Guidance of Grace and see where it leads you to!
Sites of Grace: How to Save the Game
Use as many Runes as you can

You will drop all your Runes upon death and will be completely lost if you fall again before retrieving them. Even if you manage to return to where you dropped them, you will only be able to recover a portion of your Runes. Try not to keep a lot of Runes while exploring and use them as much as you can on levelling up your character to avoid putting them to waste.
Elden Ring Related Guides

 DLC
DLC Story Walkthrough
 Maps and Locations
 NPCs
NPCs Tips and Tricks
 Talismans
 Spirit Ashes
 Bell Bearings
 Great Runes
 Whetblades
 Items
Items Endings
 Bosses
 Weapons
 Magic Spells
 Armor
Armor Builds
 Starting Classes
 Ashes of War
 Divine Towers
 Smithing Stones
 Scrolls
 News and Game Info
 Patch Notes
 Message Boards
 Dungeons
Recommended Guides
Author

Complete Walkthrough and Progression Guide
Rankings
- We could not find the message board you were looking for.
Gaming News


![Monster Hunter Stories 3 Review [First Impressions] | Simply Rejuvenating](https://img.game8.co/4438641/2a31b7702bd70e78ec8efd24661dacda.jpeg/thumb)
Popular Games

Genshin Impact Walkthrough & Guides Wiki
Honkai: Star Rail Walkthrough & Guides Wiki
Umamusume: Pretty Derby Walkthrough & Guides Wiki
Pokemon Pokopia Walkthrough & Guides Wiki
Resident Evil Requiem (RE9) Walkthrough & Guides Wiki
Monster Hunter Wilds Walkthrough & Guides Wiki
Wuthering Waves Walkthrough & Guides Wiki
Arknights: Endfield Walkthrough & Guides Wiki
Pokemon FireRed and LeafGreen (FRLG) Walkthrough & Guides Wiki
Pokemon TCG Pocket (PTCGP) Strategies & Guides Wiki


Recommended Games
Diablo 4: Vessel of Hatred Walkthrough & Guides Wiki
Cyberpunk 2077: Ultimate Edition Walkthrough & Guides Wiki
Fire Emblem Heroes (FEH) Walkthrough & Guides Wiki
Yu-Gi-Oh! Master Duel Walkthrough & Guides Wiki
Super Smash Bros. Ultimate Walkthrough & Guides Wiki
Pokemon Brilliant Diamond and Shining Pearl (BDSP) Walkthrough & Guides Wiki
Elden Ring Shadow of the Erdtree Walkthrough & Guides Wiki
Monster Hunter World Walkthrough & Guides Wiki
The Legend of Zelda: Tears of the Kingdom Walkthrough & Guides Wiki
Persona 3 Reload Walkthrough & Guides Wiki


All rights reserved
ELDEN RING™ & ©BANDAI NAMCO Entertainment Inc. / ©2021 FromSoftware, Inc.
The copyrights of videos of games used in our content and other intellectual property rights belong to the provider of the game.
The contents we provide on this site were created personally by members of the Game8 editorial department.
We refuse the right to reuse or repost content taken without our permission such as data or images to other sites.