How to Beat Bloodhound Knight Darriwil: Boss Fight Guide

This is a guide on how to beat Bloodhound Knight Darriwil, an optional boss in Elden Ring. Read on to learn more about Bloodhound Knight Darriwil's strengths, weaknesses, attack patterns, and lore!
List of Contents
Bloodhound Knight Darriwil General Info
Stats and Rewards
| Bloodhound Knight Darriwil | ||
|---|---|---|

|
||
| Weakness | Resistance | Immune |
|
Lightning |
Bleed Frost Scarlet Rot Poison |
Madness |
| Affected By | Sleep | |
| Spirit Ashes Available? | No | |
| Rune Rewards |
1400 (NG) |
|
| Summonable NPCs |
・Blaidd the Half-Wolf |
|
| Location | ||
| Item Drops |
・Bloodhound's Fang
|
|
Bloodhound Knight Darriwil Location
Where to Find
| Map Location | |
|---|---|
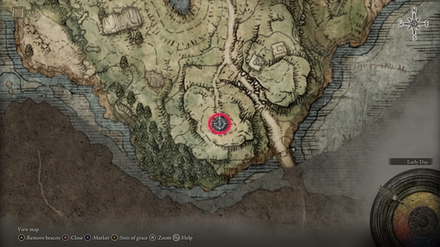 View Full Image |
|
| Recommended Level | Lv.15 |
Bloodhound Knight Darriwil is located at the Forlon Hound Evergaol in Stormhill. Look for a blue platform at the end of the road, south of the Site of Grace. Interacting with it will lead you to where Bloodhound Knight Darriwil is.
How to Beat Bloodhound Knight Darriwil
| Tips for Beating Bloodhound Knight Darriwil |
|---|
| How to Beat Strategies | ||
|---|---|---|
| Ranged Build Strategy | Melee Build Strategy | |
Click a link above to take you to that section.
Ranged Build Strategy
| Bloodhound Knight Darriwil Boss Tips |
|---|
Keep your distance
Always make sure to maintain a safe distance away from Darriwil as much as possible for this fight. Try to walk or run away whenever you're not attacking or using items to make sure you have enough distance to safely cast your spells against him.
Never attempt to attack him with your spells if he's close, as there's a big chance he'll get to you faster than you can cast your spell.
Equip a shield off-hand
Having a shield equipped on your off-hand will be helpful whenever you try to walk or run away from his attacks. As long as you have it up, you'll lessen the chance of you getting hit while also having a better time keeping your distance.
Try not to be over-reliant with your shield, as you can have your guard broken if he chains his attacks. Try to balance out defending and dodging attacks whenever you can.
Avoid using slow moving spells
Try to avoid using spells with slow projectile speed when you fight against Darriwil since he will be able to dodge the projectile with ease using his speed. Instead, try casting spells that have a fast projectile speed or one with a large hitbox. This will lessen the chance of him evading your attacks.
One example of such spell you can use in this fight is the Beast Claw, which lets you hit anything in front of you for a decent amount of damage. You can also use Glintstone Arc as the projectile is fast and wide enough to hit Darriwil.
Melee Build Strategy
| Bloodhound Knight Darriwil Boss Tips |
|---|
Get used to the delay timing
Darriwil will often delay some of its attacks to bait you into dodging really early. You will have to fight him repeatedly to learn his attack patterns to get used to his delay timing.
This will take a bit of time to get used to, but once you get it all down, you'll be rewarded with an opportunity to strike him down on some of his attacks.
Attack after he jumps
Knowing Darriwil's attack patterns and getting used to dodging his attacks is critical because of how fast his movements are. Although it could be hard to find an opportunity to strike, as a rule of thumb, attack right after he performs an overhead slash or jumps into the air. If you manage to dodge these, you will be able to land a few blows on him before he recovers.
Always keep moving
Always try to rely on your movement when fighting against Darriwil. Strafing around the boss will often make him miss some of his attacks, such as the overhead strike, which usually just hits in front of him. Equipping a shield is a good idea, as this will help mitigate any damage you receive while you're moving.
Try to experiment with which direction will cause his attack to miss, and you might be able to use this as a chance to strike.
Use weapon skills
The Reduvia Dagger’s weapon skill, Reduvia Blood Blade can be used repeatedly and shoots fast projectiles which can take a huge chunk of health away from Darriwil as well as cause Hemorrhage damage.
If you want a riskier play, the slow yet hard-hitting skill Carian Glintsword is perfect for inflicting a massive amount of damage against him.
Bloodhound Knight Darriwil Attack Patterns
3-Hit Sword Slash
A 3 hit attack with the final slash being an overhead. The boss can delay its attacks or cancel them depending on the situation. Dodge backward and create some distance away from the boss to avoid getting hit by all 3 hits.
If you're confident enough, try to evade all 3 attacks by dodging towards the boss. If you manage to dodge the final attack properly, you will gain an opportunity to hit him once. Afterward, he will usually follow this attack shortly with a ground slam.
Ground Slam
An attack where the boss will jump high up in the air before dropping back down, slamming the sword on impact, and damaging anyone nearby.
Run or dodge backward as far as possible from the boss to avoid taking damage, or you can dodge towards the boss if you can time it as soon as he reaches the ground.
Forward Slash
An attack where Darriwil will move towards you to try and slash you with his sword. Dodge backward or towards either side of him to avoid the attack.
Feel free to attack after dodging it, as there is a slight delay before he can attack again.
Backward Slash
A two-hit attack where the boss will backflip away from you after the final slash. Avoid both attacks by dodging backward.
You can use this time to heal up or recover your Stamina as there will be a considerable distance between you and him after the final slash.
Overhead Slash

A slow-moving attack where Darriwil will try to hit you with an overhead slash. There will be a wind-up before the attack, which you can use to strafe to his side or run as far away as possible from the boss. You may also try to dodge towards his side to avoid the attack.
If you can get the timing down, you can attempt to parry this attack for a riposte.
Homing Overhead Slash
A variation of the overhead slash, where Darriwil will follow you before he attacks. Dodge back or towards his side just before the overhead slash to avoid the attack.
You can also attempt to parry it for a riposte as it is a slow enough move to react to.
Uppercut Attack
An uppercut slash followed shortly by an overhead slash. Dodge backward to avoid the initial attack, then dodge towards the boss to avoid the overhead slash. You'll be able to land a hit afterward.
Charging Uppercut Attack
A variation of the Uppercut Attack where Darriwil will charge at you first before doing the uppercut as it reaches you. It is shorty followed by an overhead slash while he's still in mid-air.
Dodge backward to avoid the initial attack, then dodge behind the boss to avoid the overhead slash. There's a delay before he can move again after the attack, which you can use as an opportunity to deal damage.
Fading Dash
One of Darriwil's movement options, where he will dash towards you. He disappears during the dash for a split second before appearing near you.
Keep a safe distance and be prepared as the boss will immediately follow it up with another attack after the dash.
Short Hop
A short hop that Darriwil uses to move around. This is usually accompanied by an attack and can be dangerous as it can make your attack whiff, leaving you open for attacks.
Elden Ring Related Guides
DLC Bosses
Main Bosses
Optional Bosses
Mini-Bosses
| All Bosses in Elden Ring | |
|---|---|
| Elder Dragon Greyoll | Lion Guardian |
| Valiant Gargoyle (Leyndell) | - |
Hostile NPCs and Invaders
| Limgrave Invaders and Hostile NPCs | |
|---|---|
| Bloody Finger Nerijus | Old Knight Istvan |
| Recusant Henricus | - |
| Liurnia of the Lakes Invaders and Hostile NPCs | |
| Great Horned Tragoth | Festering Fingerprint Vyke |
| Altus Plateau Invaders and Hostile NPCs | |
| Eleonora, Violet Bloody Finger | Inquisitor Ghiza |
| Maleigh Marais, Shaded Castle Castellan | Rileigh the Idle |
| Vargram the Raging Wolf & Errant Sorcerer Wilhelm | Magnus the Beast Claw |
| Mountaintops of the Giants Invaders and Hostile NPCs | |
| Juno Hoslow, Knight of Blood | - |
| The Roundtable Hold Invaders and Hostile NPCs | |
| Mad Tongue Alberich | - |
| Multiple Location Invaders and Hostile NPCs | |
| Anastasia, Tarnished-Eater | - |
Author

How to Beat Bloodhound Knight Darriwil: Boss Fight Guide
Rankings
- We could not find the message board you were looking for.
Gaming News
![Animal Crossing: New Horizons Review [Switch 2] | Needlessly Crossing Over to a New Generation](https://img.game8.co/4391759/47d0408b0b8a892e453a0b90f54beb8a.png/show)


Popular Games

Genshin Impact Walkthrough & Guides Wiki
Honkai: Star Rail Walkthrough & Guides Wiki
Arknights: Endfield Walkthrough & Guides Wiki
Umamusume: Pretty Derby Walkthrough & Guides Wiki
Wuthering Waves Walkthrough & Guides Wiki
Pokemon TCG Pocket (PTCGP) Strategies & Guides Wiki
Abyss Walkthrough & Guides Wiki
Zenless Zone Zero Walkthrough & Guides Wiki
Digimon Story: Time Stranger Walkthrough & Guides Wiki
Clair Obscur: Expedition 33 Walkthrough & Guides Wiki


Recommended Games
Fire Emblem Heroes (FEH) Walkthrough & Guides Wiki
Pokemon Brilliant Diamond and Shining Pearl (BDSP) Walkthrough & Guides Wiki
Diablo 4: Vessel of Hatred Walkthrough & Guides Wiki
Super Smash Bros. Ultimate Walkthrough & Guides Wiki
Yu-Gi-Oh! Master Duel Walkthrough & Guides Wiki
Elden Ring Shadow of the Erdtree Walkthrough & Guides Wiki
Monster Hunter World Walkthrough & Guides Wiki
The Legend of Zelda: Tears of the Kingdom Walkthrough & Guides Wiki
Persona 3 Reload Walkthrough & Guides Wiki
Cyberpunk 2077: Ultimate Edition Walkthrough & Guides Wiki


All rights reserved
ELDEN RING™ & ©BANDAI NAMCO Entertainment Inc. / ©2021 FromSoftware, Inc.
The copyrights of videos of games used in our content and other intellectual property rights belong to the provider of the game.
The contents we provide on this site were created personally by members of the Game8 editorial department.
We refuse the right to reuse or repost content taken without our permission such as data or images to other sites.