How to Beat Rennala, Queen of the Full Moon: Boss Fight Guide
This is a guide on how to beat Rennala, Queen of the Full Moon, a boss in Elden Ring. Read on to learn more about Rennala Queen of the Full Moon's strengths, weaknesses, attack patterns, and lore!
List of Contents
Rennala Queen of the Full Moon General Info
Stats and Rewards
| Rennala, Queen of the Full Moon | ||
|---|---|---|
|
||
| Weakness | Resistance | Immune |
|
Standard Strike Pierce |
Magic Fire Holy Lightning |
━ |
| Affected By | Bleed, Frostbite, Poison, Scarlet Rot | |
| Spirit Ashes Available? | Yes | |
| Rune Rewards |
40000 (NG) |
|
| Summonable NPCs |
None
|
|
| Location | ||
| Item Drops |
・Great Rune of the Unborn
・Remembrance of the Full Moon Queen |
|
Rennala, Queen of the Full Moon Location
Where to Find
| Map Location | |
|---|---|
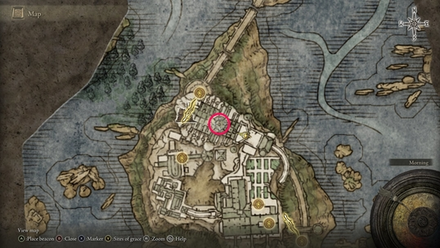 View Full Image |
|
| Recommended Level | Lv.40 |
Rennala, Queen of the Full Moon can be found at the Academy of Raya Lucaria. The nearest Site of Grace is the Debate Parlor. You're required to defeat her in order to advance in the area.
How to Beat Rennala, Queen of the Full Moon
Video Walkthrough
| Tips for Beating Rennala, Queen of the Full Moon |
|---|
| How to Beat Strategies | ||
|---|---|---|
| Ranged Strategy | Melee Strategy | |
Click a link above to take you to that section.
Ranged Strategy
| Rennala, Queen of the Full Moon Boss Tips |
|---|
Summon Lone Wolf Ashes
Since a lot of Rennala's spells are ranged, it can be difficult to find the opportunity to attack her from afar. Summoning Lone Wolf Ashes provides a distraction so that you can damage her safely without worrying about any pesky spells.
Don't use spellcasting against Rennala
Since Rennala's a powerful magic user, she'll take very little damage against your spells. It's better to just use a melee weapon or a bow in this fight. You can, however, use magic on her summons.
Melee Strategy
| Rennala, Queen of the Full Moon Boss Tips |
|---|
Run straight at Rennala when Phase 2 starts
At the start of Phase 2, Rennala will always cast a Magic Beam at you. You can immediately run directly at her when this phase starts to avoid the beam and attack her a couple of times.
Bait out ranged spells
It can be difficult to fight Rennala head-on due to the multitude of spells she can cast. Try to bait out spells such as Magic Shards or Orbs of Light since these can be easily avoided. Run diagonally as she's casting them so that you can reach and attack her.
Try to get behind her or to her side
Rennala has a few spells such as the Spinning Staff Shield to punish you if you're always attacking her front. Be agile and attack her from a different direction to avoid these so you can stagger her freely.
Be aggressive and stunlock her
It's important to end the fight before she can start summoning too many enemies. Stay on the offensive and attack her as much as possible so that she's unable to cast spells.
Heavy and jumping attacks are especially effective since these can quickly break her stance.
Rennala, Queen of the Full Moon Attack Patterns
First Phase
Rennala's boss fight has two phases. The first phase is fairly simple. She'll be invulnerable while floating in the air. You'll have to hit a follower of hers that is emitting a golden aura. The aura will then transfer to another follower. You'll hit a total of three followers, which will then cause Rennala to fall to the ground, allowing you to attack her freely.
Depending on your damage, you may have to do this one or two more times since she'll start to float again after a while.
First Phase Magic Attacks
| First Phase Magic Attack Variations |
|---|
 AoE Blast: Once brought down, you'll have a limited amount of time to hit Rennala before she starts casting a yellow orb in her hands. This should be your signal to back away since this will cast an AoE blast of light that heavily damages. |
 Meteors: While you're hunting down her followers, Rennala will sometimes launch debris at you. While you can dodge away from them, it's safer to use structures in the area for cover. |
Second Phase
Rennala's second phase transports you to a new area. This phase is much tougher since she'll have a variety of spells to cast at you, all of which can deal significant damage.
Second Phase Magic Attacks
| Second Phase Magic Attack Variations |
|---|
 Magic Shards: Rennala casts multiple dark blue shards in front of her that are then fired at you. While these shards are quick, you can avoid them by running sideways as she starts casting this spell. |
 Orbs of Light: When Rennala briefly floats away from you, she'll start casting small orbs of light. These are similar to Magic Shards but are lighter in color and slower. You can utilize the same process of evading them by running sideways. |
 Magic Beam: Rennala casts a giant beam that will heavily damage you if you're hit. This has an unlimited distance so the only way to avoid it is to dodge to the side at the right moment. A good timing for dodging is when the spellcasting animation gets smaller. |
 Magic Missile: Rennala fires a direct missile at you. This is usually cast right after either Magic Shards or Orbs of Light. This should be easy to telegraph and dodge since she raises her arm right before casting it. |
 Moon: Rennala creates a moon that slowly approaches you. This is generally cast when you're keeping your distance from her. You can just run to the side to avoid this. |
 Summoning Enemies: Once you nearly halve Rennala's health bar, she'll start summoning various enemies to attack you. These include wolves, a dragon, a bloodhound knight, and a troll. These enemies will be an extreme nuisance so try to save Spirit Ashes such as Lone Wolves for this point in the fight to give yourself extra protection. |
Staff Attacks
| Staff Attack Variations |
|---|
 Spinning Staff Shield: When fighting Rennala up close, she'll sometimes spin her staff at the area directly in front of her, damaging you if you're caught in it. This can be difficult to anticipate so make sure you're constantly moving during the fight. |
 Boomerang Staff Attack: Rennala will throw her staff in a twirling motion until it returns to her. While seemingly complex, you'll be able to avoid this by just dodging backward. Dodging to the side can be tricky since the staff will go behind Rennala's back before returning, so you can still get hit. |
Elden Ring Related Guides
DLC Bosses
Main Bosses
Optional Bosses
Mini-Bosses
| All Bosses in Elden Ring | |
|---|---|
| Elder Dragon Greyoll | Lion Guardian |
| Valiant Gargoyle (Leyndell) | - |
Hostile NPCs and Invaders
| Limgrave Invaders and Hostile NPCs | |
|---|---|
| Bloody Finger Nerijus | Old Knight Istvan |
| Recusant Henricus | - |
| Liurnia of the Lakes Invaders and Hostile NPCs | |
| Great Horned Tragoth | Festering Fingerprint Vyke |
| Altus Plateau Invaders and Hostile NPCs | |
| Eleonora, Violet Bloody Finger | Inquisitor Ghiza |
| Maleigh Marais, Shaded Castle Castellan | Rileigh the Idle |
| Vargram the Raging Wolf & Errant Sorcerer Wilhelm | Magnus the Beast Claw |
| Mountaintops of the Giants Invaders and Hostile NPCs | |
| Juno Hoslow, Knight of Blood | - |
| The Roundtable Hold Invaders and Hostile NPCs | |
| Mad Tongue Alberich | - |
| Multiple Location Invaders and Hostile NPCs | |
| Anastasia, Tarnished-Eater | - |
Author

How to Beat Rennala, Queen of the Full Moon: Boss Fight Guide
Rankings
- We could not find the message board you were looking for.
Gaming News

![Monster Hunter Stories 3 Review [First Impressions] | Simply Rejuvenating](https://img.game8.co/4438641/2a31b7702bd70e78ec8efd24661dacda.jpeg/show)


![Monster Hunter Stories 3 Review [First Impressions] | Simply Rejuvenating](https://img.game8.co/4438641/2a31b7702bd70e78ec8efd24661dacda.jpeg/thumb)
Popular Games

Genshin Impact Walkthrough & Guides Wiki
Honkai: Star Rail Walkthrough & Guides Wiki
Umamusume: Pretty Derby Walkthrough & Guides Wiki
Pokemon Pokopia Walkthrough & Guides Wiki
Resident Evil Requiem (RE9) Walkthrough & Guides Wiki
Monster Hunter Wilds Walkthrough & Guides Wiki
Wuthering Waves Walkthrough & Guides Wiki
Arknights: Endfield Walkthrough & Guides Wiki
Pokemon FireRed and LeafGreen (FRLG) Walkthrough & Guides Wiki
Pokemon TCG Pocket (PTCGP) Strategies & Guides Wiki


Recommended Games
Diablo 4: Vessel of Hatred Walkthrough & Guides Wiki
Cyberpunk 2077: Ultimate Edition Walkthrough & Guides Wiki
Fire Emblem Heroes (FEH) Walkthrough & Guides Wiki
Yu-Gi-Oh! Master Duel Walkthrough & Guides Wiki
Super Smash Bros. Ultimate Walkthrough & Guides Wiki
Pokemon Brilliant Diamond and Shining Pearl (BDSP) Walkthrough & Guides Wiki
Elden Ring Shadow of the Erdtree Walkthrough & Guides Wiki
Monster Hunter World Walkthrough & Guides Wiki
The Legend of Zelda: Tears of the Kingdom Walkthrough & Guides Wiki
Persona 3 Reload Walkthrough & Guides Wiki


All rights reserved
ELDEN RING™ & ©BANDAI NAMCO Entertainment Inc. / ©2021 FromSoftware, Inc.
The copyrights of videos of games used in our content and other intellectual property rights belong to the provider of the game.
The contents we provide on this site were created personally by members of the Game8 editorial department.
We refuse the right to reuse or repost content taken without our permission such as data or images to other sites.