Dreamless Hologram Tactical Challenge Guide
★ Version 3.2 out now!
┣ Sigrika → Builds, Materials, Weapon
┣ Qiuyuan → Builds, Materials, Weapon
┗ Phase 2 → Lynae, Zani, Phoebe
★ Upcoming Characters: Hiyuki, Denia
★ Exclusives: Tier Maker | State of the Meta
This is a guide to the Dreamless Tactical Hologram Challenge in Wuthering Waves (WuWa). See how to beat all six stages, best team comps, location, Dreamless's stage effects, and rewards here!
| Dreamless Related Guides | ||
|---|---|---|
| Location and Rewards | Echo Skill and Info | Tactical Hologram |
How to Beat Dreamless Hologram
The Tactical Hologram Challenge for Dreamless, especially Stage 6, can be classified into three phases depending on whether the boss was staggered or not.
- Phase 1 (Standard Dreamless)
- Looming Turmoil State
- Twilight Eve
- Phase 2 (Faster Dreamless)
- Phase 3 (Enraged Dreamless)
There are also a few key mechanics to watch out for when fighting Dreamless. First, she has multiple weapons in her arsenal that she can use to modify her combos. Second, you can deflect her summoned Halberds back towards her to reduce her HP and Vibration Strength. And third, her attacks evolve as the fight goes on.
Make sure to also bring a dedicated healer and use Tune Break to interrupt its attacks and avoid being downed by Dreamless.
Understand Dreamless' Weapon Arsenal
| Weapon | Description and How to Combat |
|---|---|
| Halberd | Dreamless summons a Halberd and shoots projectile in a straight line. Deflect the attack once you see the black and white flash. |
| Sword | Dreamless summons a sword and then attacks in rapid succession. Dodge all the swings as these are rarely parry opportunities. |
| Scythe | Dreamless summons a scythe and swings it around to deal large AoE attacks. The attacks are often telegraphed with long windup animations and can often be parried. |
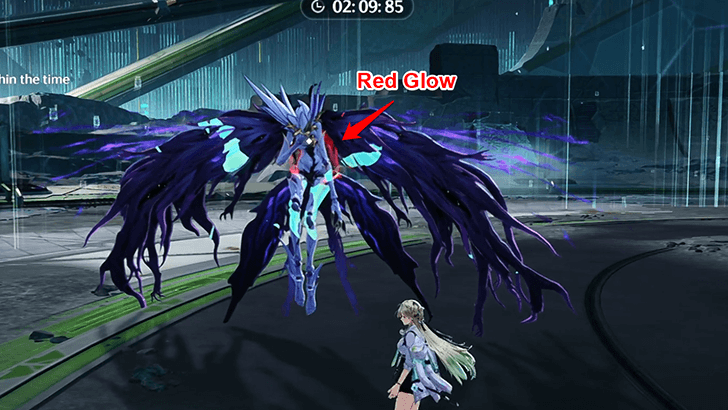
| Wings | Dreamless flails its wings and body to swing herself around to perform spinning attacks. Dodge once you see the wings glow red at the tips. |
| Explosions | Dreamless generates explosions to deal AoE attacks. Dodge once you see the black and white flash. |
| Vectors of Ruin | Dreamless summons Vectors of Ruin during the Looming Turmoil state to fire multiple small projectiles in succession. Dodge and strafe alongside the edges of the arena. |
Dreamless has a multitude of weapons that she utilizes to fight you in combat. First, she has a longsword that she places on her left hand to slice you in quick succession. Then, she has a scythe in her right hand that has longer windup animations, but has larger AoE attacks.
She also has her Halberds of Destruction that she can summon to hurl at you, and her Wings are used in spinning moves that slam on the ground. Lastly, she manipulates the arena, letting her cause explosions and her Vectors of Ruins are projectiles she summons during the Looming Turmoil state.
Each weapon has different utilities to her and have distinct indicators for you to use against Dreamless.
Deflect Halberds Back to Dreamless
The next special mechanic with Dreamless is her Halberd summons. These Halberds of Destruction appear from void rifts and rapidly hurl themselves at you. They can be deflected and are great for interrupting Dreamless while also reducing her HP and Vibration Strength.
Short flashes of light surrounding the Halberds appear to indicate when they'll come at you. Anticipate for a black and white flash then attack to parry and deflect the projectile.
How to Parry and Counterattack
Dreamless' Attacks Evolve
| First Stage | Evolved Stage |
|---|---|
The attacks of Tactical Hologram: Dreamless evolve as the fight continues on, and she adds additional moves to her attack patterns. This occurs regardless of the current phase the challenge is in.
▼ Dreamless Attack Patterns and Sequences ▼
Looming Turmoil State After First Stagger
Once Dreamless' Vibration Strength is depleted for the first time in battle, she enters the Looming Turmoil state and summons multiple Halberds and Vectors of Ruin at you. These attacks can be deflected back at Dreamless to prevent it from summoning Twilight Eve.
This also initiates Phase Two, where Dreamless' attacks become fiercer and harder to deal with.
▼ Dreamless Phase 2 Attacks and Moves ▼
Twilight Eve Mechanic
If Dreamless is in the Looming Turmoil state, she builds up energy to summon Twilight Eve. This mechanic begins with a large black hole on the ground followed by large purple spheres behind Dreamless. These purple spheres continuously release Vectors of Ruin projectiles.
Dreamless Burns Red After Second Stagger
Dreamless glows red after her Vibration Strength is depleted a second time, or if her HP is reduced to around 30%. This indicates Phase 3 has started, with new attack patterns and moves as the boss is enraged.
▼ Dreamless Phase 3 Attacks and Moves ▼
Big Gravity Pull and Explosion in Phase 3
In the third Phase, Dreamless also blinks to the center of the arena and pulls everything towards her. Afterwards, an explosion covering the entire arena happens.
Phase 1 Attacks and Moves
Dreamless follows multiple attack patterns that change as the fight progresses. These attacks evolve into extended versions and can chain together. The sequences also appear across all phases, so you can expect Dreamless to use them in both Phase 2 and Phase 3.
Gravity Pull
| Gravity Pull Attack Information |
|---|
| Gravity Pull: Dreamless pulls you towards it before summoning a halberd from the sky. The halberd quickly descends into the ground, causing the entire area around you to burst. Dodge once the halberd appears and a faint circle flashes from it. Take note that this attack changes throughout the fight, as Dreamless summons more and more Halberds during the attack. |
Spin Throw
| Spin Throw Attack Information |
|---|
| Spin Throw: Dreamless spins vertically at you before going up in the sky and throwing a halberd at you. Once the light and dark particles disappear, dodge or parry the halberd. |
Vertical Wing Slashes
| Vertical Wing Slashes Attack Information |
|---|
| Vertical Wing Slashes: Dreamless goes up in the air before spinning around using its wings to deal AoE attacks around you. Dodge once towards Dreamless as the tips of the wings glow red. |
Aerial Slashes
| Aerial Slashes Attack Information |
|---|
| Aerial Slashes: Dreamless shoots two Scythe slashes at you followed by a heavy attack that you can parry. Dodge the aerial slashes by waiting for the white light to flash around Dreamless, then parry the final attack or dodge it. |
Sword-Halberd Combo
| Sword-Halberd Combo Attack Information |
|---|
| Sword-Halberd Combo: Dreamless summons her sword and immediately slashes at you with a dash attack that you can parry. Then, she summons her halberd and slashes upwards diagonally. |
Small Explosion
| Small Explosion Attack Information |
|---|
| Small Explosion: Dreamless gathers up energy before causing a small explosion around herself. Dodge as a star-shaped black light appears. |
Double Wing Slash
| Double Wing Slash Attack Information |
|---|
| Double Wing Slash: Dreamless shifts her body around to slash you with her wings twice. Dodge once the wings turn red. There is another variation to this move wherein she throws a Wing Projectile at you after the initial Wing Slash. |
Scythe Spin
| Scythe Spin Attack Information |
|---|
| Scythe Spin: Dreamless summons its scythe to throw at you in a circular manner. It will revolve around her once, where she then follows with an upwards slash. Dodge as the black light around Dreamless appears twice. |
Scythe Rotations
| Scythe Rotations Attack Information |
|---|
| Scythe Spins: Dreamless pulls her scythe back before spinning around you with the weapon. Then, she slashes upwards into the air followed by slicing heavily with the scythe twice. Dodge once Dreamless pulls back the scythe, dodge another time once her silhouette glows white as she goes up, and dodge once black light surrounds her body for the two succeeding scythe spins. |
Sword-Scythe Combo
| Sword-Scythe Combo Attack Information |
|---|
| Sword-Scythe Combo: Dreamless slashes four times with her sword before pulling back with her scythe and quickly spinning at you. Dodge or parry once she summons the scythe. |
Dual Wield Combo
| Dual Wield Combo Attack Information |
|---|
| Dual Wield Combo: Dreamless gathers energy around itself before exploding, which you can dodge as the white light appears. She then comes out with both the scythe and sword in her hands. Afterwards, she flies up into the air before coming back down to slash you with the scythe once, followed by two sword slashes. Then, she deals a charged Sword attack before going to the other side of the arena to generate a more powerful Sword slash and an explosion after. For the regular slashes, dodge as the swings make their halfway point. As for the black sword slash, anticipate the screen to flash white light, with the same going for the explosion that comes after. |
Double Explosion
| Small Explosion Attack Information |
|---|
| Double Explosion: Dreamless gathers up energy before causing a small explosion around herself. Dodge as a star-shaped black light appears. After a short while, another explosion appears that you can dodge in the same manner. |
Consecutive Sword Swings
| Consecutive Sword Swings Attack Information |
|---|
| Consecutive Sword Swings: Dreamless swings her swords around her before slashing at you four times. She then summons her scythe and slices in place before going up in the sky then doing two downward spin slashes. Afterwards, she summons her halberd and spins before throwing it at you. Dodge as each swing reaches its midway point for her sword and scythe moves, then dodge when her halberd generates a circular light. Lastly, deflect the halberd once no light particles are left. |
Sword Throw
| Sword Throw Attack Information |
|---|
| Sword Throw: A faint purple light surrounds Dreamless as she positions her left arm towards her right side. Then, she throws her sword at you before teleporting to the air and hurling the halberd towards you. |
Phase 2 Attacks and Moves
Spin Reset
| Spin Reset Attack Information |
|---|
| Spin Reset: Once Dreamless recovers from being immobilized, she immediately winds up her body before spinning around with her wings. Dodge as she positions her body to the left. |
Halberds of Destruction
| Halberds of Destruction Attack Information |
|---|
| Halberds of Destruction: Dreamless teleports above the arena and summons void rifts. Once a void rift flashes, it will generate a Halberd of Destruction spear that rapidly moves towards you. Deflect these spears to bring Dreamless' Vibration Strength down. |
Twilight Eve Pillar
| Twilight Eve Pillar Attack Information |
|---|
| Twilight Eve Pillar: Dreamless summons a large black hole on the ground where it'll build up energy. Afterwards, energy comes out of the ground in a pillar. Dodge once the inner ring reaches the outer ring. |
Vectors of Ruin
| Vectors of Ruin Attack Information |
|---|
| Vectors of Ruin: Dreamless generates large purple spheres behind her. The first two spheres generate Vector projectiles that can be deflected, while the succeeding spheres generate lasers that should be dodged. After the spheres, Dreamless does a large explosion attack that you must dodge. |
Two Halberd Throws
| Two Halberd Throws Attack Information |
|---|
| Two Halberd Throws: Dreamless backs up into the air before throwing two halberds at you in succession. Dodge each halberd as the light glows from the void rift. |
Six Halberd Throws
| Six Halberd Throws Attack Information |
|---|
| Six Halberd Throws: Dreamless summons six Void Rifts behind her before summoning projectiles that you can deflect. There will be two halberds released for three times. Alternatively, a variant of this move occurs wherein she teleports far away and generates projectiles in a random order. It is better to dodge during this sequence. |
Void Rift Eyes
| Void Rift Eyes Attack Information |
|---|
| Void Rift Eyes: Dreamless summons multiple Void Rifts behind her that connect to each other, making two eye shapes. After a few seconds, she'll summon all of her Halberds to attack you at once. Make sure to dodge this attack as white light flashes the screen. |
Phase 3 Attacks and Moves
Quick Explosion
| Quick Explosion Attack Information |
|---|
| Quick Explosion: Dreamless generates an explosion as she recovers from her second immobilization. This also chains into the Consecutive Sword Swings attack. |
Center Explosion
| Center Explosion Attack Information |
|---|
| Center Explosion: Dreamless teleports to the center of the map and pulls everyone in. Afterwards, she generates an explosion covering the entire arena. Dodge as the white light flashes from the orb above her. |
Have a Dedicated Healer and Use Items
As Stage 6 of Tactical Hologram: Dreamless features the boss at Lvl. 100, a majority of its attacks can deplete your health quickly or even one-shot you. As such, we suggest bringing a dedicated healer to the team. Some characters even have revives, like Shorekeeper and Verina at higher sequences.
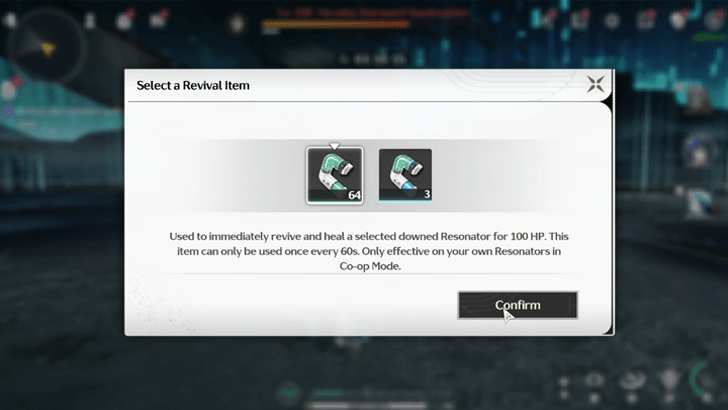
In Tactical Hologram: Synchronization, you're allowed to use revival items to keep the entire team in commission. Make sure to use them whenever possible, as these have cooldowns when you consume them.
Use Tune Break During Major Attacks
The Tune Break mechanic is highly useful in disrupting the flow of battle. Use it when Dreamless begins its attack animation to slow down the pace and stop its attack. Tune Breaks also reduce Vibration Strength, making it useful for downing Dreamless faster.
Best Team Comps
Tune Rupture Team
| Character / Role | Echo Set |
|---|---|
|
(Main DPS) |
|
|
(Sub-DPS) |
|
|
(Support) |
|
Aemeath's Tune Rupture team is one of the best comps to use against Dreamless due to her high damage output and consistent Tune Breaks that interrupt the boss effectively. That said, any general team with the Tune Break core of Lynae and Mornye works, as long as the DPS is non-Havoc.
Sun and Moon Team
| Character / Role | Echo Set |
|---|---|
|
(Main DPS) |
|
|
(Sub-DPS) |
|
|
(Support) |
|
The Sun and Moon team is one of the best team comps to use against Dreamless, as both Augusta and Iuno provide high DMG outputs on top of having great survivability and utility with their heals, shields, and time stop. Just make sure to deflect Dreamless' projectiles to have an easier time against the boss.
Aero Erosion Team
| Character / Role | Echo Set |
|---|---|
|
(Main DPS) |
|
|
(Sub-DPS) |
|
|
(Support) |
|
| Character | Explanation |
|---|---|
| | Support Replacement for Chisa Aero Rover is a great alternative to Chisa, as they provide the same benefit of increasing the max Aero Erosion stack limit. Rover can be a bit clunky to play against the boss, however, so keep that in mind when executing rotations. |
The Aero Erosion team with Cartethyia as the Main DPS is one of the best teams to use against the Dreamless Hologram, as her attacks have a lot of AoE that can parry Dreamless' projectiles.
Dreamless Hologram Location
Part of Tactical Hologram: Synchronization
Located in Startorch Academy
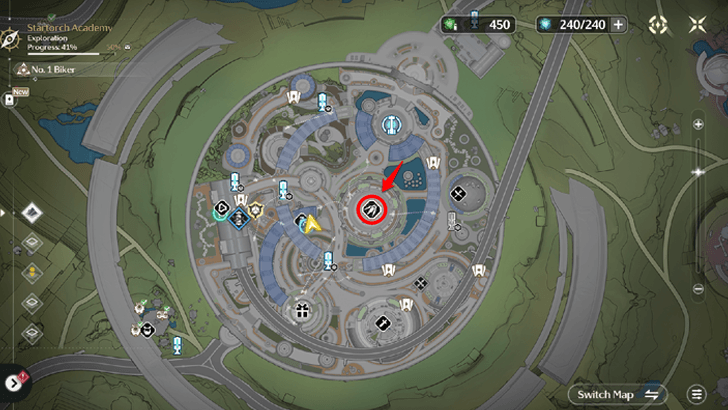
Dreamless is found in Startorch Academy as part of the Tactical Hologram: Synchronization set of challenges.
Startorch Academy Map and Exploration Guide
Dreamless Hologram Details and Mechanisms
| Stage 6 | |
|---|---|
|
Hologram Level: Lv. 100
Resistance: This enemy has a higher Havoc RES. Dreamless: Dreamless enters the Looming Turmoil state upon recovering from Immobilization for the first time. During this state, Dreamless sends out deflectable Halberd of Destruction and Vectors of Ruin cannot trigger Successful Dodges. Endless: Dreamless will unleash Twilight Eve after entering Looming Turmoil. Reduce Dreamless's Vibration Strength to below 50% to interrupt the channeling of Twilight Eve. Death's Dance: 3 minutes after the battle begins, Resonators' ATK is increased by 10% every 10s, up to 100%. The DMG taken by Resonators will also increase by 10% every 10s, with no stacking limit. All Resonators in the team lose 10% of their Max HP every 2s, until their HP reaches below 20%. |
Stage 5 |
|
Hologram Level: Lv. 90
Resistance: This enemy has a higher Havoc RES. Dreamless: Dreamless enters the Looming Turmoil state upon recovering from Immobilization for the first time. During this state, Dreamless sends out deflectable Halberd of Destruction and Vectors of Ruin cannot trigger Successful Dodges. Endless: Dreamless will unleash Twilight Eve after entering Looming Turmoil. Reduce Dreamless's Vibration Strength to below 50% to interrupt the channeling of Twilight Eve. Death's Dance: 3 minutes after the battle begins, Resonators' ATK is increased by 10% every 10s, up to 100%. The DMG taken by Resonators will also increase by 10% every 10s, with no stacking limit. All Resonators in the team lose 10% of their Max HP every 2s, until their HP reaches below 20%. |
Stage 4 |
|
Hologram Level: Lv. 80
Resistance: This enemy has a higher Havoc RES. Dreamless: Dreamless enters the Looming Turmoil state upon recovering from Immobilization for the first time. During this state, Dreamless sends out deflectable Halberd of Destruction and Vectors of Ruin cannot trigger Successful Dodges. Endless: Dreamless will unleash Twilight Eve after entering Looming Turmoil. Reduce Dreamless's Vibration Strength to below 50% to interrupt the channeling of Twilight Eve. |
Stage 3 |
|
Hologram Level: Lv. 70
Resistance: This enemy has a higher Havoc RES. Dreamless: Dreamless enters the Looming Turmoil state upon recovering from Immobilization for the first time. During this state, Dreamless sends out deflectable Halberd of Destruction and Vectors of Ruin cannot trigger Successful Dodges. Endless: Dreamless will unleash Twilight Eve after entering Looming Turmoil. Reduce Dreamless's Vibration Strength to below 50% to interrupt the channeling of Twilight Eve. |
Stage 2 |
|
Hologram Level: Lv. 65
Resistance: This enemy has a higher Havoc RES. Dreamless: Dreamless enters the Looming Turmoil state upon recovering from Immobilization for the first time. During this state, Dreamless sends out deflectable Halberd of Destruction and Vectors of Ruin cannot trigger Successful Dodges. Endless: Dreamless will unleash Twilight Eve after entering Looming Turmoil. Reduce Dreamless's Vibration Strength to below 50% to interrupt the channeling of Twilight Eve. |
Stage 1 |
|
Hologram Level: Lv. 60
Resistance: This enemy has a higher Havoc RES. Dreamless: Dreamless enters the Looming Turmoil state upon recovering from Immobilization for the first time. During this state, Dreamless sends out deflectable Halberd of Destruction and Vectors of Ruin cannot trigger Successful Dodges. Endless: Dreamless will unleash Twilight Eve after entering Looming Turmoil. Reduce Dreamless's Vibration Strength to below 50% to interrupt the channeling of Twilight Eve. |
Dreamless Hologram Rewards
List of Rewards
| Stage | Rewards |
|---|---|
| 1 |
|
| 2 |
|
| 3 |
|
| 4 |
|
| 5 |
|
| 6 |
|
Unlocked Trophies
| Trophy | Objective and Rewards |
|---|---|
 No Dreams, No Illusions No Dreams, No Illusions |
Complete Tactical Hologram: Synchronization - Dreamless I Rewards: |
 Dreamless, Flawless Dreamless, Flawless |
Complete Tactical Hologram: Synchronization - Dreamless VI Rewards: |
Complete both Stage 1 and Stage 6 of the Tactical Hologram: Dreamless Challenge to receive the trophies.
Wuthering Waves Related Guides

All Boss Guides
| All Boss Types | |
|---|---|
Tactical Hologram Guides
| Version 3.0+ (Synchronization) |
||
|---|---|---|
Comment
Author

Dreamless Hologram Tactical Challenge Guide
Premium Articles

Rankings

Gaming News


![Nova Roma Review [Early Access] | Newer, Better, and More Confusing](https://img.game8.co/4455512/2cbf8926e9a1c72a3ff056088f801ef4.png/thumb)
Popular Games

Genshin Impact Walkthrough & Guides Wiki
Umamusume: Pretty Derby Walkthrough & Guides Wiki
Crimson Desert Walkthrough & Guides Wiki
Monster Hunter Stories 3: Twisted Reflection Walkthrough & Guides Wiki
Honkai: Star Rail Walkthrough & Guides Wiki
Pokemon Pokopia Walkthrough & Guides Wiki
The Seven Deadly Sins: Origin Walkthrough & Guides Wiki
Wuthering Waves Walkthrough & Guides Wiki
Zenless Zone Zero Walkthrough & Guides Wiki
Arknights: Endfield Walkthrough & Guides Wiki


Recommended Games
Fire Emblem Heroes (FEH) Walkthrough & Guides Wiki
Diablo 4: Vessel of Hatred Walkthrough & Guides Wiki
Cyberpunk 2077: Ultimate Edition Walkthrough & Guides Wiki
Yu-Gi-Oh! Master Duel Walkthrough & Guides Wiki
Super Smash Bros. Ultimate Walkthrough & Guides Wiki
Pokemon Brilliant Diamond and Shining Pearl (BDSP) Walkthrough & Guides Wiki
Elden Ring Shadow of the Erdtree Walkthrough & Guides Wiki
Monster Hunter World Walkthrough & Guides Wiki
The Legend of Zelda: Tears of the Kingdom Walkthrough & Guides Wiki
Persona 3 Reload Walkthrough & Guides Wiki


All rights reserved
Copyright© 2024-2025 Kuro Games. All Rights Reserved.
The copyrights of videos of games used in our content and other intellectual property rights belong to the provider of the game.
The contents we provide on this site were created personally by members of the Game8 editorial department.
We refuse the right to reuse or repost content taken without our permission such as data or images to other sites.