Reactor Husk Hologram Tactical Challenge Guide
★ Version 3.2 out now!
┣ Sigrika → Builds, Materials, Weapon
┣ Qiuyuan → Builds, Materials, Weapon
┗ Phase 2 → Lynae, Zani, Phoebe
★ Upcoming Characters: Hiyuki, Denia
★ Exclusives: Tier Maker | State of the Meta
This is a guide to the Reactor Husk Tactical Hologram Challenge in Wuthering Waves (WuWa). See how to beat all six stages, best team comps, location, Reactor Husk's stage effects, and rewards here!
| Reactor Husk Related Guides | ||
|---|---|---|
| Location and Rewards | Echo Skill and Info | Tactical Hologram |
How to Beat Reactor Husk Hologram
The Tactical Hologram Challenge for Reactor Husk, especially Stage 6, can be classified into three phases depending on whether the boss was staggered or not.
- Phase 1 - Reduce Vibration Strength
- Hologram Spews Fire and Enters Huntfire State
- Phase 2 (Huntfire) - Break the Arm in the Dark
- Phase 3 - Defeat a Faster Reactor Husk
There are also a few key mechanics to watch out for when fighting Reactor Husk. First, its left arm has a separate HP bar you can deplete to stagger it immediately. Second, the boss has a one-hit knock-out grab attack that occurs in any phase. And third, its attacks generate wind slashes called Cinder Cuts that you can parry and deflect.
Make sure to also bring a dedicated healer and use Tune Break to interrupt its attacks and avoid being downed by Reactor Husk.
Break Reactor Husk's Left Arm
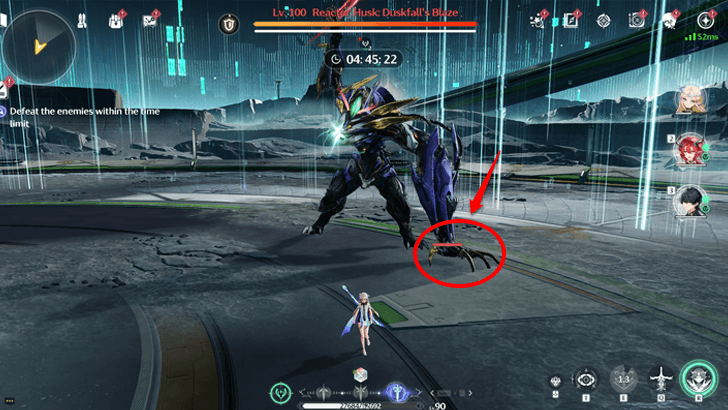
One of the main mechanics against the Reactor Husk Hologram is its left arm, as it affects the Phase and attack patterns of the boss. It has its own HP and can be affected by Tune Break and Negative Status effects. It can be revealed when Reactor Husk is parried. Once you destroy it, Reactor Husk becomes staggered.
Negative Statuses are highly effective against Reactor Husk, since they automatically expose the arm so it can be hit in Phase 1 and 3. In its Huntfire state or Phase 2, however, it cannot be affected by it.
Negative Status Effects Explained
Parry to Expose the Arm
In the 2nd Phase, Reactor Husk's arm is hidden and cannot be exposed via Negative Status Effects. To expose it, parry attacks and intercept its patterns.
Avoid Reactor Husk's Grab Attack
Reactor Husk has a special grab move that automatically one-shots your characters if you get caught by it. When the boss lunges at you, make sure to dodge or parry the attack.
Deflect Cinder Cut Slashes
The Reactor Husk Hologram's slashes occasionally create wind slashes called Cinder Cut. You can deflect these attacks by hitting the slash as it gets near your character, causing the boss to take damage instead.
How to Parry and Counterattack
Phase 1 Reactor Husk Attacks and Moves
There are multiple notable attack patterns in Phase 1 that Reactor Husk has when you're fighting it as a Tactical Hologram. These attacks can appear even in the succeeding phases.
Your main goal in this Phase is to break Reactor Husk's Vibration Strength, so it enters the Huntfire state.
▼ Reactor Husk Huntfire State ▼
Left Arm Slashes
| Left Arm Slashes Attack Information |
|---|
Left Arm Slashes: Reactor Husk swings its Left Arm Blade around itself in succession. Dodge two times as the blade is about to reach the midpoint of its swing, and be careful of the claw swipe after the second slash. Afterwards, it winds up slightly before making a big swiping slash. |
Blade Slam
| Blade Slam Attack Information |
|---|
Blade Slam: Reactor Husk curls up its body, as its left arm violently glows red. It then pulls its arm into the air before slamming it into the ground twice. Afterwards, it pulls its arm back and slashes around itself. Dodge three times as the blade is raised and slammed down, then parry the big slash when it pulls its arm back, indicated by a blue light. |
Charged Dash
| Charged Dash Attack Information |
|---|
Charged Dash: Reactor Husk violently glows red as it charges for an attack. Once it finishes charging, a blue light appears on its blade. Dodge just a second after this appears. |
Vertical Slash
| Vertical Slash Attack Information |
|---|
Vertical Slash : Reactor Husk slowly slashes its left arm blade upwards, causing a large vertical slash and becoming airborne. It then swings its blade downwards into the ground followed by a quick claw slash. |
Heart Pierce
| Heart Pierce Attack Information |
|---|
Heart Pierce : Reactor Husk pulls its blade from the left arm and stabs itself with it, producing fireballs on the ground. Stay slightly away from the boss and dodge the lasers. |
Ground Pound
| Ground Pound Attack Information |
|---|
| Ground Pound: Reactor Husk jumps back before leaping high up on the air and plunging down into the ground. After the ground pound, Reactor Husk bites twice. |
Tumble Roll
| Tumble Roll Attack Information |
|---|
| Tumble Roll: Reactor Husk jumps to the side and rolls on its back before using its blade on its right hand instead. Then, it jumps again towards you, rolling on the ground as it violently spins its blade. You must dodge five times to avoid taking damage. |
Blade Throw
| Blade Throw Attack Information |
|---|
| Blade Throw: An alternative attack pattern to the Tumble Roll. Reactor Husk jumps at you and throws its blade in a circular manner, followed by two quick slashes. Dodge three times during this sequence. |
Hot Lava Spit
| Hot Lava Spit Attack Information |
|---|
| Hot Lava Spit: Reactor Husk spits out hot lava from its mouth, imbuing its hands with it. If you're up close, dodge as it throws the lava with its right arm at you. After the lava throw, it slashes three times at you with wind slashes. You can deflect these attacks by hitting the slashes as they reach you. Once the slashes are done, it jumps up into the air before plunging into the ground. Deflect these attacks just before the boss touches the ground. Then, dodge twice as it slashes again and lava bursts from the ground. |
Hot Lava Throw
| Hot Lava Throw Attack Information |
|---|
| Hot Lava Throw: Reactor Husk spews lava from its mouth onto its blade as it quickly throws off the excess at you. Dodge this once. Reactor Husk jumps at you after where it swings its blade three times before jumping into the air and plunging down. Dodge the blade swings thrice, then dodge the plunging attack and the lava burst on the ground once the light flashes blue and white. |
Reactor Husk Enters the Huntfire State
Once Reactor Husk is staggered for the first time with its Vibration Strength broken, it jumps to the center of the field and summons lava from its neck. Get up close and spam dodge counters to reduce its arm's health bar.
It will enter the Huntfire state after spewing lava, bringing your characters and the entire field into darkness.
Huntfire State Attacks and Moves
In the Second Phase, the arena becomes a lot dimmer as Reactor Husk uses the lack of vision to its advantage. It will also have new attack patterns not available in the first phase. To end Phase 2, you must destroy its left arm by depleting its separate health bar. Negative Statuses will not expose the arm in Phase 2.
Do note that the attack patterns in Phase 1 are still available in Phase 2, the Huntfire State.
Fiery Leap
| Fiery Leap Attack Information |
|---|
| Fiery Leap: Reactor Husk blends into the shadows before jumping high up in the air from far away and then plunging down at you. It then attacks on the ground twice with its claws. Dodge three times for the whole sequence. This is similar to the Ground Pound move in Phase 1. |
Heavy Swings
| Heavy Swings Attack Information |
|---|
Heavy Swings: Reactor Husk swipes three times with its claws, with the third one having a longer windup. Dodge the first two, then parry the third attack to expose the arm's HP bar. |
Charged Swing
| Charged Swing Attack Information |
|---|
| Charged Swing: Reactor Husk charges at you before swinging its claws twice and tumbling on the ground. Afterwards, it will raise its left arm up before swinging it down quickly to the ground. You can parry the first attack to stop the sequence and expose the arm. Alternatively, just dodge three times as the arm will be exposed at the end of the attack pattern. |
Erratic Roar
| Erratic Roar Attack Information |
|---|
| Erratic Roar: Reactor Husk begins this sequence by roaring loudly before swinging its arms quickly at you. You can parry some of these attacks. |
Fury Swipes
| Fury Swipes Attack Information |
|---|
| Fury Swipes: Reactor Husk starts its attack with a swing, followed by a continuous chain of claw swipes. It's better to step away from Reactor Husk when it begins this attack, although you can parry its attacks consecutively. Once its attack sequence ends, it throws a Cinder Cut windslash at you that you can deflect. |
Break the Arm to Enter Phase 3
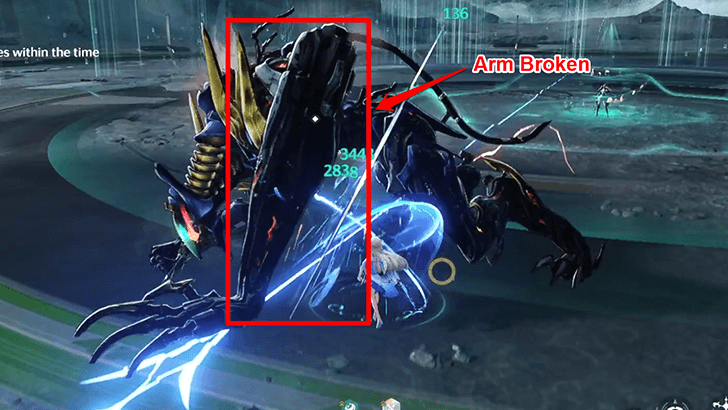
Once Reactor Husk's left arm is broken in Phase 2, the Hologram boss will be staggered. The battlefield will return to its normal state, initiating Phase 3. In this phase, all attack patterns from Phase 1 and Phase 2 become available with slightly faster animations.
Have a Dedicated Healer and Use Items
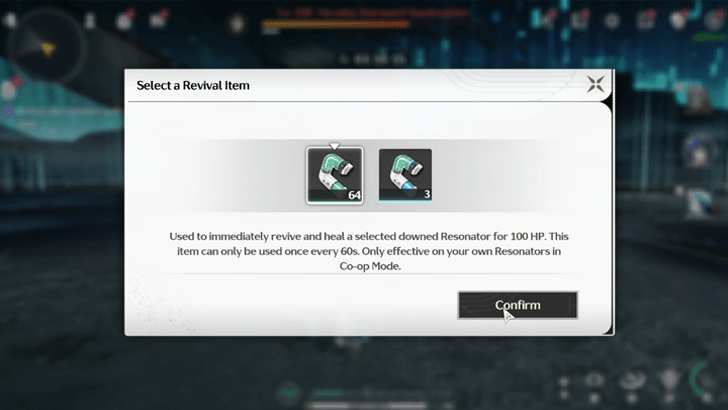
As Stage 6 of Tactical Hologram: Reactor Husk features the boss at Lvl. 100, a majority of its attacks can deplete your health quickly or even one-shot you. As such, we suggest bringing a dedicated healer to the team. Some characters even have revives, like Shorekeeper and Verina at higher sequences.
In Tactical Hologram: Synchronization, you're allowed to use revival items to keep the entire team in commission. Make sure to use them whenever possible, as these have cooldowns when you consume them.
Use Tune Break During Major Attacks

The Tune Break mechanic is highly useful in disrupting the flow of battle. Use it when Hyvatia begins its attack animation to slow down the pace and stop its attack. Tune Breaks also reduce Vibration Strength, making it useful for downing Hyvatia faster.
Best Team Comps
Aero Erosion Team
| Character / Role | Echo Set |
|---|---|
|
(Main DPS) |
|
|
(Sub-DPS) |
|
|
(Support) |
|
| Character | Explanation |
|---|---|
| | Support Replacement for Chisa Aero Rover is a great alternative to Chisa, as they provide the same benefit of increasing the max Aero Erosion stack limit. Rover can be a bit clunky to play against the boss, however, so keep that in mind when executing rotations. |
The Aero Erosion team with Cartethyia as the Main DPS is one of the best teams to use against the Reactor Husk Hologram, as its special mechanisms have a unique interaction with Negative Statuses. Applying Aero Erosion exposes Reactor Husk's Vulnerable Core.
Wait Before Transforming Into Fleurdelys
If you're running this team, we suggest waiting for Reactor Husk to complete its attack sequence first when the fight begins. If you're transformed and its attacks are already underway, they will connect and easily kill Cartethyia.
Zani Spectro Frazzle Team
| Character / Role | Echo Set |
|---|---|
|
(Main DPS) |
|
|
(Sub-DPS) |
|
|
(Support) |
|
| Character | Explanation |
|---|---|
| | Sub-DPS Replacement for Phoebe If you don't have Phoebe, Spectro Rover is a good alternative for Spectro Frazzle application, albeit less consistent. |
The Spectro Frazzle team with Zani is highly recommended for this boss due to Reactor Husk being highly affected by Negative Statuses with its special mechanism. Zani deals a lot of damage and has great parrying mechanics to avoid taking damage from the Hologram boss.
Phoebe Spectro Frazzle Team
| Character / Role | Echo Set |
|---|---|
|
(Main DPS) |
|
|
(Sub-DPS) |
|
|
(Support) |
|
Similar to Zani's Spectro Frazzle team, you can run Phoebe as the Main DPS with Rover as the dedicated Frazzle stack applicator.
Reactor Husk Hologram Location
Part of Tactical Hologram: Synchronization
Located in Startorch Academy
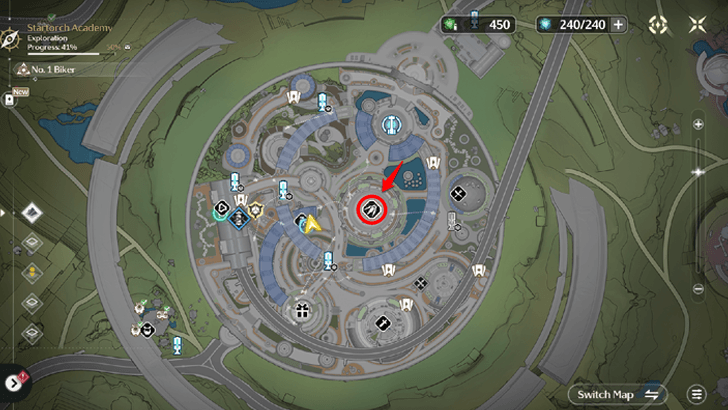
The Reactor Husk Hologram is found in Startorch Academy as part of the Tactical Hologram: Synchronization set of challenges.
Startorch Academy Map and Exploration Guide
Reactor Husk Hologram Details and Mechanisms
| Stage 6 | |
|---|---|
|
Hologram Level: Lv. 100
Resistance: This enemy has a higher Fusion RES. Red Shift: Reactor Husk enters the Huntfire state upon recovering from Immobilization for the first time. While in this state, the Vulnerable Core on its left arm will no longer be exposed under Negative Statuses. When the Vulnerable Core is exposed, Reactor Husk takes increased DMG. Huntfire ends when Reactor Husk is Immobilized again or when its left-arm armor is destroyed. Death's Dance: 3 minutes after the battle begins, Resonators' ATK is increased by 10% every 10s, up to 100%. The DMG taken by Resonators will also increase by 10% every 10s, with no stacking limit. All Resonators in the team lose 10% of their Max HP every 2s, until their HP reaches 20%. |
Stage 5 |
|
Hologram Level: Lv. 90
Resistance: This enemy has a higher Fusion RES. Red Shift: Reactor Husk enters the Huntfire state upon recovering from Immobilization for the first time. While in this state, the Vulnerable Core on its left arm will no longer be exposed under Negative Statuses. When the Vulnerable Core is exposed, Reactor Husk takes increased DMG. Huntfire ends when Reactor Husk is Immobilized again or when its left-arm armor is destroyed. Death's Dance: 3 minutes after the battle begins, Resonators' ATK is increased by 10% every 10s, up to 100%. The DMG taken by Resonators will also increase by 10% every 10s, with no stacking limit. All Resonators in the team lose 10% of their Max HP every 2s, until their HP reaches 20%. |
Stage 4 |
|
Hologram Level: Lv. 80
Resistance: This enemy has a higher Fusion RES. |
Stage 3 |
|
Hologram Level: Lv. 70
Resistance: This enemy has a higher Fusion RES. |
Stage 2 |
|
Hologram Level: Lv. 65
Resistance: This enemy has a higher Fusion RES. |
Stage 1 |
|
Hologram Level: Lv. 60
Resistance: This enemy has a higher Fusion RES. |
Reactor Husk Hologram Rewards
List of Rewards
| Stage | Rewards |
|---|---|
| 1 |
|
| 2 |
|
| 3 |
|
| 4 |
|
| 5 |
|
| 6 |
|
Unlocked Trophies
| Trophy | Objective and Rewards |
|---|---|
 You Dare Defy Me Who Has an Exostrider You Dare Defy Me Who Has an Exostrider |
Complete Tactical Hologram: Synchronization - Reactor Husk I. Rewards: |
 Iron-Blooded Husk Iron-Blooded Husk |
Complete Tactical Hologram: Synchronization - Reactor Husk II. Rewards: |
Complete both Stage 1 and Stage 6 of the Tactical Hologram: Reactor Husk Challenge to receive the trophies.
Wuthering Waves Related Guides

All Boss Guides
| All Boss Types | |
|---|---|
Tactical Hologram Guides
| Version 3.0+ (Synchronization) |
||
|---|---|---|
Comment
Author

Reactor Husk Hologram Tactical Challenge Guide
Premium Articles

Rankings
- We could not find the message board you were looking for.

Gaming News


![Nova Roma Review [Early Access] | Newer, Better, and More Confusing](https://img.game8.co/4455512/2cbf8926e9a1c72a3ff056088f801ef4.png/thumb)


Popular Games

Genshin Impact Walkthrough & Guides Wiki
Umamusume: Pretty Derby Walkthrough & Guides Wiki
Crimson Desert Walkthrough & Guides Wiki
Monster Hunter Stories 3: Twisted Reflection Walkthrough & Guides Wiki
Honkai: Star Rail Walkthrough & Guides Wiki
Pokemon Pokopia Walkthrough & Guides Wiki
The Seven Deadly Sins: Origin Walkthrough & Guides Wiki
Wuthering Waves Walkthrough & Guides Wiki
Zenless Zone Zero Walkthrough & Guides Wiki
Arknights: Endfield Walkthrough & Guides Wiki


Recommended Games
Fire Emblem Heroes (FEH) Walkthrough & Guides Wiki
Diablo 4: Vessel of Hatred Walkthrough & Guides Wiki
Cyberpunk 2077: Ultimate Edition Walkthrough & Guides Wiki
Yu-Gi-Oh! Master Duel Walkthrough & Guides Wiki
Super Smash Bros. Ultimate Walkthrough & Guides Wiki
Pokemon Brilliant Diamond and Shining Pearl (BDSP) Walkthrough & Guides Wiki
Elden Ring Shadow of the Erdtree Walkthrough & Guides Wiki
Monster Hunter World Walkthrough & Guides Wiki
The Legend of Zelda: Tears of the Kingdom Walkthrough & Guides Wiki
Persona 3 Reload Walkthrough & Guides Wiki


All rights reserved
Copyright© 2024-2025 Kuro Games. All Rights Reserved.
The copyrights of videos of games used in our content and other intellectual property rights belong to the provider of the game.
The contents we provide on this site were created personally by members of the Game8 editorial department.
We refuse the right to reuse or repost content taken without our permission such as data or images to other sites.