Hyvatia Hologram Tactical Challenge Guide
★ Version 3.2 out now!
┣ Sigrika → Builds, Materials, Weapon
┣ Qiuyuan → Builds, Materials, Weapon
┗ Phase 2 → Lynae, Zani, Phoebe
★ Main Story Guide | Side Stories Event
★ Exclusives: Tier Maker | State of the Meta
This is a guide to the Hyvatia Tactical Hologram Challenge in Wuthering Waves (WuWa). See how to beat all six stages, best team comps, location, Hyvatia's stage effects, and rewards here!
| Hyvatia Related Guides | ||
|---|---|---|
| Location and Rewards | Echo Skill and Info | Tactical Hologram |
How to Beat Hyvatia Hologram
The Tactical Hologram: Hyvatia is a highly difficult challenge for players and requires utilizing the special mechanisms to defeat it within the time limit. Here are all the best tips to complete the challenge!
It is important to note that the Hyvatia Hologram follows three phases and two major attacks in between, with each phase having a different strategy to follow in order to beat it.
Phase 1 Hyvatia Attacks and Moves
There are four notable attack patterns in Phase 1 that Hyvatia has when you're fighting it as a Tactical Hologram. It uses its wing blades, energy blasts, dashes, and laser beams to try and defeat you in battle. Do note that Hyvatia sometimes does incomplete versions of these attacks.
Wing Slashes
| Wing Slashes Attack Information |
|---|
| Wing Slashes: The first attack pattern Hyvatia has is its wing slashes that it always starts off with when you begin the challenge. It is a 5-stage attack with four swings going side-to-side starting from the left, then to the right, repeatedly, before finishing with a straight laser beam. Dodge as the swing makes it way downwards, as well as when the laser indicator changes its color to avoid the laser beam. You can try and move towards its backside to avoid the rest of the attacks. The third attack can also be parried to stop Hyvatia from continuing the attack. |
Energy Blasts
| Energy Blasts Attack Information |
|---|
| Energy Blasts: The next attack pattern that Hyvatia has is its energy blasts followed by windblade slashes. It floats into the air and circles around you, generating energy blasts in the process. Wait for Hyvatia to move downwards, completing its circle around you before dodging the attacks in succession. After the five waves of energy blasts, if Hyvatia dodges to the right, it immediately follows up with two windblade slashes before throwing its sword on the ground, pulling you into it. Dodge immediately after the energy blasts to avoid taking damage from the slashes, and run away from the thrown sword, as it immediately goes down and slashes you with it. |
Aerial Laser Beam
| Aerial Laser Beam Attack Information |
|---|
| Aerial Laser Beam: Another attack pattern that Hyvatia has is when it goes up into the air, charging up its attack, before firing off a large straight laser beam. Once it does, it will immediately go downwards to slash you before charging towards you in an accelerated manner twice. Dodge the laser beam sideways, then parry the slash. If you dodge the slash, Hyvatia accelerates towards you but can be parried. If you dodge, it winds up for the second time before charging at you as the laser indicator turns pink. Dodge once the black dot from the indicator disappears. |
Wing Shield
| Wing Shield Attack Information |
|---|
| Wing Shield: The last attack Hyvatia has is when it winds up its swing downwards slightly before having its wings drop down on the ground to act as a shield. You can parry it as Hyvatia swings down to stop the attack. If the attack isn't parried, Hyvatia continues by flying upwards and remains stationary, firing energy blasts at you in succession before plunging downwards. |
Hologram Hyvatia's Eye of Perception
| Eye of Perception Details |
|---|
| How to Dodge: ・If you dodged the first dive attack, parry the second dive. ・If you parried the first dive attack, dodge the second dive. ・Dodge the ground slam after a few seconds. |
Hyvatia has a special mechanic available after its Vibration Strength is first broken or if its HP reaches 75% called Eye of Perception that causes it to fly high up in the air before plunging into the ground with significant force. Make sure to parry or avoid its attacks to have a chance against it.
If you get hit directly by Hyvatia as it flies downwards toward you and you fail to parry or dodge, the on-field character is guaranteed to be one-shot by the attack.
Characters in the Air Bypass This Mechanic
If you're using characters who can stay in the air for a long time, they can dodge the attack and hover above the battlefield. This bypasses Hyvatia's Eye of Perception mechanic, so you can just anticipate its plunging attack and dodge it.
Phase 2 Hyvatia Attacks and Moves
After Hyvatia completes its Eye of Perception move, it changes into its second phase. This phase is a lot more difficult, as Hyvatia becomes a lot faster and its attacks are significantly harder to observe.
There are, however, a lot more windows to parry against this boss, so focus on dodging and parrying to beat it. Additionally, Hyvatia's second phase has a lot more windows for you to deal damage, as it remains on the ground quite a bit after its attacks. Wait for it to complete its attacks before doing your own combos.
Sword Slash Combo
| Sword Slash Attack Information |
|---|
| Sword Slash: Hyvatia attacks in close combat using its swords twice before throwing a large projectile at you. Then, it flies above while dashing with the sword, before plunging into the ground. After a few seconds, the ground will flash a red light and a sound will be made, indicating when to dodge the attack. |
Wind Slashes
| Wind Slashes Attack Information |
|---|
| Wind Slashes: If Hyvatia is slightly far from you, she slashes thrice with her swords and will generate wind slashes that travel some distance. Dodge these attacks in succession. |
Backstep Slash
| Backstep Slash Attack Information |
|---|
Backstep Slash: Hyvatia steps back from the fight before instantaneously dashing and slashing in front of you. She follows this up with slash attacks and a projectile afterwards. |
Jump Slash
| Jump Slash Attack Information |
|---|
| Jump Slash: Hyvatia can start by moving up vertically and starting off with an attack slash that you can parry. Even if you parry them, it continues the slashes. Dodge three times after the parry as it swings its sword thrice in succession. |
Red Dash
| Red Dash Attack Information |
|---|
| Red Dash: Hyvatia hovers in the air before a bright red light embodies it. It then swiftly dashes downwards multiple times. You can dodge this once Hyvatia is near you. |
Dash Plunge
| Dash Plunge Attack Information |
|---|
| Dash Plunge: Hyvatia flies toward you, which you can parry if close in range. It plunges into the ground after, dealing AoE damage. |
Fight Clones in Two Waves of the Black Hole
| Wave 1 | Dodge → Dodge → Dodge → Dodge → Dodge |
|---|---|
| Wave 2 | Parry → Parry → Parry → Parry → Parry |
| Final Blast (White Flash) |
Dodge once the screen flashes white. |
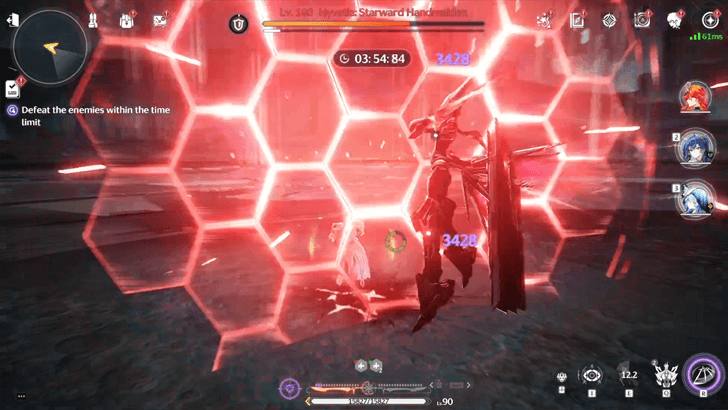
Once Hyvatia is staggered for the 2nd time or if her HP reaches 25%, she enters her third phase, indicated by a black hole on the field. 5 clones will appear from the black hole and attack you. All attacks from the clones can be parried or dodged.
Whatever you do in the first wave of the black hole, you must do the opposite in the second wave. For example, if you parry all 5 attacks in the first wave, you must dodge all 5 attacks in the second wave. Once the two waves are finished, wait for a white flash to appear on screen and dodge.
Bypass the Entire Mechanic in the Air
If you have a character hovering above the battlefield, you can skip the sequence entirely. This lets you take way less damage and effort as the boss shifts to the third phase.
Phase 3 Hyvatia Attacks and Moves
In Phase 3 of the Tactical Hologram, Hyvatia follows the same attack patterns from Phase 2 with slightly more variation. You have less of a window to attack it on the ground, and its recovery is a lot faster in between attack sequences.
▲ Hyvatia Phase 2 Attacks and Moves ▲
Hyvatia Can Parry Attacks
Hyvatia becomes erratic during some instances where it parries attacks or if you miss a parry yourself. It attacks in a random pattern with different variations to its attack sequences depending on the phase.
Make sure to have your parries connect to avoid dealing with more attacks.
How to Parry and Counterattack
Save STA From Running and Just Dodge
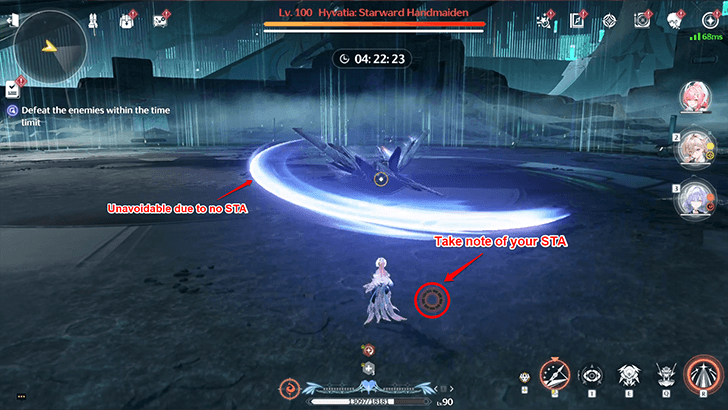
In Hyvatia's Hologram Challenge, dodging is an important mechanic since it's tied to its Special Mechanism. Gain significant Vibration Strength Reduction and Healing Effectiveness for each dodge every 5s, with this effect being stackable up to 5 times.
Hyvatia, in particular, has a lot of consecutive attacks, so you'll be dodging in succession often. Try to avoid running when you can and instead conserve STA to dodge its attacks. Getting hit also has its consequences, since you'll lose 1 stack every 5s you get hit by an attack.
Have a Dedicated Healer and Use Items
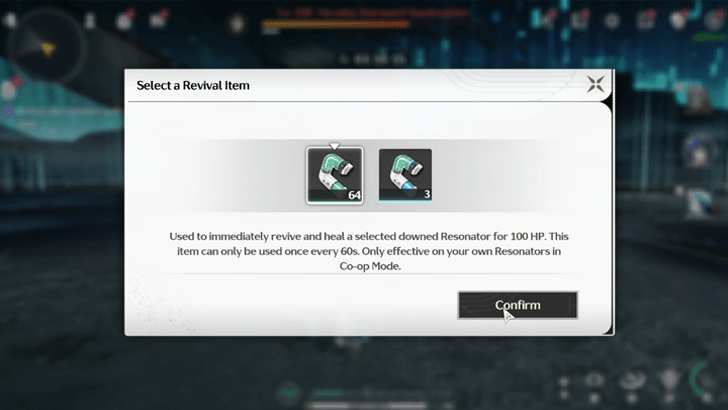
The Hyvatia Hologram hits very hard and has a guaranteed one-hit knock-out attack if you aren't careful. Having a dedicated healer like Shorekeeper or Mornye in your party is highly effective in dealing with Hyvatia, especially when they have skills that revive you.
In Tactical Hologram: Synchronization, you're allowed to use revival items to keep the entire team in commission. Make sure to use them whenever possible, as these have cooldowns when you consume them.
Use Tune Break During Major Attacks

The Tune Break mechanic is highly useful in disrupting the flow of battle. Use it when Hyvatia begins its attack animation to slow down the pace and stop its attack. Tune Breaks also reduce Vibration Strength, making it useful for downing Hyvatia faster.
Best Team Comps
Aemeath Tune Rupture Team
| Character / Role | Echo Set |
|---|---|
|
(Main DPS) |
|
|
(Sub DPS) |
|
|
(Support) |
|
Aemeath's Tune Rupture team is one of the best teams you can use to deal with the Tactical Hologram: Hyvatia. With the team's high damage output and faster Tune Break triggers, Hyvatia's mechanics are slightly negated.
Aemeath is also one of the best DPS units in the game due to her high DMG multipliers, making it a lot easier for her to clear the stage.
Perform Tune Break During Major Attacks
One of the hidden features Tune Break has is it disrupts the tempo of battle by automatically cancelling Hyvatia's attack sequence when it's triggered. Make sure to perform it when a major attack is being charged up to prevent Hyvatia from casting it.
Sun and Moon Team
| Character / Role | Echo Set |
|---|---|
|
(Main DPS) |
|
|
(Sub-DPS) |
|
|
(Support) |
|
The Sun and Moon team with Augusta and Iuno is one of the best options to have for this challenge, as the team has significant healing alongside Shorekeeper to avoid being downed by Hyvatia, while also having great utility against the Hologram boss.
Iuno's aerial attacks let her deal good damage against the highly mobile Hyvatia. Additionally, Augusta can stop time for players to slow down the tempo slightly. Just make sure to dodge and parry whenever possible to avoid unnecessary attack sequences.
Have Iuno in the Air During The Special Attack
As Hyvatia performs its Eye of Perception, have Iuno stay up in the air on her Moonring to avoid Hyvatia's attacks. You'll bypass the mechanic, letting you anticipate when Hyvatia plunges downwards so you can dodge out of the way.
Hyvatia Hologram Location
Part of Tactical Hologram: Synchronization
Located in Startorch Academy
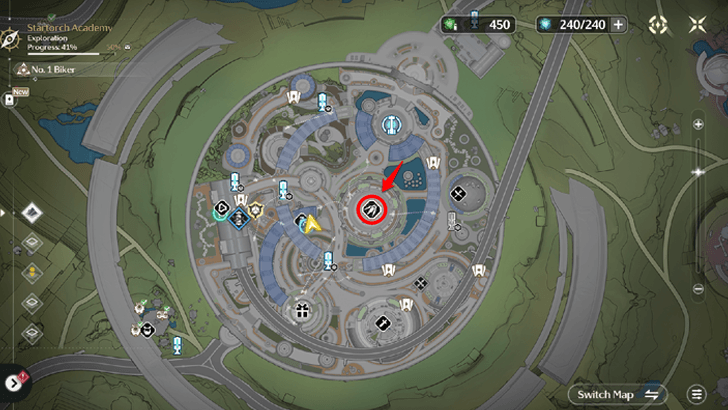
Hyvatia is found in Startorch Academy as part of the Tactical Hologram: Synchronization set of challenges.
Startorch Academy Map and Exploration Guide
Hyvatia Hologram Details and Mechanisms
| Stage 6 | |
|---|---|
|
Hologram Level: Lv. 100
Resistance: This enemy has a higher Spectro RES. False Vision: When a Resonator successfully Dodges, all Resonators in the team gain 1 stack of Transcendence. This effect can be triggered once every 5s, stacking up to 5 times. When a Resonator takes damage, all Resonators in the team lose 1 stack of Transcendence. This effect can be triggered once every 5s. Transcendence: The Resonator's Vibration Strength Reduction Rate is increased. Healing received is increased by 20%. True Vision: When a Resonator takes damage, all Resonators in the team gain 1 stack of Lock-On. This effect can be triggered once every 5s. Lock-On: The Resonator's Vibration Strength Reduction Rate is reduced. Healing received is reduced by 20%. Death's Dance: 3 minutes after the battle begins, Resonators' ATK is increased by 10% every 10s, up to 100%. The DMG taken by Resonators will also increase by 10% every 10s, with no stacking limit. All Resonators in the team lose 10% of their Max HP every 2s, until their HP reaches below 20%. |
Stage 5 |
|
Hologram Level: Lv. 90
Resistance: This enemy has a higher Spectro RES. False Vision: When a Resonator successfully Dodges, all Resonators in the team gain 1 stack of Transcendence. This effect can be triggered once every 5s, stacking up to 5 times. When a Resonator takes damage, all Resonators in the team lose 1 stack of Transcendence. This effect can be triggered once every 5s. Transcendence: The Resonator's Vibration Strength Reduction Rate is increased. Healing received is increased by 20%. True Vision: When a Resonator takes damage, all Resonators in the team gain 1 stack of Lock-On. This effect can be triggered once every 5s. Lock-On: The Resonator's Vibration Strength Reduction Rate is reduced. Healing received is reduced by 20%. Death's Dance: 3 minutes after the battle begins, Resonators' ATK is increased by 10% every 10s, up to 100%. The DMG taken by Resonators will also increase by 10% every 10s, with no stacking limit. All Resonators in the team lose 10% of their Max HP every 2s, until their HP reaches below 20%. |
Stage 4 |
|
Hologram Level: Lv. 80
Resistance: This enemy has a higher Spectro RES. Vision: When a Resonator successfully Dodges, all Resonators in the team gain 1 stack of Transcendence. This effect can be triggered once every 5s, stacking up to 5 times. When a Resonator takes damage, all Resonators in the team lose 1 stack of Transcendence. This effect can be triggered once every 5s. Transcendence: The Resonator's Vibration Strength Reduction Rate is increased. Healing received is increased by 20%. |
Stage 3 |
|
Hologram Level: Lv. 70
Resistance: This enemy has a higher Spectro RES. |
Stage 2 |
|
Hologram Level: Lv. 65
Resistance: This enemy has a higher Spectro RES. |
Stage 1 |
|
Hologram Level: Lv. 60
Resistance: This enemy has a higher Spectro RES. |
Hyvatia Hologram Rewards
List of Rewards
| Stage | Rewards |
|---|---|
| 1 |
|
| 2 |
|
| 3 |
|
| 4 |
|
| 5 |
|
| 6 |
|
Unlocked Trophies
| Trophy | Objective and Rewards |
|---|---|
 The Ending She Saw The Ending She Saw |
Complete Tactical Hologram: Synchronization - Hyvatia I. Rewards: |
 This Path She Missed This Path She Missed |
Complete Tactical Hologram: Synchronization - Hyvatia VI. Rewards: |
Complete both Stage 1 and Stage 6 of the Tactical Hologram: Hyvatia Challenge to receive the trophies.
Wuthering Waves Related Guides

All Boss Guides
| All Boss Types | |
|---|---|
Tactical Hologram Guides
| Version 3.0+ (Synchronization) |
||
|---|---|---|
Comment
Author

Hyvatia Hologram Tactical Challenge Guide
Premium Articles

Rankings
- We could not find the message board you were looking for.

Gaming News

![Death Stranding 2: On The Beach [PC] Review | A Port That Delivers](https://img.game8.co/4447392/15310a0c9aa1b6843bb713b2ea216930.jpeg/show)


Popular Games

Genshin Impact Walkthrough & Guides Wiki
Umamusume: Pretty Derby Walkthrough & Guides Wiki
Crimson Desert Walkthrough & Guides Wiki
Monster Hunter Stories 3: Twisted Reflection Walkthrough & Guides Wiki
Honkai: Star Rail Walkthrough & Guides Wiki
Pokemon Pokopia Walkthrough & Guides Wiki
The Seven Deadly Sins: Origin Walkthrough & Guides Wiki
Wuthering Waves Walkthrough & Guides Wiki
Zenless Zone Zero Walkthrough & Guides Wiki
Arknights: Endfield Walkthrough & Guides Wiki


Recommended Games
Fire Emblem Heroes (FEH) Walkthrough & Guides Wiki
Diablo 4: Vessel of Hatred Walkthrough & Guides Wiki
Cyberpunk 2077: Ultimate Edition Walkthrough & Guides Wiki
Yu-Gi-Oh! Master Duel Walkthrough & Guides Wiki
Super Smash Bros. Ultimate Walkthrough & Guides Wiki
Pokemon Brilliant Diamond and Shining Pearl (BDSP) Walkthrough & Guides Wiki
Elden Ring Shadow of the Erdtree Walkthrough & Guides Wiki
Monster Hunter World Walkthrough & Guides Wiki
The Legend of Zelda: Tears of the Kingdom Walkthrough & Guides Wiki
Persona 3 Reload Walkthrough & Guides Wiki


All rights reserved
Copyright© 2024-2025 Kuro Games. All Rights Reserved.
The copyrights of videos of games used in our content and other intellectual property rights belong to the provider of the game.
The contents we provide on this site were created personally by members of the Game8 editorial department.
We refuse the right to reuse or repost content taken without our permission such as data or images to other sites.