Energy Amplifier Lemma 4.8 Rerun Event Guide
✉ Send your thoughts in our Genshin 6.4 Patch Survey!
★ Exclusive: Dive back in time with the Meta History
◆ Hot: Version 6.4, Luna 5 Codes
◆ Builds: Varka, Flins, Skirk, Escoffier
◆ Events: Travelers' Tales, He Who Caught the Wind
◆ Future: Linnea, Version 6.5 Luna VI
Energy Amplifier Lemma is a domain combat event in Genshin Impact 4.8. See all 4.8 Energy Amplifier stages, how to play, the event's release date, and all event rewards here!
| Energy Amplifier Lemma Stage Guides | ||
|---|---|---|
Energy Amplifier Lemma Schedule
4.8 Energy Amplifier Stage and Unlock Dates
| Energy Amplifier Stage | Unlock Date |
|---|---|
| 1 - Interference: Overgrowth | August 12, 2024 |
| 2 - Validation: Torrential Tide | August 13, 2024 |
| 3 - Observation: Soaring Will | August 14, 2024 |
| 4 - Collection: High-Energy Elements | August 15, 2024 |
| 5 - Extension: Polyphasic Excitation | August 16, 2024 |
| 6 - Exceedance: Resonance Amplification | August 17, 2024 |
Energy Amplifier Stage 1
| Ley Line Disorder | After a character triggers a Dendro-related reaction on an opponent or uses Dendro Cores to deal DMG to an opponent (including Burgeon and Hyperbloom), the All Elemental RES of that opponent is decreased by 30% for 4s. |
|---|---|
| Trial Characters | |
| Enemies | |
| Best Characters | Round 1 Round 2 Round 3 |
Use Dendro Reactions
Interference: Overgrowth has Nahida, Collei, and Emilie for its trial characters. Along with the Ley Line disorder, this stage encourages Dendro Elemental Reactions!
Choose the Primary Effectors that increase your characters' ATK and Elemental Mastery, and choose Secondary Effectors based on your team composition.
Interference: Overgrowth Day 1 Guide
Energy Amplifier Stage 2
| Ley Line Disorder | After a character triggers a Hydro-related reaction on an opponent, the All Elemental RES of that opponent is decreased by 30% for 6s. |
|---|---|
| Trial Characters | |
| Enemies | |
| Best Characters | Round 1 Round 2 Round 3 |
Use Hydro Reactions
Validation: Torrential Tide has Sigewinne, Ayato, and Xingqiu for its trial characters. Along with the Ley Line disorder, this stage encourages Hydro Elemental Reactions!
Choose the Primary Effectors that increase your characters' ATK and Elemental Mastery, and choose Secondary Effectors based on your team composition.
Validation: Torrential Tide Day 2 Guide
Energy Amplifier Stage 3
| Ley Line Disorder | When a character's Normal Attacks hit opponents, the DMG dealt by this character's Normal Attacks is increased by 10% for 4s. Can be triggered up to once every 0.2s, max 3 times; When characters' Charged or Plunging Attacks hit an opponent, unleash a shockwave that deals True DMG at the location hit. Can be triggered up to once every 2.5s. |
|---|---|
| Trial Characters | |
| Enemies | |
| Best Characters | Round 1 Round 2 Round 3 |
Use Pyro Characters
Observation: Soaring Will focuses on Pyro characters and Normal, Charged, or Plunging Attacks against multiple tough Cryo opponents. Arlecchino and Zhongli as the trial characters are your best bet here, as they can easily give more than half of the points required for the rewards due to their strong synergy and survivability.
Observation: Soaring Will Day 3 Guide
Energy Amplifier Stage 4
| Ley Line Disorder | Increase characters' Elemental Skill and Elemental Burst DMG by 25%. |
|---|---|
| Trial Characters | |
| Enemies | |
| Best Characters | Round 1 Round 2 Round 3 |
Utilize Off-Field Units
Along with focusing on Cryo units on the 1st round and high DPS units on the 2nd and 3rd, Collection: High-Energy Elements feature a boost to Elemental Skill and Burst DMG, making off-field units and strong on-field Skill and Burst users extremely potent for this stage.
Collection: High-Energy Elements Day 4 Guide
Energy Amplifier Stage 5
| Ley Line Disorder | When the party comprises characters of 1/2/3 and above Elemental Types, all party members gain a 10%/15%/25% All Elemental DMG Bonus. |
|---|---|
| Trial Characters | |
| Enemies | |
| Best Characters | Round 1 Round 2 Round 3 |
Utilize Strong Elemental Damage
Elemental Damage plays a huge role here thanks to the Ley Line Disorder and the ability to stack that damage even further, making Catalyst wielders and potent Off-Field damage dealers a solid choice here!
Extension: Polyphasic Excitation Day 5 Guide
Energy Amplifier Stage 6
| Ley Line Disorder | When a character triggers a Swirl or Crystallize Reaction, all party members gain a 25% All Elemental DMG Bonus for 8s. Can be triggered up to once every 1s. |
|---|---|
| Trial Characters | |
| Enemies | |
| Best Characters | Round 1 Round 2 Round 3 |
Swirl and Crystallize Buffs
Anemo and Geo units thrive in the first and second rounds respectively. Especially for the first round and third round, utilize buffs that provide Elemental Mastery, and shield or DEF buffs that favor Geo units on the second round!
Exceedance: Resonance Amplification Day 6
How to Play Energy Amplifier Lemma
Go to the Event Domain

To start playing the Energy Amplifier: Lemma event, go to the challenge domain in Fontaine, north of Poisson.
Choose Three Teams for Three Rounds
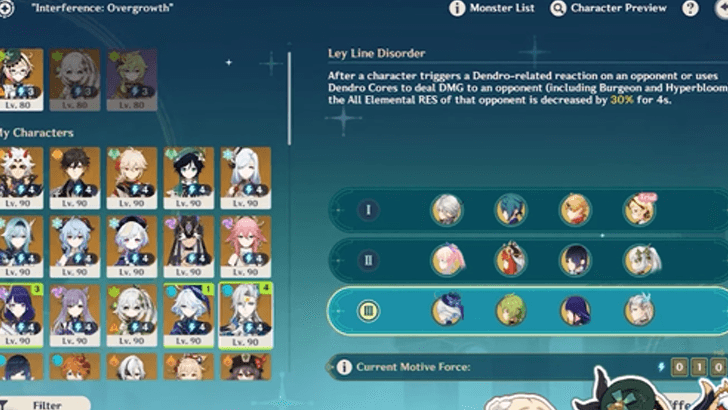
Before beginning any challenge, you must first set up a party for each combat round. There will also be Trial Characters that you can use depending on the challenge.
Choosing The Same Characters Give Less Motive Force
Each character is worth a certain amount of Motive Force. You can accumulate more Motive Force by choosing different characters for each team! The same character can be assigned to parties for all three rounds of combat, but choosing the same character will not increase Motive Force.
Use Motive Force to Get Ley Line Effectors

Motive Force can be utilized to activate Ley Line Effectors, allowing your group to earn combat buffs for the stage. The more Motive Force you have, the more Ley Line Effectors you can afford.
Defeat Enemies in Three Combat Rounds

Each stage will have three combat rounds in which you have to defeat as many opponents as possible in the allotted time to score points.
Energy Amplifier Lemma Event Info
Energy Amplifier 4.8 Rerun Event Details
| Event Start | August 12, 2024 |
|---|---|
| Event Start | August 26, 2024 |
| How to Unlock | Reach Adventure Rank 27+ |
| Rewards |
+ Talent Level Up Materials |
Energy Amplifier: Lemma is a domain combat event in Genshin Impact 4.8, where you use Motive Force to get Effector buffs and eliminate as many opponents as possible within the time limit to earn rewards!
Energy Amplifier Lemma Event Rewards
Total Energy Amplifier Lemma Rewards
| All Event Rewards | ||
|---|---|---|
|
|
|
|
|
|
|
|
We'll update this section once more information is available!
Energy Amplifier Stage Rewards
| Stage | Objectives | Rewards |
|---|---|---|
| 1 | Obtain a high score of 500 | |
| Obtain a high score of 2000 | ||
| Obtain a high score of 5000 | ||
| 2 | Obtain a high score of 500 | |
| Obtain a high score of 2000 | ||
| Obtain a high score of 5000 | ||
| 3 | Obtain a stage score of 500 |
|
| Obtain a stage score of 2000 |
|
|
| Obtain a stage score of 5000 |
|
|
| 4 | Obtain a high score of 500 | |
| Obtain a high score of 2000 | ||
| Obtain a high score of 5000 | ||
| 5 | Obtain a high score of 500 | |
| Obtain a high score of 2000 | ||
| Obtain a high score of 5000 | ||
| 6 | Obtain a high score of 500 | |
| Obtain a high score of 2000 | ||
| Obtain a high score of 5000 |
Genshin Impact Related Guides

Current Events
| Event Guide | Date and Rewards |
|---|---|
 Homeward, He Who Caught the Wind Homeward, He Who Caught the Wind
|
02/27/2026 - 03/16/2026
|
Upcoming Events
| Event Guide | Date and Rewards |
|---|---|
 Sightseeing With Friends Sightseeing With Friends
|
03/16/2026 - 03/26/2026
|
 Operation Stronghold Defense Operation Stronghold Defense
|
03/23/2026 - 04/02/2026
|
 Overflowing Abundance 6.4 Rerun Overflowing Abundance 6.4 Rerun
|
03/30/2026 - 04/06/2026
Weapon and Talent Up Materials
|
Permanent/Recurring Events
| Event Guide | Date and Rewards |
|---|---|
 To Temper Thyself and Journey Far To Temper Thyself and Journey Far
|
02/23/2026 - 05/18/2026
|
 Stygian Onslaught Stygian Onslaught
|
03/04/2026 - 04/07/2026
|
 Travelers' Tales Travelers' Tales
|
Permanently Available after Version 6.0
|
 Repertoire of Myriad Melodies Repertoire of Myriad Melodies
|
Permanently Available
|
 Test Run Test Run
|
Permanently Available
|
 Hangout Events Hangout Events
|
Permanently Available after Version 1.4
|
 Baptism of Song Baptism of Song
|
Permanently Available
+ Free Barbara
|
 Daily Check-In Daily Check-In
|
2021/03/01 - Permanently Available
|
 Stellar Reunion Returnee Event Stellar Reunion Returnee Event
|
Permanently Available
|
Past Events
Comment
Energy Amplifier is the worst and hardest and the most character dependant event they yet came up with these events are keep getting worse and it doesnt worth the effort i cant beat the gold with anything i have so worthless
Author
Energy Amplifier Lemma 4.8 Rerun Event Guide
improvement survey
03/2026
improving Game8's site?

Your answers will help us to improve our website.
Note: Please be sure not to enter any kind of personal information into your response.

We hope you continue to make use of Game8.
Rankings
- We could not find the message board you were looking for.
Gaming News
Popular Games

Genshin Impact Walkthrough & Guides Wiki

Honkai: Star Rail Walkthrough & Guides Wiki

Umamusume: Pretty Derby Walkthrough & Guides Wiki

Pokemon Pokopia Walkthrough & Guides Wiki

Resident Evil Requiem (RE9) Walkthrough & Guides Wiki

Monster Hunter Wilds Walkthrough & Guides Wiki

Wuthering Waves Walkthrough & Guides Wiki

Arknights: Endfield Walkthrough & Guides Wiki

Pokemon FireRed and LeafGreen (FRLG) Walkthrough & Guides Wiki

Pokemon TCG Pocket (PTCGP) Strategies & Guides Wiki
Recommended Games

Diablo 4: Vessel of Hatred Walkthrough & Guides Wiki

Cyberpunk 2077: Ultimate Edition Walkthrough & Guides Wiki

Fire Emblem Heroes (FEH) Walkthrough & Guides Wiki

Yu-Gi-Oh! Master Duel Walkthrough & Guides Wiki

Super Smash Bros. Ultimate Walkthrough & Guides Wiki

Pokemon Brilliant Diamond and Shining Pearl (BDSP) Walkthrough & Guides Wiki

Elden Ring Shadow of the Erdtree Walkthrough & Guides Wiki

Monster Hunter World Walkthrough & Guides Wiki

The Legend of Zelda: Tears of the Kingdom Walkthrough & Guides Wiki

Persona 3 Reload Walkthrough & Guides Wiki
All rights reserved
Copyright© 2012-2024 HoYoverse — COGNOSPHERE. All Rights Reserved.
The copyrights of videos of games used in our content and other intellectual property rights belong to the provider of the game.
The contents we provide on this site were created personally by members of the Game8 editorial department.
We refuse the right to reuse or repost content taken without our permission such as data or images to other sites.


![Monster Hunter Stories 3 Review [First Impressions] | Simply Rejuvenating](https://img.game8.co/4438641/2a31b7702bd70e78ec8efd24661dacda.jpeg/thumb)


What the site curators are not able to find out is that the lower level your characters are, the quality of gear they have, and the less gear they have, all affect the amount of Motive Force you can get. You could equip a lvl 50 with all you can get, and they'll still be at MF 3.