Lone Bridge (Common) Stage Guide | Tidal Defense Simulator
★ Version 3.2 out now!
┣ Sigrika → Builds, Materials, Weapon
┣ Qiuyuan → Builds, Materials, Weapon
┗ Phase 2 → Lynae, Zani, Phoebe
★ 3.2 Main Story, All Events
★ Exclusives: Tier Maker | State of the Meta
Lone Bridge is the first Common stage in Pass Guardian Mode of the Tidal Defense Simulator event in Version 2.6 of Wuthering Waves. See Lone Bridge's map layout, best combat machines, and a guide on how to complete all waves here!
| All Lone Bridge Stage Guides | |
|---|---|
| Common | Elite |
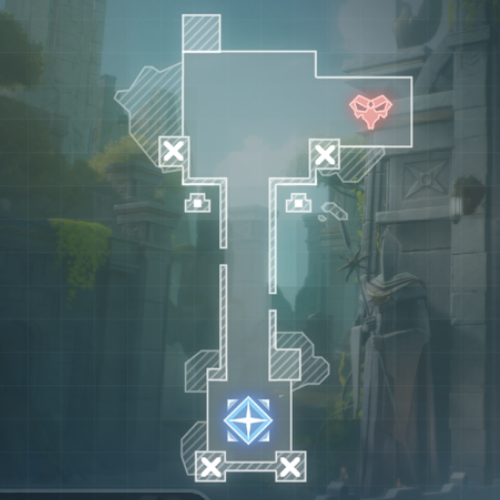
Lone Bridge Map Layout and Enemies
| Lone Bridge Map and Enemies Information | |
|---|---|
 |
|
| No. of Waves | 3 |
| List of Enemies |
Glacio Predator HP: 400 SPD: 200 DMG: 1 x5 |
Tick Tack HP: 100 SPD: 200 DMG: 1 x65 |
|---|
Lone Bridge is a stage that only has one straightforward path, spawning enemies from a room that leads directly to your Energy Matrix. A total of 70 enemies will appear during this beginner stage, introducing mostly small enemies with relatively low health that can be eliminated quickly.
Lone Bridge Best Combat Machines
Recommended Combat Machines
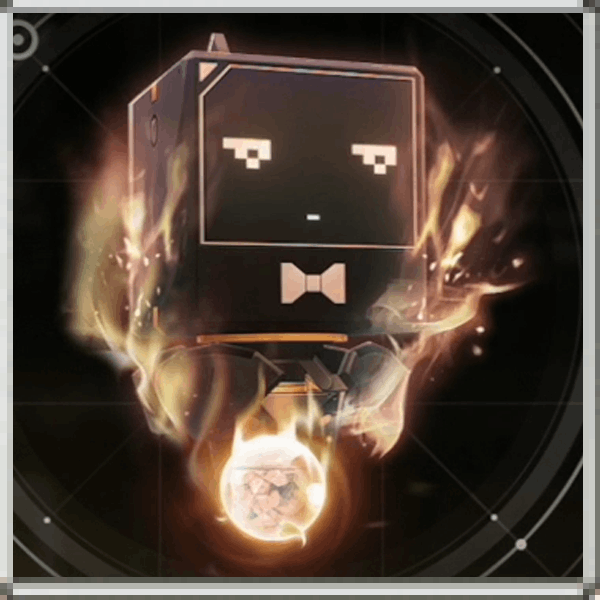 Speed Shooter Speed Shooter Speed Shooter Type: KU-Roro Weapon
Base ATK: 60 Automatically fires projectiles in a row, dealing low Fusion DMG. |
 Stun Emitter Stun Emitter Stun Emitter Type: Ground
Cost: 200 Base ATK: 60 Cooldown: 4 Periodically shocks nearby Tacet Discords and temporarily Paralyzes them. |
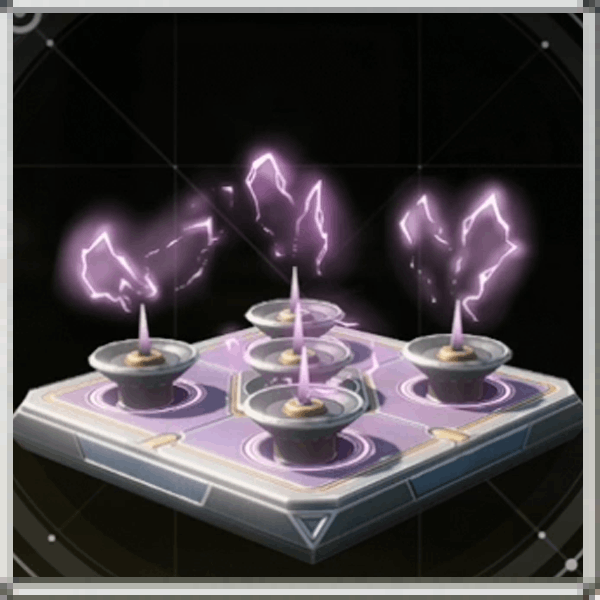
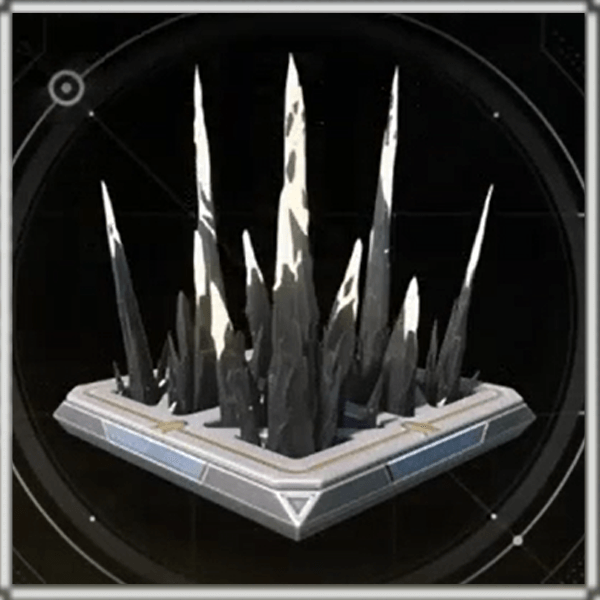 Tacetite Spikes Tacetite Spikes Tacetite Spikes Type: Ground
Cost: 100 Base ATK: 100 Cooldown: 2 Periodically launches Tacetite Spikes, dealing Physical DMG to Tacet Discords. |
Since Lone Bridge is the introductory stage, you’ll only have access to three Combat Machines: the Tacetite Spikes, Stun Emitter, and the Speed Shooter.
Focus on letting the Tacetite Spikes carry your defenses, as their attack speed and numbers make them highly effective at clearing out smaller enemies. Use the Speed Shooter to pick off any stragglers that slip past your initial line. while the Stun Emitter, though helpful, comes with a high Deployment Cost and only provides a brief stun, so use it sparingly.
Lone Bridge Wave Guide
| Lone Bridge Wave Guide |
|---|
|
|
Wave 1: Set Up Tacetite Spikes
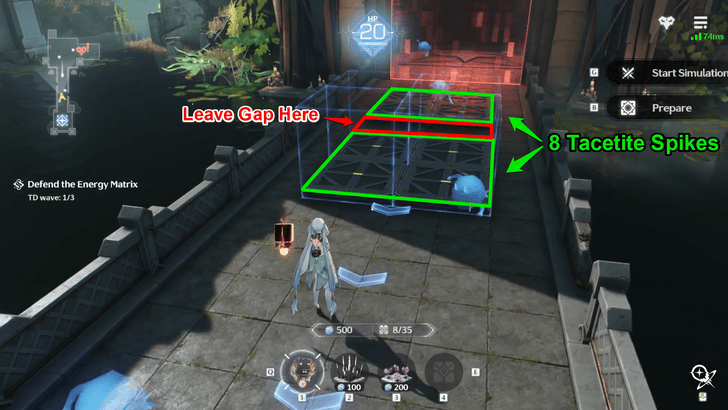
For the first wave, spend 800 Sim Credits to deploy 8 Tacetite Spikes along the center of the bridge, positioned near the TD spawn room. Be sure to leave a gap after every four spikes, as this space will later be used for Stun Emitters.
Placing them in a central line as opposed to occupying the bridge's width creates a longer hallway of offense, allowing the spikes to deal continuous damage as enemies advance.
Make Use of the Speed Shooter
While this leaves the sides uncovered, most enemies will funnel through the middle, ensuring the spikes chip away at the majority of the wave. Any stragglers that slip by can be safely picked off with the Speed Shooter.
Wave 2: Add Stun Emitters
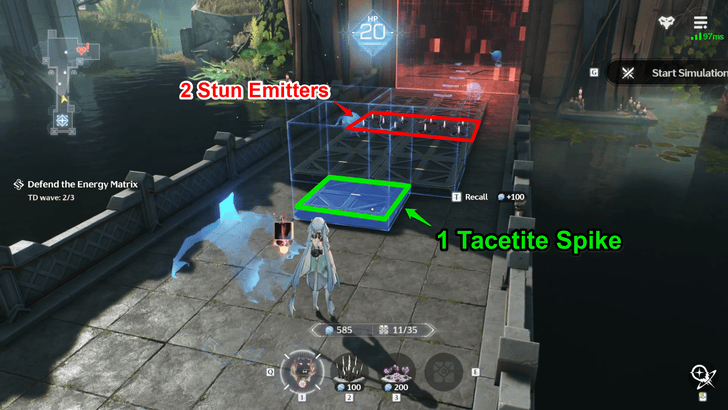
During the second wave, use your earned Sim Credits to place 2 Stun Emitters in the gaps you left earlier along the center of the bridge, then spend the remaining 100 Sim Credits on a single Tacetite Spike at the end of the line.
The Stun Emitters will momentarily stun an enemy as they pass, once every four seconds, giving your Tacetite Spikes more time to deal damage before the TDs advance any further.
Wave 3: Cover With Remaining Tacetite Spikes
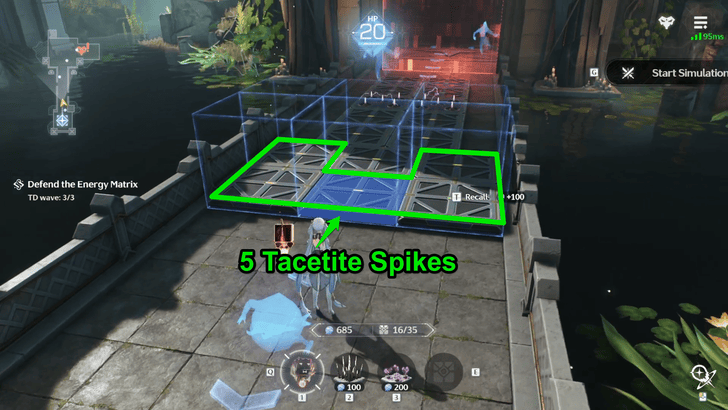
At the final wave, invest all remaining funds into covering the full width of the bridge with Tacetite Spikes. Spend 500 Sim Credits to set up two rows along the final stretch, ensuring good coverage across the path.
This extra offense will help eliminate TDs that slip past the corners, dealing reliable finishing damage if KU-Roro’s support fire isn’t enough.
Lone Bridge Stage Information
Basic Information
| Stage Information | |
|---|---|
| Stage Type: Pass Guardian |
Threat Level: Common |
| Rewards | |
|
Glacio Beacon Type: Ground Cost: 200 Base ATK: 0 Emits artificial chilling currents, Slowing any Tacet Discords moving past the device. Tacetite Barrage Type: Wall Cost: 150 Base ATK: 75 Cooldown: 2 Fires Tacetite shards when Tacet Discords approach, dealing Physical DMG to the nearest target. |
|
| All Challenge Goals | |
|
|
|
Wuthering Waves Related Guides

Tidal Defense Simulator Event Guide
Pass Guardian Stages
| Threat: Overlord | |||||
|---|---|---|---|---|---|
| Threat: Elite | |||||
| Threat: Common | |||||
Deathtrap Mode Stages
(Infinite Mode) |
|
All Tidal Defense Simulator Guides
| - |
Comment
Author

Lone Bridge (Common) Stage Guide | Tidal Defense Simulator
Premium Articles

Rankings

Gaming News


![Star Savior Review [First Impressions] | Engaging, Entertaining, and Expensive](https://img.game8.co/4447603/8f500e9bf666bdb8adb1af478e9dfdbd.png/thumb)
![Death Stranding 2: On The Beach [PC] Review | A Port That Delivers](https://img.game8.co/4447392/15310a0c9aa1b6843bb713b2ea216930.jpeg/thumb)
Popular Games

Genshin Impact Walkthrough & Guides Wiki
Umamusume: Pretty Derby Walkthrough & Guides Wiki
Pokemon Pokopia Walkthrough & Guides Wiki
Honkai: Star Rail Walkthrough & Guides Wiki
Monster Hunter Stories 3: Twisted Reflection Walkthrough & Guides Wiki
Arknights: Endfield Walkthrough & Guides Wiki
Wuthering Waves Walkthrough & Guides Wiki
Zenless Zone Zero Walkthrough & Guides Wiki
Pokemon TCG Pocket (PTCGP) Strategies & Guides Wiki
Monster Hunter Wilds Walkthrough & Guides Wiki


Recommended Games
Fire Emblem Heroes (FEH) Walkthrough & Guides Wiki
Diablo 4: Vessel of Hatred Walkthrough & Guides Wiki
Cyberpunk 2077: Ultimate Edition Walkthrough & Guides Wiki
Yu-Gi-Oh! Master Duel Walkthrough & Guides Wiki
Super Smash Bros. Ultimate Walkthrough & Guides Wiki
Pokemon Brilliant Diamond and Shining Pearl (BDSP) Walkthrough & Guides Wiki
Elden Ring Shadow of the Erdtree Walkthrough & Guides Wiki
Monster Hunter World Walkthrough & Guides Wiki
The Legend of Zelda: Tears of the Kingdom Walkthrough & Guides Wiki
Persona 3 Reload Walkthrough & Guides Wiki


All rights reserved
Copyright© 2024-2025 Kuro Games. All Rights Reserved.
The copyrights of videos of games used in our content and other intellectual property rights belong to the provider of the game.
The contents we provide on this site were created personally by members of the Game8 editorial department.
We refuse the right to reuse or repost content taken without our permission such as data or images to other sites.