Lone Bridge (Elite) Stage Guide | Tidal Defense Simulator
★ Version 3.2 out now!
┣ Sigrika → Builds, Materials, Weapon
┣ Qiuyuan → Builds, Materials, Weapon
┗ Phase 2 → Lynae, Zani, Phoebe
★ 3.2 Main Story, All Events
★ Exclusives: Tier Maker | State of the Meta
Lone Bridge (Elite) is the first Elite stage in Pass Guardian Mode of the Tidal Defense Simulator event in Version 2.6 of Wuthering Waves. See Lone Bridge (Elite)'s map layout, best combat machines, and a guide on how to complete all waves in this guide!
| All Lone Bridge Stage Guides | |
|---|---|
| Common | Elite |
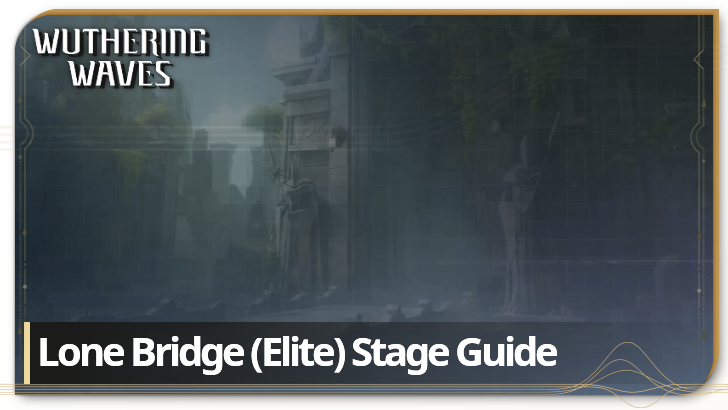
Lone Bridge (Elite) Map Layout and Enemies
| Lone Bridge (Elite) Map and Enemies Information | |
|---|---|
 |
|
| No. of Waves | 4 |
| List of Enemies |
Glacio Prism HP: 2000 SPD: 300 DMG: 5 Passive - Reversal When Slowed this Tacet Discord moves faster instead, during which it is immune to Slow. x4 |
Aero Predator HP: 600 SPD: 150 DMG: 1 Wrath This Tacet Discord starts with a slow Movement Speed. The lower its remaining HP, the faster it moves. x22 |
Nimbus Wraith HP: 50 SPD: 200 DMG: 1 Passive - Bounty This Tacet Discord drops one Lucky Coin when defeated. Collect Lucky Coins to gain Sim Credits. x7 |
|---|---|---|
|
Glacio Predator HP: 400 SPD: 200 DMG: 1 x15 |
Tick Tack HP: 100 SPD: 200 DMG: 1 x51 |
Chop Chop: Headless HP: 800 SPD: 150 DMG: 1 x4 |
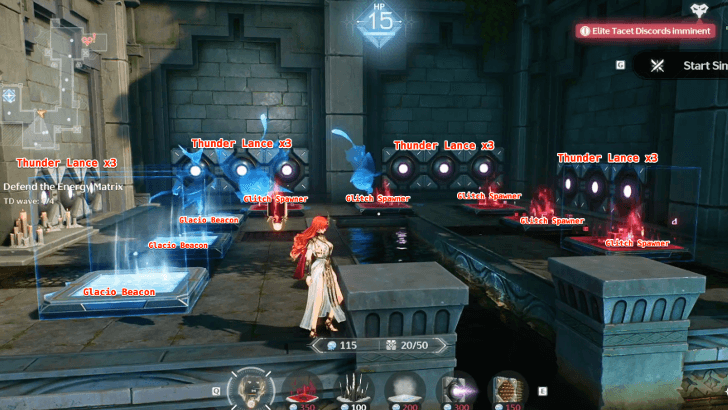
The Lone Bridge map is a single route map that features long corridors with winding routes. There are minimal openings to allow Repulsors to push away enemies, so we should avoid that at all costs. On that note, we have to rely on the Thunder Lance and delaying tactics from the Glacio Beacon or Glitch Spawners.
The enemies are pretty normal this time around, with the Glacio Prism posing the biggest threat. It gets faster when slowed, but we cane easily use that to our advantage with a Glitch Spawner array.
Lone Bridge (Elite) Best Combat Machines
Recommended Combat Machines
 Glacio Beacon Glacio Beacon Glacio Beacon Type: Ground
Cost: 200 Base ATK: 0 Emits artificial chilling currents, Slowing any Tacet Discords moving past the device. |
 Glitch Spawner Glitch Spawner Glitch Spawner Type: Ground
Cost: 250 Base ATK: 150 Cooldown: 10 Periodically infects nearby Tacet Discords with glitches and temporarily Confuses them. Tacet Discords in the Confusion state move in the opposite direction. |
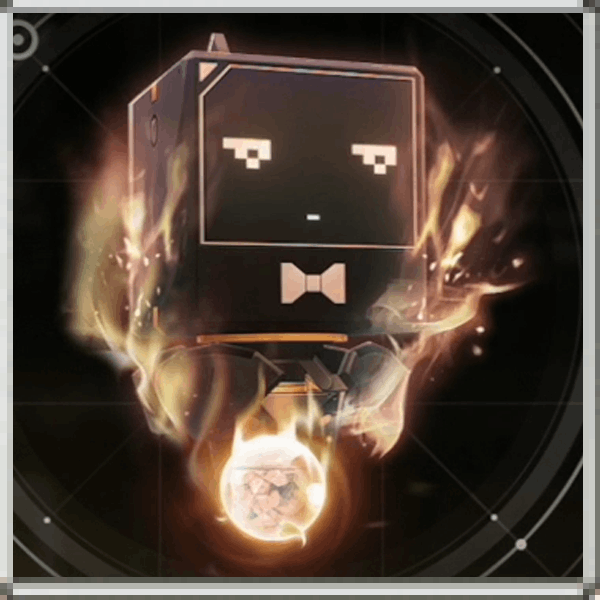 Speed Shooter Speed Shooter Speed Shooter Type: KU-Roro Weapon
Base ATK: 60 Automatically fires projectiles in a row, dealing low Fusion DMG. |
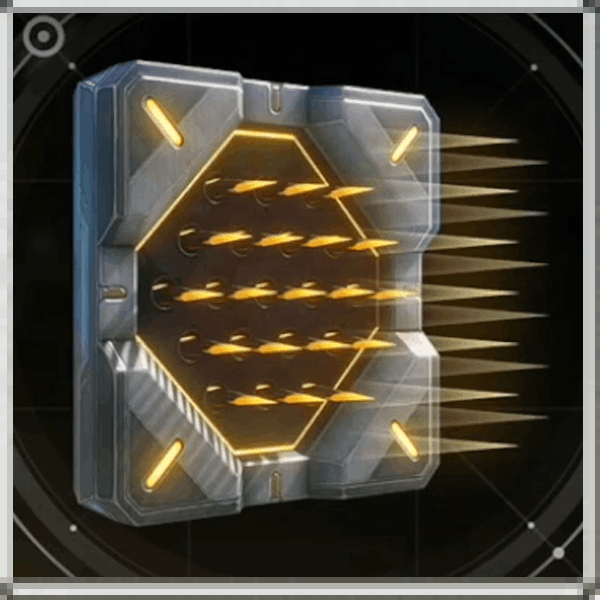 Tacetite Barrage Tacetite Barrage Tacetite Barrage Type: Wall
Cost: 150 Base ATK: 75 Cooldown: 2 Fires Tacetite shards when Tacet Discords approach, dealing Physical DMG to the nearest target. |
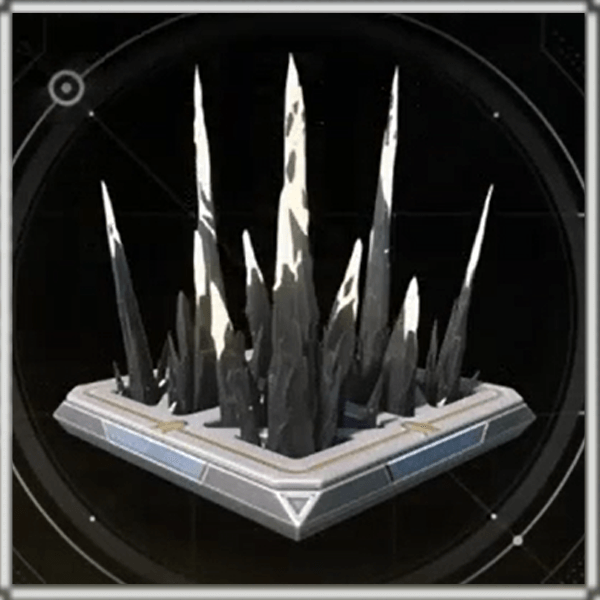 Tacetite Spikes Tacetite Spikes Tacetite Spikes Type: Ground
Cost: 100 Base ATK: 100 Cooldown: 2 Periodically launches Tacetite Spikes, dealing Physical DMG to Tacet Discords. |
 Thunder Lance Thunder Lance Thunder Lance Type: Wall
Cost: 300 Base ATK: 150 Cooldown: 4 Periodically fires a thunder lance that can pierce through Tacet Discords with an unlimited range, dealing Electro DMG. |
As mentioned earlier, the stage is composed of long corridor and winding routes so we should exploit the Thunder Lance's infinite reach, and a combination of Glitch Spawners & Glacio Beacons to delay.
We suggest pushing Thunder Lance to Level 3 and get the double-firing module, while also leveling the Glitch Spawner to max and getting the module that speeds up enemies in Confusion. This will deal with the Glacio Prism later on.
Lone Bridge (Elite) Wave Guide
| Lone Bridge (Elite) Wave Guide |
|---|
|
|
WAVE 1: Focus all Firepower on the U-Bend
| Wave 1 Tips and Recommendations | |
|---|---|
| 1 | 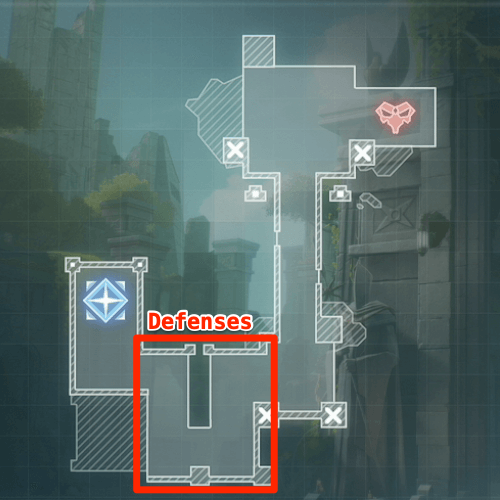
For maximum efficiency, we should focus all firepower in the U-Bend near the Matrix that we are trying to defend. This exploits the infinite range of our Thunder Lances allowing us to delay while the Lance shoots their lasers. |
| 2 |
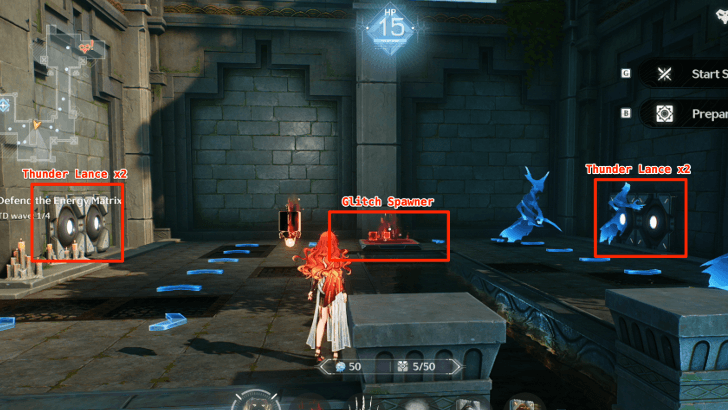 For Wave 1, we should maximize the positioning of the Thunder Lances that allows it to focus fire on anyone that approaches that singular area. In addition, use your Ku-Roro to shoot the TDs approaching the U-Bend to pick some enemies out. |
WAVE 2: Add More Lances and Delaying Machines
| Wave 2 Tips and Recommendations | |
|---|---|
| 1 |
For Wave 2, we still focus on the same U-Bend and just add more Thunder Lances. |
| 2 |
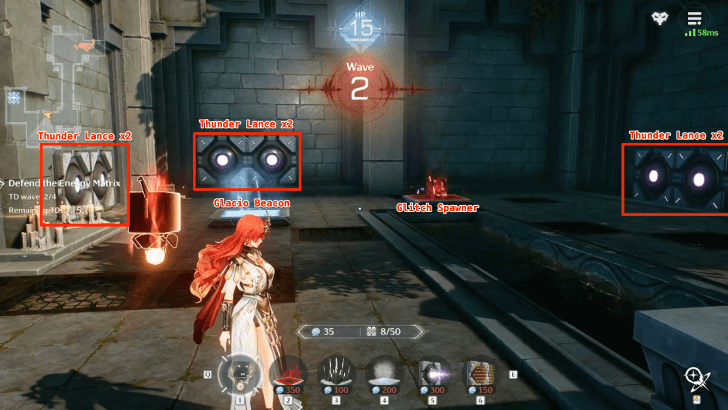 For Wave 2, we continue bolstering our defenses around the U-Bend and add more Thunder Lances. For this wave, we add two more Thunder Lances at the first leg of the U-Bend while adding a Glacio Beacon to slow enemies. Also, do not forget to go around the map to collect Lucky Coins that the Nimbus Wraith will drop when defeated for additional Sim Credits! |
WAVE 3: More Lances, More Slows!
| Wave 3 Tips and Recommendations | |
|---|---|
| 1 |
For Wave 3, we still focus on the same U-Bend and just add more Thunder Lances. This time, we should add more machines that will slow enemies so the Thunder Lance can hit more! |
| 2 |
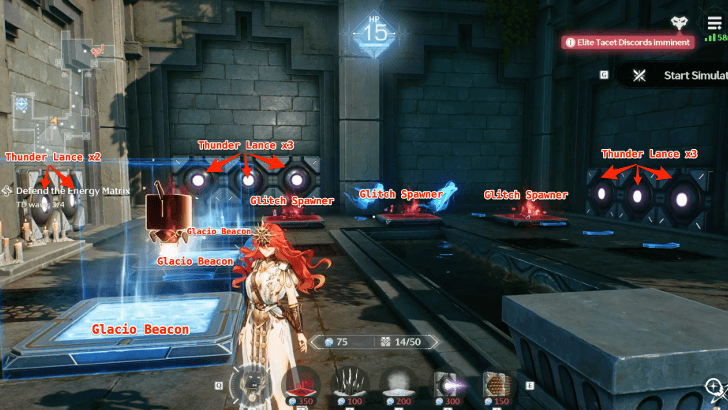 For Wave 3, we still continue bolstering our defenses around the U-Bend and add more Thunder Lances. For this wave, we added more Thunder Lances as well as Glitch Spawners since we need them to deal with the Glacio Prisms. There are still Nimbus Wraith int his wave, do not forget to go around the map to collect Lucky Coins that the Nimbus Wraith will drop when defeated for additional Sim Credits! |
WAVE 4: We Go All Out with Lances and Slows!
| Wave 4 Tips and Recommendations | |
|---|---|
| 1 |
This is the final wave, so we need to go all out with the Thunder Lance, Glacio Beacons, and Glitch Spawners! |
| 2 |
 Wave 4 is where we put our foot down all the way. Put Thunder Lances on all sides allowing us to deal as much damage as possible while slowing enemies with the Glacio Beacon and Glitch Spawner. To deal with the Glacio Prisms, we activate them with the Glacio Prism then use their speed to reverse them back to the start when they get to the Glitch Spawner! In addition, we suggest using your Ku-Roro weapon to deal as much damage as possible before the enemies even get to the U-Bend! |
Lone Bridge (Elite) Stage Information
Basic Information
| Stage Information | |
|---|---|
| Stage Type: Pass Guardian |
Threat Level: Elite |
| Rewards | |
|
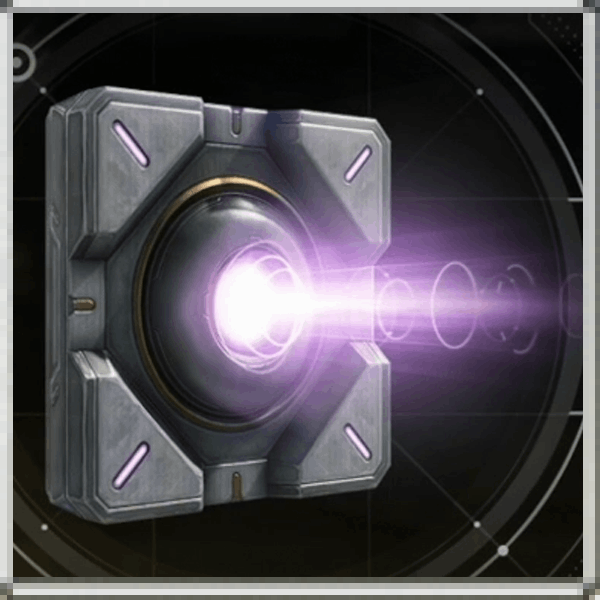
Repulsion Field Type: KU-Roro Weapon Base ATK: 0 Cooldown: 15 Generates a repulsion field, knocking back targets within the range. |
|
| All Challenge Goals | |
|
|
|
Wuthering Waves Related Guides
Tidal Defense Simulator Event Guide
Pass Guardian Stages
| Threat: Overlord | |||||
|---|---|---|---|---|---|
| Threat: Elite | |||||
| Threat: Common | |||||
Deathtrap Mode Stages
(Infinite Mode) |
|
All Tidal Defense Simulator Guides
| - |
Comment
Author

Lone Bridge (Elite) Stage Guide | Tidal Defense Simulator
Premium Articles

Rankings

Gaming News


![Star Savior Review [First Impressions] | Engaging, Entertaining, and Expensive](https://img.game8.co/4447603/8f500e9bf666bdb8adb1af478e9dfdbd.png/thumb)
![Death Stranding 2: On The Beach [PC] Review | A Port That Delivers](https://img.game8.co/4447392/15310a0c9aa1b6843bb713b2ea216930.jpeg/thumb)
Popular Games

Genshin Impact Walkthrough & Guides Wiki
Umamusume: Pretty Derby Walkthrough & Guides Wiki
Pokemon Pokopia Walkthrough & Guides Wiki
Honkai: Star Rail Walkthrough & Guides Wiki
Monster Hunter Stories 3: Twisted Reflection Walkthrough & Guides Wiki
Arknights: Endfield Walkthrough & Guides Wiki
Wuthering Waves Walkthrough & Guides Wiki
Zenless Zone Zero Walkthrough & Guides Wiki
Pokemon TCG Pocket (PTCGP) Strategies & Guides Wiki
Monster Hunter Wilds Walkthrough & Guides Wiki


Recommended Games
Fire Emblem Heroes (FEH) Walkthrough & Guides Wiki
Diablo 4: Vessel of Hatred Walkthrough & Guides Wiki
Cyberpunk 2077: Ultimate Edition Walkthrough & Guides Wiki
Yu-Gi-Oh! Master Duel Walkthrough & Guides Wiki
Super Smash Bros. Ultimate Walkthrough & Guides Wiki
Pokemon Brilliant Diamond and Shining Pearl (BDSP) Walkthrough & Guides Wiki
Elden Ring Shadow of the Erdtree Walkthrough & Guides Wiki
Monster Hunter World Walkthrough & Guides Wiki
The Legend of Zelda: Tears of the Kingdom Walkthrough & Guides Wiki
Persona 3 Reload Walkthrough & Guides Wiki


All rights reserved
Copyright© 2024-2025 Kuro Games. All Rights Reserved.
The copyrights of videos of games used in our content and other intellectual property rights belong to the provider of the game.
The contents we provide on this site were created personally by members of the Game8 editorial department.
We refuse the right to reuse or repost content taken without our permission such as data or images to other sites.