 Vessel of Hatred
 Seasons and Season 12
 Builds
 Classes
 Bosses
 Unique Items
 Aspects
 Runewords
 Items
Items Tips and Tricks
 Transmog
 Interactive Map
 Main Quests
 Priority Quests
 Side Quests
 World Bosses
 Dungeons
 Strongholds
 Tempering Manuals
 Gems
Gems Affixes
 Skills
 Paragon Boards & Glyphs
 Glossary
 NPCs
NPCs Mounts
 Altars of Lilith
 Cow Level
 PVP
PVP World Events
 Rare Spawns
 Shop Bundles
 News and Events
 Bugs and Errors
 The Pit Guide
 Infernal Horde Guide
 Masterworking Guide
 Helltide Event Guide
 Legion Event Guide
 Nightmare Dungeon Guide
 How to Complete Tree of Whispers
 Horadric Strongrooms Guide
 Nightmare Dungeon Tier List
 Best Tree of Whispers Rewards
 The Tower Guide
This survey will take about 1 minute.
Your answers will help us to improve our website.
Diablo 4: Vessel of Hatred (D4)
List of All Legendary Aspects for Season 11
★ NEW: Season 12 Guide and New Features
┗ Seasonal Content: New Uniques | Bloodied Sigils | Slaughterhouses
┗ Seasonal Mechanic: Killstreaks and Bloodied Items
★ NEW: Lord of Hatred Expansion Release Date
★ Check out our Vessel of Hatred expansion guide
Legendary Aspects are unique effects that can be used to imprint powerful buffs on equipment in Diablo 4 (D4). Read on for a complete list of all Legendary Aspects for Season 11, including how to get them and their effects when imprinted into your gear.
List of Contents
Season 11 Aspects
New Legendary Aspects for the Paladin Class
| Skill | Effect |
|---|---|
|
|
Each stack of Fervor 10.0-20.0% bonus Healing Recieved from all sources. |
|
|
Your All Resistance is increased by 100.0-140.0% while in Arbiter form. |
|
|
Judging an enemy grants you 60-100% increased armor for 5 seconds. |
|
|
Your Maximum Resolve is increased by 2. Resolve increase your Damage Reduction by an additional 1-5%. |
|
|
Healing while at full life Fortifies you for 0.5-1.0% Maximum Life and grants 50% increased Armor for 5 seconds. |
|
|
Your Damage Reduction is increased by 10.00-20.00% while wielding a Two Handed weapon. |
|
|
Gain 20 Armor and 2 All Resistance every 25-5 Faith you spend for 4 seconds, stacking up to 50 times. |
|
|
Lucky Hit: Critically Striking has up to a 25% chance to Fortify for 0.25-0.50% of your Maximum Life for each stack of Fervor you have. |
|
|
Your Disciple Skills now Weaken enemies for 2.0-6.0 seconds. |
|
|
Gain up to 100-140% Armor and Impairment Resistance, based on your block chance. |
|
|
Consuming Judgement has a 10% chance to restore 1.00-2.50% of your Maximum Life to you and nearby allies. |
|
|
Thorns damage heals you for 0.20-0.40% of your Maximum Life. |
|
|
Lucky Hit: Up to 20% chance to heal you for 1.0-9.0% of your missing Life. |
|
|
Casting a Skill that grants Arbiter form increases your damage by 8.0-12.0%x, stacking up to 10 times. All stacks are lost when leaving Arbiter form. |
|
|
While in Arbiter, kills grant 1.5-2.5%x increased Vulnerable damage, up to a maximum of 75-125%x. |
|
|
Your Juggernaught skills deal 55-75%x increased damage to Bosses and Crowd Controlled enemies. |
|
|
Losing 8 Resolve grants 30-50% increased Retribution chance for 10 seconds. |
|
|
Lucky Hit: Holy Damage has up to a 5-25% chance to Execute non-Boss enemies with less than 15% life. |
|
|
Holy and Fire damage increased by 50.0-70.0%x. |
|
|
Each stack of Fervor grants you 15.0-20.0%x bonus Critical Strike Damage. |
|
|
Your Disciple Skills deal 40.0-60.0%x increased damage. |
|
|
Losing Resolve Grants you 4-8 Thorns for 10 seconds. Stacks up to 20 times. |
|
|
Judicator Skills have a 40% chance to chain to a Close enemy for 50-150%x of their damage. If no enemy is in range, damage the initial target instead. |
|
|
Judgement detonations can detonate other Judgements early. Judgement deals 60-100%x increased damage. |
|
|
Increase the damage and size of Judgement's explosion by 40-60%x. |
|
|
Consuming Resolve stacks with Juggernaught Oath grants an additional 60-100%x damage. |
|
|
Justice Skills deal 60.0-80.0%x increased damage. |
|
|
Additional Hits from Zealot Oath deal 100.0-120.0%x increased damage. Your maximum Fervor is increased by 1 and its duration is increased by 2 seconds. |
|
|
Arbiter's Wing Strikes now seek nearby enemies and deal 160-250%x increased damage. |
|
|
While Healthy you Skills deal 20-35% increased damage. Double this bonus against Weakened enemies. |
|
|
Your Judicator Skills deal 45.0-65.0%x increased damage against enemies affected by Judgement. |
|
|
You no longer dodge, but your Block chance is increased by 10-30%+. |
|
|
Zealot Skills deal 12.5-32.5%x increased damage, doubles while at 3 or more stacks of Fervor. |
|
|
Basic Skills increase the Critical Strike Chance of your Core Skills by 10.0-20.0% for 5 seconds, up to 3 times. |
|
|
Spending Health on a skill grants you 5.0-15.0% Critical Strike Chance and 35-55%x Critical Strike Damage for 4 seconds. |
|
|
Juggernaught Skills deal 100-140%x increased damage to the first 3 enemies hit. |
|
|
Using a Valor Skill increases your damage by 40.0-60.0%x for 7 seconds. |
|
|
Blocks have a 5-15% chance to reduce all Cooldowns by 1 second. |
|
|
Every time you consume Judgement, reduce on of your active Cooldowns by 0.10-0.20 seconds. |
|
|
Gain 5-25 Faith every 10 times you consume Judgement. |
|
|
Crowd Controlling an enemy has a 25% chance to generate 1-5 Resolve. |
|
|
Your Disciple Skills with Cooldowns generate up to 20-60 Faith based on how far you travel with them. |
|
|
Lucky Hit: Critical Strikes with Zealot Skills have up to a 20% chance to restore 3-7 Faith. |
|
|
The first time you apply Judgement to an enemy, you Daze them for 1.0-3.0 seconds. |
|
|
Blocks have a 25-45% chance to Freeze the Attacker for 3 seconds. |
|
|
Valor Skills generate 1-6 Resolve when cast. |
|
|
When Judgement detonates you gain 20-47%+ increased Movement Speed for 8 seconds. |
|
|
Losing Resolve grants 5.0-15.0% Movement Speed for 10 seconds, stacking up to 5 times. |
|
|
Arbiter's evade cooldown is reduced by 1.0-3.0 Seconds. |
|
|
Gain 5.0-20.0% Movement Speed. Double this bonus while Unhindered or Unstoppable. |
There are 50 new aspects for the newly added Paladin Class for Season 11. These Aspects support each archetype of the Paladin, diversifying the class's builds and strengthening its skills.
Season 11 Guide (Divine Intervention)
All Legendary Aspect Locations
Legendary Aspect Interactive Map
The Interactive Map both shows the location of key points on the map, and doubles as a collectible checker.
- Click an icon on the right side to show all the pins of a specific type, or click the magnifying glass button to search for a specific pin by name.
- Click a pin on the map to see its name and description, and a relevant picture or video if available.
- From here, click Mark as Acquired to indicate that you've gotten a collectible already. This will change its icon on the map to show that it has been collected, and add 1 to that pin type's Counter.
- To undo this, click on the same pin and click Restore to unclaimed.
- To check how many pins you have marked so far, check the Counter in the bottom left, and click the icon that looks like a checklist to see counters for all pin types.
- If the collected pins start to get in the way, you can hide them all by clicking the green Show Pins button on the left side.
| Icon | How to Use |
|---|---|
 | Show Names This button reveals the Name of every icon currently shown. |
 | Show Pins This button will toggle between showing and hiding all the pins which you have already marked as acquired. |
 | Fullscreen This button will change the map display to fill the screen. |
 | Search Mode Toggle This button will display a searchbar which you can use to search for an individual pin by its name. |
 | Icon Mode Toggle In Search Mode, this button will toggle you back to Icon Mode, removing the search bar and displaying the icons again. |
 | All Pins This button is shown along with the Icons on the right when there are over 6 types of pins. Click it for a full selection of all available pin types. |
 | Counter Tracks the number of pins you have of a certain type. The pin type shown is set to the page and currently cannot be changed; however, all pin type counters can be viewed by clicking the checklist icon on the right side. |
| View All Counters This icon is found on the right side of the Counter. When a map has more than one pin type, click this icon to see Counters for all pin types. | |
| Zoom In / Zoom Out This icon is found on the top left side of the map. You can press these buttons, or use your scroll wheel while hovering, to Zoom In and Out of the interactive map. |
Some Aspects Can Only Be Obtained by Salvaging
Although numerous aspects can be found inside Dungeons, a some of them can only be obtained by salvaging Legendary Items you've obtained or traded with another player.
Once you obtain a Legendary equipment with the aspect that you want, head for the Blacksmith to salvage the equipment and register the aspect to your Codex of Power.
All Extractable Legendary Aspects
All Legendary Aspects in Diablo 4
List of Legendary Aspects
| Aspects by Class | |||||
|---|---|---|---|---|---|
 Paladin Paladin |
|||||
| Aspects by Type | |||||
 Offensive Offensive |
 Defensive Defensive |
 Mobility Mobility |
|||
 Utility Utility |
 Resource Resource |
||||
Diablo 4 Legendary aspects are categorized by class and by type. Check out our guides above for a full list of all Legendary Aspects for each class and Aspect type in the game.
How to Equip Aspects
Imprint Aspect at the Occultist
To equip an aspect, head for the Occultist and select the Imprint Aspect tab. Click on the Codex of Power, and choose the aspect that you want to imprint on your gear. Make sure you have enough gold and materials such as Iron Chunks, Veiled Crystals, Baleful Fragments, and Forgotten Souls.
Keep in mind that imprinting two of the same aspects do not stack, so you have to equip a different aspect in each equipment when you are making your build.
How to Upgrade Aspects
Salvage Equipment with Higher Rolls
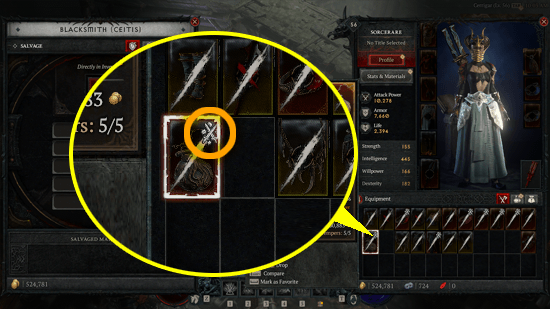
You can continue upgrading the values of the aspects found in your Codex of Power as you salvage Legendary Items with higher rolls. Look for items with a crossed sword icon. This would indicate that the aspect imbedded in that item is an upgrade to your current entry in the Codex of Power.
Legendary items without the crossed sword icon are better sold for a good amount of gold unless you need the upgrade materials from salvaging them.
Diablo 4 Related Guides

Game Mechanics and Activities
Upcoming Lord of Hatred Content
 Horadric Cube Horadric Cube |
 Talisman Explained Talisman Explained |
 War Plans Explained War Plans Explained |
 Echoing Hatred Guide Echoing Hatred Guide |
Recommended Activity Guides
 Mystery Chest Locations and Map Mystery Chest Locations and Map |
- |
Author

List of All Legendary Aspects for Season 11
Please participate in our site
improvement survey
03/2026
improvement survey
03/2026
Would you assist in
improving Game8's site?
improving Game8's site?

×
We are listening to our users' valuable opinions and discussing how to act on them.
The information collected through this survey will be used for the purpose of improving our services. In addition, the information will only be disclosed a part of a statistic in a format that will not allow identification of personal information.
Begin Survey
Not Now
×
Please rate each item regarding Game8.co's Advertisements.
Amount of Ads
Very Dissatisfied
Somewhat Dissatisfied
Fine
Somewhat Satisfied
Highly Satisfied
Placement of Ads
Timing of Ad Display
Ad Loading Speed
Safeness of Ads
Content of Ads
×
Please rate each item regarding Game8.co's Quality of Articles.
Amount of information
Very Dissatisfied
Somewhat Dissatisfied
Fine
Somewhat Satisfied
Highly Satisfied
Frequency of updates
Speed of new information
Accuracy of articles
Understandibility of articles
Readability of sentences
×
Please rate each item regarding Game8.co's Usability of the Site.
Ease of finding information
Very Dissatisfied
Somewhat Dissatisfied
Fine
Somewhat Satisfied
Highly Satisfied
Loading Speed
Use of Color
Font Size
Visibility of Images
Easy to Understand Layout
×
Please rate each item regarding Game8.co's Message Boards, Comments.
Ease of Writing
Very Dissatisfied
Somewhat Dissatisfied
Fine
Somewhat Satisfied
Highly Satisfied
Readability
Ease in Finding Information
Comment Quality
Comment Quantity
Admin Response
×
Please rate each item regarding Game8.co's Site's new design.
Please rate our site's new design
Very Dissatisfied
Somewhat Dissatisfied
Fine
Somewhat Satisfied
Highly Satisfied
Do you think that the website's design change makes the site easier to use?
Has the new design made it easier for you to find information on the site?
Has the new design improved the overall visual appeal of the site?
How would you rate your overall satisfaction with the new design of the site?
×
How likely are you to recommend Game8 to someone you know?
Very Unlikely
0
1
2
3
4
5
6
7
8
9
10
Very Likely
If you have other opinions regarding potential improvement to the website, please share them with us. We would appreciate your honest opinion.
Note: This is a free response section, so you can proceed without entering anything.
Note: Please be sure not to enter any kind of personal information into your response.
Note: Please be sure not to enter any kind of personal information into your response.
×
Thank You
×
Thank you for participating in our survey! Your answers will help us to improve the quality of our website and services.
We hope you continue to make use of Game8.
We hope you continue to make use of Game8.
Close
Rankings
- We could not find the message board you were looking for.

Gaming News


![Monster Hunter Stories 3 Review [First Impressions] | Simply Rejuvenating](https://img.game8.co/4438641/2a31b7702bd70e78ec8efd24661dacda.jpeg/thumb)
Popular Games

Genshin Impact Walkthrough & Guides Wiki
Honkai: Star Rail Walkthrough & Guides Wiki
Umamusume: Pretty Derby Walkthrough & Guides Wiki
Pokemon Pokopia Walkthrough & Guides Wiki
Resident Evil Requiem (RE9) Walkthrough & Guides Wiki
Monster Hunter Wilds Walkthrough & Guides Wiki
Wuthering Waves Walkthrough & Guides Wiki
Arknights: Endfield Walkthrough & Guides Wiki
Pokemon FireRed and LeafGreen (FRLG) Walkthrough & Guides Wiki
Pokemon TCG Pocket (PTCGP) Strategies & Guides Wiki


Recommended Games
Diablo 4: Vessel of Hatred Walkthrough & Guides Wiki
Cyberpunk 2077: Ultimate Edition Walkthrough & Guides Wiki
Fire Emblem Heroes (FEH) Walkthrough & Guides Wiki
Yu-Gi-Oh! Master Duel Walkthrough & Guides Wiki
Super Smash Bros. Ultimate Walkthrough & Guides Wiki
Pokemon Brilliant Diamond and Shining Pearl (BDSP) Walkthrough & Guides Wiki
Elden Ring Shadow of the Erdtree Walkthrough & Guides Wiki
Monster Hunter World Walkthrough & Guides Wiki
The Legend of Zelda: Tears of the Kingdom Walkthrough & Guides Wiki
Persona 3 Reload Walkthrough & Guides Wiki


All rights reserved
©2022 BLIZZARD ENTERTAINMENT, INC. ALL RIGHTS RESERVED.
All trademarks referenced herein are the properties of their respective owners.
The copyrights of videos of games used in our content and other intellectual property rights belong to the provider of the game.
The contents we provide on this site were created personally by members of the Game8 editorial department.
We refuse the right to reuse or repost content taken without our permission such as data or images to other sites.