Paragon System Explained
★ NEW: Season 11 Guide | Season 11 Release Date
┗ Seasonal Content: New Uniques
┗ Seasonal Mechanic: Divine Gifts
★ NEW: Paladin Class and Lord of Hatred Expansion Release Date
★ Check out our Vessel of Hatred expansion guide
This is a guide to Paragon Boards, the final class progression system in Diablo 4 (D4) that provides stat boosts and enhances your preferred build and playstyle. Read on for a full explanation of Paragon Boards with tips for beginners, a list of all the different Node types, a guide to getting 300 Paragon Points, and some advanced tips!
List of Contents
Paragon System Explained
| Beginner's Guide to Paragon Boards |
|---|
|
|
Endgame System for Deep Buildcrafting
Paragon Boards are the ultimate endgame system in Diablo 4, offering deep crafting options of your class for endless build possibilities.
While the Skill Tree you leveled in the early game focuses on building the playstyle of your choosing through character abilities and core passive skills, the Paragon Board system is all about taking your build to the next level by offering a plethora of stat boosts and Legendary powers that synergize with specific build archetypes.
While it might be overwhelming to take in all at once, our Paragon Board guide will break down this endgame system into its most basic parts, explaining the different Node types, how to select and place Glyphs, how to rotate Boards, and take you through the Board and Node selection process step-by-step.
 Heads-up! Heads-up! |
Note: If you've got the basics down and are just looking for more advanced tips, jump to our advanced tips and tricks section for optimal pathing advice, how many Boards you should be equipping, and more! ▼ Jump to advanced tips and tricks! |
Introduction to Node Types
Each point you spend on your Paragon Board unlocks one Node. There are a variety of nodes, each offering a different kind of boost to your character. They range from Normal Nodes with small stat bonuses, Magic and Rare Nodes with slightly better buffs, and class-defining Legendary Nodes that synergize with a particular playstyle.
Two special Nodes to be aware of are Glyph Sockets, which provide buffs to surrounding activated Nodes when a Glyph is inserted, and Board Attachment Gates, which lead to the next Board.
| Node Type | Normal |
|---|---|
| ・These come in four varieties and provide +5 to one Core Stat: Strength, Intelligence, Willpower, or Dexterity. | |
| ・Magic Nodes generally offer a slightly better buff to an Offensive, Defensive, Utility Stat, or a Core Stat. These come in a group of 5 bunched around a Rare Node that they are thematically aligned with. | |
| ・Rare Nodes provide two bonuses, plus a possible third bonus if you meet the Core Stat requirement. This bonus requirement is based on your character's stats overall and not limited to bonuses obtained from the Paragon Board. | |
|
|
・As the strongest Nodes, these are the focal point of any Paragon Board, only appear one per Board, and offer a class and archetype -specific bonus. Legendary Nodes are to Paragon Boards what Aspects are to Gear. |
| ・On their own, Glyph Sockets don't do anything. Once enhanced with Glyphs, however, these can juice up your stats based on any nodes that fall within their radius. They also provide an additional bonus if conditions are met. | |
| ・Board Attachment Gates are where Paragon Boards connect. They also offer a flat +5 to all four of your Core Stats. You are required to purchase at least one Board Attachment Gate to move to the next Paragon Board. |
Normal Nodes: Leave Them or Take Them
You shouldn't go out of your way to acquire more Normal Nodes, however, you do want to at least make sure you have enough Normal Nodes purchased in radius range to meet the requirements of any Glyph you've socketed.
Insert Glyphs into Glyph Sockets

Once your first Paragon Board unlocks, you'll have a chance to start getting Rare Glyphs in your loot randomly. Although pretty weak at first, Glyphs offer more and more significant bonuses once you've leveled them up in The Pit.
To make the most of your Glyph, make sure to target Normal Nodes that fall in its radius. There's no punishment like respec costs for switching out Glyphs, so feel free to experiment with these or settle for a non-optimal Glyph until you can find a better one.
| All Glyph Guides | |
|---|---|
| List of Glyphs by Class | How to Get Glyphs |
Make a Bee-Line for Legendary Nodes
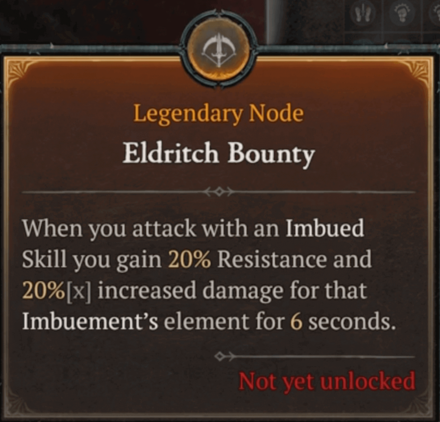
Hands-down the best Node of a given Board and what you should (almost always) be pathing towards. It's best to select Legendary Nodes that sync with your Skill Tree.
Attaching the Next Board
Reach a Board Attachment Gate
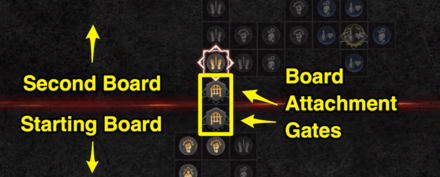
Once you've made a path through the first Board and purchased the Board Attachment Gate, it's time to select and orient your next Board. On this tile, choose Board Selection, then you'll be show all 8 available Paragon Boards with their Legendary and Rare Node descriptions.
Based on what kind of build you want to make, you should be able to decide which Board is right for your character. Select Preview to see a Board in full, Rotate to change its orientation, and Attach to lock it into place when you make your decision.
Rotate a Board with Optimal Pathing in Mind
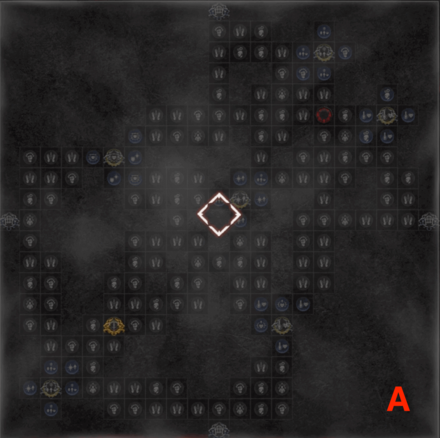
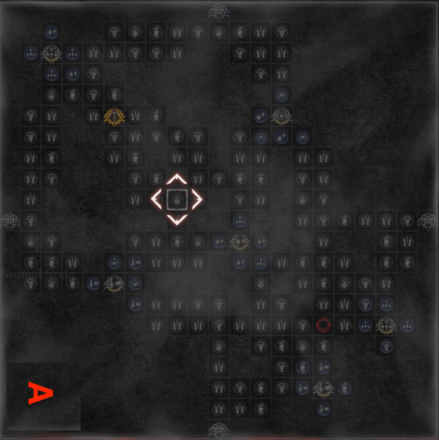
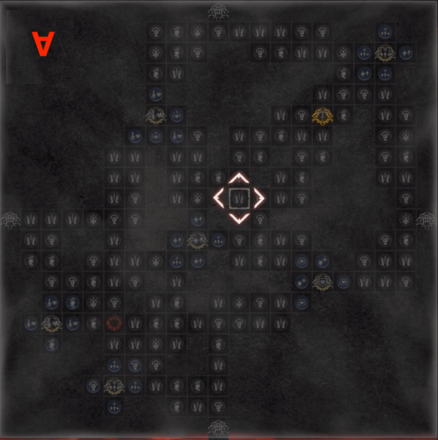
| Eldritch Bounty Paragon Board Rotations (example) | |
|---|---|
 |
 |
 |
 |
When should you rotate a Board, and to which position? There is no easy answer here, but ultimately your goal with Paragon Board pathing is to get the most bang for your buck - by choosing which path is going to give you the most amount of power by spending the least amount of Paragon Points.
If you're only going for a Legendary Node on a Board, it almost always makes the most sense to rotate the Board and bring the Legendary Node as close as possible to the bottom Board Attachment Gate so you can grab the Node and move on to the next board.
Respec Individual Nodes with Gold
Just like with the Skill Tree, you can respec your Paragon Board choices for gold. Although the price of each refund starts off very low, it quickly increases each time you level up, so try to plan out your Paragon Board in advance to save some money.
How to Unlock Paragon Boards
First Board Unlocks Automatically at Level 60

Simply reach level 60 and the first Paragon Board will automatically unlock. You do not need to complete any other objectives to unlock the Paragon Board system.
Access your Starting Board in the Abilities tab next to the Skill Tree tab. From here, you can expand the Paragon Board to full screen for a better view or see your available Glyphs.
Reach the First Board Attachment Gate to Unlock the Next Paragon Board

Spend enough Paragon Points to reach the Board Attachment Gate node at the end of the Starting Board, then choose Board Selection to view all of the Paragon Boards for your class.
You may choose any of the 9 available Boards to attach next. As of Season 6 you can only use 5 Paragon Boards including the Starting Board, so choose wisely.
What is the Max Paragon Points Total?
Up to 300 Paragon Points
At level 60, you stop earning Skill Points for your Skill Tree and instead start earning 1 Paragon Point for each level.
Furthermore, completing the fourth rank of the Region progress nets you an additional 4 points per region. There are also 4 Altars of Lilith in Dry Steppes that give you a bonus point each. You can receive up to 300 Paragon Points on top of the renown rewards and Altars of Lilith.
Respec Cost Guide: When Should You Respec?
Tips and Tricks for Using the Paragon Board
Theorycraft Your Boards Starting from Legendary Nodes
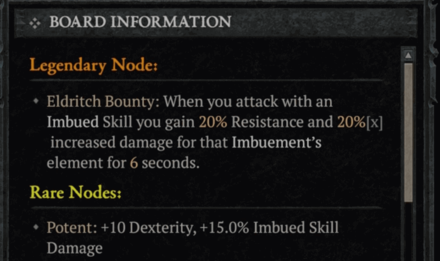
The best Paragon Board for you is the one that synergizes the most with your build. Study the Board Selection screen and determine if the Legendary node works for you, then choose which Rare Nodes you want to purchase from this Board (if any).
While building a path to the Legendary Node of your next Board, you should be trying to reach the stat requirements of the Rare Node that you want to hit along the way.
| Example: Pathing the Rogue's Eldritch Bounty Paragon Board |
|---|
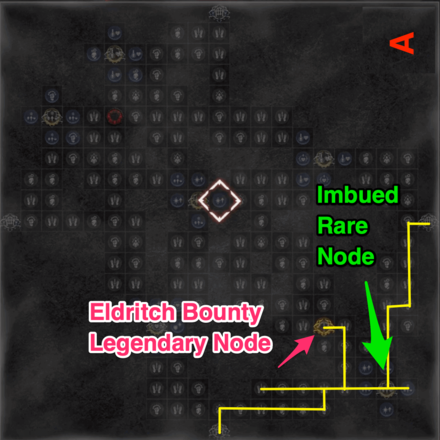 |
| For instance, let's say you're running a Rogue build that focuses on Shadow Imbuement. The Eldritch Bounty Paragon Board is a match made in heaven because its Legendary Node gives 20% Resistance and 20%[x] increased damage when you attack with an Imbued Skill. Imbuer, one of the Rare Nodes on this board, gives +15% Imbued Skill Damage as one of its perks, plus an additional +15% if you meet the stat requirements of 260 Strength and 350 Dexterity. Knowing that this offers a massive boost to your Imbued Skills, you'll want to make sure that you select enough Strength and Dexterity Nodes to get you there (or otherwise ensure that your Gear is providing you with those stat increases). |
Scan the Nodes Around Glyph Sockets

Glyphs are only worth it if you can take advantage of the Nodes that land in their radius, so make sure to analyze the glowing red range before pathing to a Glyph Socket.
In the case of the Exploit Glyph (pictured), the bonus ramps up with each Strength node purchased. As there are only a few Strength Nodes in the surrounding area, this would not be the optimal Glyph for this particulal Glyph socket.
Rare Nodes in the Radius of a Glyph Give Bonuses to the Main Stat
Paragon Boards follow consistent patterns in their structure across all classes. While the individual Nodes differ, the shape and layout is the same for each class.
One important thing to notice is that the Rare Nodes that fall within the radius of a Glyph Socket always give a bonus to the Main Stat of your class, which you want to target as much as possible. The blue Magic Nodes that surround this Rare Node will give bonuses to the two medium stats and must be considered on a case by case basis.
Diablo IV Related Guides

| All Diablo 4 Wiki Categories | |
|---|---|
 Vessel of Hatred Vessel of Hatred |
 Seasons and Season 11 Seasons and Season 11 |
 Builds Builds |
 Classes Classes |
 Bosses Bosses |
 Unique Items Unique Items |
 Aspects Aspects |
 Runewords Runewords |
 Items Items |
 Tips and Tricks Tips and Tricks |
 Transmog Transmog |
 Interactive Map Interactive Map |
 Main Quests Main Quests |
 Priority Quests Priority Quests |
 Side Quests Side Quests |
 World Bosses World Bosses |
 Dungeons Dungeons |
 Strongholds Strongholds |
 Tempering Manuals Tempering Manuals |
 Gems Gems |
 Affixes Affixes |
 Skills Skills |
 Paragon Boards & Glyphs Paragon Boards & Glyphs |
 Glossary Glossary |
 NPCs NPCs |
 Mounts Mounts |
 Altars of Lilith Altars of Lilith |
 Cow Level Cow Level |
 PVP PVP |
 World Events World Events |
 Rare Spawns Rare Spawns |
 Shop Bundles Shop Bundles |
 News and Events News and Events |
 Bugs and Errors Bugs and Errors |
Game Mechanics and Activities
Upcoming Lord of Hatred Content
 Horadric Cube Horadric Cube |
 Talisman Explained Talisman Explained |
 War Plans Explained War Plans Explained |
 Echoing Hatred Guide Echoing Hatred Guide |
Recommended Activity Guides
 Mystery Chest Locations and Map Mystery Chest Locations and Map |
- |
Comment
Author
Paragon System Explained
Rankings
- We could not find the message board you were looking for.
Gaming News
Popular Games

Genshin Impact Walkthrough & Guides Wiki

Honkai: Star Rail Walkthrough & Guides Wiki

Arknights: Endfield Walkthrough & Guides Wiki

Umamusume: Pretty Derby Walkthrough & Guides Wiki

Wuthering Waves Walkthrough & Guides Wiki

Pokemon TCG Pocket (PTCGP) Strategies & Guides Wiki

Abyss Walkthrough & Guides Wiki

Zenless Zone Zero Walkthrough & Guides Wiki

Digimon Story: Time Stranger Walkthrough & Guides Wiki

Clair Obscur: Expedition 33 Walkthrough & Guides Wiki
Recommended Games

Fire Emblem Heroes (FEH) Walkthrough & Guides Wiki

Pokemon Brilliant Diamond and Shining Pearl (BDSP) Walkthrough & Guides Wiki

Diablo 4: Vessel of Hatred Walkthrough & Guides Wiki

Super Smash Bros. Ultimate Walkthrough & Guides Wiki

Yu-Gi-Oh! Master Duel Walkthrough & Guides Wiki

Elden Ring Shadow of the Erdtree Walkthrough & Guides Wiki

Monster Hunter World Walkthrough & Guides Wiki

The Legend of Zelda: Tears of the Kingdom Walkthrough & Guides Wiki

Persona 3 Reload Walkthrough & Guides Wiki

Cyberpunk 2077: Ultimate Edition Walkthrough & Guides Wiki
All rights reserved
©2022 BLIZZARD ENTERTAINMENT, INC. ALL RIGHTS RESERVED.
All trademarks referenced herein are the properties of their respective owners.
The copyrights of videos of games used in our content and other intellectual property rights belong to the provider of the game.
The contents we provide on this site were created personally by members of the Game8 editorial department.
We refuse the right to reuse or repost content taken without our permission such as data or images to other sites.
 The Pit Guide
 Infernal Horde Guide
 Masterworking Guide
 Helltide Event Guide
 Legion Event Guide
 Nightmare Dungeon Guide
 How to Complete Tree of Whispers
 Horadric Strongrooms Guide
 Nightmare Dungeon Tier List
 Best Tree of Whispers Rewards
 The Tower Guide


![Neverness to Everness (NTE) Review [Beta Co-Ex Test] | Rolling the Dice on Something Special](https://img.game8.co/4414628/dd3192c8f1f074ea788451a11eb862a7.jpeg/show)


