This survey will take about 1 minute.
Your answers will help us to improve our website.
Diablo 4: Vessel of Hatred (D4)
All Rare Spawns and Drops
★ NEW: Season 12 Guide and New Features
┗ Seasonal Content: New Uniques | Bloodied Sigils | Slaughterhouses
┗ Seasonal Mechanic: Killstreaks and Bloodied Items
★ NEW: Lord of Hatred Expansion Release Date
★ Check out our Vessel of Hatred expansion guide
This is a guide on how to find rare spawns in Diablo 4 (D4). Read on to know more about rare monster spawn locations, their special rare item drops, and more!
List of Contents
All Rare Spawns and Drops
| Jump to a Region! | |||||
|---|---|---|---|---|---|
| Fractured Peaks | Hawezar | Kehjistan | |||
| Dry Steppes | Scosglen | ||||
Below is a list of all the ultra rare mobs that drop rare and strong equipment when defeated! Read on to know where these mobs are and the drops that you may get for defeating them.
Fractured Peaks
| Rare Spawns by Region | |||||
|---|---|---|---|---|---|
| Fractured Peaks | Hawezar | Kehjistan | |||
| Dry Steppes | Scosglen | ||||
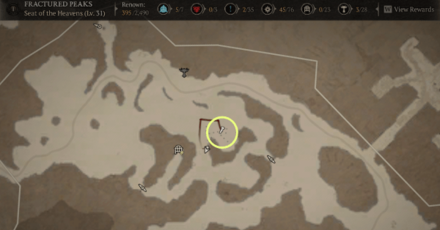
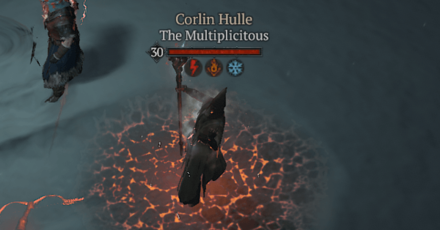
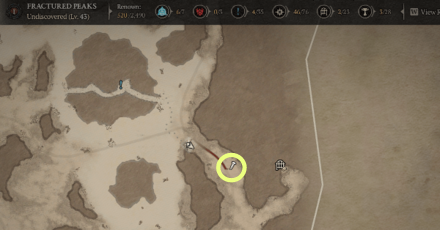
Corlin Hulle (Staff of Elemental Command)
| Map View | Ultra Rare Mob | ||||
|---|---|---|---|---|---|
 |
 |
||||
| Equipment Drop Info | |||||
 Staff of Elemental Command Staff of Elemental Command
|
Class | Sorcerer | |||
| Equipment Type | Rare Staff | ||||
| Equipment Details | |||||
|
・+ X% Damage to Crowd Controlled Enemies ・+ X% Damage ・+ X% Damage Over Time |
|||||
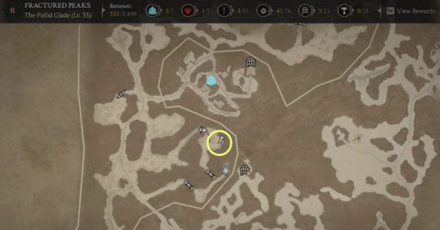
Osgar Reede (Mace of Blazing Furor)
| Map View | Ultra Rare Mob | ||||
|---|---|---|---|---|---|
 |
 |
||||
| Equipment Drop Info | |||||
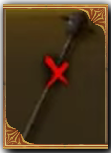 Mace of Blazing Furor Mace of Blazing Furor
|
Class | Barbarian | |||
| Equipment Type | Rare 1H Mace | ||||
| Equipment Details | |||||
|
・+ X% Overpower Damage ・+ X% Damage While Berserking ・+ X% Overpower Damage ・+ X% Damage to Burning Enemies |
|||||
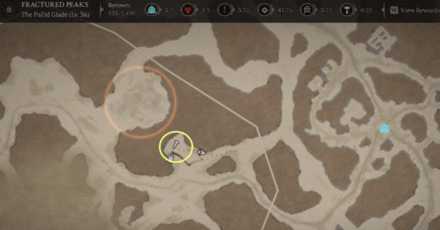
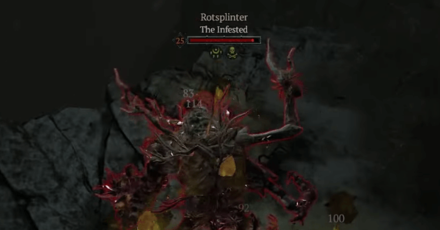
Rotsplinter (Ring of Splintered Wood)
| Map View | Ultra Rare Mob | ||||
|---|---|---|---|---|---|
 |
 |
||||
| Equipment Drop Info | |||||
 Ring of Splintered Wood Ring of Splintered Wood
|
Class | All Classes | |||
| Equipment Type | Rare Ring | ||||
| Equipment Details | |||||
|
・+ X% Resistance to All Elements ・+ X Shadow Resistance ・+ X% Attack Speed ・+ X% Overpower Damage |
|||||
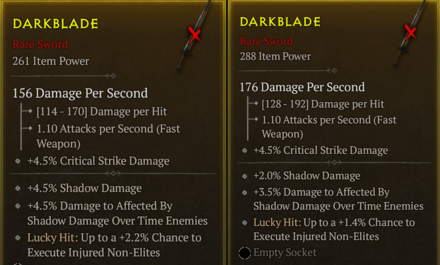
Sir Lynna (Darkblade)
| Map View | Ultra Rare Mob | ||||
|---|---|---|---|---|---|
 |
 |
||||
| Equipment Drop Info | |||||
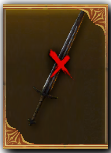 Darkblade Darkblade
|
Class | All Classes | |||
| Equipment Type | Rare 1H Sword | ||||
| Equipment Details | |||||
|
・+ X% Critical Strike Damage ・+ X% Shadow Damage ・+ X% Damage to Enemies Affected by Shadow DoT ・Lucky Hit: Up to a X% Chance to Execute Injured Non-Elites |
|||||
Hawezar
| Rare Spawns by Region | |||||
|---|---|---|---|---|---|
| Fractured Peaks | Hawezar | Kehjistan | |||
| Dry Steppes | Scosglen | ||||
Captain Willcocks (Captain’s Ragged Boots)
| Map View | Ultra Rare Mob | ||||
|---|---|---|---|---|---|
 |
 |
||||
| Equipment Drop Info | |||||
 Captain’s Ragged Boots Captain’s Ragged Boots
|
Class | All Classes | |||
| Equipment Type | Rare Boots | ||||
| Equipment Details | |||||
|
・+ Attacks reduce evade cooldown by .X seconds ・+ X% Slow Duration Reduction ・+ X% Damage Reduction While Injured ・+ X% Element Resistance |
|||||
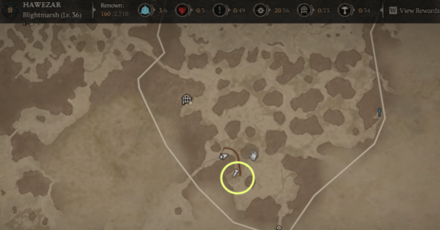
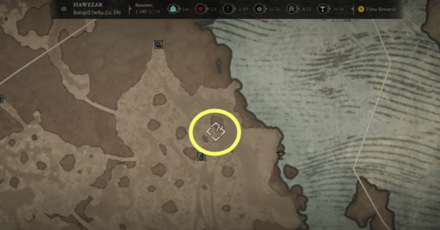
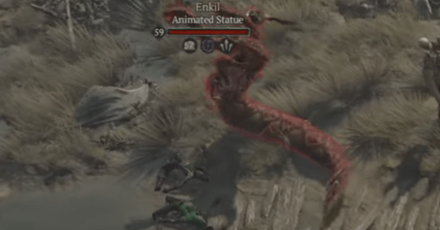
Enkil (Eye of Enkil)
| Map View | Ultra Rare Mob | ||||
|---|---|---|---|---|---|
 |
 |
||||
| Equipment Drop Info | |||||
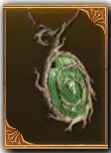 Eye of Enkil Eye of Enkil
|
Class | All Classes | |||
| Equipment Type | Rare Amulet | ||||
| Equipment Details | |||||
|
・+ X% Resistance to All Elements ・+ X% Crowd Control Duration ・+ X% Damage for X Seconds After Killing an Elite ・+ X% Shrine Buff Duration |
|||||
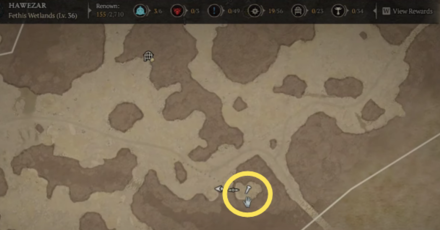
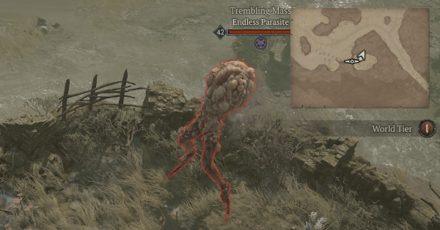
Trembling Mass, Endless Parasite (Trembling Ring)
| Map View | Ultra Rare Mob | ||||
|---|---|---|---|---|---|
 |
 |
||||
| Equipment Drop Info | |||||
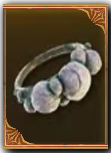 Trembling Ring Trembling Ring
|
Class | All Classes | |||
| Equipment Type | Rare Ring | ||||
| Equipment Details | |||||
|
・+ X% Resistance (2 Elements) ・+ X% Maximum Life ・+ X Life on Kill ・+ X Life Regeneration while Not Damaged Recently |
|||||
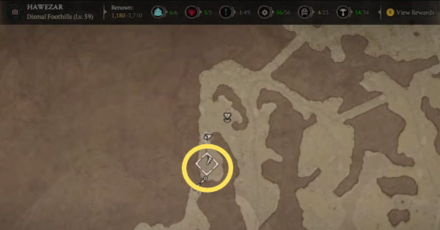
Renn Dayne (Haunted Crossbow)
| Map View | Ultra Rare Mob | ||||
|---|---|---|---|---|---|
 |
 |
||||
| Equipment Drop Info | |||||
 Haunted Crossbow Haunted Crossbow
|
Class | Rogue | |||
| Equipment Type | Rare Crossbow | ||||
| Equipment Details | |||||
|
・+ X% Vulnerable Damage ・+ X% Shadow Damage ・+ X% Core Skill Damage ・+ X% Damage to Close Enemies |
|||||
Kehjistan
| Rare Spawns by Region | |||||
|---|---|---|---|---|---|
| Fractured Peaks | Hawezar | Kehjistan | |||
| Dry Steppes | Scosglen | ||||
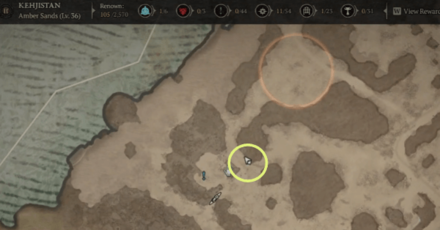
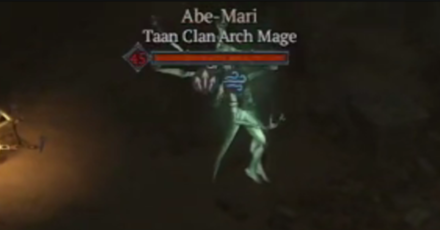
Abe-Mari (Wand of Abe-Mari)
| Map View | Ultra Rare Mob | ||||
|---|---|---|---|---|---|
 |
 |
||||
| Equipment Drop Info | |||||
 Wand of Abe-Mari Wand of Abe-Mari
|
Class | Necromancer | |||
| Equipment Type | Rare Wand | ||||
| Equipment Details | |||||
|
・+ X% Lucky Hit Chance ・+ X Intelligence ・+ X% Critical Strike Damage ・+ X% Damage to Distant Enemies |
|||||
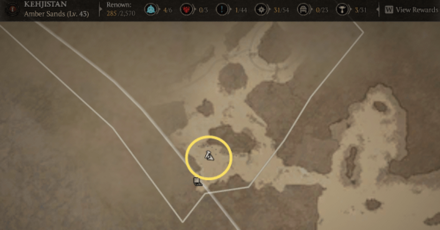
Faraya Tehi (Grotesque Loop)
| Map View | Ultra Rare Mob | ||||
|---|---|---|---|---|---|
 |
 |
||||
| Equipment Drop Info | |||||
 Grotesque Loop Grotesque Loop
|
Class | All Classes | |||
| Equipment Type | Rare Ring | ||||
| Equipment Details | |||||
|
・+ X% Resistance (2 Elements) ・+ X% Barrier Generation ・+ X% Fortify Generation ・+ X Life on Kill |
|||||
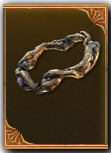
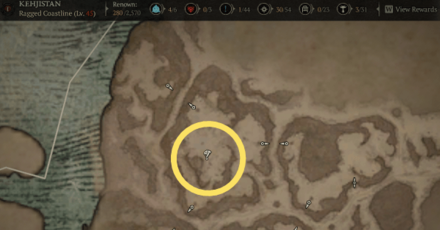
Nine-Eyes (Broodmother’s Stinger)
| Map View | Ultra Rare Mob | ||||
|---|---|---|---|---|---|
 |
 |
||||
| Equipment Drop Info | |||||
 Broodmother’s Stinger Broodmother’s Stinger
|
Class | Necromancer | |||
| Equipment Type | Rare Dagger | ||||
| Equipment Details | |||||
|
・+ X% Damage to Close Enemies ・+ X% Poison Damage ・+ X% Damage Over Time ・+ X% Damage Over Time |
|||||
Qiniel (Qin’s Captivating Eye)
| Map View | Ultra Rare Mob | ||||
|---|---|---|---|---|---|
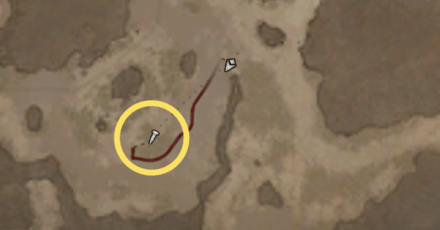 |
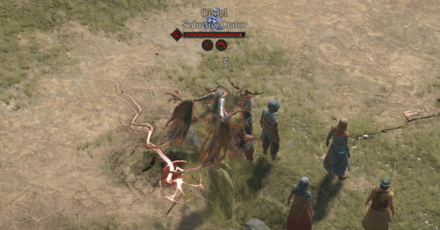 |
||||
| Equipment Drop Info | |||||
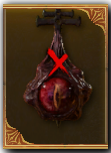 Qin’s Captivating Eye Qin’s Captivating Eye
|
Class | Necromancer | |||
| Equipment Type | Rare Focus | ||||
| Equipment Details | |||||
|
・+ X% Cooldown Reduction ・+ X% Lucky Hit Chance ・+ X% Lucky Hit Chance ・+ X% Crowd Control Duration |
|||||
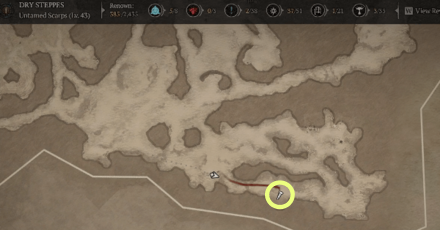
Dry Steppes
| Rare Spawns by Region | |||||
|---|---|---|---|---|---|
| Fractured Peaks | Hawezar | Kehjistan | |||
| Dry Steppes | Scosglen | ||||
Almunn (Infernal Edge)
| Map View | Ultra Rare Mob | ||||
|---|---|---|---|---|---|
 |
 |
||||
| Equipment Drop Info | |||||
 Infernal Edge Infernal Edge
|
Class | Barbarian / Necromancer | |||
| Equipment Type | Rare 2H Sword | ||||
| Equipment Details | |||||
|
・+ X% Critical Strike Damage ・+ X% Damage to Injured Enemies ・+ X All Stats ・Lucky Hit: Up to a X% Chance to Execute Injured Non-Elites |
|||||
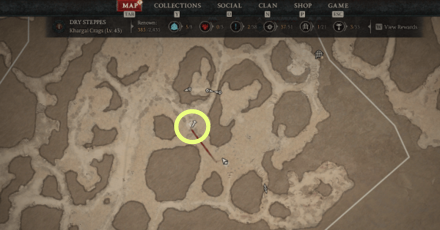
Bhotak the Inevitable (Necklace of Inevitability)
| Map View | Ultra Rare Mob | ||||
|---|---|---|---|---|---|
 |
 |
||||
| Equipment Drop Info | |||||
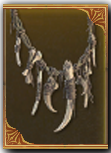 Necklace of Inevitability Necklace of Inevitability
|
Class | All Classes | |||
| Equipment Type | Rare Amulet | ||||
| Equipment Details | |||||
|
・+ X% Resistance to All Elements ・+ X% Critical Strike Chance Against Injured Enemies ・+ X% Damage Reduction While Injured ・+ X% Healing Received |
|||||
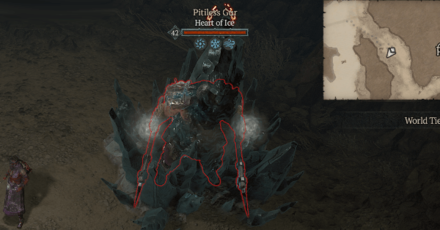
Pitiless Gur (Gur’s Freezing Armor)
| Map View | Ultra Rare Mob | ||||
|---|---|---|---|---|---|
 |
 |
||||
| Equipment Drop Info | |||||
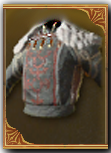 Gur’s Freezing Armor Gur’s Freezing Armor
|
Class | All Classes | |||
| Equipment Type | Rare Chest Armor | ||||
| Equipment Details | |||||
|
・+ X% Cold Damage ・+ X% Element Resistance ・+ X Thorns |
|||||
Zarozar the Mighty (Bloodspiller’s Helm)
| Map View | Ultra Rare Mob | ||||
|---|---|---|---|---|---|
 |
 |
||||
| Equipment Drop Info | |||||
 Bloodspiller’s Helm Bloodspiller’s Helm
|
Class | All Classes | |||
| Equipment Type | Rare Helm | ||||
| Equipment Details | |||||
|
・+ X% Damage While Berserking ・+ X Ranks of Rupture ・+ X Life on Kill |
|||||
Scosglen
| Rare Spawns by Region | |||||
|---|---|---|---|---|---|
| Fractured Peaks | Hawezar | Kehjistan | |||
| Dry Steppes | Scosglen | ||||
Blind Odwyn (Blind Man’s Bell)
| Map View | Ultra Rare Mob | ||||
|---|---|---|---|---|---|
 |
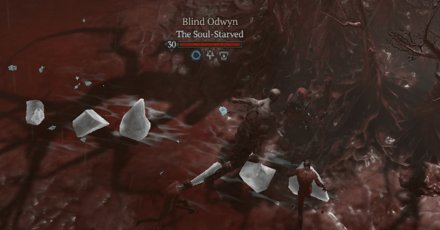 |
||||
| Equipment Drop Info | |||||
 Blind Man’s Bell Blind Man’s Bell
|
Class | All Classes | |||
| Equipment Type | Rare Amulet | ||||
| Equipment Details | |||||
|
・+ X% Resistance to All Elements ・+ X% Control Impaired Duration Reduction ・+ X% Damage Reduction While Injured ・+ X% Movement Speed for 4 Seconds After Killing an Elite |
|||||
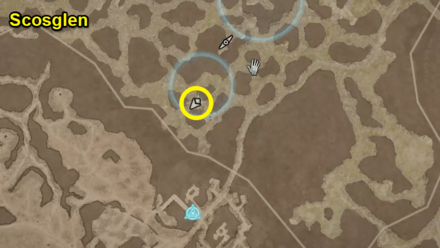
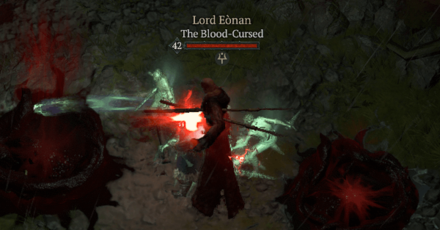
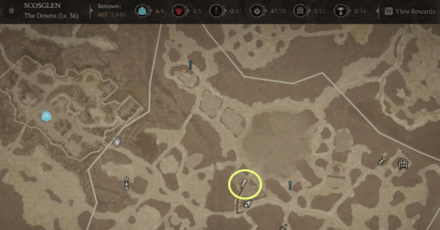
Lord Eonan (Blood-Cursed Band)
| Map View | Ultra Rare Mob | ||||
|---|---|---|---|---|---|
 |
 |
||||
| Equipment Drop Info | |||||
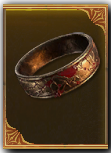 Blood-Cursed Band Blood-Cursed Band
|
Class | All Classes | |||
| Equipment Type | Rare Ring | ||||
| Equipment Details | |||||
|
・+ X% Resistance (2 Elements) ・+ X% Damage for 4 Seconds After Picking Up a Blood Orb ・+ X% Blood Orb Healing ・+ X% Damage to Close Enemies |
|||||
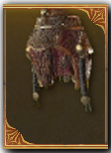
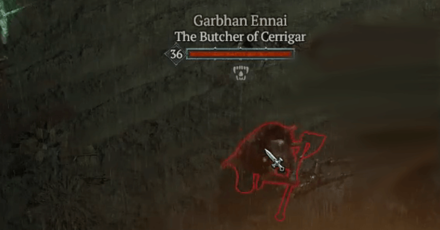
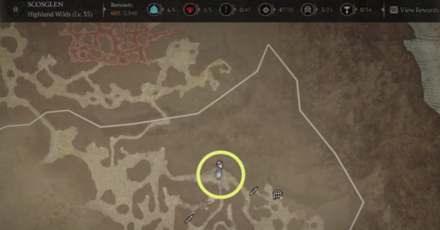
Garbhan Ennai (Manhunter’s Breeches)
| Map View | Ultra Rare Mob | ||||
|---|---|---|---|---|---|
 |
 |
||||
| Equipment Drop Info | |||||
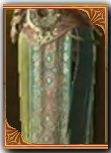 Manhunter’s Breeches Manhunter’s Breeches
|
Class | All Classes | |||
| Equipment Type | Rare Pants | ||||
| Equipment Details | |||||
|
・+ X Main Stat ・+ X% Damage for 4 Seconds After Killing an Elite ・+ X% Healing Received |
|||||
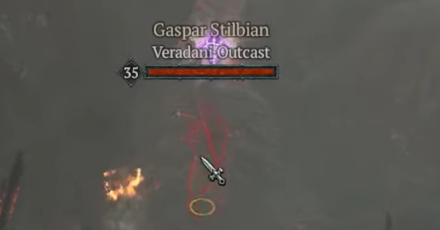
Gaspar Stilbian (Outcast’s Handwraps)
| Map View | Ultra Rare Mob | ||||
|---|---|---|---|---|---|
 |
 |
||||
| Equipment Drop Info | |||||
 Outcast’s Handwraps Outcast’s Handwraps
|
Class | All Classes | |||
| Equipment Type | Rare Gloves | ||||
| Equipment Details | |||||
|
・+ X Ranks of Incinerate ・+ X% Fire Damage Over Time ・Lucky Hit: Up to a +X% Chance to Slow |
|||||
How to Find Rare Spawns
Rare Spawns Have Unique Names and Titles
If you suddenly encounter an enemy that has a unique name and title, has a glowing aura, and tons of enemies spawning around, that enemy is definitely an ultra rare mob. It's hard to distinguish at first without defeating the mobs around it, but you'll get used to it after a few more encounters.
Are Rare Spawn Drops Worth It?
Higher Item Power Equals Stronger Equipment
Rare spawns have the ability to drop equipment with high item power for regular dropped items. These weapons are powerful alternatives, as your DPS scales with higher item powers.
Item Power and Breakpoints Explained
Affixes Can Be Rerolled to Fit Your Build
These rare spawn drops appear with the same affixes every time but can be rerolled at the Occultist for cheap in order to get an affix that will complement your build.
All Occultist Features
What are Rare Spawns?
Unique Enemies That Drop Rare Items
Rare spawns are enemies that have specific spawning points on the map, are uniquely named, much stronger than the average mobs, and drop rare items when defeated. If you happen to encounter one on the field, do your best to defeat it and grab their guaranteed item loot!
Completion Rewards
Elemental Heart Mount Trophy
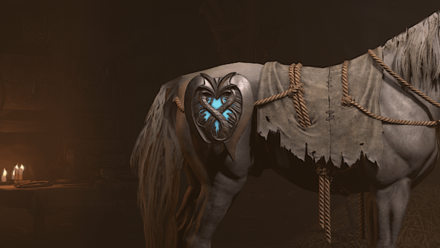
The Elemental Heart Mount Trophy is an additional reward that you'll get for completing the Trophy Hunter Challenge, an open world challenge that contains a list of 15 Rare Spawns. Head to Kyovashad or any waypoint that has a Stable icon, talk to the vendor, and check the Trophies tab. It should show up there, then equip it to view on your mount and carry it around as proof of completing the challenge.
You'll also receive the Merciless and Pursuer player titles that you can equip to show that you have completed the Trophy Hunter Challenge.
How to Get the Elemental Heart Mount Trophy
Diablo 4 Related Guides
Beginner Guides and Best Tips for Getting Started
Tips and Tricks
Comment
Author

All Rare Spawns and Drops
Please participate in our site
improvement survey
03/2026
improvement survey
03/2026
Would you assist in
improving Game8's site?
improving Game8's site?

×
We are listening to our users' valuable opinions and discussing how to act on them.
The information collected through this survey will be used for the purpose of improving our services. In addition, the information will only be disclosed a part of a statistic in a format that will not allow identification of personal information.
Begin Survey
Not Now
×
Please rate each item regarding Game8.co's Advertisements.
Amount of Ads
Very Dissatisfied
Somewhat Dissatisfied
Fine
Somewhat Satisfied
Highly Satisfied
Placement of Ads
Timing of Ad Display
Ad Loading Speed
Safeness of Ads
Content of Ads
×
Please rate each item regarding Game8.co's Quality of Articles.
Amount of information
Very Dissatisfied
Somewhat Dissatisfied
Fine
Somewhat Satisfied
Highly Satisfied
Frequency of updates
Speed of new information
Accuracy of articles
Understandibility of articles
Readability of sentences
×
Please rate each item regarding Game8.co's Usability of the Site.
Ease of finding information
Very Dissatisfied
Somewhat Dissatisfied
Fine
Somewhat Satisfied
Highly Satisfied
Loading Speed
Use of Color
Font Size
Visibility of Images
Easy to Understand Layout
×
Please rate each item regarding Game8.co's Message Boards, Comments.
Ease of Writing
Very Dissatisfied
Somewhat Dissatisfied
Fine
Somewhat Satisfied
Highly Satisfied
Readability
Ease in Finding Information
Comment Quality
Comment Quantity
Admin Response
×
Please rate each item regarding Game8.co's Site's new design.
Please rate our site's new design
Very Dissatisfied
Somewhat Dissatisfied
Fine
Somewhat Satisfied
Highly Satisfied
Do you think that the website's design change makes the site easier to use?
Has the new design made it easier for you to find information on the site?
Has the new design improved the overall visual appeal of the site?
How would you rate your overall satisfaction with the new design of the site?
×
How likely are you to recommend Game8 to someone you know?
Very Unlikely
0
1
2
3
4
5
6
7
8
9
10
Very Likely
If you have other opinions regarding potential improvement to the website, please share them with us. We would appreciate your honest opinion.
Note: This is a free response section, so you can proceed without entering anything.
Note: Please be sure not to enter any kind of personal information into your response.
Note: Please be sure not to enter any kind of personal information into your response.
×
Thank You
×
Thank you for participating in our survey! Your answers will help us to improve the quality of our website and services.
We hope you continue to make use of Game8.
We hope you continue to make use of Game8.
Close
Rankings
- We could not find the message board you were looking for.

Gaming News


![Monster Hunter Stories 3 Review [First Impressions] | Simply Rejuvenating](https://img.game8.co/4438641/2a31b7702bd70e78ec8efd24661dacda.jpeg/thumb)
Popular Games

Genshin Impact Walkthrough & Guides Wiki
Honkai: Star Rail Walkthrough & Guides Wiki
Umamusume: Pretty Derby Walkthrough & Guides Wiki
Pokemon Pokopia Walkthrough & Guides Wiki
Resident Evil Requiem (RE9) Walkthrough & Guides Wiki
Monster Hunter Wilds Walkthrough & Guides Wiki
Wuthering Waves Walkthrough & Guides Wiki
Arknights: Endfield Walkthrough & Guides Wiki
Pokemon FireRed and LeafGreen (FRLG) Walkthrough & Guides Wiki
Pokemon TCG Pocket (PTCGP) Strategies & Guides Wiki


Recommended Games
Diablo 4: Vessel of Hatred Walkthrough & Guides Wiki
Cyberpunk 2077: Ultimate Edition Walkthrough & Guides Wiki
Fire Emblem Heroes (FEH) Walkthrough & Guides Wiki
Yu-Gi-Oh! Master Duel Walkthrough & Guides Wiki
Super Smash Bros. Ultimate Walkthrough & Guides Wiki
Pokemon Brilliant Diamond and Shining Pearl (BDSP) Walkthrough & Guides Wiki
Elden Ring Shadow of the Erdtree Walkthrough & Guides Wiki
Monster Hunter World Walkthrough & Guides Wiki
The Legend of Zelda: Tears of the Kingdom Walkthrough & Guides Wiki
Persona 3 Reload Walkthrough & Guides Wiki


All rights reserved
©2022 BLIZZARD ENTERTAINMENT, INC. ALL RIGHTS RESERVED.
All trademarks referenced herein are the properties of their respective owners.
The copyrights of videos of games used in our content and other intellectual property rights belong to the provider of the game.
The contents we provide on this site were created personally by members of the Game8 editorial department.
We refuse the right to reuse or repost content taken without our permission such as data or images to other sites.