This survey will take about 1 minute.
Your answers will help us to improve our website.
Diablo 4: Vessel of Hatred (D4)
Barbarian HOTA Earthquake Endgame Build (Season 7)
★ NEW: Season 12 Guide and New Features
┗ Seasonal Content: New Uniques | Bloodied Sigils | Slaughterhouses
┗ Seasonal Mechanic: Killstreaks and Bloodied Items
★ NEW: Lord of Hatred Expansion Release Date
★ Check out our Vessel of Hatred expansion guide
This is a Barbarian HOTA Earthquake build guide for Season 7 of Diablo 4: Vessel of Hatred (D4). Read on to learn more about the Barbarian HOTA Earthquake endgame build in the Season of Witchcraft!
 Attention! Attention! |
This build is a Legacy Build that was created from Season 7 (Season of Witchcraft) and is not updated for the current season. |
|---|
| All Barbarian Guides | ||
|---|---|---|
List of Contents
Barbarian HOTA Earthquake Endgame Build
HOTA Earthquake Build Summary
| Click on a Link to Jump to a Section! | |||||||||||
|---|---|---|---|---|---|---|---|---|---|---|---|
| Build Summary | |
|---|---|
 HOTA Earthquake Build HOTA Earthquake Build |
|
| Focus: Pit Pushing, Bossing | |
|
|
|
This build uses the already strong Earthquake Barbarian archetype with the new Mantle of the Mountain's Fury Unique to detonate Earthquakes for their full damage! Generate large Earthquakes that devastates the battlefield and detonate them with Hammer of the Ancients to clear the whole screen of enemies.
HOTA Earthquake Build Skills and Passives
| Click on a Link to Jump to a Section! | |||||||||||
|---|---|---|---|---|---|---|---|---|---|---|---|
※ More skills can be seen by scrolling vertically.
| Active Skills | |
|---|---|
┗
┗
┗
|
|
┗
┗
┗
┗
|
|
┗
┗
┗
┗
┗
┗
┗
┗
┗
┗
|
|
|
┗
┗
┗
┗
┗
┗
┗
┗
|
|
|
┗
┗
┗
┗
|
|
|
┗
┗
┗
┗
┗
|
|
|
|
|
HOTA Earthquake Build Technique Slot
| Weapon Expertise |
|---|
 Two-Handed Axe Expertise Two-Handed Axe Expertise When using any Weapon: 10% increased damage to Vulnerable enemies. |
The Two-Handed Axe Expertise is the best offensive expertise, giving another damage multiplier to all hits to Vulnerable enemies. This build uses Witchcraft Powers to apply Vulnerable.
Arsenal System and Techniques Guide
Best Witchcraft Powers
| Click on a Link to Jump to a Section! | |||||||||||
|---|---|---|---|---|---|---|---|---|---|---|---|
| Witchcraft | Effect Rank Up Bonus |
|---|---|
|
|
Eldritch Effects apply Vulnerable to enemies for X seconds.
Rank 10: Damage from Psyche and Growth & Decay Effects will also apply Vulnerable at half the duration. |
|
|
An ominous orb of pure Eldritch energy circles you, damaging any enemy it touches for 400% Fire damage. Doom Orb may launch itself at distant enemies before returning.
Rank 5: Kills or damage to Bosses empower the orb’s damage by 5%. After 100%, the orb explodes dealing 5,200 damage to nearby enemies before reforming 3 seconds later. |
|
|
Damage done by your Witchcraft Effects afflicts enemies with Hex of Shattering causing them to deal X reduced damage for 5 seconds.
Rank 8: When any Hex Effect is applied to Headrotten, all damage will be guaranteed Critical Strikes for 5 seconds. |
|
|
Every X seconds, gain a Barrier for 5 seconds absorbing Y damage.
Rank 12: Twilight Warding reflects enemy projectiles while active. |
|
|
Conjure an aura of decay that deals 80% Poison damage to enemies every second.
Rank 10: Each time Aura of Siphoning deals damage, you are healed for 1% of Maximum Life. |
|
|
Dealing damage or applying a Crowd Control effect with any of your Witchcraft Effects increases your Attack Speed by X for 10 Seconds, stacking once per unique Witchcraft Effect. Witchcraft Effects are Eldritch, Psyche, and Growth & Decay.
Rank 8: Gain 40% Lucky Hit chance while bonuses from Eldritch, Psyche, Growth & Decay are active at once. |
This build utilizes a combination of Witchcraft Powers to benefit from the massive Attack Speed boost from the Breath of the Coven power. Doom Orb and Shaken Soul also combos with each other to consistently inflict Vulnerable to all nearby enemies for extra damage.
You can replace Twilight Warding with Soul Harvest if you need more damage in exchange for survivability.
HOTA Earthquake Build Best Aspects and Affixes
| Click on a Link to Jump to a Section! | |||||||||||
|---|---|---|---|---|---|---|---|---|---|---|---|
※ More gear Aspects can be seen by scrolling vertically.
| Gear | Aspect and Affixes |
|---|---|
| Head |
Stats: ・ Ranks to Prolific Fury ・ Wrath of the Berserker Cooldown Reduction ★★★ ・ Ranks to Agressive Resistance ・ Lucky Hit: Chance to deal Fire Damage |
| Chest |
Stats: ・ 100% Hammer of the Ancients damage for 5 seconds after an Earthquake explodes ・ Armor ・ Ranks to Hammer of the Ancients ・ Ranks of Defensive Stance ・ Chance for Earthquake to Deal Double Damage ★★★ |
| Gloves |
Stats: Attack Speed ・ Critical Strike Chance ★★★ ・ Lucky Hit Chance ・ Lucky Hit: Chance to Apply a Random Crowd Control Effect for 2 Seconds |
| Pants |
・ Strength ・ Maximum Life ・ Any Elemental Resistance Temper: ・ Defensive - Worldly Endurance ┗ % Total Armor
・ Utility - Brute Innovation
┗ Earthquake Size ★★★
|
| Boots |
・ Movement Speed ・ Fury Per Second ・ Strength Temper: ・ Mobility - Barbarian Motion ┗ Movement Speed
・ Utility - Brute Innovation
┗ Earthquake Size ★★★
|
| Amulet |
・ Strength ・ Critical Strike Chance ・ Any Elemental Resistance Temper: ・ Offensive - Berserking Finesse ┗ Damage While Berserking
・ Resource - Ultimate Efficiency - Barbarian
┗ Wrath of the Berserker Cooldown Reduction
|
| Ring |
・ Critical Strike Chance ・ Attack Speed ・ Strength Temper: ・ Offensive - Berserking Finesse ┗ Damage While Berserking
・ Resource - Ultimate Efficiency - Barbarian
┗ Wrath of the Berserker Cooldown Reduction
|
| Ring |
・ Critical Strike Chance ・ Attack Speed ・ Strength Temper: ・ Offensive - Berserking Finesse ┗ Damage While Berserking
・ Resource - Ultimate Efficiency - Barbarian
┗ Wrath of the Berserker Cooldown Reduction
|
| One-Handed Mace |
・ Strength ・ Vulnerable Damage / Critical Strike Damage ・ Maximum Life Temper: ・Weapons - Wasteland Augments ┗ Earthquake Duration
・ Offensive - Berserking Finesse
┗ Damage While Berserking
|
| One-Handed Mace |
・ Strength ・ Vulnerable Damage / Critical Strike Damage ・ Maximum Life Temper: ・Weapons - Wasteland Augments ┗ Earthquake Duration
・Offensive - Natural Finesse
┗ Damage to Close Enemies
|
| Two-Handed Mace |
・ Strength ・ Vulnerable Damage / Critical Strike Damage ・ Maximum Life Temper: ・Weapons - Wasteland Augments ┗ Earthquake Duration
・Offensive - Natural Finesse
┗ Damage to Close Enemies
|
| Two-Handed Sword |
・ Strength ・ Vulnerable Damage / Critical Strike Damage ・ Maximum Life Temper: ・Weapons - Wasteland Augments ┗ Earthquake Duration
・Offensive - Natural Finesse
┗ Damage to Close Enemies
|
Gear Stat Break Points
Make sure to get at least 500% Damage to Close Enemies and 450% Damage while Berserking to maximize the damage you get from your Legendary Paragon Nodes. Use Masterworking to increase the Tempering Stats from your Pants and Boots to get 100% Earthquake Size. And of course, always aim for 1000 Armor and 70% to all Resistances to maximize your survivability too.
HOTA Earthquake Build Best Gems and Runewords
| Click on a Link to Jump to a Section! | |||||||||||
|---|---|---|---|---|---|---|---|---|---|---|---|
HOTA Earthquake Best Gems
| Armor | Weapons |
|---|---|
 Ruby Ruby
|
 Emerald Emerald
|
Stacking Strength from Rubies are necessary for the damage bonus you get from the Executioner's Aspect. Then, get as much Critical Strike Damage with Emeralds since we don't get much of them from gear.
HOTA Earthquake Best Occult Gems
| Amulet | Ring | Ring |
|---|---|---|
 Hungering Void Hungering Void
|
 Moonlight Ward Moonlight Ward
|
Dust Stone
|
Occult Gems are new Gems you can socket into Jewelry that provides Armor, Resistances, and a special bonus. The Hungering Void Occult Gem periodically pulls in enemies for better clear speed. While Moonlight Ward is the best Occult Gem in general as it brings very powerful and rare defensive stats.
As for the final Occult Gem, you can get Dust Stone for more damage, Cornucopia for more Barrier and better Fortify up time, or use Killing Wind by replacing the Twilight Warding power to another Eldritch one for Movement Speed and Critical Strike Chance.
HOTA Earthquake Build Best Runewords
| Runeword 1 | Runeword 2 |
|---|---|
|
|
|
Lith is a rare Legendary Rune but is definitely the best rune to trigger Earthquakes with the Tec rune as standing for half a second every time we attack generates a powerful Earthquake. The PocGar rune word also allows us to consistently get 25% Critical Strike Chance as we spend Resource to use Hammer of the Ancients.
HOTA Earthquake Build Best Mercenaries
| Click on a Link to Jump to a Section! | |||||||||||
|---|---|---|---|---|---|---|---|---|---|---|---|
| Mercenary | Reinforcement |
|---|---|
 Varyana Varyana |
 Raheir Raheir |
Add Varyana as Your Main Mercenary
Get Varyana as your Main Mercenary to get free Overpowers with the Dismembering upgrade. This allows the build to increase the up-time of HOTA's 40% damage buff after an Overpower.
Make sure to grab Varyana's Reprisal passive skill to help with our survivability a bit. Note that having Varyana as our Main Mercenary allows us to gain Movement Speed as we gain Massacre stacks by killing hordes of enemies. You lose this movement speed bonus when you haven't killed an enemy recently
Choose Raheir as Your Reinforcement
With Raheir as our Reinforcement Mercenary, he can save use from dicey situations with the Bastion skill set to trigger when we are hit with a Control Impairing Effect. This skill gives us Unstoppable and allows Raheir to instead take most of the damage dealt to us.
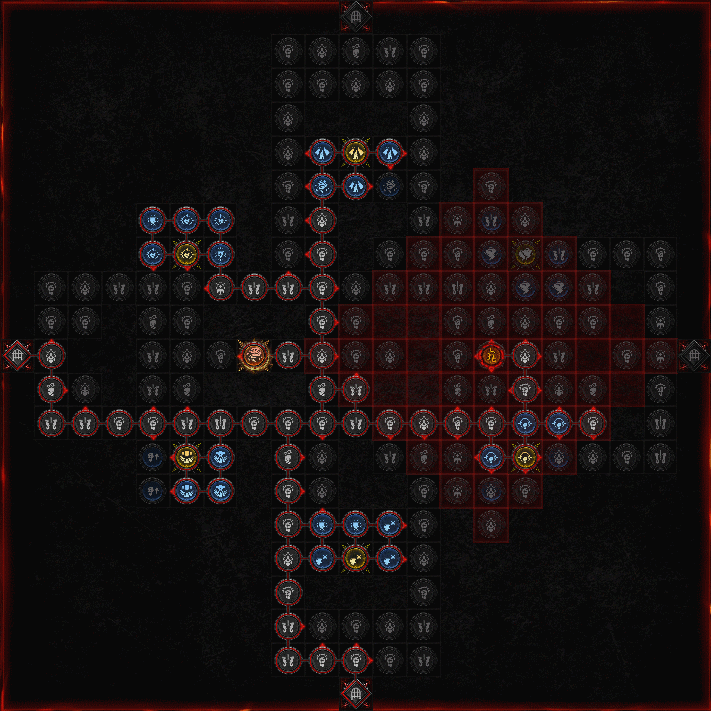
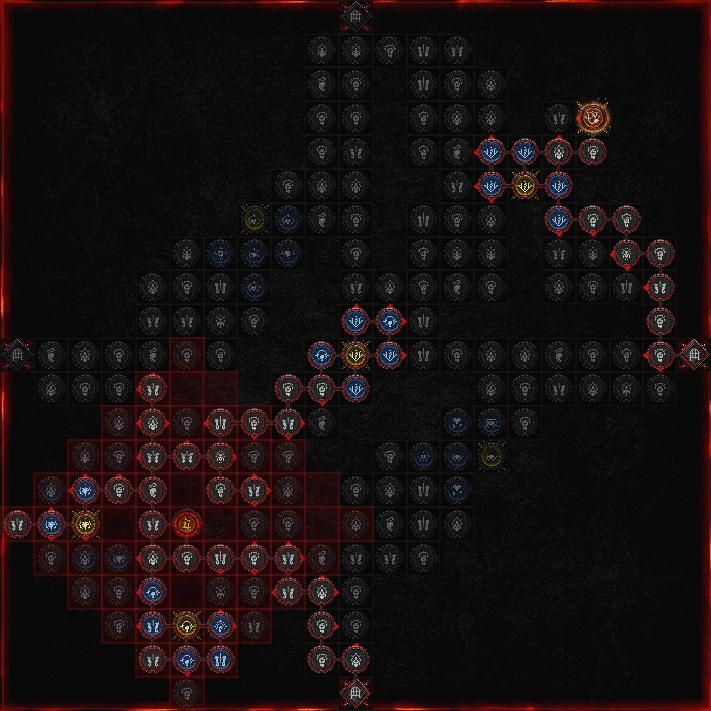
HOTA Earthquake Build Paragon Boards
| Click on a Link to Jump to a Section! | |||||||||||
|---|---|---|---|---|---|---|---|---|---|---|---|
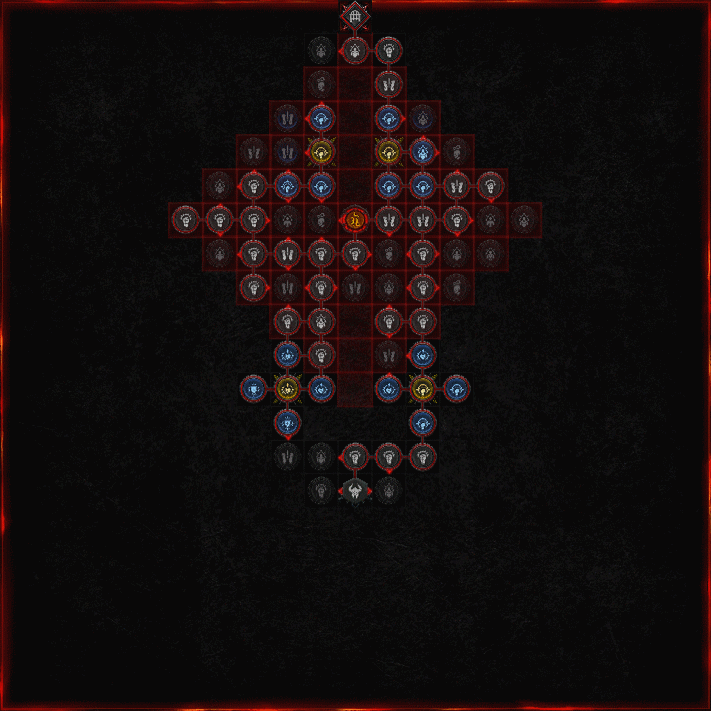
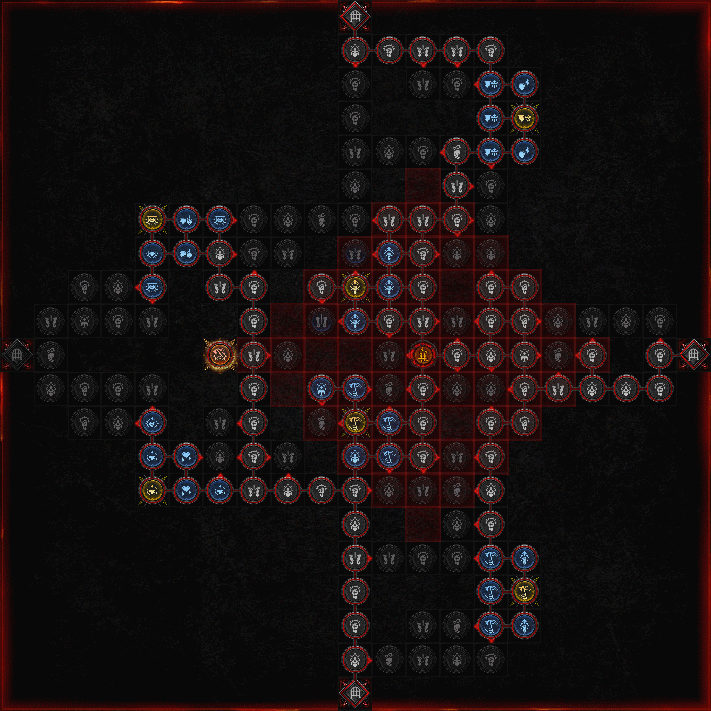
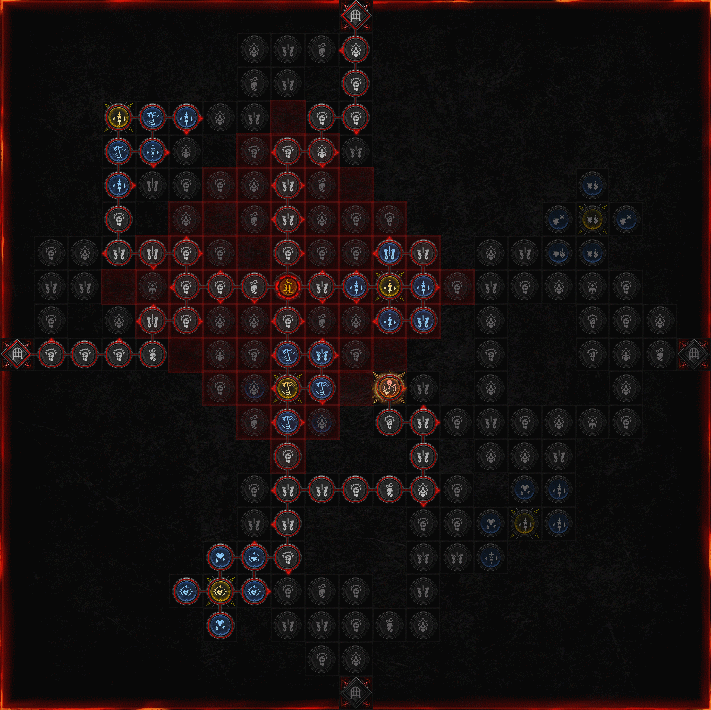
| Paragon Boards |
|---|
| 1. Starting Board (Rumble) |
 |
| 2. Carnage (Ire) |
 |
| 3. Blood Rage (Territorial) |
 |
| 4. Force of Nature (Marshal) |
 |
| 5. Bone Breaker (Wrath) |
 |
HOTA Earthquake Build Playstyle and Rotation
| Click on a Link to Jump to a Section! | |||||||||||
|---|---|---|---|---|---|---|---|---|---|---|---|
The playstyle for the Hammer of the Ancients Earthquake build is pretty straightforward as we just repeatedly use Bash and Hammer of the Ancients to detonate the Earthquakes surrounding you. The usual rotation is as follows:
- Use War Cry and and Rallying Cry before engaging a monster pack. If there's an Elite, you can use Wrath of the Berserker too.
- Start attacking with Bash to generate Resource, invoke Earthquakes with the LithTec rune word, and gain stacks of Bash Critical Strikes for a guaranteed Overpower with Hammer of the Ancients.
- As you start invoking Earthquakes, most of the smaller mobs will start dying, use Hammer of the Ancients to detonate the Earthquakes surrounding you to deal with the rest of the tankier enemies.
- Once you're hit and go below ~50% Life, use Iron Skin to generate a Barrier and heal yourself.
Diablo 4 Related Guides

All Class Builds
| All Classes | |||||
|---|---|---|---|---|---|
All Endgame Builds
| List of Endgame Builds |
|---|
All Leveling Builds
| List of Leveling Builds |
|---|
All Legacy Builds per Season
| Seasons | List of Legacy Builds |
|---|---|
| Season 9 | |
| Season 8 | |
| Season 7 |
|
| Season 6 |
Comment
Author

Barbarian HOTA Earthquake Endgame Build (Season 7)
Please participate in our site
improvement survey
03/2026
improvement survey
03/2026
Would you assist in
improving Game8's site?
improving Game8's site?

×
We are listening to our users' valuable opinions and discussing how to act on them.
The information collected through this survey will be used for the purpose of improving our services. In addition, the information will only be disclosed a part of a statistic in a format that will not allow identification of personal information.
Begin Survey
Not Now
×
Please rate each item regarding Game8.co's Advertisements.
Amount of Ads
Very Dissatisfied
Somewhat Dissatisfied
Fine
Somewhat Satisfied
Highly Satisfied
Placement of Ads
Timing of Ad Display
Ad Loading Speed
Safeness of Ads
Content of Ads
×
Please rate each item regarding Game8.co's Quality of Articles.
Amount of information
Very Dissatisfied
Somewhat Dissatisfied
Fine
Somewhat Satisfied
Highly Satisfied
Frequency of updates
Speed of new information
Accuracy of articles
Understandibility of articles
Readability of sentences
×
Please rate each item regarding Game8.co's Usability of the Site.
Ease of finding information
Very Dissatisfied
Somewhat Dissatisfied
Fine
Somewhat Satisfied
Highly Satisfied
Loading Speed
Use of Color
Font Size
Visibility of Images
Easy to Understand Layout
×
Please rate each item regarding Game8.co's Message Boards, Comments.
Ease of Writing
Very Dissatisfied
Somewhat Dissatisfied
Fine
Somewhat Satisfied
Highly Satisfied
Readability
Ease in Finding Information
Comment Quality
Comment Quantity
Admin Response
×
Please rate each item regarding Game8.co's Site's new design.
Please rate our site's new design
Very Dissatisfied
Somewhat Dissatisfied
Fine
Somewhat Satisfied
Highly Satisfied
Do you think that the website's design change makes the site easier to use?
Has the new design made it easier for you to find information on the site?
Has the new design improved the overall visual appeal of the site?
How would you rate your overall satisfaction with the new design of the site?
×
How likely are you to recommend Game8 to someone you know?
Very Unlikely
0
1
2
3
4
5
6
7
8
9
10
Very Likely
If you have other opinions regarding potential improvement to the website, please share them with us. We would appreciate your honest opinion.
Note: This is a free response section, so you can proceed without entering anything.
Note: Please be sure not to enter any kind of personal information into your response.
Note: Please be sure not to enter any kind of personal information into your response.
×
Thank You
×
Thank you for participating in our survey! Your answers will help us to improve the quality of our website and services.
We hope you continue to make use of Game8.
We hope you continue to make use of Game8.
Close
Rankings
- We could not find the message board you were looking for.

Gaming News


![Everwind Review [Early Access] | The Shaky First Step to A Very Long Journey](https://img.game8.co/4440226/ab079b1153298a042633dd1ef51e878e.png/thumb)

![Monster Hunter Stories 3 Review [First Impressions] | Simply Rejuvenating](https://img.game8.co/4438641/2a31b7702bd70e78ec8efd24661dacda.jpeg/thumb)
Popular Games

Genshin Impact Walkthrough & Guides Wiki
Honkai: Star Rail Walkthrough & Guides Wiki
Umamusume: Pretty Derby Walkthrough & Guides Wiki
Pokemon Pokopia Walkthrough & Guides Wiki
Resident Evil Requiem (RE9) Walkthrough & Guides Wiki
Monster Hunter Wilds Walkthrough & Guides Wiki
Wuthering Waves Walkthrough & Guides Wiki
Arknights: Endfield Walkthrough & Guides Wiki
Pokemon FireRed and LeafGreen (FRLG) Walkthrough & Guides Wiki
Pokemon TCG Pocket (PTCGP) Strategies & Guides Wiki


Recommended Games
Diablo 4: Vessel of Hatred Walkthrough & Guides Wiki
Fire Emblem Heroes (FEH) Walkthrough & Guides Wiki
Yu-Gi-Oh! Master Duel Walkthrough & Guides Wiki
Super Smash Bros. Ultimate Walkthrough & Guides Wiki
Pokemon Brilliant Diamond and Shining Pearl (BDSP) Walkthrough & Guides Wiki
Elden Ring Shadow of the Erdtree Walkthrough & Guides Wiki
Monster Hunter World Walkthrough & Guides Wiki
The Legend of Zelda: Tears of the Kingdom Walkthrough & Guides Wiki
Persona 3 Reload Walkthrough & Guides Wiki
Cyberpunk 2077: Ultimate Edition Walkthrough & Guides Wiki


All rights reserved
©2022 BLIZZARD ENTERTAINMENT, INC. ALL RIGHTS RESERVED.
All trademarks referenced herein are the properties of their respective owners.
The copyrights of videos of games used in our content and other intellectual property rights belong to the provider of the game.
The contents we provide on this site were created personally by members of the Game8 editorial department.
We refuse the right to reuse or repost content taken without our permission such as data or images to other sites.