Sorcerer Cosmic Anomaly Hydra Endgame Build (Season 9)
★ NEW: Season 12 Guide and New Features
┗ Seasonal Content: New Uniques | Bloodied Sigils | Slaughterhouses
┗ Seasonal Mechanic: Killstreaks and Bloodied Items
★ NEW: Lord of Hatred Expansion Release Date
★ Check out our Vessel of Hatred expansion guide
This is the Cosmic Anomaly Hydra endgame build and guide for Season 9 of Diablo 4: Vessel of Hatred (D4). Read on to learn more about the Cosmic Anomaly Hydra build as well as its playstyle in Season 9 (Sins of the Horadrim)!
 Attention! Attention! |
This build is a Legacy Build that was created from Season 9 and is not updated for the current season. |
|---|
| All Sorcerer Guides | ||
|---|---|---|
List of Contents
Cosmic Anomaly Hydra Sorcerer Build
Cosmic Anomaly Hydra Build Summary
| Click on a Link to Jump to a Section! | |||||||||||
|---|---|---|---|---|---|---|---|---|---|---|---|
This Cosmic Anomaly Hydra Sorcerer build is based on Mekuna's Hydrakuna Sorcerer. The video includes details on how to set up and gear the build for Endgame Pit. You can check out Mekuna on YouTube for more Diablo IV content or visit him on Twitch to learn more about the build!
| Build Summary | |
|---|---|
 Cosmic Anomaly Hydra Endgame Build Cosmic Anomaly Hydra Endgame Build |
|
| Focus: Pit 100+, AoE DPS, Endgame Dungeons | |
|
| |
The Hydrakuna endgame build for Season 9 primarily revolves around Hydras and increasing your max mana to take full advantage of the Serpentine Aspect and the Ophidian Iris, a new unique introduced this season. You will also pair this setup with the Cosmic Anomaly Catalyst and Fractured Core Arcana to reduce the resistances of all enemies on top of your Hydra.
This build is designed to spam Conjuration skills, such as using your Familiars, Hydra, and Ice Blades for maximum damage output. You will also be extremely mobile and hard to kill, thanks to the Teleport Enchantment, allowing you to speedrun any endgame content.
Cosmic Anomaly Hydra Build Skills and Passives
| Click on a Link to Jump to a Section! | |||||||||||
|---|---|---|---|---|---|---|---|---|---|---|---|
| Back to the top ▲ | |||||||||||
※ More skills can be seen by scrolling vertically.
| Active Skills | |
|---|---|
┗
|
|
┗
┗
|
|
┗
┗
┗
┗
┗
┗
┗
|
|
┗
┗
┗
┗
┗
┗
┗
┗
┗
┗
┗
┗
┗
┗
┗
|
|
┗
┗
┗
┗
┗
┗
|
|
┗
┗
┗
┗
┗
┗
┗
┗
|
|
Cosmic Anomaly Hydra Build Enchantment
| Hydra Enchantment Slots | |
|---|---|
|
(Level 15) |
(Level 30) |
For your first enchantment, choose Familiars to generate additional Conjurations, which benefit from the bonus damage provided by Invoked Familiar. Since you will be spamming Ice Blades, Lightning Spear, and Hydra, you will be able to trigger this effect consistently.
As for your second enchantment, you will choose Teleport. This allows you to cast Teleport more frequently, giving you increased mobility and additional survivability.
Cosmic Anomaly Hydra Build Best Horadric Spells
| Click on a Link to Jump to a Section! | |||||||||||
|---|---|---|---|---|---|---|---|---|---|---|---|
| Back to the top ▲ | |||||||||||
| Horadic Spellcraft Setup | |||||
|---|---|---|---|---|---|
|
Smoldering Ember Smoldering Ember Your Catalyst now deals Fire and or Burning damage. It destroys enemy structures and has 10% chance to ignite the ground beneath enemies, dealing 74,800 Burning damage over 5 seconds. While equipped, your Fire Damage Bonus is equal to that of your highest Damage Type Bonus. (Infusion) |
|||||
|
Fractured Core Fractured Core Your Catalyst deactivates monster Damage Resistance Aura effects for 3.0 seconds, but you take 15% more stacking damage for the same duration. (Arcana) |
Bloody Charm Bloody Charm Your Catalyst gains a specialized Execute effect for a non-Boss enemies with 12% or less Life (Arcana) |
Tranquil Stone Tranquil Stone Invoking your Catalyst grants Unstoppable for 3.4 seconds. (Arcana) |
|||
|
Cosmic Anomaly Cosmic Anomaly Manifest up to 5 Anomalies that emit particles which deal 10,530 damage over 4 seconds. Activate again to command your Anomalies to all coverage and implode, dealing 42,135 damage per detonation. (Catalyst) |
Hydra Hydra Summon a 3-headed hydra for 10.0 seconds. Each head splits fire at enemies, dealing XX% damage. You may have up to 2 Hydras active at a time. (Skill) |
||||
Since Hydra has no cooldown, you will be able to consistently trigger Cosmic Anomaly and fully benefit from the effects of your Arcanas and Infusion. However, it is highly recommended that you avoid spamming Hydra. Instead, make sure you have full Mana before casting to maximize the effects of the Serpentine Aspect.
With the combination of the Bloody Charm and Cosmic Anomaly, you will gain a 20% Attack Speed bonus, which also applies to your Hydra's attacks, further boosting your overall damage.
Cosmic Anomaly Hydra Aspects and Affixes
| Click on a Link to Jump to a Section! | |||||||||||
|---|---|---|---|---|---|---|---|---|---|---|---|
| Back to the top ▲ | |||||||||||
 Masterwork Priority Masterwork Priority |
Affixes marked with ★ are the ones you should aim to upgrade when masterworking. |
|---|
※ More gear Aspects can be seen by scrolling vertically.
| Gear | Aspect and Affixes |
|---|---|
| Head | Stats: ・Cooldown Reduction ★★★ ・Maximum Life ・Maximum Resource ・Armor |
| Chest | Stats: ・All Stats ★★★ ・Maximum Life ・Damage on Next Attack After Entering Stealth ・Resource Generation |
| Gloves | Stats: ・Ranks to Core Skills ★★★ ・Intelligence ・Attack Speed Temper: ・Offensive - Conjuration Finesse ┗ Hydra Damage
・Utility - Worldly Fortune
┗ Lucky Hit Chance |
| Pants | Stats: ・Chance for Chain Lightning to Hit Twice ・Damage Reduction ・Resource Generation and Maximum ★★★ ・Ranks to Chain Lightning |
| Boots | Stats: ・Maximum Life ・Intelligence ★ ・Armor Temper: ・Mobility - Natural Motion ┗ Evade CDR ★★
・Utility - Worldly Fortune
┗ Lucky Hit Chance |
| Amulet | Stats: ・Intelligence ・Attack Speed ・Pyromancy Damage ・Ranks to Primordial Binding ★★★ |
| Ring | Stats: ・Non-Physical Damage ・Cooldown Reduction ★★★ ・Lucky Hit Chance ・Ranks to Potent Warding |
| Ring | Stats: ・Attack Speed ・Critical Strike Chance ・Lucky Hit Chance ・Ranks to Core Skills ★★★ |
| Main (Wand) |
Stats: ・Intelligence ・Maximum Life ・Lucky Hit: Up to a 15% Chance to Restore Primary Resource Temper: ・Offensive - Conjuration Finesse ┗ Hydra Damage
・Weapon - Conjuration Augments
┗ Casted Hydras Have 1-2 Heads ★★★ |
| Off-Hand (Focus) |
Stats: ・Intelligence ・Maximum Resource ・Cooldown Reduction Temper: ・Offensive - Conjuration Finesse ┗ Hydra Damage
・Weapon - Conjuration Augments
┗ Casted Hydras Have 1-2 Heads ★★★ |
Cosmic Anomaly Hydra Best Gems and Runewords
| Click on a Link to Jump to a Section! | |||||||||||
|---|---|---|---|---|---|---|---|---|---|---|---|
| Back to the top ▲ | |||||||||||
Cosmic Anomaly Hydra Build Gems
| Weapon | Armor |
|---|---|
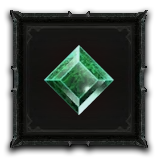 Emerald Emerald
|
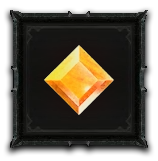 Topaz Topaz
|
For gems, it is best to slot Topaz into your armor to boost Elemental Resistance and Intelligence. For your weapon, socket an Emerald to increase your Critical Damage.
Cosmic Anomaly Hydra Best Horadric Jewels
| Amulet | Ring 1 | Ring 2 |
|---|---|---|
 Scornful Light Scornful Light
|
 Idol From Below Idol From Below
|
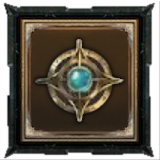 Reverie Horn Reverie Horn
|
The Reverie Horn Jewel provides a massive damage boost to your summons, which are your main source of damage in this build. You will pair it with the Scornful Light to further improve your overall damage output.
Lastly, the Idol From Below grants bonus Intelligence and Maximum Life. Its negative effects are minimal, as your strong AoE capabilities make it easy to deal with the Jewel Guardians.
Cosmic Anomaly Hydra Best Runewords
| Runeword 1 | Runeword 2 |
|---|---|
|
|
|
First, you will be using Ohm for additional damage and pairing it with Cem, since you will be using Teleport in one of your Enchantment slots. Evading will be especially useful for speedruns, allowing you to move quickly and avoid incoming damage.
Secondly, you will be using Vex along with Cir to boost the rank of all your skills. Since you will be constantly spamming your summons, you will be able to trigger Vex continuously for consistent rank up on your skills.
Cosmic Anomaly Hydra Build Mercenaries
| Click on a Link to Jump to a Section! | |||||||||||
|---|---|---|---|---|---|---|---|---|---|---|---|
| Back to the top ▲ | |||||||||||
| Mercenary | Reinforcement |
|---|---|
Use Subo as Your Mercenary
For this build, you will mainly use Subo to crowd control enemies, which is especially useful against bosses. Since you won't be able to burst them down immediately, his crowd control can help build up stagger more effectively.
Use Raheir as Your Reinforcement
As for the reinforcement, you will use Raheir to redirect incoming damage, greatly improving your survivability.
Cosmic Anomaly Hydra Build Paragon Boards
| Click on a Link to Jump to a Section! | |||||||||||
|---|---|---|---|---|---|---|---|---|---|---|---|
| Back to the top ▲ | |||||||||||
| Paragon Boards |
|---|
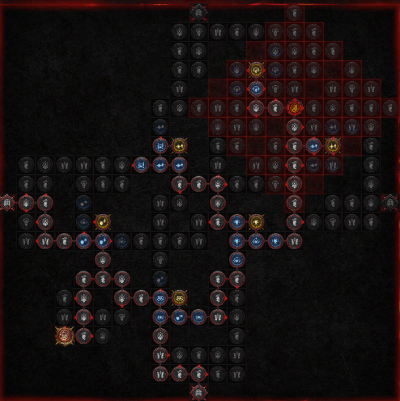
| 1. Starter Board (Tactician) |
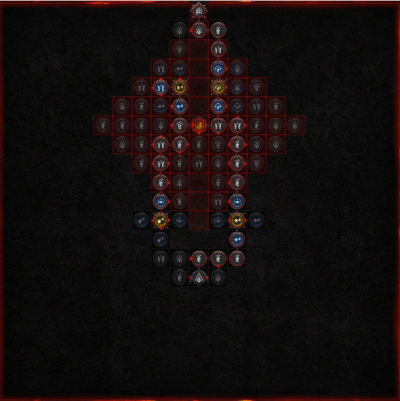 |
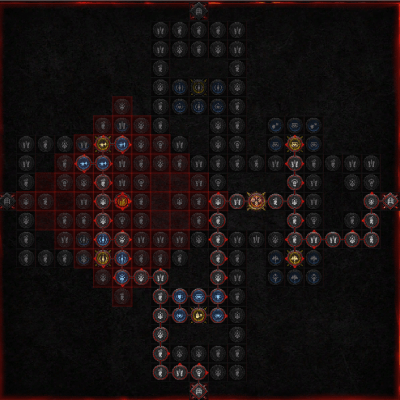
| 2. Enchantment Master (Elementalist) |
 |
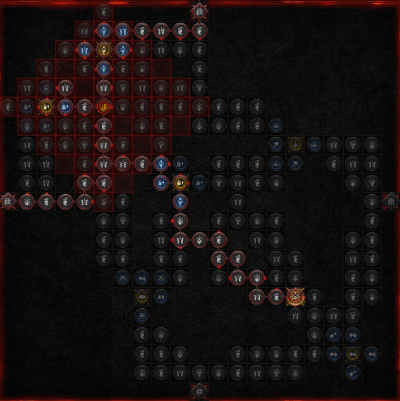
| 3. Fundamental Release (Pyromaniac) |
 |
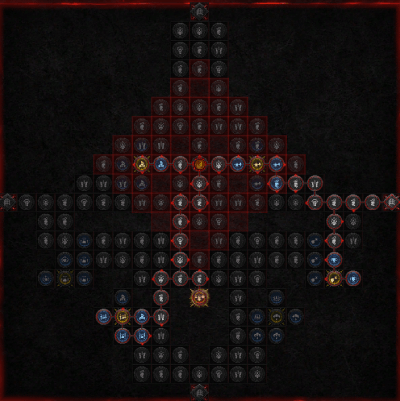
| 4. Searing Heat (Destruction) |
 |
| 5. Elemental Summoner (Conjurer) |
 |
With this setup, you will still have extra points available on your Paragon Board. Use them to pick up bonus stats surrounding your Glyphs to further enhance their effects or allocate them toward resistances to improve your survivability.
Cosmic Anomaly Hydra Build Playstyle and Tips
| Click on a Link to Jump to a Section! | |||||||||||
|---|---|---|---|---|---|---|---|---|---|---|---|
| Back to the top ▲ | |||||||||||
This build's playstyle revolves around summoning multiple Conjuration skills to gain a damage boost from Primordial Binding. Since Hydra is your main source of damage, you want to maximize its effectiveness with the Serpentine Aspect. However, to consistently deal high damage, it is important to have full Mana before casting Hydras.
This is where Teleport comes in. It helps you pick up Crackling Energy to recover Mana. This is further supported by the Chance to Restore Primary Resource affix on your weapon, allowing you to maintain your Mana pool.
- Activate Unstable Currents
- Summon Lightning Spear and Ice Blades
- Engage enemies and summon Hydra directly on top of them to begin clearing
- Surround yourself with Ball Lightning to kill approaching enemies
- Use Teleport to collect Crackling Energy and recover Mana
- Rinse and repeat
Diablo 4 Related Guides

All Class Builds
| All Classes | |||||
|---|---|---|---|---|---|
All Endgame Builds
| List of Endgame Builds |
|---|
All Leveling Builds
| List of Leveling Builds |
|---|
All Legacy Builds per Season
| Seasons | List of Legacy Builds |
|---|---|
| Season 11 | |
| Season 10 | |
| Season 9 |
|
| Season 8 | |
| Season 7 | |
| Season 6 |
Author

Sorcerer Cosmic Anomaly Hydra Endgame Build (Season 9)
Rankings
- We could not find the message board you were looking for.

Gaming News


Popular Games

Genshin Impact Walkthrough & Guides Wiki
Umamusume: Pretty Derby Walkthrough & Guides Wiki
Crimson Desert Walkthrough & Guides Wiki
Monster Hunter Stories 3: Twisted Reflection Walkthrough & Guides Wiki
Honkai: Star Rail Walkthrough & Guides Wiki
Pokemon Pokopia Walkthrough & Guides Wiki
The Seven Deadly Sins: Origin Walkthrough & Guides Wiki
Wuthering Waves Walkthrough & Guides Wiki
Zenless Zone Zero Walkthrough & Guides Wiki
Arknights: Endfield Walkthrough & Guides Wiki


Recommended Games
Fire Emblem Heroes (FEH) Walkthrough & Guides Wiki
Diablo 4: Vessel of Hatred Walkthrough & Guides Wiki
Cyberpunk 2077: Ultimate Edition Walkthrough & Guides Wiki
Yu-Gi-Oh! Master Duel Walkthrough & Guides Wiki
Super Smash Bros. Ultimate Walkthrough & Guides Wiki
Pokemon Brilliant Diamond and Shining Pearl (BDSP) Walkthrough & Guides Wiki
Elden Ring Shadow of the Erdtree Walkthrough & Guides Wiki
Monster Hunter World Walkthrough & Guides Wiki
The Legend of Zelda: Tears of the Kingdom Walkthrough & Guides Wiki
Persona 3 Reload Walkthrough & Guides Wiki


All rights reserved
©2022 BLIZZARD ENTERTAINMENT, INC. ALL RIGHTS RESERVED.
All trademarks referenced herein are the properties of their respective owners.
The copyrights of videos of games used in our content and other intellectual property rights belong to the provider of the game.
The contents we provide on this site were created personally by members of the Game8 editorial department.
We refuse the right to reuse or repost content taken without our permission such as data or images to other sites.
name changed to Occult Dominion now