Complete Story Walkthrough
✬ Pokemon HOME Dex Completion Shiny Rewards:
┗ Meloetta | Manaphy | Enamorus | Keldeo | Meltan
☆ Check out all PLA Pokemon Transferrable to BDSP!
★ Finish the story → Story Walkthrough
┣ Complete the Dex → Pokemon Locations / Trading Board
┗ Research Tasks → Best Tasks / Farm Research Points
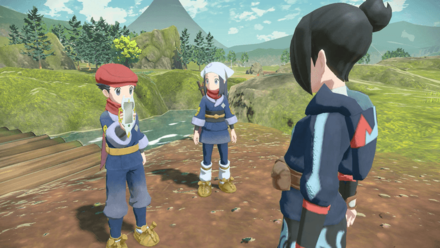
Learn how to complete the game and handle all the Frenzied Noble Pokemon with Game8's complete story walkthrough for Pokemon Legends: Arceus. Read on to learn how to handle each mission, what objectives you'll need to complate, as well as any other helpful information!
List of Contents
- Complete Story Walkthrough
- Frenzied Noble Kleavor Objectives
- Frenzied Noble Hisuian Lilligant Objectives
- Frenzied Noble Hisuian Arcanine Objectives
- Frenzied Noble Hisuian Electrode Objectives
- Frenzied Noble Hisuian Avalugg Objectives
- The Lake Trials Objectives
- Climbing Mount Coronet Objectives
- Finding All the Plates (Post-Game) Objectives
- Tips for Your Journey
- Pokedex Research Tasks Guide
- All Mission Walkthrough Guides
- All Trainer Battle Guides
- Other Story Walkthrough Guides
- Pokemon Legends: Arceus Related Guides
Complete Story Walkthrough
Frenzied Noble Kleavor Objectives
| 1 | In an Unfamiliar Land Pick up the Arc Phone and after completing the tutorial on the use of Poke Balls, catch the three starter Pokemon. |
|---|---|
| 2 | The Galaxy Team's Entry Trial Choose your starter and head to the village gate to fight Volo in a Pokemon battle. ▶ Best Starter Pokemon to Choose |
| 3 | Head to the Obsidian Fieldlands and catch a Bidoof, Starly, and Shinx. |
| 4 | Report back to Cyllene to complete the trial and receive your Survey Corps outfit. Meet with Captain Kamado after wearing them in your quarters. |
| 5 | The Basics of Crafting Receive the recipe for Poke Balls and some funds from Cyllene then head to the Craftworks workbench to create your own Poke Ball. |
| 6 | Getting to Work on Research Tasks Travel to the Fieldlands Camp to learn about research tasks then gain enough research points to move up to the next rank. |
| 7 | Return to Cyllene to advance to First Star rank. |
| 8 | A Request from Mai Go to the Training Grounds and win the battle against Akari/Rei. ▶ How to Beat Akari/Rei |
| 9 | Travel to Obsidian Fieldlands to meet with Mai and defeat her in battle. ▶ How to Beat Mai and Munchlax |
| 10 | Make your way to Deertrack Heights and drive away the Alpha Kricketune. |
| 11 | Summoned by Commander Kamado Enter the headquarters to speak to Commander Kamado. |
| 12 | The Frenzy of the Lord of the Woods Speak with Cyllene and travel to Grandtree Arena to meet Lian. Defeat him in a Pokemon battle. ▶ How to Beat Lian |
| 13 | Return to the base camp and speak with Professor Laventon. |
| 14 | Head to the Heights Camp and talk to Adaman. Ride Wydeer to Grandtree Arena and talk to Irina, who will challenge you to a Pokemon battle. ▶ How to Beat Irida |
| 15 | Defeat the Frenzied Noble Kleavor in a boss battle then report back to Commander Kamado. ▶ How to Beat Frenzied Noble Kleavor |
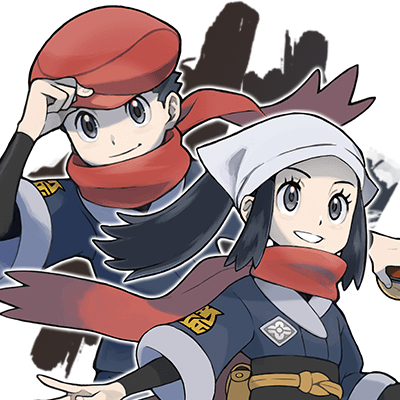
Protip: Do Not Collect Wisps Early!
After defeating Kleavor, a cutscene will play in which you will receive Request 22: Eerie Apparitions in the Night, in which you must collect 107 Wisps scattered across the game's 5 zones and Jubilife Village.
If you collect Wisps absentmindedly, later on when attempting to gather all the Wisps, you will not be sure which ones are still remaining in an area, forcing you to re-check every Wisp spot to figure out which ones are still missing.
The most efficient way to collect Wisps is to wait until you unlock Hisuian Braviary in Alabaster Icelands, and flying around each zone while consulting maps, so resist the urge to grab Wisps early and instead, save them for the right time.
All Wisp Locations: Guide & Maps
Frenzied Noble Hisuian Lilligant Objectives
| 16 | Arezu's Predicament Receive your next mission from Kamado then make your way to Solaceon Ruins in the Crimson Mirelands to meet Warden Calaba. Defeat Akari/Rei in battle on your way out of the village. Note that you must reach a Two Star Rank to enter the Crimson Mirelands. ▶ How to Increase Star Rank |
|---|---|
| 17 | Defeat Volo in another Pokemon battle after meeting Calaba. Afterwards, head out to find the Miss Fortune Sisters and retrieve the stolen wall fragment after beating Coin. |
| 18 | After giving the wall fragment to Calaba, go to Sludge Mound and defeat Ursaluna. |
| 19 | Return to Jubilife Village and talk to Kamado to continue the mission. |
| 20 | Ride on Ursaluna and follow the blue signals to find Arezu in the Crimson Mirelands. ▶ Where to Find Arezu |
| 21 | Meet with Adaman at Brava Arena and defeat the Frenzied Noble Hisuian Lilligant in a boss battle. ▶ How to Get to Brava Arena ▶ How to Beat Frenzied Noble Hisuian Lilligant |
Unown Research Notes Added
Upon returning to the Mirelands Camp after retrieving the stolen Wall Fragment, the Professor will add Unown Research Notes to your Pokedex. There are a total of 28 Unown that can be found across the region so be sure to be on the lookout while exploring. Unown cannot be forced in a battle and you must catch it directly using Poke Balls.
Frenzied Noble Hisuian Arcanine Objectives
| 22 | A New Mission Find Commander Kamado in the Galaxy Hall to learn about your next mission. |
|---|---|
| 23 | The Lordless Island Travel to Cobalt Coastlands and defeat Irida in battle. Note that you must reach a Three Star Rank to enter the Cobalt Coastlands. ▶ How to Increase Star Rank |
| 24 | Find Palina on the ridge Irida was talking about. |
| 25 | Go to Aipom Hill and talk to Iscan. Capture a Dusclops at night and return to him afterwards. |
| 26 | Bring the Basculegion Food to Gingko Landing and feed it to Basculegion. Ride Basculegion across the waters and head for Firespit Island. |
| 27 | Find the Miss Fortune Sisters and defeat them in three consecutive battles. ▶ How to Beat Miss Fortune Sisters |
| 28 | Talk to Iscan and defeat the Frenzied Noble Hisuian Arcanine in a boss battle. Report back to Commander Kamado to complete the mission. ▶ How to Beat Frenzied Noble Hisuian Arcanine |
Catch Pokemon Easier by Making Basculegion jump
After unlocking Basculegion as a Rideable Pokemon, you will be able to traverse the waters as well as catch Pokemon that you will run into while surfing!
It will be difficult to aim and throw Pokeballs as most of these Pokemon are constantly moving. To make catching Pokemon a lot less challenging, make Basculegion jump by pressing the Y button then while in mid-air, hold ZR to slow down time, giving you an opportunity to adjust your throw.
Frenzied Noble Hisuian Electrode Objectives
| 29 | Scaling Perilous Heights Exit the headquarters and battle Adaman outside. Receive your next mission from Cyllene then travel to Coronet Highlands. Note that you must reach a Four Star Rank to enter the Coronet Highlands. ▶ How to Increase Star Rank |
|---|---|
| 30 | Meet with Ingo and pass through Wayward Cave. When you're back outside, make your way to the mountain and defeat Melli at the entrance of the quarry. ▶ How to Beat Melli |
| 31 | Pass through the quarry and continue making your way up. Ingo will challenge you upon reaching your next destination. ▶ How to Beat Ingo |
| 32 | Climb the cliffs with Sneasler then head to Moonview Arena, where Melli will challenge you to another battle. ▶ How to Beat Melli |
| 33 | Defeat the Frenzied Noble Hisuian Electrode in a boss battle then report back to Commander Kamado to complete the mission. ▶ How to Beat Frenzied Noble Hisuian Electrode |
Climbing With Sneasler
When you unlock Sneasler as a Rideable Pokemon after defeating Ingo, you will be able to climb cliffs and other high places, making map exploration a lot easier.
Frenzied Noble Hisuian Avalugg Objectives
| 34 | The Slumbering Lord of the Tundra Walk towards the village gate and you'll be challenged by Akari/Rei. After the battle, head to Alabaster Icelands. Note that you must reach a Five Star Rank to enter the Alabaster Icelands. ▶ How to Increase Star Rank |
|---|---|
| 35 | Head to Avalugg's Legacy at the center of the map, where Gaeric will challenge you to a battle. ▶ How to Beat Gaeric |
| 36 | Head to the mountaintop southwest of Avalugg's Legacy to reach Sabi. Use Wrydeer and Sneasler to climb up the mountain. |
| 37 | Head to Snowpoint Temple and solve the door puzzles until you reach the top floor. Defeat Sabi in a trainer battle. First door: Rock → Steel → Ice Second door: Ice → Rock → Steel → Rock → Ice Third Door: Steel → Ice → Rock → Ice → Steel → Rock ▶ The Plate of Snowpoint Temple Mission Guide |
| 38 | Defeat Hisuian Braviary to unlock it as a Rideable Pokemon. Use the Pokemon to land on top of Avalugg's Legacy. Investigate the ice at the center to obtain a piece of Eternal Ice. |
| 39 | Make your way towards Icepeak Arena and defeat the Frenzied Noble Hisuian Avalugg in a boss battle. Report back to Commander Kamado to complete the mission. ▶ How to Beat Frenzied Noble Hisuian Avalugg |
Use Hisuian Braviary to Collect Wisps
Now that you have the ability to fly, thanks to Hisuian Braviary, you can now reach every Wisp that you need to complete the Eerie Apparitions in the Night Request! It is best to check each map and collect the Wisps in one sweep so you don't forget which ones you already found and which ones remain.
How to Unlock Hisuian Braviary
The Lake Trials Objectives
| 40 | Disaster Looming Go outside your quarters. After a few cutscenes, follow Cyllene to reach the front gate of Jubilife Village. |
|---|---|
| 41 | Find Lian at the Grandtree Arena. After speaking with him, head to the area east of the Worn Bridge to find Mai. After a few cutscenes, exit the tent to go outside. |
| 42 | Choose either Adaman from the Diamond Clan or Irida from the Pearl Clan to accompany you at the lake trials. This decision will affect the Legendary Pokemon that you will face later on. ▶ Should You Choose Adaman or Irida? |
| 43 | The Trial of Lake Verity Head to Lake Verity in Obsidian Fieldlands. Defeat the Alpha Hisuian Goodra and talk to Mesprit. You can pick any reply and still complete the trial. |
| 44 | The Trial of Lake Valor Head to Lake Valor in Crimson Mirelands. Defeat the Alpha Overqwill and try to hit Azelf with the Marsh Balms. You won't be able to hit Azelf but you will complete the trial if you don't give up on throwing. |
| 45 | The Trial of Lake Acuity Head to Lake Acuity in Alabaster Icelands. Defeat the Alpha Hisuian Zoroark and answer Uxie correctly to complete the trial. The answer is 60131. |
| 46 | After finishing all three trials, you will automatically head to the Shrouded Ruins and obtain the Red Chain. |
You Can Choose Either Adaman or Irida
The choice between Adaman and Irida only affects which of the two Legendary Pokemon you will fight first and which of them will be on their Origin Form. Whoever you choose, Dialga and Palkia's level will be both at 65, so it doesn't matter who you choose unless you have a reason to get the one you like as soon as possible.
Should You Choose Adaman or Irida? Diamond or Pearl Clan Choice
Climbing Mount Coronet Objectives
| 47 | Atop Mount Coronet Head to Mount Coronet's peak and enter the cave. Defeat Beni near the end of the cave to proceed. ▶ How to Beat Beni |
|---|---|
| 48 | Talk to Commander Kamado and defeat him in a trainer battle. ▶ How to Beat Commander Kamado |
| 49 | Bring the Red Chain at the Temple of Sinnoh and catch Dialga/Palkia. You won't be able to proceed if you don't catch the Legendary Pokemon and the battle will restart if you defeat it. |
| 50 | The Counterpart Go to the cave marked on your map and defeat Charm to obtain the Origin Ore. Report back to the professor to obtain the Origin Ball. |
| 51 | Head back to the Temple of Sinnoh and defeat Dialga/Palkia (Origin Form) in a boss battle. ▶ How to Beat Dialga and Palkia Origin Form |
Finding All the Plates (Post-Game) Objectives
| 52 | A New Day Dawns Exit your quarters and talk to Captain Cyllene at the Survey Corps office. |
|---|---|
| 53 | The Researcher of Myths Travel to the Obsidian Fieldlands and meet Volo at the Heights Camp. |
| 54 | Follow Volo to Grueling Grove and defeat the Vespiquen. |
| 55 | Travel to the Ancient Retreat and speak to Cogita. Choose all 5 options to unlock the next missions associated with the remaining Plates. |
| 56 | The Plate of the Lakes Travel to Lake Verity in the Obsidian Fieldlands, Lake Valor in the Crimson Mirelands, and Lake Acuity in the Alabaster Icelands and catch Mesprit, Azelf, and Uxie to obtain the Draco Plate. |
| 57 | The Plate of Firespit Island Travel to Firespit Island in the Cobalt Coastlands, enter the cave at the Molten Arena, and catch Heatran to obtain the Iron Plate. |
| 58 | The Plate of Moonview Arena Travel to Moonview Arena in the Coronet Highlands and catch Cresselia to obtain the Dread Plate. |
| 59 | The Plate of Snowpoint Temple Travel to Snowpoint Temple in the Alabaster Icelands and descend to the lowest floor to catch Regigigas and obtain the Blank Plate. |
| 60 | The Plate of Prelude Beach Travel to Jubilife Village and talk to Commander Kamado. Meet him at the Prelude Beach and defeat him in battle to obtain the Fist Plate. ▶ How to Beat Commander Kamado |
| 61 | Seeking the Remaining Plates Return to Cogita to report your progress and give her 3 logs of Wood to obtain the Pixie Plate. ▶ Where to Find Wood and Craftable Items |
| 62 | Meet Volo at the Sacred Plaza in the Coronet Highlands then head to the Temple of Sinnoh and defeat him in battle. ▶ How to Beat Giratina and Volo |
| 63 | Giratina will appear right after winning the battle against Volo. You won't be able to capture Giratina so your only choice is to defeat its Altered and Origin Forms to proceed. You will receive the Spooky Plate from Volo after taking down Giratina. |
| 64 | The Deified Pokemon Capture all Pokemon and use the Azure Flute at the Temple of Sinnoh. Ascend the stairs and meet Arceus at the top. ▶ How to Get Arceus ▶ Story Summary and Ending Explained |
Tips for Your Journey
Aim for a Five Star Rank

In order to visit each new map and progress with the main story, you'll need to complete Research Tasks and reach a certain Star for your Survery Corps Rank. Even if you complete all the story objectives, you won't be able to continue on unless you've finished enough Research Tasks and gained enough Research Points to proceed.
Although there are ten ranks in total, only reaching the five star rank is required for completing the main story, so you don't need to continue grinding once you've reached this point.
| Star Rank | Area Unlocked |
|---|---|
| Second Star Member | Crimson Mirelands |
| Third Star Member | Cobalt Coastlands |
| Fourth Star Member | Coronet Highlands |
| Fifth Star Member | Alabaster Icelands |
How to Increase Research Level Fast
Upgrade Your Satchel Size
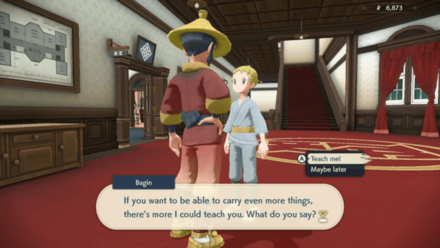
After completing Mission 6: Summoned by Commander Kamado, you gain the ability to increase your inventory space. We recommend upgrading the satchel as soon as you unlock the option as this makes gathering Crafting Materials easier.
How to Increase Satchel (Inventory) Size
Change Your Pokemon's Moves
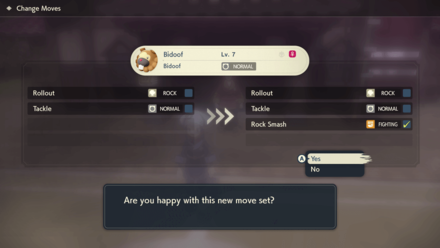
Unlike in previous Pokemon games, no prompt will appear if a Pokemon learns a new move upon leveling up. You need to manually replace the move in the Satchel menu if you want to use the new one.
In addition, replacing a move does not make the Pokemon forget it permanently, so you can always go back and change the previous move that was replaced.
Pokedex Research Tasks Guide
Complete Tasks to Level Up a Pokemon's Research Level

Unlike previous Pokemon games, catching a Pokemon does not complete their Pokedex entries. Instead, you need to complete research tasks assigned to each Pokemon.
Each Pokemon have a unique set of research tasks to do, although the most common include: catching it, defeating it, observing it perform a specific move, and evolving it. You can find the list of research tasks for each Pokemon in the Research Tasks menu of your Pokedex.
Research Tasks Guide: How to Complete the Pokedex
Update the Pokedex to Earn Pokemon Research Points
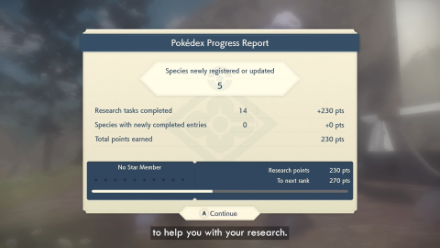
After completing Research Tasks for certain Pokemon, you can go to Professor Laventon at the Base Camp to update the Pokedex. The updates to your Pokedex will be calculated into Pokemon Research Points, which helps you level up to the next Star Rank and unlock new areas.
Updating the Pokedex also helps you earn money, which you can use to stock up on items you need for your adventure.
How to Get Research Points Fast and Increase Research Level
All Mission Walkthrough Guides
Missions are regarded as main quests in Pokemon Legends: Arceus. Completing Missions will progress the story and further unravel the mysteries surrounding the region of Hisui!
List of All Missions
All Trainer Battle Guides
| All Trainer Battles | ||
|---|---|---|
 Akari/Rei Akari/Rei |
 Mei Mei |
 Lian Lian |
 Melli Melli |
 Ingo Ingo |
 Sabi Sabi |
 Gaeric Gaeric |
 Beni Beni |
 Commander Kamado Commander Kamado |
 Adaman Adaman |
 Irida Irida |
 Volo Volo |
Other Story Walkthrough Guides
| Other Story Guides | |
|---|---|
| Arezu Location in Mission 8 | How to Get to Brava Arena |
| Snowpoint Temple Door Puzzle Solution | Story Summary and Ending Explained |
Pokemon Legends: Arceus Related Guides
Pokemon Legends: Arceus Wiki Front
| Pokemon Legends: Arceus Guides | |
|---|---|
 Pokedex Pokedex |
 Story Walkthrough Story Walkthrough |
 Requests Requests |
 Bosses Bosses |
 Map and Locations Map and Locations |
 Alpha Pokemon Alpha Pokemon |
 Items Items |
 Beginner's Tips & Guides Beginner's Tips & Guides |
 Moves Moves |
 News and Game Info News and Game Info |
 Message Boards Message Boards |
 Characters Characters |
 Best Pokemon Tier List and Movesets Best Pokemon Tier List and Movesets |
- |
Author

Complete Story Walkthrough
Rankings
- We could not find the message board you were looking for.
Gaming News


![Monster Hunter Stories 3 Review [First Impressions] | Simply Rejuvenating](https://img.game8.co/4438641/2a31b7702bd70e78ec8efd24661dacda.jpeg/thumb)
Popular Games

Genshin Impact Walkthrough & Guides Wiki
Honkai: Star Rail Walkthrough & Guides Wiki
Umamusume: Pretty Derby Walkthrough & Guides Wiki
Pokemon Pokopia Walkthrough & Guides Wiki
Resident Evil Requiem (RE9) Walkthrough & Guides Wiki
Monster Hunter Wilds Walkthrough & Guides Wiki
Wuthering Waves Walkthrough & Guides Wiki
Arknights: Endfield Walkthrough & Guides Wiki
Pokemon FireRed and LeafGreen (FRLG) Walkthrough & Guides Wiki
Pokemon TCG Pocket (PTCGP) Strategies & Guides Wiki


Recommended Games
Diablo 4: Vessel of Hatred Walkthrough & Guides Wiki
Cyberpunk 2077: Ultimate Edition Walkthrough & Guides Wiki
Fire Emblem Heroes (FEH) Walkthrough & Guides Wiki
Yu-Gi-Oh! Master Duel Walkthrough & Guides Wiki
Super Smash Bros. Ultimate Walkthrough & Guides Wiki
Pokemon Brilliant Diamond and Shining Pearl (BDSP) Walkthrough & Guides Wiki
Elden Ring Shadow of the Erdtree Walkthrough & Guides Wiki
Monster Hunter World Walkthrough & Guides Wiki
The Legend of Zelda: Tears of the Kingdom Walkthrough & Guides Wiki
Persona 3 Reload Walkthrough & Guides Wiki


All rights reserved
©2021 Pokémon. TM, ®Nintendo.
The copyrights of videos of games used in our content and other intellectual property rights belong to the provider of the game.
The contents we provide on this site were created personally by members of the Game8 editorial department.
We refuse the right to reuse or repost content taken without our permission such as data or images to other sites.