Rogue Deathmask Flurry Endgame Build (Season 9)
★ NEW: Season 12 Guide and New Features
┗ Seasonal Content: New Uniques | Bloodied Sigils | Slaughterhouses
┗ Seasonal Mechanic: Killstreaks and Bloodied Items
★ NEW: Lord of Hatred Expansion Release Date
★ Check out our Vessel of Hatred expansion guide
This is the Deathmask Flurry endgame build and guide for Season 9 of Diablo 4: Vessel of Hatred (D4). Read on to learn more about the Deathmask Flurry build as well as its playstyle in the Season of Horadrim!
 Attention! Attention! |
This build is a Legacy Build that was created from Season 9 and is not updated for the current season. |
|---|
| All Rogue Guides | ||
|---|---|---|
List of Contents
Deathmask Flurry Rogue Build
Deathmask Flurry Build Summary
| Click on a Link to Jump to a Section! | |||||||||||
|---|---|---|---|---|---|---|---|---|---|---|---|
This Rogue Endgame build is based on a build by Slaydra over at Slaydra (Youtube). The video includes details on how to gear up to get the build online. You can check Slaydra's Twitch Channel for more Diablo 4 content and ask questions about the build!
| Build Summary | |
|---|---|
 Deathmask Flurry Endgame Build Deathmask Flurry Endgame Build |
|
| Focus: AoE Burst, Endgame Dungeons | |
|
|
|
The build revolves around the use of Flurry, modified and empowered by the Deathmask of Nirmitruq for higher damage output and better resource management. The build aims to keep spamming Flurry by including your health as a resource for casting, allowing for consistent damage outputs.
Season 9 Guide (Sins of the Horadrim)
Deathmask Flurry Build Skills and Passives
| Click on a Link to Jump to a Section! | |||||||||||
|---|---|---|---|---|---|---|---|---|---|---|---|
| Back to the top ▲ | |||||||||||
※ More skills can be seen by scrolling vertically.
| Active Skills | |
|---|---|
┗
┗
|
|
┗
┗
┗
┗
┗
┗
┗
|
|
┗
┗
┗
┗
┗
┗
┗
┗
┗
|
|
┗
┗
┗
┗
┗
┗
┗
|
|
┗
|
|
┗
┗
┗
┗
┗
┗
|
|
┗
|
|
Deathmask Flurry Build Specialization
| Preparation | Spend 75 Energy to reduce your Ultimate Skill's Cooldown by 5 seconds. Ultimate Skills reset other Cooldowns and grant 15% Damage Reduction for 10 seconds. |
|---|
Preparation reduces the cooldown of Shadow Clone, allowing it to be spammed more often to improve the build's clear time and damage.
Deathmask Flurry Build Horadric Spells
| Click on a Link to Jump to a Section! | |||||||||||
|---|---|---|---|---|---|---|---|---|---|---|---|
| Back to the top ▲ | |||||||||||
| Horadic Spellcraft Setup | |||||||||||
|---|---|---|---|---|---|---|---|---|---|---|---|
|
Nebulous Extract Nebulous Extract Your Catalyst now deals Shadow and or Corrupting damage. Enemies hit by it deal 5.5% reduced damage for 7 seconds. While equipped, your Shadow Damage Bonus is equal to that of your highest Damage Type Bonus. (Infusion) |
|||||||||||
|
Bottled Wind Bottled Wind Invoking your Catalyst grants a Barrier equal to 34% of your Maximum Life for 4 seconds. After it dissipates, its essence is bottle back up. (Arcana) |
Luminous Gem Luminous Gem Your Catalyst will Daze enemies it damages for 2.0 seconds. (Arcana) |
Potent Alloy Potent Alloy Your Catalyst destroys enemy Barriers and Knocks them Down for 1.8 seconds afteer the removal (Arcana) |
|||||||||
|
Disintegrate Disintegrate Form an Arcane Conductor that emits a persistent beam between itself and you, dealing a steady blitz of 220,463 damage over 8 seconds. (Catalyst) |
Flurry Flurry Unleash a flurry of stabs and slashes, striking enemies in front of you 4 times and dealing a total of XX% damage to each. (Skill) |
||||||||||
The Horadric Spells for the Deathmask Flurry build focuses on survivability to mitigate the negative effects of the Deathmask of Nirmitruq. The most important Arcana to have will be Bottled Wind as this grants barrier, keeping your from dying.
Deathmask Flurry Build Aspects and Affixes
| Click on a Link to Jump to a Section! | |||||||||||
|---|---|---|---|---|---|---|---|---|---|---|---|
| Back to the top ▲ | |||||||||||
 Masterwork Priority Masterwork Priority |
Affixes marked with ★ are the ones you should aim to upgrade when masterworking. |
|---|
※ More gear Aspects can be seen by scrolling vertically.
| Gear | Aspect and Affixes |
|---|---|
| Head | Stats: ・Maximum Life ・Ranks to Flurry ★★★ ・Movement Speed ・Armor |
| Chest | Stats: ・All Stats ★★ ・Damage on Next Attack After Entering Stealth ・Maximum Life ★ ・Resource Generation. |
| Gloves | Stats: ・Attack Speed ★ ・Critical Strike Chance ★ ・Ultimate Damage ・Ranks to Marksman and Cutthroat Skills ★ |
| Pants | Stats: ・Maximum Life ・Resistance to All Elements ★★★ ・Armor Temper: ・Defensive - Rogue Recovery ┗ Bonus to Siphoning Strikes
・Utility - Alchemist Control
┗ Flurry Size |
| Boots | Stats: ・Movement Speed ・Chill Slow Potency ・Critical Strike Chance Against Chilled Enemies ★★★ ・Cold Resistance |
| Amulet | Stats: ・Attack Speed ・Dexterity ★★★ ・Critical Strike Chance Temper: ・Offensive - Subterfuge Expertise ┗ Damage per Dark Shroud
・Defensive - Rogue Recovery
┗ Bonus to Siphoning Strikes |
| Ring | Stats: ・Resistance to All Elements ・Critical Strike Chance ★★ ・Attack Speed Temper: ・Offensive - Subterfuge Expertise ┗ Damage per Dark Shroud ★
・Resource - Ultimate Efficiency
┗Shadow Clone Cooldwown Reduction |
| Ring | Stats: ・Resistance to All Elements ・Critical Strike Chance ★★ ・Attack Speed Temper: ・Offensive - Subterfuge Expertise ┗ Damage per Dark Shroud ★
・Resource - Ultimate Efficiency
┗Shadow Clone Cooldwown Reduction |
| Weapon (Bow) |
Stats: ・Maximum Life ・Dexterity ★★ ・Critical Strike Damage ★ Temper: ・Offensive - Subterfuge Expertise ┗ Damage per Dark Shroud ★
・Weapon - Agile Augments
┗ Chance for Flurry to Deal Double Damage |
| Weapon (Sword) |
Stats: ・All Stats ・Damage Reduction ・Lucky Hit: Chance to Heal for Life ★★★ ・Maximum Life |
| Weapon (Dagger) |
Stats: ・Maximum Life ・Dexterity ★★★ ・Vulnerable Damage Temper: ・Offensive - Specialist Evolution ┗ Damage per Dark Shroud ★
・Weapon - Agile Augments
┗ Chance for Flurry to Deal Double Damage |
Deathmask Flurry Build Gems and Runewords
| Click on a Link to Jump to a Section! | |||||||||||
|---|---|---|---|---|---|---|---|---|---|---|---|
| Back to the top ▲ | |||||||||||
| Weapon | Armor |
|---|---|
 Emerald Emerald
|
|
For Gems, it's best to slot in Emerald on your Armor slots for more Dexterity and on your weapons for more Critical Strike Damage.
Deathmask Flurry Build Best Horadric Jewels
| Amulet | Ring | Ring |
|---|---|---|
 Willbreaker Willbreaker
|
 Idol From Below Idol From Below
|
 Seal of Denial Seal of Denial
|
Willbreaker and Idol from Below are used as damage multipliers for the build, while Seal of Denial grants more defense to mitigate the life drain from the Deathmask of Nirmitruq.
Deathmask Flurry Build Runewords
| Runeword 1 | Runeword 2 |
|---|---|
|
|
|
Ahu + Qax is used to gain more damage as you spam Flurry. While Neo + Vex is used to add temporary ranks to your skills, allowing you to deal more damage.
Deathmask Flurry Build Mercenaries
| Click on a Link to Jump to a Section! | |||||||||||
|---|---|---|---|---|---|---|---|---|---|---|---|
| Back to the top ▲ | |||||||||||
| Mercenary | Reinforcement |
|---|---|
Use Subo as the Main Mercenary
Subo is used as the main mercenary for marking enemies and regaining energy. Take Subo's Cover Fire and Opening Fire to gain more Critical Strike Damage, ultimately allowing the build to deal more damage over a time interval.
Equip Raheir as a Reinforcement
Use Raheir as your reinforcement for your survivability. It's best to use his Bastion skill whenever you become crowd-controlled so you can avoid damage and become unstoppable.
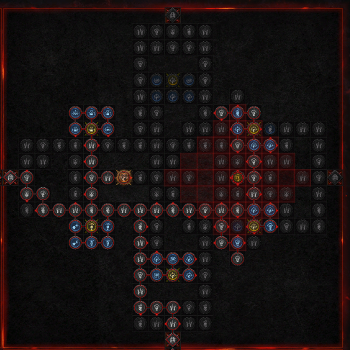
Deathmask Flurry Build Paragon Boards
| Click on a Link to Jump to a Section! | |||||||||||
|---|---|---|---|---|---|---|---|---|---|---|---|
| Back to the top ▲ | |||||||||||
| Paragon Boards |
|---|
| 1. Starting Board (Exploit) |
 |
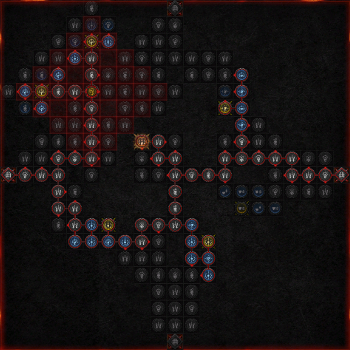
| 2. Danse Macabre (Turf) |
 |
| 3. Exploit Weakness (Headhunter) |
 |
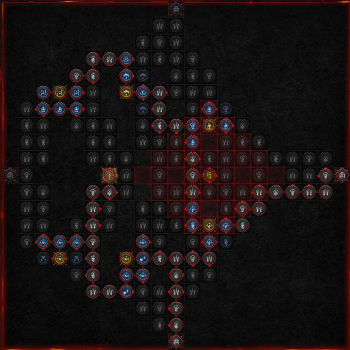
| 4. No Witnesses (Devious) |
 |
| 5. Cheap Shot (Chip) |
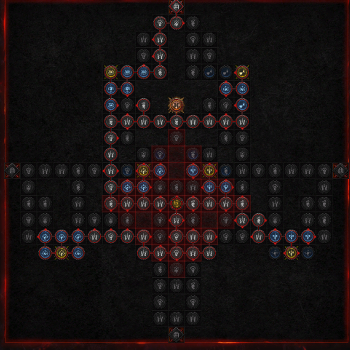 |
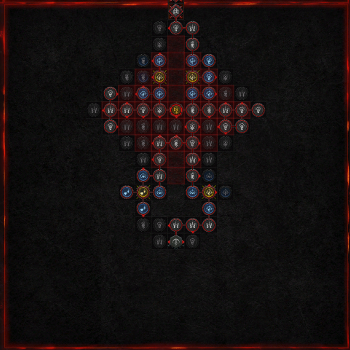
The Paragon Boards and Glyphs for the build focus on enhancing the damage scaling of Flurry as well as Critical Damage. The Paragon setup can be achieved under Paragon 270, with extra nodes you can put into maximum life or armor and resistances.
Deathmask Flurry Build Playstyle and Rotation
| Click on a Link to Jump to a Section! | |||||||||||
|---|---|---|---|---|---|---|---|---|---|---|---|
| Back to the top ▲ | |||||||||||
This build's playstyle revolves around close combat by spamming Flurry through the cycle created by Preparation. The playstyle rotation follows:
- Cast Shadow Step to Elites or mob groups.
- Cast Shadow Clone to reset all cooldowns.
- Use Flurry until Shadow Clone cooldown resets, then use Shadow Clone again.
- Use Dash or Shadow Step to move around.
Diablo 4 Related Guides

All Class Builds
| All Classes | |||||
|---|---|---|---|---|---|
All Endgame Builds
| List of Endgame Builds |
|---|
All Leveling Builds
| List of Leveling Builds |
|---|
All Legacy Builds per Season
| Seasons | List of Legacy Builds |
|---|---|
| Season 11 | |
| Season 10 | |
| Season 9 |
|
| Season 8 | |
| Season 7 | |
| Season 6 |
Comment
Author

Rogue Deathmask Flurry Endgame Build (Season 9)
Rankings
- We could not find the message board you were looking for.

Gaming News


Popular Games

Genshin Impact Walkthrough & Guides Wiki
Umamusume: Pretty Derby Walkthrough & Guides Wiki
Crimson Desert Walkthrough & Guides Wiki
Monster Hunter Stories 3: Twisted Reflection Walkthrough & Guides Wiki
Honkai: Star Rail Walkthrough & Guides Wiki
Pokemon Pokopia Walkthrough & Guides Wiki
The Seven Deadly Sins: Origin Walkthrough & Guides Wiki
Wuthering Waves Walkthrough & Guides Wiki
Zenless Zone Zero Walkthrough & Guides Wiki
Arknights: Endfield Walkthrough & Guides Wiki


Recommended Games
Fire Emblem Heroes (FEH) Walkthrough & Guides Wiki
Diablo 4: Vessel of Hatred Walkthrough & Guides Wiki
Cyberpunk 2077: Ultimate Edition Walkthrough & Guides Wiki
Yu-Gi-Oh! Master Duel Walkthrough & Guides Wiki
Super Smash Bros. Ultimate Walkthrough & Guides Wiki
Pokemon Brilliant Diamond and Shining Pearl (BDSP) Walkthrough & Guides Wiki
Elden Ring Shadow of the Erdtree Walkthrough & Guides Wiki
Monster Hunter World Walkthrough & Guides Wiki
The Legend of Zelda: Tears of the Kingdom Walkthrough & Guides Wiki
Persona 3 Reload Walkthrough & Guides Wiki


All rights reserved
©2022 BLIZZARD ENTERTAINMENT, INC. ALL RIGHTS RESERVED.
All trademarks referenced herein are the properties of their respective owners.
The copyrights of videos of games used in our content and other intellectual property rights belong to the provider of the game.
The contents we provide on this site were created personally by members of the Game8 editorial department.
We refuse the right to reuse or repost content taken without our permission such as data or images to other sites.