
This survey will take about 1 minute.
Your answers will help us to improve our website.
Cyberpunk 2077
Best Blunt Weapon Build (Bonk Build)
★ Coming to Switch 2
★ New: Metro System, Car Racing, Romantic Hangouts
★ Phantom Liberty: Dogtown Map & Relics System
★ See our Best Builds here!
┗ HOT: Blades Build, Netrunner Build, & Assassin Build

This is a guide to creating the Blunt Weapon melee build in Cyberpunk 2077: Ultimate Edition. Check here for details about the bonk build, what attributes to level up, which perks to choose, and what equipment to use.
List of Contents
Blunt Weapon Build Overview
Build Basic Information
| Blunt Weapon Build | |
|---|---|
| Main Attributes | |
| Main Weapons / Arm Cyberware | ・ Gold-Plated Baseball Bat / Murphy's Law ・ Sasquatch's Hammer ・ Guts ・Electrifying Projectile Launch System |
| Operating System | ・Militech Berserk |
Strengths and Weaknesses
Strengths
This blunt weapon build is extremely strong when used together with a Berserk Sandevistan. Blunt weapons, except for two-handed clubs, have inherently low attack speed but can deal tons of damage. The Stun effect from blunt weapons is also great to use against hoards of enemies - even bosses.
Weaknesses
The build relies heavily on jumping in and taking on multiple enemies at the same time, so it won't be very effective when stealth is required for a certain mission. Additionally, the player is required to jump in face-to-face with an enemy so they will inevitably soak up a lot of damage. This may not be very effective against high HP enemies like bosses.
Also since we are using a Sandevistan, note that V won't have access to any quickhacks in this build.
Blunt Weapon Best Attribute Build
Attribute Progression
| Build Attributes | |||||
|---|---|---|---|---|---|
| Lv. | Body | Reflex | Tech | Intel | Cool |
| 1 | 6 | 6 | 4 | 3 | 3 |
| 10 | 9 | 9 | 7 | 3 | 3 |
| 50 | 20 | 20 | 20 | 3 | 8 |
| 60 | 20 | 20 | 20 | 3 | 18 |
The max level is only up until 50 in the base game. Purchase Phantom Liberty to reach level 60.
When starting out, add points to Body first. Body is the main attribute of this build, due to the access it gives to the Blunt weapon perk tree. This attribute also provides perks that enable V to survive in combat.
Reflexes is your second-most important attribute, as it gives you access to perks that will enable you to dash around in battle. This greatly increases your mobility and chances to survive in battle.
You then need to level up your Technical Ability attribute to unlock perks that enable you to increase cyberware capacity and reduce cooldowns for certain cyberwares like the Sandevistan.
We will not put any points in Intelligence mostly because our Operating Systems would be primarily a Sandevistan. V won't have access to any quickhacks in this build, so be wary of that.
Blunt Weapon Build Best Perks
This is the full list of perks that you can get if you achieve the maximum level 60 with the Phantom Liberty DLC. Optional perks are also listed in their own section in case you have not purchased the DLC.
| Jump to Each Attribute for Their Perks! | |||
|---|---|---|---|
| Optional Perks | |||
Body Attribute
Points invested on Body improves the overall performance of Blunt weapons as well as perks that promote V's survivability. This is also where we add perks that improve on your secondary weapon - a Shotgun.
Perk List
| Main Perk | Secondary Perk(s) |
|---|---|
|
(1 pt) |
|
|
(2 pt) |
|
|
(2 pt) |
|
|
(3 pt) |
|
|
(3 pt) |
|
|
(3 pt) |
Final Perks
| Final Perks | |||
|---|---|---|---|
|
|
|
|
|
Cross-Branch Perk
| Perk | Requirement |
|---|---|
|
|
|
|
|
Get this perk when you have specific secondary perks unlocked.
Reflexes Attribute
Most Reflexes perks for this build give you mobility options as you dash in and out of battle while holding a two-handed club. Dash will help you easily cut the distance between you and an enemy or give you the capability to jump out of battle when low on health.
Air Dash, on the other hand, will help you leap across platforms or buildings to more easily access enemies.
Perk List
| Main Perk | Secondary Perk(s) |
|---|---|
|
(1 pt) |
|
|
(2 pt) |
|
|
(3 pt) |
Final Perks
| Final Perks | |||
|---|---|---|---|
|
|
|||
Technical Ability Attribute
Perks from Technical Ability allows you to increase your cyberware capacity. These said Cyberware also increases your overall armor and health to promote survivability.
The explosives perk tree is also taken in this attribute to improve the overall performance of the Projectile Launch System.
Perk List
| Main Perk | Secondary Perk(s) |
|---|---|
|
(1 pt) |
|
|
(2 pt) |
|
|
(2 pt) |
|
|
(3 pt) |
|
|
(3 pt) |
Final Perks
| Final Perks | |||
|---|---|---|---|
|
|
|
||
Cross-Branch Perk
| Perk | Requirement |
|---|---|
|
|
Get this perk when you have specific secondary perks unlocked.
Optional Perks
If you still have not purchased the Phantom Liberty DLC and have no access to the 10 additional perk points that came with it, these perks are optional and can be removed.
| Removable Perks (10 pts) | |
|---|---|
Blunt Weapon Build Relic Skill Priority
Take Jailbreak and Launch Capacity Override
| Priority | Main Skill | → | Branch Skill |
|---|---|---|---|
| 1st |
|
→ |
|
| 2nd |
|
→ |
|
Blunt weapons do not specifically utilize any of the effects brought about by the Relic Skill Tree. We take Jailbreak then Launch Capacity Override to improve on the performance of the Projectile Launch System that will be slotted in this build.
Lastly, take Vulnerability Analytics and Machine Learning to expose your opponent's weakness and generally increase your damage output.
Blunt Weapon Build Best Weapons
Base Game Only
| Recommended Weapons (Base Game only) |
||
|---|---|---|
| Gold-Plated Baseball Bat | Sasquatch's Hammer | Guts |
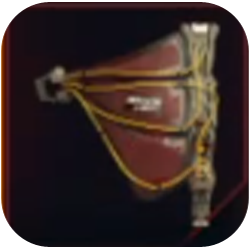
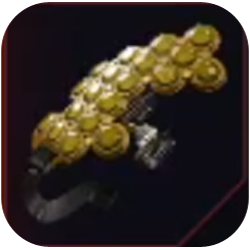
- Gold-Plated Baseball Bat your go-to one-handed club weapon for this build. It's fast and easy to swing! In case you don't have this iconic weapon, any normal one-handed club is OK.
- The Sasquatch's Hammer is a need for this build. The damage dealt by this weapon is just too good to pass up. Only use it though when you have a Berserk operating system equipped.
- Lastly, get Guts as soon as you can. It's a very powerful shotgun that can carry you to the end of the game.
Base Game + Phantom Liberty
| Recommended Weapons (with Phantom Liberty) |
||
|---|---|---|
| Murphy's Law | Sasquatch's Hammer | Guts |
- Murphy's Law replaces Gold-Plated Baseball Bat as your one-handed club of choice in the expansion. This is unlocked sometime in the story, so use the G-P Baseball Bat until then.
- Sasquatch's Hammer retains its importance in this build, even in the expansion.
- The Guts is still our recommended shotgun for this build.
Blunt Weapon Build Best Cyberwares
| Jump to a Cyberware section! | |||
|---|---|---|---|
| Operating System | Face | Hands | Circulatory System |
| Legs | Frontal Cortex | Arms | Skeleton |
| Nervous System | Integumentary System | ||
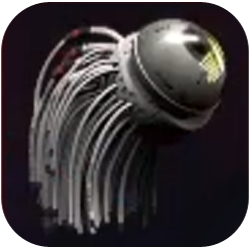
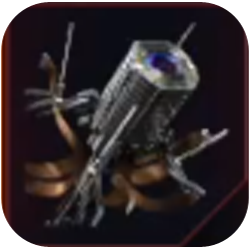
Operating System
| Cyberware | Effect (Tier 5) |
|---|---|
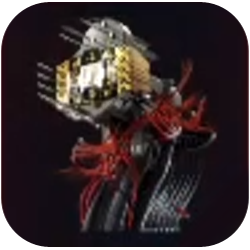
 Militech Berserk Militech Berserk
|
When active: Invulnerable to damage, cannot use items, Melee weapons only, +30% attack speed, -100% stamina cost, +20% movement speed, Increased damage at low health. When it ends: +25% Health for each enemy neutralized. |
A Berserk is the main cyberware for melee weapons which gives you several buffs when activated. Use this when you have low health and out of Blood Pump charges.
Whenever you activate Berserk, always switch to the Sasquatch's Hammer to maximize damage. When this cyberware is on cooldown, switch to the Gold-Plated Baseball Bat so you have access to dashes.
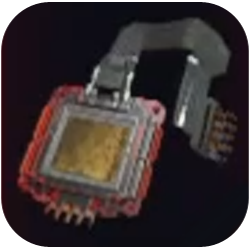
Face
| Cyberware | Effect (Tier 5) |
|---|---|
 Kiroshi "The Oracle" Optics Kiroshi "The Oracle" Optics
|
Effect active when scanning: Highlights enemies within 17.5 m.including enemies behind cover. Highlights cameras and turrets within 35m. Highlights explosive devices and traps near your crosshair within 26m. |
The Oracle variant of a Kiroshi Optics lets you track enemies, which is useful to keep track of who to kill next.
Hands
| Cyberware | Effect (Tier 5) |
|---|---|
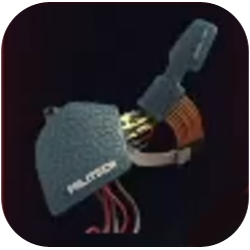 Shock Absorber Shock Absorber
|
-20% Recoil |
Shotguns have inherently high recoil, so we'd want to slot in Shock Absorber to reduce the overall recoil from such a huge weapon.
Circulatory System
| Cyberware | Effect (Tier 5) |
|---|---|
 Adrenaline Booster Adrenaline Booster
|
Stamina +23% whenever you use a melee weapon to neutralize an enemy. |
 Biomonitor Biomonitor
|
Automatically heals you with your Health Item when your Health drops below 35%. +14% Health Item effectiveness. |
 Heal-on-Kill Heal-on-Kill
|
Health +7% when you neutralize an enemy. |
Both Blood Pump and Heal-on-Kill help with your overall survival during fights especially when facing a large group of enemies.
Adrenaline Booster enables you to maintain your stamina while slashing through hoards of enemies.
Legs
| Cyberware | Effect (Tier 5) |
|---|---|
 Reinforced Tendons Reinforced Tendons
|
Press Space Bar in midair to perform a double jump. |
Reinforced Tendons enable double jumping, which is a valuable positioning move that lets you reach higher places, helping you get away or giving you a better vantage point. Do note that you can combine double jumps with air dashes, which lets you zip across areas easily.
Frontal Cortex
| Cyberware | Effect (Tier 5) |
|---|---|
 Mechatronic Core Mechatronic Core
|
+35% damage against drones, robots, mechs and turrets. +2 Max RAM. |
 Newton Module Newton Module
|
-1.25% Cooldown instantly for all cyberware after neutralizing an enemy. |
Newton Module will decrease Berserk's cooldown whenever you kill an target, which is useful when you are fighting several enemies and you're always at low health.
Mechatronic Core will let you deal more damage against robots, which you will encounter as you progress through the game.
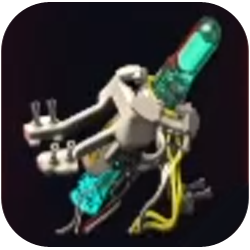
Arms
| Cyberware | Effect (Tier 5) |
|---|---|
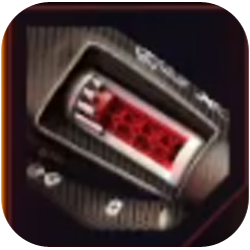
 Thermal Projectile Launch System Thermal Projectile Launch System
|
Charged shots gain: +30% damage, +25% explosion radius, +30% Burn chance |
The Projectile Launch Systems are your secondary weapon that you use to attack far away enemies. The thermal variant of this cyberware fits well with the build as it has a bigger explosion radius.
Skeleton
| Cyberware | Effect (Tier 5) |
|---|---|
 Dense Marrow Dense Marrow
|
+24% melee damage +15% melee Stamina cost |
 Para Bellum Para Bellum
|
+12% Armor |
 Scar Coalescer Scar Coalescer
|
+22% Armor when below 50% Health. |
For Skeleton cyberwares, we focused mainly on improving V's overall defense.
Dense Marrow is added to bolster this build's overall damage with the cost of some extra stamina. Don't worry, the added stamina cost is completely negated when Berserk Sandevistan is active so just go ham!
Nervous System
| Cyberware | Effect (Tier 5) |
|---|---|
 Adrenaline Converter Adrenaline Converter
|
+40% movement speed for 7 sec. when entering combat. |
 Neofiber Neofiber
|
+10% Mitigation Chance, +9% Mitigation Strength Mitigation grants a chance to reduce incoming damage by current Mitigation Strength (default: 50%). |
 Reflex Tuner Reflex Tuner
|
Slows time by 60% for 4 sec. when your Health drops below 25%. Cooldown 40 sec. |
Adrenaline Converter and Neofiber was added to improve overall movement speed and provide survivability respectively.
Reflex Tuner is also slotted in as an additional layer of protection that gives you time to react when you drop down to 25% health. Zoom out of battle, or pop in a Health potion whenever the time slow kicks in!
Integumentary System
| Cyberware | Effect (Tier 5) |
|---|---|
 Pain Editor Pain Editor
|
-7% all incoming damage +0.1% damage reduction per Attribute Point. +0.5% Mitigation Chance +2.1% Damage Over Time Resistance |
 Proxishield Proxishield
|
The closer an attacking enemy is, the less damage they deal to you. -20% incoming damage at 3 m. Damage reduction tapers off to 0% at 6 m. +0.5 Health per Attribute Point. +2.1% Melee Damage Resistance +2.5% Melee Damage |
 Subdermal Armor Subdermal Armor
|
+0.5 Armor per Attribute Point. +1.3% Decreased enemy vision +2.6 Health |
All of the cyberwares listed above aim to improve V's overall survivability in fights. Pain Editor ensures your health is topped up everytime you kill an enemy.
How to Play the Blunt Weapon Build
General Build Playstyle
Here is a general playstyle guide for this build which involves switching between the Gold-Plated Baseball Bat and the Sasquatch's Hammer depending on the situation.
| Step | What To Do |
|---|---|
| 1 | Use the One-Handed Club Whenever your Berserk Sandevistan is not active, use a One-Handed Club. This gives you access to dashes so you can zoom around while picking off enemies one-by-one. |
| 2 | Switch to Sasquatch's Hammer When you inevitably lose health during a fight, activate your Sandevistan to enter the berserk state & switch to the Sasquatch's Hammer. You will deal increased damage and become invulnerable during this time, enabling you to freely whack enemies to oblivion while healing with Heal-on-Kill. |
| 3 | Repeat the Steps Once the Sandevistan goes on cooldown, go back to Step 1 and switch to your One-Handed Club. |
| Opt. | Shotgun Whenever you find yourself surrounded by hoards of enemies, whip out your shotgun for a quick burst of point blank damage! |
| Projectile Launch System If you want to kill enemies from far away, use the Projectile Launch System to reach them. This can even make cars explode, so use that to your advantage! |
Keep Dashing, Keep Bonking
Similar to using the Blades, the key to surviving with Blunt Weapons is to not let your enemies pin you down in one location. Keep moving and cut through each enemy one by one - leaping from one to the next. Make use of the improved Dashing perks to go in or out of battle when necessary.
Always Use Quake
Quake is a special, high-damage AoE move that only blunt weapons have access to. Use this whenever it is off cooldown preferably around multiple enemies. The cooldown for Quake is around 10 seconds!
Manage Your Stamina Effectively

Blunt weapons use up stamina for every swing, which could mean life and death for you in fights. Managing your stamina should always be the top priority.
On that note, Tailwind negates stamina consumption while dashing as long as you do it in mid-air. This is basically free mobility so use it extensively.
Use the Projectile Launch System on Far Away Enemies
When you see a group of enemies shooting from afar, try using your Projectile Launch System (PLS) to deal explosive damage! Don't forget to charge your PLS to maximize your damage by shooting 5 projectiles.
Use Shotguns When There Are Hoards of Enemies
When you are pinned down by hoards of enemies and got nowhere to go, switch to your shotgun and start shooting multiple enemies at once. Your shotgun should have enough perks to deal decent damage for that particular situation!
Cyberpunk 2077 Related Guides
All Build Guides
All Cyberpunk 2077 Guides
Author

Best Blunt Weapon Build (Bonk Build)
Please participate in our site
improvement survey
03/2026
improvement survey
03/2026
Would you assist in
improving Game8's site?
improving Game8's site?

×
We are listening to our users' valuable opinions and discussing how to act on them.
The information collected through this survey will be used for the purpose of improving our services. In addition, the information will only be disclosed a part of a statistic in a format that will not allow identification of personal information.
Begin Survey
Not Now
×
Please rate each item regarding Game8.co's Advertisements.
Amount of Ads
Very Dissatisfied
Somewhat Dissatisfied
Fine
Somewhat Satisfied
Highly Satisfied
Placement of Ads
Timing of Ad Display
Ad Loading Speed
Safeness of Ads
Content of Ads
×
Please rate each item regarding Game8.co's Quality of Articles.
Amount of information
Very Dissatisfied
Somewhat Dissatisfied
Fine
Somewhat Satisfied
Highly Satisfied
Frequency of updates
Speed of new information
Accuracy of articles
Understandibility of articles
Readability of sentences
×
Please rate each item regarding Game8.co's Usability of the Site.
Ease of finding information
Very Dissatisfied
Somewhat Dissatisfied
Fine
Somewhat Satisfied
Highly Satisfied
Loading Speed
Use of Color
Font Size
Visibility of Images
Easy to Understand Layout
×
Please rate each item regarding Game8.co's Message Boards, Comments.
Ease of Writing
Very Dissatisfied
Somewhat Dissatisfied
Fine
Somewhat Satisfied
Highly Satisfied
Readability
Ease in Finding Information
Comment Quality
Comment Quantity
Admin Response
×
Please rate each item regarding Game8.co's Site's new design.
Please rate our site's new design
Very Dissatisfied
Somewhat Dissatisfied
Fine
Somewhat Satisfied
Highly Satisfied
Do you think that the website's design change makes the site easier to use?
Has the new design made it easier for you to find information on the site?
Has the new design improved the overall visual appeal of the site?
How would you rate your overall satisfaction with the new design of the site?
×
How likely are you to recommend Game8 to someone you know?
Very Unlikely
0
1
2
3
4
5
6
7
8
9
10
Very Likely
If you have other opinions regarding potential improvement to the website, please share them with us. We would appreciate your honest opinion.
Note: This is a free response section, so you can proceed without entering anything.
Note: Please be sure not to enter any kind of personal information into your response.
Note: Please be sure not to enter any kind of personal information into your response.
×
Thank You
×
Thank you for participating in our survey! Your answers will help us to improve the quality of our website and services.
We hope you continue to make use of Game8.
We hope you continue to make use of Game8.
Close
Rankings
- We could not find the message board you were looking for.
Gaming News


Popular Games

Genshin Impact Walkthrough & Guides Wiki
Honkai: Star Rail Walkthrough & Guides Wiki
Umamusume: Pretty Derby Walkthrough & Guides Wiki
Pokemon Pokopia Walkthrough & Guides Wiki
Resident Evil Requiem (RE9) Walkthrough & Guides Wiki
Monster Hunter Wilds Walkthrough & Guides Wiki
Wuthering Waves Walkthrough & Guides Wiki
Arknights: Endfield Walkthrough & Guides Wiki
Pokemon FireRed and LeafGreen (FRLG) Walkthrough & Guides Wiki
Pokemon TCG Pocket (PTCGP) Strategies & Guides Wiki


Recommended Games
Diablo 4: Vessel of Hatred Walkthrough & Guides Wiki
Fire Emblem Heroes (FEH) Walkthrough & Guides Wiki
Yu-Gi-Oh! Master Duel Walkthrough & Guides Wiki
Super Smash Bros. Ultimate Walkthrough & Guides Wiki
Pokemon Brilliant Diamond and Shining Pearl (BDSP) Walkthrough & Guides Wiki
Elden Ring Shadow of the Erdtree Walkthrough & Guides Wiki
Monster Hunter World Walkthrough & Guides Wiki
The Legend of Zelda: Tears of the Kingdom Walkthrough & Guides Wiki
Persona 3 Reload Walkthrough & Guides Wiki
Cyberpunk 2077: Ultimate Edition Walkthrough & Guides Wiki


All rights reserved
CD PROJEKT®, Cyberpunk®, Cyberpunk 2077® are registered trademarks of CD PROJEKT S.A. © 2020 CD PROJEKT S.A. All rights reserved. All other copyrights and trademarks are the property of their respective owners.
The copyrights of videos of games used in our content and other intellectual property rights belong to the provider of the game.
The contents we provide on this site were created personally by members of the Game8 editorial department.
We refuse the right to reuse or repost content taken without our permission such as data or images to other sites.
Is the LMG a viable alternativa to the shotgun or the Projectile launch system? The perks work the same