Best Adam Smasher Build
★ Coming to Switch 2
★ New: Metro System, Car Racing, Romantic Hangouts
★ Phantom Liberty: Dogtown Map & Relics System
★ See our Best Builds here!
┗ HOT: Blades Build, Netrunner Build, & Assassin Build
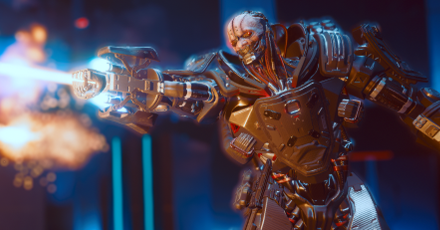
This is a guide to the best Adam Smasher Build for Cyberpunk 2077: Phantom Liberty. Read our guide for details about this build inspired by the legendary Adam Smasher, what attributes to level up, which perks to choose, and what weapons and cyberware to use.
List of Contents
Adam Smasher Build Overview
Basic Information
| Adam Smasher Build | |
|---|---|
| Main Attributes | |
| Main Weapons / Arm Cyberware | ・M-76E Omaha ・Defender ・Wild Dog (Phantom Liberty) ・Projectile Launch System |
| Operating System | ・Militech "Apogee" Sandevistan |
Strengths and Weaknesses
Strengths
This build lets you play similarly as the legendary Adam Smasher, Night City's own metal boogeyman.
Just like Smasher, you'll be wielding light machine guns and fire off rocket projectiles via the Projectile Launch System which are powered up by several perks.
You'll also be playing the game like a living, walking tank, boasting high HP and armor with a reliable health regen from cyberware and perks while being agile thanks to mobility perks.
Weaknesses
You can easily jump right into the firefight with this build and let the bullets rain, but you'll eventually run out of bullets due to your weapons being so ammo hungry.
You will also be vulnerable whenever you are reloading your LMGs, as it takes some time to change magazines per reload, and need to keep your stamina low to be able to take advantage of several heavy weapon perks.
Additionally, Adam Smasher does not operate stealthily, so this build is not suited for sneaking around, much like the tank build.
Adam Smasher Best Attribute Build
Attribute Progression
| Build Attributes | |||||
|---|---|---|---|---|---|
| Lv. | Body | Reflex | Tech | Int | Cool |
| 1 | 6 | 4 | 6 | 3 | 3 |
| 10 | 15 | 4 | 6 | 3 | 3 |
| 50 | 20 | 20 | 20 | 3 | 8 |
| 60 | 20 | 20 | 20 | 3 | 18 |
The max level is only up until 50 in the base game. Purchase Phantom Liberty to reach level 60.
The Body attribute is built up first to get health regen and heavy weapon perks. This will allow you to deal as much damage as possible while being supported by steady health regen.
After maxing Body, you can start leveling up your Technical Ability to get faster health item cooldown and additional stat boosts from your cyberware.
Mobility perks under Reflexes are also obtained so you can easily move around, but those that improve stamina regeneration are skipped so you can steadily maintain low stamina, which is important for certain heavy weapon perks.
The rest of the points are alloted to Cool to raise your crit damage.
Adam Smasher Build Best Perks
This is the full list of perks that you can get if you achieve the maximum level 60 with the Phantom Liberty DLC. Optional perks are also listed in their own section in case you have not purchased the DLC.
| Jump to Each Attribute for Their Perks! | ||
|---|---|---|
| Optional Perks | ||
Body Attribute
The main attribute for this build is Body, which is maxed out first to get heavy weapon and health regen perks immediately.
To start off, get Die! Die! Die! and Adrenaline Rush to power up your light machine guns and get extra health whenever you use a health item. The former even speeds up your fire rate if you have low stamina, which makes you even deadlier.
You can then follow this up with Spontaneous Obliteration, which has a chance to dismember and insta-kill low health targets, giving them a very messy ending.
Once Body is maxed out, get Onslaught to get ammo refills everytime you kill a target. This will allow you to get additional ammo in your magazine without reloading, as long as you kill enemies.
You can also get Wrecking Ball and Quake to get some extra moves with your bare fists. You will be able to charge towards your enemies or crush them from above with Epicenter.
Perk List
| Main Perk | Secondary Perk(s) |
|---|---|
|
(1 pt) |
|
|
(2 pt) |
|
|
(2 pt) |
|
|
(3 pt) |
|
|
(3 pt) |
|
|
(3 pt) |
Final Perks
| Final Perks | |||
|---|---|---|---|
|
|
|
||
Cross-Branch Perk
| Perk | Requirement |
|---|---|
|
|
Get this perk when you have specific secondary perks unlocked.
2.0 Body Attribute and List of Body Perks
Technical Ability Attribute
The Tech tree is prioritized next after body to speed up your health item and Projectile Launch System's recharge rates, as well as get more stat boosts from your equipped cyberware.
Pyromania and its connected perk synergizes well with Projectile Launch System by improving its damage and speeding up its recharge rate so you'll be able to constantly fire explosives, much like Smasher's rocket launcher.
For cyberwares, the Edgerunner and its connected perks will improve all of your equipped cyberwares. Edgerunner also has a chance to activate Fury, which will make you deal even more damage.
Perk List
| Main Perk | Secondary Perk(s) |
|---|---|
|
(1 pt) |
|
|
(2 pt) |
|
|
(2 pt) |
|
|
(3 pt) |
|
|
(3 pt) |
Final Perks
| Final Perks | |||
|---|---|---|---|
|
|
|||
Cross-Branch Perk
| Perk | Requirement |
|---|---|
|
|
Get this perk when you have specific secondary perks unlocked.
2.0 Technical Ability Attribute and List of Technical Ability Perks
Reflexes Attribute
Lastly, perks under the Reflexes attribute will help you gain some mobility via Dashing or Air Dashing.
Do note that stamina perks are skipped so you can maintain low stamina rather than extending it.
Perk List
| Main Perk | Secondary Perk(s) |
|---|---|
|
(1 pt) |
|
|
(2 pt) |
|
|
(3 pt) |
2.0 Reflexes Attribute and List of Reflexes Perks
Optional Perks
If you still have not purchased the Phantom Liberty DLC and have no access to the 10 additional perk points that came with it, these perks are optional and can be removed.
| Removable Perks (10 pts) | |
|---|---|
Adam Smasher Build Relic Skill Priority
Take Vulnerability Analytics and Machine Learning First
| Priority | Main Skill | → | Branch Skill |
|---|---|---|---|
| 1st |
|
→ |
|
| 2nd |
|
→ |
|
Even if Adam Smasher did not have the Relic chipped in, it is imperative to get Jailbreak and Launch Capacity Override to really get the most out of your Projectile Launch System.
Once you get Jailbreak, you'll be able to charge the weapon to launch five projectiles instead of one. With Launch Override Capacity, you'll have one additional charge, and can even add up to three charges if you have the Doomlauncher perk.
Once you get these Relic skills, you can get Vulnerability Analytics and Machine Learning next. These skills will highlight enemy weakspots that you can shoot to deal bonus damage.
Relic Skill Tree Available in the DLC
Please take note that the Phantom Liberty expansion is needed to access the Relic Skill Tree.
Relic Skill Tree Guide and List
Adam Smasher Build Recommended Weapons
Base Game Only
| Recommended Weapons (Base Game only) |
|
|---|---|
| MA70 HB | Defender |
- MA70 HB has a slower rate of fire and smaller magazine size than the Defender, but deals more damage. You can use this LMG solely against tougher enemies and bosses to deal as much damage as possible.
- Defender, meanwhile, has a faster rate of fire and reload speed but deals less damage than the MA70 HB. If you want to spray and pray and quickly mow down several enemies at once, you can switch to this weapon.
Base Game + Phantom Liberty
| Recommended Weapons (with Phantom Liberty) |
||
|---|---|---|
| MA70 HB | Defender | Wild Dog |
- The Wild Dog is an Iconic LMG you can get in Dogtown, whose fire rate increases as you shoot a target repeatedly. This gun is optional as it is locked behind a certain choice during Firestarter.
Adam Smasher Build Best Cyberwares
| Jump to a Cyberware section! | |||||||
|---|---|---|---|---|---|---|---|
| Operating System | Face | Hands | Circulatory System | ||||
| Legs | Frontal Cortex | Arms | Skeleton | ||||
| Nervous System | Integumentary System | ||||||
Operating System
| Cyberware | Effect (Tier 5) |
|---|---|
 Militech "Apogee" Sandevistan Militech "Apogee" Sandevistan
|
Press L1 and R1 to activate and deactivate. It can be activated at any charged level. When active: Slows time by 85% (you are not slowed) +10% headshot damage +9% Crit Chance +13% Crit Damage Neutralizing an enemy when active gives: +20% extended duration +22% Stamina Max Duration: 8 sec. Cooldown: 30 sec. |
Adam Smasher had his own Sandevistan which he used against David in Cyberpunk: Edgerunners.
It wasn't mentioned which specific Sandevistan Adam was using, but you can use the Apogee to get not only several stat boosts but also equip the Sandevistan that has the lowest cooldown, which can be further lowered with perks and other cyberware.
Alternative: Zetatech Sandevistan
| Cyberware | Effect (Tier 5) |
|---|---|
 Zetatech Sandevistan Zetatech Sandevistan
|
When active on the ground: Slows time by 30%(You are not slowed), +12% damage. When active midair: Slows time by 60% +24% damage +40% headshot and weakspot damage -30% fall damage. |
If you don't have the Apogee, you can temporarily equip the Zetatech Sandevistan which may not as be as great as the Apogee, but has a low cooldown compared to other Sandevistans.
Face
| Cyberware | Effect (Tier 5) |
|---|---|
 Kiroshi "Doomsayer" Optics Kiroshi "Doomsayer" Optics
|
Highlights explosive devices and traps near your crosshair within 26m. |
The Doomsayer variant of Kiroshi optics lets you track enemies, which is useful to know which enemy to kill next.
This cyberware has lower capacity, which should give you some space to slot in more cyberware especially if your capacity is low.
Hands
| Cyberware | Effect (Tier 5) |
|---|---|
 Ballistic Coprocessor Ballistic Coprocessor
|
Increased ricochet chance with Power weapons. +30% ricochet damage. |
 Shock Absorber Shock Absorber
|
-20% Recoil |
With the Ambidextrous perk, you'll be able to equip two cyberwares for the hands slot.
Ballistic Coprocessor is useful for your power light machine guns, while you can reduce their recoil with Shock Absorber.
Circulatory System
| Cyberware | Effect (Tier 5) |
|---|---|
 Blood Pump Blood Pump
|
Activate to instantly restore 90% of max Health. Cooldown 30 sec. |
 Heal-on-Kill Heal-on-Kill
|
Health +7% when you neutralize an enemy. |
Blood Pump is a key cyberware for this build, as this will activate Adrenaline Rush and all of its effects, apart from it being your main healing item.
You can also equip a Heal-on-Kill to get recover some health after killing an enemy.
Legs
| Cyberware | Effect (Tier 5) |
|---|---|
 Fortified Ankles Fortified Ankles
|
Allows you to charge jumps for greater distance. Hold the jump button and release for a charged jump. |
You can use Fortified Ankles to charge a jump from the ground, switch to your fists, and use Quake to copy Smasher's infamous crushing slam.
Frontal Cortex
| Cyberware | Effect (Tier 5) |
|---|---|
 Mechatronic Core Mechatronic Core
|
+35% damage against drones, robots, mechs and turrets. +2 Max RAM. |
 Newton Module Newton Module
|
-1.25% Cooldown instantly for all cyberware after neutralizing an enemy. |
 Self-ICE Self-ICE
|
Automatically negates an enemy quickhack. +2 Max RAM Cooldown: 45 sec. |
Newton Module is very useful for this build, as it lets you have faster Sandevistan cooldowns by simply just killing targets.
Mechatronic Core will let you deal more damage against robots, which you will encounter as you progress through the game.
Meanwhile, Self-ICE allows you to shrug off quickhack attempts from enemy netrunners, like how Smasher easily repelled Lucy's quickhacking attempt in Cyberpunk: Edgerunners.
Arms
| Cyberware | Effect (Tier 5) |
|---|---|
 Projectile Launch System Projectile Launch System
|
Charged shots gain: +30% damage, +25% explosion radius, +40% dismemberment chance |
The Projectile Launch System serves as your rocket launcher and second weapon other than your light machine guns. This cyberware will get several boosts from Body perks like Pyromania, and can be further powered up with Relic skills.
Skeleton
| Cyberware | Effect (Tier 5) |
|---|---|
 Epimorphic Skeleton Epimorphic Skeleton
|
+13% Max Health |
 Scar Coalescer Scar Coalescer
|
+22% Armor when below 50% Health. |
 Universal Booster Universal Booster
|
Health Items now also give: +10% Armor for 5 sec. -30% all Stamina costs for 5 sec. These effects do not stack. |
You can't go full-borg like Adam Smasher in 2077, but you can imitate his metal body's durability by slotting in skeletal cyberware that raise your armor.
Nervous System
| Cyberware | Effect (Tier 5) |
|---|---|
 Adrenaline Converter Adrenaline Converter
|
+40% movement speed for 7 sec. when entering combat. |
 Neofiber Neofiber
|
+10% Mitigation Chance, +9% Mitigation Strength Mitigation grants a chance to reduce incoming damage by current Mitigation Strength (default: 50%). |
Adrenaline Converter grants you extra movement at the start of combat, allowing you to quickly reach enemies after activating your Sandevistan.
Neofiber grants you more mitigation stats and is slotted in for defensive purposes.
Integumentary System
| Cyberware | Effect (Tier 5) |
|---|---|
 Carapace Carapace
|
+32% Armor effectiveness when attacked from the side or rear. +0.5 Armor per Attribute Point. +1.3% Bonus Ricochet Damage +1.3% Decreased enemy vision |
 Cellular Adapter Cellular Adapter
|
+1% explosion resistance '+0.5% Tech weapon damage +0.5% Health item recharge speed +0.5% grenade recharge speed +13 Carrying Capacity +2.6 Health |
 Subdermal Armor Subdermal Armor
|
+0.5 Armor per Attribute Point. +1.3% Decreased enemy vision +2.6 Health |
These cyberware also give you additional armor and defense boosts to make you even more tanky and durable.
Phantom Liberty Alternative: Chitin
| Cyberware | Effect (Tier 5) |
|---|---|
 Chitin Chitin
|
Provides additional Health Regen. +1.6% Health Regen Bonus +3.1 Health |
If you have Phantom Liberty and have excess cyberware capacity, you can chip in a Chitin instead a Carapace to get even more armor.
Chitin is an Iconic cyberware that is only sold inside Dogtown.
How to Use Adam Smasher Build
Activate Sandevistan During Fights
Adam Smasher is known to be a high-functioning cyberpsycho, which just fits the playstyle of abusing the Sandevistan for this build without any detriments.
Keep eliminating enemies to shorten its cooldown so you can use it again once it ends. You can also activate it to run away from a fight to reload and heal.
Approach Targets Up Close
Light machine guns have issues with accuracy and bullet spread, so try to be near your enemies during fights to alleviate these downsides.
You'll also be able to utilize Close-Quarters Carnage's effects of a higher chance of dismembering your enemies when you're shooting them up close.
Use Projectile Launch System and Pyromania Combo
To take full advantage of Pyromania and its connected perks, make sure to position yourself near the area where you'll fire your Projectile Launch System.
This will help you easily stack five Pyromania instances, which will instantly give you another Projectile Launch System charge via the Burn This City perk. If you can do this regularly, you will never have to wait for a long time to charge your arm cyberware.
You also don't have to worry about blowing yourself up, as you'll have reduced damage from your own explosions if you have the Friendlier Fire perk.
Use Aerial Quake as AoE Attack
Use Quake and Epicenter together with Fortified Ankles to jump high in the air and slam on the ground, similar to how Smasher crushed a certain someone into bits back in 2076.
If a fight gets crowded, charge your jump, switch to your fists, and use Quake in the air to crash into the ground and damage anyone near you.
Cyberpunk 2077: Phantom Liberty Related Guides
All Build Guides
All Cyberpunk 2077 Guides
Comment
Author
Best Adam Smasher Build
improvement survey
03/2026
improving Game8's site?

Your answers will help us to improve our website.
Note: Please be sure not to enter any kind of personal information into your response.

We hope you continue to make use of Game8.
Rankings
Gaming News
Popular Games

Genshin Impact Walkthrough & Guides Wiki

Honkai: Star Rail Walkthrough & Guides Wiki

Umamusume: Pretty Derby Walkthrough & Guides Wiki

Pokemon Pokopia Walkthrough & Guides Wiki

Resident Evil Requiem (RE9) Walkthrough & Guides Wiki

Monster Hunter Wilds Walkthrough & Guides Wiki

Wuthering Waves Walkthrough & Guides Wiki

Arknights: Endfield Walkthrough & Guides Wiki

Pokemon FireRed and LeafGreen (FRLG) Walkthrough & Guides Wiki

Pokemon TCG Pocket (PTCGP) Strategies & Guides Wiki
Recommended Games

Diablo 4: Vessel of Hatred Walkthrough & Guides Wiki

Cyberpunk 2077: Ultimate Edition Walkthrough & Guides Wiki

Fire Emblem Heroes (FEH) Walkthrough & Guides Wiki

Yu-Gi-Oh! Master Duel Walkthrough & Guides Wiki

Super Smash Bros. Ultimate Walkthrough & Guides Wiki

Pokemon Brilliant Diamond and Shining Pearl (BDSP) Walkthrough & Guides Wiki

Elden Ring Shadow of the Erdtree Walkthrough & Guides Wiki

Monster Hunter World Walkthrough & Guides Wiki

The Legend of Zelda: Tears of the Kingdom Walkthrough & Guides Wiki

Persona 3 Reload Walkthrough & Guides Wiki
All rights reserved
CD PROJEKT®, Cyberpunk®, Cyberpunk 2077® are registered trademarks of CD PROJEKT S.A. © 2020 CD PROJEKT S.A. All rights reserved. All other copyrights and trademarks are the property of their respective owners.
The copyrights of videos of games used in our content and other intellectual property rights belong to the provider of the game.
The contents we provide on this site were created personally by members of the Game8 editorial department.
We refuse the right to reuse or repost content taken without our permission such as data or images to other sites.


![Monster Hunter Stories 3 Review [First Impressions] | Simply Rejuvenating](https://img.game8.co/4438641/2a31b7702bd70e78ec8efd24661dacda.jpeg/thumb)


