This survey will take about 1 minute.
Your answers will help us to improve our website.
Cyberpunk 2077
Don't Lose Your Mind Quest Walkthrough, Rewards and Best Choice
★ Coming to Switch 2
★ New: Metro System, Car Racing, Romantic Hangouts
★ Phantom Liberty: Dogtown Map & Relics System
★ See our Best Builds here!
┗ HOT: Blades Build, Netrunner Build, & Assassin Build
This is a walkthrough for Don't Lose Your Mind, a Side Quest in Cyberpunk 2077. Read on to learn all the available choices in Don't Lose Your Mind, how to get the best possible result, tips and strategies for the Quest, and all available rewards.
List of Contents
Don't Lose Your Mind Basic Information
| Quest Type | Side |
|---|---|
| Act | Act 2 |
| Quest No. | - |
| Lifepath | All |
How to Unlock Don't Lose Your Mind
| Quest Unlock Conditions | Complete Epistrophy and wait 48 in-game hours. |
|---|
Don't Lose Your Mind Rewards
| Quest Rewards | Delamain No. 21 |
|---|
Don't Lose Your Mind Walkthrough
Video Walkthrough
Don't Lose Your Mind Quest Objectives
Vista del Rey, Heywood
| Objectives | |
|---|---|
| 1 |  Method 1: If you have 8 Technical Ability, you can open a nearby door. Method 2: you'll have to go around back, jump on some boxes, and go in through a vent shaft. |
| 2 | |
| 3 | 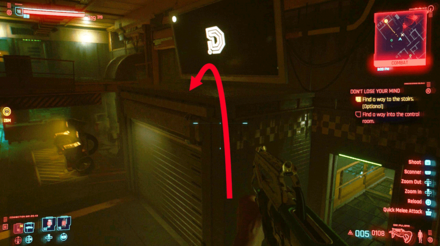 |
| 4 |  Method 1: You'll find a car which you can Push through. Jump on the car to get across. Method 2: If you have 5 Body or Technical Ability, you can go through the vent in the floor and back up on the opposite side. |
| 5 | 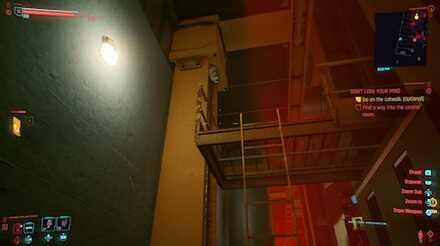 Optional: If you have 10 Body, you can force through the door at the end. This will allow you to skip steps 6 and 7. |
| 6 | 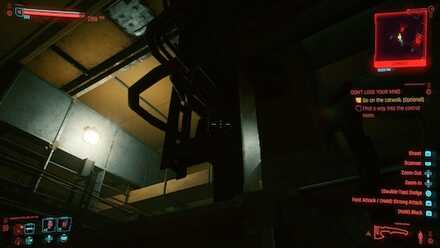 |
| 7 | 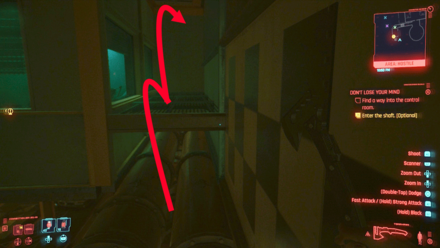 At the top, don't go in the room; instead, climb on the pipe to the right of the room, go on the platform, then get a running jump and climb up. Crouch down and go in the shaft to the right. |
| 8 |
Don't Lose Your Mind Choices
Choose Delamain's Fate
Reset the Core
| Objectives | |
|---|---|
| 1 | |
| 2 |
Destroy the Core
| Objectives | |
|---|---|
| 1 | |
| 2 |
Merge the Core
| Objectives | |
|---|---|
| 1 | |
| 2 |
All Completion Routes
Best Completion Route
| Route | Rating |
|---|---|
| Delamain HQ | |
| Turn off the switch using Technical | ★★★★★ |
| Force open the control room door | ★★★ |
| Don't use shortcuts | ★ |
The best route to take in this Side Job is by meeting the required Technical Ability for the switch as it makes your path to the control room significantly shorter and safer.
Completion Route Guides - Delamain HQ
There are three possible approaches to this mission.
| Turn Off the Switch Using Technical | After opening the double door to the workshop, look on your right and you'll see a grate on the floor. Open it if you meet the required Tech attribute then turn off the switch below. You can now waltz straight to the control room (take out the drones if needed) and reach your objective. |
|---|---|
| Force Open the Control Room Door | Upon reaching the catwalk near the control room (see step 5), find a locked door nearby which can be opened by meeting a certain level of Body attribute. This will let you skip the last few steps of your main objective. It's not much but it saves time and effort. |
| Don't Use Shortcuts | If you don't meet both attribute requirements, you'll have to go to different parts of the workshop swarming with drones to avoid the live wires in the main area. Save frequently just in case you get flatlined. |
Don't Lose Your Mind Choices and Best Choice
What to do to the Core
| Reset the Core | If you choose this path, the sentient AIs within Delamain will be erased, and Delamain will be reverted to his factory settings.
This ending is the saddest of the three, so we don't advise going for this one. Johnny will also berate you for your choice. |
|---|---|
| Destroy the Core | This step might seem drastic, but it allows both the original Delamain and the sentient AIs to both exist, so morally it seems to be the best ending. On top of that, Johnny will think you're cool. |
| Merge the Core | This ending will result in the AIs merging to become a super-AI which leaves Night City. The original Delamain still exists in some form, seemingly in order to allow the super-AI to have someone to shirk responsibility onto. Although this is the hardest ending to achieve, it doesn't feel very morally gratifying or provide any special benefits. |
Best Choice
All three of the possible endings yield the Delamain No. 21 vehicle, and there do not seem to be any long-term effects of the decision made in this Quest.
For players who want to maintain a good relationship with Johnny, it's best to choose to Destroy the Core. Don't spend your Attribute Points just to get the 10 Intelligence needed to merge the core.
Tips and Strategies
The Body Attribute Helps
There are multiple doors found in this Quest which can only be opened with a high enough Body Attribute.
One door early on can be opened for extra goodies if you have 5 points in Body, while the door before the Enter the Shaft objective will let you skip some troublesome steps if you have 10 points.
The Quest can be completed with no problems either way, but players who want to clear it easily should wait until they have enough Attribute Points in Body to take it on.
Cyberpunk 2077 Related Links

Phantom Liberty Side Quests
Act 1 Side Quests
| Act 1 Side Quests | |||
|---|---|---|---|
| Burning Desire | Paid in Full | ||
| Psycho Killer (Rec. Lvl 4) |
The Gun | ||
| The Highwayman | |||
| Act 1 Side Quest Given by Wakako | Act 1 Side Quest Given by T-Bug | ||
| The Gig | The Gift |
||
| Act 1 Side Quest Given by Garry | |||
| The Prophet's Song (Rec. Lvl 4) |
|||
Act 2 Side Quests
All Quest Types
| Quest Types | ||
|---|---|---|
Author

Don't Lose Your Mind Quest Walkthrough, Rewards and Best Choice
Please participate in our site
improvement survey
03/2026
improvement survey
03/2026
Would you assist in
improving Game8's site?
improving Game8's site?

×
We are listening to our users' valuable opinions and discussing how to act on them.
The information collected through this survey will be used for the purpose of improving our services. In addition, the information will only be disclosed a part of a statistic in a format that will not allow identification of personal information.
Begin Survey
Not Now
×
Please rate each item regarding Game8.co's Advertisements.
Amount of Ads
Very Dissatisfied
Somewhat Dissatisfied
Fine
Somewhat Satisfied
Highly Satisfied
Placement of Ads
Timing of Ad Display
Ad Loading Speed
Safeness of Ads
Content of Ads
×
Please rate each item regarding Game8.co's Quality of Articles.
Amount of information
Very Dissatisfied
Somewhat Dissatisfied
Fine
Somewhat Satisfied
Highly Satisfied
Frequency of updates
Speed of new information
Accuracy of articles
Understandibility of articles
Readability of sentences
×
Please rate each item regarding Game8.co's Usability of the Site.
Ease of finding information
Very Dissatisfied
Somewhat Dissatisfied
Fine
Somewhat Satisfied
Highly Satisfied
Loading Speed
Use of Color
Font Size
Visibility of Images
Easy to Understand Layout
×
Please rate each item regarding Game8.co's Message Boards, Comments.
Ease of Writing
Very Dissatisfied
Somewhat Dissatisfied
Fine
Somewhat Satisfied
Highly Satisfied
Readability
Ease in Finding Information
Comment Quality
Comment Quantity
Admin Response
×
Please rate each item regarding Game8.co's Site's new design.
Please rate our site's new design
Very Dissatisfied
Somewhat Dissatisfied
Fine
Somewhat Satisfied
Highly Satisfied
Do you think that the website's design change makes the site easier to use?
Has the new design made it easier for you to find information on the site?
Has the new design improved the overall visual appeal of the site?
How would you rate your overall satisfaction with the new design of the site?
×
How likely are you to recommend Game8 to someone you know?
Very Unlikely
0
1
2
3
4
5
6
7
8
9
10
Very Likely
If you have other opinions regarding potential improvement to the website, please share them with us. We would appreciate your honest opinion.
Note: This is a free response section, so you can proceed without entering anything.
Note: Please be sure not to enter any kind of personal information into your response.
Note: Please be sure not to enter any kind of personal information into your response.
×
Thank You
×
Thank you for participating in our survey! Your answers will help us to improve the quality of our website and services.
We hope you continue to make use of Game8.
We hope you continue to make use of Game8.
Close
Rankings
- We could not find the message board you were looking for.
Gaming News


![Monster Hunter Stories 3 Review [First Impressions] | Simply Rejuvenating](https://img.game8.co/4438641/2a31b7702bd70e78ec8efd24661dacda.jpeg/thumb)
Popular Games

Genshin Impact Walkthrough & Guides Wiki
Honkai: Star Rail Walkthrough & Guides Wiki
Umamusume: Pretty Derby Walkthrough & Guides Wiki
Pokemon Pokopia Walkthrough & Guides Wiki
Resident Evil Requiem (RE9) Walkthrough & Guides Wiki
Monster Hunter Wilds Walkthrough & Guides Wiki
Wuthering Waves Walkthrough & Guides Wiki
Arknights: Endfield Walkthrough & Guides Wiki
Pokemon FireRed and LeafGreen (FRLG) Walkthrough & Guides Wiki
Pokemon TCG Pocket (PTCGP) Strategies & Guides Wiki


Recommended Games
Diablo 4: Vessel of Hatred Walkthrough & Guides Wiki
Cyberpunk 2077: Ultimate Edition Walkthrough & Guides Wiki
Fire Emblem Heroes (FEH) Walkthrough & Guides Wiki
Yu-Gi-Oh! Master Duel Walkthrough & Guides Wiki
Super Smash Bros. Ultimate Walkthrough & Guides Wiki
Pokemon Brilliant Diamond and Shining Pearl (BDSP) Walkthrough & Guides Wiki
Elden Ring Shadow of the Erdtree Walkthrough & Guides Wiki
Monster Hunter World Walkthrough & Guides Wiki
The Legend of Zelda: Tears of the Kingdom Walkthrough & Guides Wiki
Persona 3 Reload Walkthrough & Guides Wiki


All rights reserved
CD PROJEKT®, Cyberpunk®, Cyberpunk 2077® are registered trademarks of CD PROJEKT S.A. © 2020 CD PROJEKT S.A. All rights reserved. All other copyrights and trademarks are the property of their respective owners.
The copyrights of videos of games used in our content and other intellectual property rights belong to the provider of the game.
The contents we provide on this site were created personally by members of the Game8 editorial department.
We refuse the right to reuse or repost content taken without our permission such as data or images to other sites.
It say I need level 20 to merge what a pain as I was level 15