
This survey will take about 1 minute.
Your answers will help us to improve our website.
Cyberpunk 2077
Disasterpiece Quest Walkthrough and Rewards
★ Coming to Switch 2
★ New: Metro System, Car Racing, Romantic Hangouts
★ Phantom Liberty: Dogtown Map & Relics System
★ See our Best Builds here!
┗ HOT: Blades Build, Netrunner Build, & Assassin Build
This is a walkthrough for Disasterpiece, a Main Quest in Cyberpunk 2077. Read on to learn all the available choices in Disasterpiece, how to get the best possible result, tips and strategies for the Quest, and all available rewards.
| All Judy Quests (Judy Romance Guide) | |
|---|---|
| 1 | The Information |
| 2 | Automatic Love |
| 3 | The Space In Between |
| 4 | Disasterpiece |
| 5 | Double Life |
| 6 | Both Sides, Now |
| 7 | Ex-Factor |
| 8 | Talkin' 'Bout A Revolution |
| 9 | Pisces |
| 10 | Pyramid Song |
List of Contents
Disasterpiece Overview
| Quest Type | Main |
|---|---|
| Act | Act 2 |
| Quest No. | 5 |
| Lifepath | All |
How to Unlock Disasterpiece
| Quest Unlock Conditions | Complete The Space in Between. |
|---|
Disasterpiece Rewards
| Rewards |
|---|
|
・ 992 Street Cred ・ 58 XP ・ 1964 Eddies |
Disasterpiece Walkthrough
Video Walkthrough and Guide
Disasterpiece Quest Objectives
Jig-Jig Street/Charter Hill
| Objectives | |
|---|---|
| 1 |  |
| 2 | 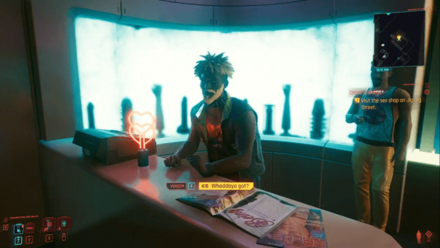 |
| 3 | 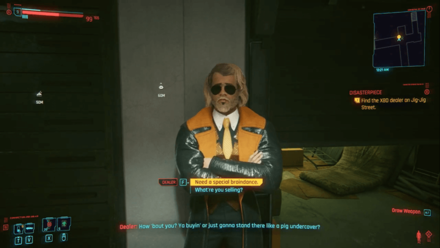 Method 1: The braindance you're looking for will set you back 4837 eurodollars, so make sure you have enough. Method 2: You can kill the dealer and just loot the braindance from his corpse. |
| 4 | 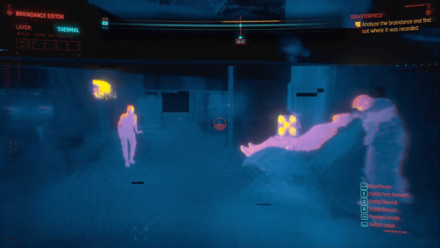 ▶ Braindance Clues |
| 5 |  |
| 6 |  |
| 7 | 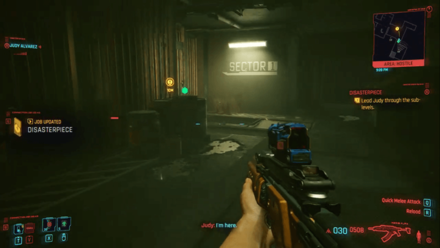 |
| 8 |  |
All Completion Routes
Best Completion Route
| Route | Rating |
|---|---|
| Main Floor | |
| Ground Floor Door | ★★★★★ |
| No Requirements | ★★★★ |
| Through the Front | ★★★ |
| Guns Blazing | ★★★ |
| Basement 1 | |
| Body Check | ★★★★★ |
| Technical Ability | ★★★★ |
| Default Route | ★★★ |
| Guns Blazing | ★★★ |
| Basement 2 | |
| Technical Ability | ★★★★★ |
| Default Route | ★★★ |
| Guns Blazing | ★★★ |
The best routes here are locked behind skill checks, but do take note that they aren't that significantly different for the basement levels. The biggest effect would be how you go about infiltrating the main building, because the door that has the Body skill check puts you to the staircase going down quicker than the other paths.
Stealth Route Guides - Main Building
| No Requirements | You can access entry into the compound without attributes through climbing a collapsed platform using stacks of wood as a stepping stone. It allows you access to the computer in the small building opposite of the warehouse that controls the cameras. From there, climb up the stacks of pallets and metal canopy on the northeast side of the warehouse to reach the elevated platform. The door at the top gives you access to a metal walkway. Sprint forward and jump across the gap, and then drop to the stairs. |
|---|---|
| Ground Floor Door | If you're prepared to deal with the sentry, you can simply enter the warehouse through the door on the ground floor, and force-open the door in front of you with Body attribute. |
| Through the Front | If you sneak in past the guards in front, climb the stack of pallets to your right to reach a platform, then drop down on the other side, then proceed to sneak to your objective. |
Stealth Route Guides - Basement 1
You can sneak past the guards in the main path going towards the next staircase.
| Technical Ability | You could alternatively use a Technical Ability check to go through a shortcut leading you close to the main hallway, though you'll still need to sneak past two scavengers. |
|---|---|
| Body Check | With sufficient Body attribute, you can force open shutters in the room next to the main hallway, avoiding two guards. |
Stealth Route Guides - Basement 2
The first room has one guard and a breachable computer. Then you go through the main room with three guards, and then find Evelyn.
Technical Ability
Using a Technical ability check, you can open the double door in the first room to avoid the main hallway. There's only a single guard there.
Guns Blazing Route Guide
The route down is pretty straight forward, find each of the stairs going down and keep going. In the main building, look out at the top for enemies in the walkways. The route is winding in the basements but it is straightforward.
Disasterpiece Braindance Guide
Braindance Clues
| First Braindance | |
|---|---|
 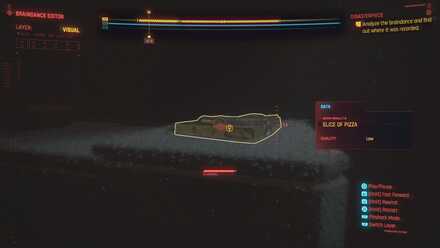 |
Visual Clue: Scan the box of pizza on the counter. |
 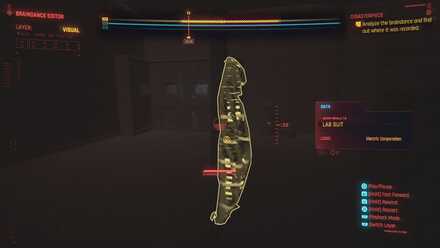 |
Visual Clue : Scan the lab coat.. |
  |
Visual Clue: Scan the coffe on the desk. |
Tips and Strategies
Use Cameras
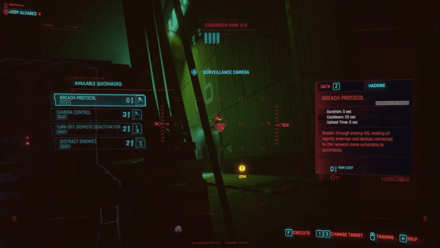
Making use of the various cameras that can be taken over through hacking or access points you can get a better view of where enemies are throughout the area. One access point will even allow you to detonate a furnace.
Cyberpunk 2077 Related Guides
All Main Quest Guides
Act 1
| No. | Quest | |||||
|---|---|---|---|---|---|---|
| 1 | The Streetkid | The Nomad | The Corpo-Rat | |||
| 2 | The Rescue | |||||
| 3 | The Ripperdoc | |||||
| 4 | The Ride | |||||
| 5 | The Information | The Pickup | ||||
| 6 | The Heist | |||||
Act 2
Act 3
1.5*: Only available in the Secret Ending
Phantom Liberty Main Quests
All Quest Types
| Quest Types | ||
|---|---|---|
Author

Disasterpiece Quest Walkthrough and Rewards
Please participate in our site
improvement survey
03/2026
improvement survey
03/2026
Would you assist in
improving Game8's site?
improving Game8's site?

×
We are listening to our users' valuable opinions and discussing how to act on them.
The information collected through this survey will be used for the purpose of improving our services. In addition, the information will only be disclosed a part of a statistic in a format that will not allow identification of personal information.
Begin Survey
Not Now
×
Please rate each item regarding Game8.co's Advertisements.
Amount of Ads
Very Dissatisfied
Somewhat Dissatisfied
Fine
Somewhat Satisfied
Highly Satisfied
Placement of Ads
Timing of Ad Display
Ad Loading Speed
Safeness of Ads
Content of Ads
×
Please rate each item regarding Game8.co's Quality of Articles.
Amount of information
Very Dissatisfied
Somewhat Dissatisfied
Fine
Somewhat Satisfied
Highly Satisfied
Frequency of updates
Speed of new information
Accuracy of articles
Understandibility of articles
Readability of sentences
×
Please rate each item regarding Game8.co's Usability of the Site.
Ease of finding information
Very Dissatisfied
Somewhat Dissatisfied
Fine
Somewhat Satisfied
Highly Satisfied
Loading Speed
Use of Color
Font Size
Visibility of Images
Easy to Understand Layout
×
Please rate each item regarding Game8.co's Message Boards, Comments.
Ease of Writing
Very Dissatisfied
Somewhat Dissatisfied
Fine
Somewhat Satisfied
Highly Satisfied
Readability
Ease in Finding Information
Comment Quality
Comment Quantity
Admin Response
×
Please rate each item regarding Game8.co's Site's new design.
Please rate our site's new design
Very Dissatisfied
Somewhat Dissatisfied
Fine
Somewhat Satisfied
Highly Satisfied
Do you think that the website's design change makes the site easier to use?
Has the new design made it easier for you to find information on the site?
Has the new design improved the overall visual appeal of the site?
How would you rate your overall satisfaction with the new design of the site?
×
How likely are you to recommend Game8 to someone you know?
Very Unlikely
0
1
2
3
4
5
6
7
8
9
10
Very Likely
If you have other opinions regarding potential improvement to the website, please share them with us. We would appreciate your honest opinion.
Note: This is a free response section, so you can proceed without entering anything.
Note: Please be sure not to enter any kind of personal information into your response.
Note: Please be sure not to enter any kind of personal information into your response.
×
Thank You
×
Thank you for participating in our survey! Your answers will help us to improve the quality of our website and services.
We hope you continue to make use of Game8.
We hope you continue to make use of Game8.
Close
Rankings
Gaming News


![Monster Hunter Stories 3 Review [First Impressions] | Simply Rejuvenating](https://img.game8.co/4438641/2a31b7702bd70e78ec8efd24661dacda.jpeg/thumb)
Popular Games

Genshin Impact Walkthrough & Guides Wiki
Honkai: Star Rail Walkthrough & Guides Wiki
Umamusume: Pretty Derby Walkthrough & Guides Wiki
Pokemon Pokopia Walkthrough & Guides Wiki
Resident Evil Requiem (RE9) Walkthrough & Guides Wiki
Monster Hunter Wilds Walkthrough & Guides Wiki
Wuthering Waves Walkthrough & Guides Wiki
Arknights: Endfield Walkthrough & Guides Wiki
Pokemon FireRed and LeafGreen (FRLG) Walkthrough & Guides Wiki
Pokemon TCG Pocket (PTCGP) Strategies & Guides Wiki


Recommended Games
Diablo 4: Vessel of Hatred Walkthrough & Guides Wiki
Cyberpunk 2077: Ultimate Edition Walkthrough & Guides Wiki
Fire Emblem Heroes (FEH) Walkthrough & Guides Wiki
Yu-Gi-Oh! Master Duel Walkthrough & Guides Wiki
Super Smash Bros. Ultimate Walkthrough & Guides Wiki
Pokemon Brilliant Diamond and Shining Pearl (BDSP) Walkthrough & Guides Wiki
Elden Ring Shadow of the Erdtree Walkthrough & Guides Wiki
Monster Hunter World Walkthrough & Guides Wiki
The Legend of Zelda: Tears of the Kingdom Walkthrough & Guides Wiki
Persona 3 Reload Walkthrough & Guides Wiki


All rights reserved
CD PROJEKT®, Cyberpunk®, Cyberpunk 2077® are registered trademarks of CD PROJEKT S.A. © 2020 CD PROJEKT S.A. All rights reserved. All other copyrights and trademarks are the property of their respective owners.
The copyrights of videos of games used in our content and other intellectual property rights belong to the provider of the game.
The contents we provide on this site were created personally by members of the Game8 editorial department.
We refuse the right to reuse or repost content taken without our permission such as data or images to other sites.