Spiritborn Thorns Poison Endgame Build (Season 9)
★ NEW: Season 12 Guide and New Features
┗ Seasonal Content: New Uniques | Bloodied Sigils | Slaughterhouses
┗ Seasonal Mechanic: Killstreaks and Bloodied Items
★ NEW: Lord of Hatred Expansion Release Date
★ Check out our Vessel of Hatred expansion guide
This is a Thorns Poison Spiritborn endgame build and guide for Season 9 of Diablo 4: Vessel of Hatred (D4). Read on to learn more about the Thorns Poison endgame build in the Sins of the Horadrim season update!
 Attention! Attention! |
This build is a Legacy Build that was created from Season 9 and is not updated for the current season. |
|---|
| All Spiritborn Guides | ||
|---|---|---|
List of Contents
Spiritborn Thorns Poison Endgame Build
Thorns Poison Build Summary
| Click on a Link to Jump to a Section! | |||||||||||
|---|---|---|---|---|---|---|---|---|---|---|---|
This Spiritborn Endgame build is based on a build by Slaydra over at Slaydra (Youtube). The video includes details on how to gear up to get the build online. You can check Slaydra's Twitch Channel for more Diablo 4 content and ask questions about the build!
| Build Summary | |
|---|---|
 Thorns Poison Endgame Build Thorns Poison Endgame Build |
|
| Focus: Critical, DoT, AoE, Bossing, Endgame | |
|
|
|
This Thorns Poison endgame build for Season 9 focuses on dealing high Poison damage that scales off your Thorns damage once you have the new Balazan's Maxtlatl unique pants. Furthermore, your Thorns damage will also scale with your Dodge Chance once you equip the Hubris glyph.
Season 9 Guide (Sins of the Horadrim)
Thorns Poison Build Skills and Passives
| Click on a Link to Jump to a Section! | |||||||||||
|---|---|---|---|---|---|---|---|---|---|---|---|
| Back to the top ▲ | |||||||||||
※ More skills can be seen by scrolling vertically.
| Active Skills | |
|---|---|
┗
┗
|
|
┗
┗
┗
┗
|
|
┗
┗
┗
┗
┗
┗
┗
┗
┗
┗
┗
|
|
┗
┗
┗
┗
┗
┗
┗
┗
┗
┗
┗
┗
┗
┗
|
|
┗
┗
|
|
┗
┗
┗
┗
┗
┗
┗
|
|
Thorns Poison Spiritborn Class Specialization
| Primary Spirit |
|---|
(Level 15) Every 15th time you deal direct damage to an enemy with a Jaguar Skill, unleash additional slashes dealing 43% of the damage your have dealt to them in the last 0.5 seconds. All Skills are now also Jaguar Skills. |
| Secondary Spirit |
(Level 30) Maximum Ferocity is increased by 2. Gain 2 stacks of Ferocity whenever you kill an enemy or damage a Boss. |
The Jaguar spirit is the best specialization for both the Primary and Secondary Spirit Hall slot simply due to the double dipping bug that deals huge damage once you proc the additional strike.
Thorns Poison Build Best Horadric Spells
| Click on a Link to Jump to a Section! | |||||||||||
|---|---|---|---|---|---|---|---|---|---|---|---|
| Back to the top ▲ | |||||||||||
| Horadic Spellcraft Setup | |||||
|---|---|---|---|---|---|
|
Glacial Nimbus Glacial Nimbus Your Catalyst now deals Cold and or Frostbiting damage. Enemies damaged by it are Chilled for 16%. This effect happens once per enemy every 1 second. While equipped, your Cold Damage Bonus is equal to that of your highest damage Type Bonus. (Infusion) |
|||||
|
Bottled Wind Bottled Wind Invoking your Catalyst grants a Barrier equal to 34% of your Maximum Life for 4 seconds. After it dissipates, its essence is bottle back up. (Arcana) |
Reactive Ooze Reactive Ooze Invoking your Catalyst grants 8% Maximum Rescource Generation per second for the next 10 seconds. (Arcana) |
Fractured Core Fractured Core Your Catalyst deactivates monster Damage Resistance Aura effects for 3.0 seconds, but you take 15% more stacking damage for the same duration. (Arcana) |
|||
|
Disintegrate Disintegrate Form an Arcane Conductor that emits a persistent beam between itself and you, dealing a steady blitz of 220,463 damage over 8 seconds. (Catalyst) |
The Hunter The Hunter Bound across the battlefield with the Jaguar Spirit, dealing XX% damage upon landing and the rapidily slashing enemies in the area for YY% total damage over 7 strikes. (Skill) |
||||
The Horadric Spells for the Thorns Poison build focuses on crowd control with the Glacial Nimbus infusion and survivability with the Bottled Wind arcana. Make sure to use Disintegrate on your The Hunter skill as this enables your Myriad Stone Horadric Jewel to give you more attack speed.
Do note that if you do not have the suggested Arcanas, we recommended focusing on grinding Nightmare Dungeons until you obtain the Arcana you need for the build.
Thorns Poison Build Best Aspects and Affixes
| Click on a Link to Jump to a Section! | |||||||||||
|---|---|---|---|---|---|---|---|---|---|---|---|
| Back to the top ▲ | |||||||||||
 Masterwork Priority Masterwork Priority |
Affixes marked with ★ are the ones you should aim to upgrade when masterworking. |
|---|
※ More gear Aspects can be seen by scrolling vertically.
| Gear | Aspect and Affixes |
|---|---|
| Head | ・All Stats ・Movement Speed ・Damage Reduction ★★★ ・Ranks to Velocity |
| Chest | ・Thorns ・Thorns ・Thorns ・Thorns |
| Gloves | ・Dexterity ・Maximum Life ・Critical Strike Chance ★★★ Temper: ・Offensive - Jaguar Finesse ┗ Mystic Circle Potency ・Utility - Natural Schemes ┗ Barrier Generation |
| Pants | ・Dexterity ・Maximum Life ・Thorns ★★★ ・Ranks to Bastion |
| Boots | ・Movement Speed ・Dodge Chance ★★★ ・Armor Temper: ・Utility - Natural Schemes ┗ Barrier Generation ・Mobility - Natural Motion ┗ Movement Speed |
| Amulet | ・Dexterity ・Maximum Life ・Critical Strike Chance ★★★ Temper: ・Defensive - Worldly Endurance ┗ Dodge Chance ・Resource - Jaguar Efficiency ┗ The Hunter Cooldown Reduction |
| Ring | ・Critical Strike Chance ・Attack Speed ・Resistance to All Elements Temper: ・Offensive - Jaguar Finesse ┗ Mystic Circle Potency ★★★ ・Resource - Jaguar Efficiency ┗ The Hunter Cooldown Reduction |
| Ring | ・Attack Speed ・Critical Strike Chance ・Resistance to All Elements Temper: ・Offensive - Jaguar Finesse ┗ Mystic Circle Potency ★★★ ・Resource - Jaguar Efficiency ┗ The Hunter Cooldown Reduction |
| Weapon (Quarterstaff) | ・Block Chance (Implicit) ・Lucky Hit: Up to a 15% Chance to Restore Primary Resource ・Maximum Life ・Dexterity Temper: ・Weapon - Jaguar Augments ┗ Primary Jaguar Spirit Hall Potency ・Offensive - Jaguar Finesse ┗ Mystic Circle Potency ★★★ |
| Gear | Aspect and Affixes |
|---|---|
| Head | ・All Stats ・Movement Speed ・Damage Reduction ★★★ ・Ranks to Velocity |
| Chest | ・Thorns ・Thorns ・Thorns ・Thorns |
| Gloves | ・Dexterity ・Maximum Life ・Critical Strike Chance ★★★ Temper: ・Offensive - Jaguar Finesse ┗ Mystic Circle Potency ・Utility - Natural Schemes ┗ Barrier Generation |
| Pants | ・Dexterity ・Maximum Life ・Thorns ★★★ ・Ranks to Bastion |
| Boots | ・Movement Speed ・Dodge Chance ★★★ ・Armor Temper: ・Utility - Natural Schemes ┗ Barrier Generation ・Mobility - Natural Motion ┗ Movement Speed |
| Amulet | ・Dexterity ・Maximum Life ・Critical Strike Chance ★★★ Temper: ・Defensive - Worldly Endurance ┗ Dodge Chance ・Resource - Jaguar Efficiency ┗ The Hunter Cooldown Reduction |
| Ring | ・Attack Speed ・Critical Strike Chance ・Lucky Hit Chance ・Ranks to Core Skills |
| Ring | ・Attack Speed ・Critical Strike Chance ・Resistance to All Elements Temper: ・Offensive - Jaguar Finesse ┗ Mystic Circle Potency ★★★ ・Resource - Jaguar Efficiency ┗ The Hunter Cooldown Reduction |
| Weapon (Quarterstaff) | ・Block Chance (Implicit) ・Lucky Hit: Up to a 15% Chance to Restore Primary Resource ・Maximum Life ・Dexterity Temper: ・Weapon - Jaguar Augments ┗ Primary Jaguar Spirit Hall Potency ・Offensive - Jaguar Finesse ┗ Mystic Circle Potency ★★★ |
Thorns Poison Build Best Gems and Runewords
| Click on a Link to Jump to a Section! | |||||||||||
|---|---|---|---|---|---|---|---|---|---|---|---|
| Back to the top ▲ | |||||||||||
Thorns Poison Build Gems
| Armor | Weapon |
|---|---|
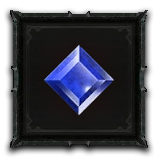 Sapphire Sapphire
|
|
The best Gems to slot in for the Thorns Poison build is the Sapphire on your armor and weapon since this provides you with more Willpower for survivability and Vulnerable Damage to increase your damage output.
Thorns Poison Best Horadric Jewels
| Amulet | Ring 1 | Ring 2 |
|---|---|---|
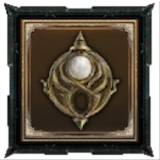 Seal of Denial Seal of Denial
|
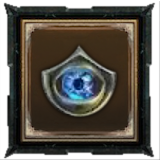
 Idol From Below Idol From Below
|
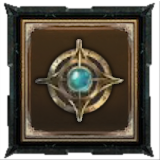
 Myriad Stone Myriad Stone
|
The Seal of Denial gives you more Thorns which in return boosts your Poison damage for the build, while the Idol From Below will provide you with better survivability. Last but not the least, Myriad Stone is important for boosting your Attack Speed once you slot in your Catalyst to The Hunter.
Thorns Poison Best Runewords
| Runeword 1 | Runeword 2 |
|---|---|
|
|
|
The best Runewords for the Thorns Poison build are the Cir + Gar combo for more consistent Critical Strikes, while Igni + Zec will reduce the cooldown of your The Hunter ultimate skill.
Thorns Poison Best Mercenaries
| Click on a Link to Jump to a Section! | |||||||||||
|---|---|---|---|---|---|---|---|---|---|---|---|
| Back to the top ▲ | |||||||||||
| Mercenary | Reinforcement |
|---|---|
 Raheir Raheir |
 Varyana Varyana |
Use Raheir as Your Main Mercenary
Although this build does not require any Mercenaries, here are some we personally recommend to help min-max the build. Use Raheir's Bastion to grant passive Unstoppable for 1 second and redirect 90% of damage taken to Raheir to help you survive better.
Make sure to get Raheir's Aegis to max out your resistances, and Inspiration as well to get that sweet 25% increased damage.
Raheir Mercenary Guide and Best Skills
Use Varyana For Reinforcement
Slot in Bloodthirst on Varyana to gain more attack speed and allow you to use Crushing Hand faster.
You can pair Varyana's Bloodthirst with Counterattack or Crushing Hand as these are the skills you will constantly use throughout your runs.
Varyana Mercenary Guide and Best Skills
Thorns Poison Build Paragon Boards
| Click on a Link to Jump to a Section! | |||||||||||
|---|---|---|---|---|---|---|---|---|---|---|---|
| Back to the top ▲ | |||||||||||
| Paragon Boards |
|---|
| 1. Starting Board (Hubris) |
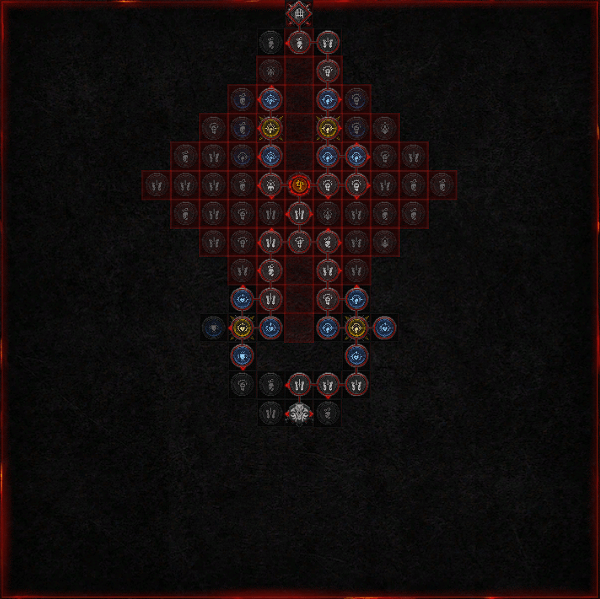 |
| 2. Spiney Skin (Revenge) |
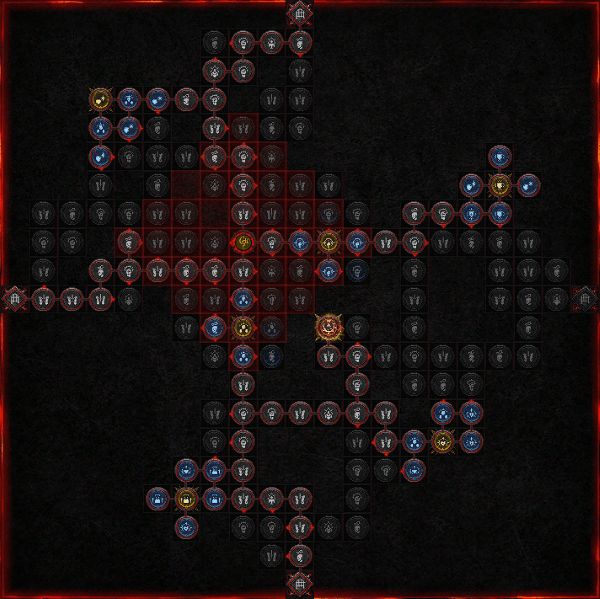 |
| 3. Sapping (Ritual) |
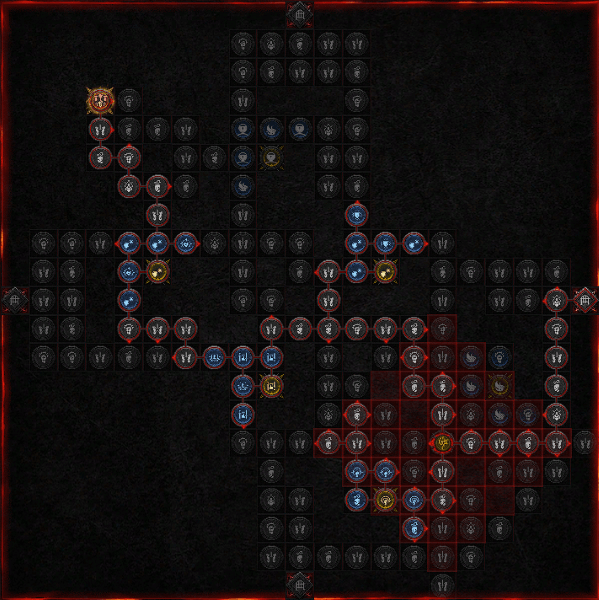 |
| 4. Convergence (Wildfire) |
 |
| 5. Viscous Shield (Canny) |
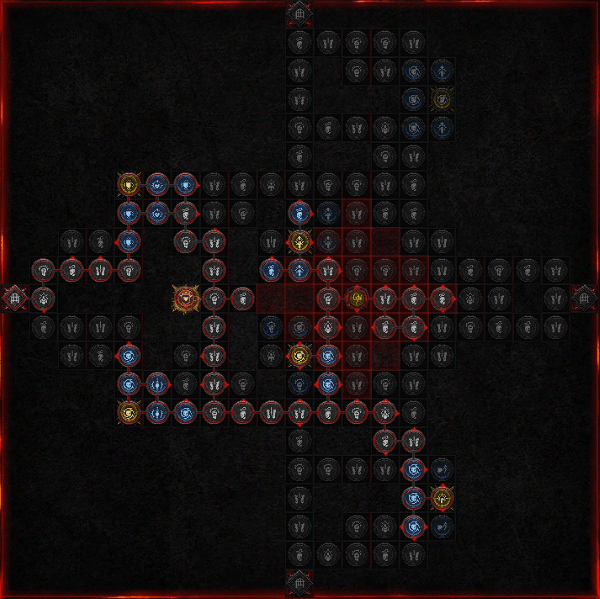 |
Thorns Poison Build Playstyle and Rotation
| Click on a Link to Jump to a Section! | |||||||||||
|---|---|---|---|---|---|---|---|---|---|---|---|
| Back to the top ▲ | |||||||||||
The playstyle of the Thorns Poison Spiritborn revolves around inflicting Critical Strikes to trigger Poison burst damage that scales off your Thorns and Dodge Chance. The skill rotation is as follows:
- Cast Ravager, Toxic Skin, and Armored Hide to provide damage buffs and survivability.
- Spam Quill Volley while keeping Ravager active to allow you to dash towards enemies.
- Use The Hunter whenever you can to stack more hits and proc Noxious Resonance better.
- Cast Counterattack whenever the duration ends to keep you from getting one-shotted, especially against Bosses.
- Rinse and Repeat.
Diablo 4 (D4) Related Guides

All Class Builds
| All Classes | |||||
|---|---|---|---|---|---|
All Endgame Builds
| List of Endgame Builds |
|---|
All Leveling Builds
| List of Leveling Builds |
|---|
All Legacy Builds per Season
| Seasons | List of Legacy Builds |
|---|---|
| Season 11 | |
| Season 10 | |
| Season 9 | |
| Season 8 | |
| Season 7 | |
| Season 6 |
Comment
Author

Spiritborn Thorns Poison Endgame Build (Season 9)
Rankings
- We could not find the message board you were looking for.

Gaming News


Popular Games

Genshin Impact Walkthrough & Guides Wiki
Umamusume: Pretty Derby Walkthrough & Guides Wiki
Crimson Desert Walkthrough & Guides Wiki
Monster Hunter Stories 3: Twisted Reflection Walkthrough & Guides Wiki
Honkai: Star Rail Walkthrough & Guides Wiki
Pokemon Pokopia Walkthrough & Guides Wiki
The Seven Deadly Sins: Origin Walkthrough & Guides Wiki
Wuthering Waves Walkthrough & Guides Wiki
Zenless Zone Zero Walkthrough & Guides Wiki
Arknights: Endfield Walkthrough & Guides Wiki


Recommended Games
Fire Emblem Heroes (FEH) Walkthrough & Guides Wiki
Diablo 4: Vessel of Hatred Walkthrough & Guides Wiki
Cyberpunk 2077: Ultimate Edition Walkthrough & Guides Wiki
Yu-Gi-Oh! Master Duel Walkthrough & Guides Wiki
Super Smash Bros. Ultimate Walkthrough & Guides Wiki
Pokemon Brilliant Diamond and Shining Pearl (BDSP) Walkthrough & Guides Wiki
Elden Ring Shadow of the Erdtree Walkthrough & Guides Wiki
Monster Hunter World Walkthrough & Guides Wiki
The Legend of Zelda: Tears of the Kingdom Walkthrough & Guides Wiki
Persona 3 Reload Walkthrough & Guides Wiki


All rights reserved
©2022 BLIZZARD ENTERTAINMENT, INC. ALL RIGHTS RESERVED.
All trademarks referenced herein are the properties of their respective owners.
The copyrights of videos of games used in our content and other intellectual property rights belong to the provider of the game.
The contents we provide on this site were created personally by members of the Game8 editorial department.
We refuse the right to reuse or repost content taken without our permission such as data or images to other sites.